Advertisement
Quick Links
Thank you for purchasing a Sealey product. Manufactured to a high standard this product will, if used according to these instructions and
properly maintained, give you years of trouble free performance.
IMPORTANT: PLEASE READ THESE INSTRUCTIONS CAREFULLY. NOTE THE SAFE OPERATIONAL REQUIREMENTS, WARNINGS, AND
CAUTIONS. USE THIS PRODUCT CORRECTLY, AND WITH CARE FOR THE PURPOSE FOR WHICH IT IS INTENDED. FAILURE TO DO SO
MAY CAUSE DAMAGE, OR PERSONAL INJURY, AND WILL INVALIDATE THE WARRANTY.
1.
SAFETY INSTRUCTIONS
1.1.
ELECTRICAL .
! WARNING! It is the user's responsibility to read, understand and comply with the following:
! WARNING! THIS PRODUCT MUST BE INSTALLED BY A QUALIFIED ELECTRICIAN.
You must check all electrical equipment and appliances to ensure they are safe before using. You must inspect power supply leads, plugs and all electrical connections for wear and damage.
You must ensure the risk of electric shock is minimised by the installation of appropriate safety devices. An RCCB (Residual Current Circuit Breaker) should be incorporated in the main
distribution board. You must also read and understand the following instructions concerning electrical safety.
1.1.1.
Ensure the light is connected to an appropriate electrical on/off switch.
1.1.2.
Ensure the insulation on all cables and the product itself is safe before connecting to the mains power supply.
1.1.3.
Ensure that cables are always protected against short circuit and overload.
1.1.4.
Regularly inspect power supply, leads, plugs and all electrical connections for wear and damage, especially power
connections, to ensure that none are loose.
1.1.5.
Important: Ensure the voltage marked on the product is the same as the electrical power supply to be used.
1.1.6.
DO NOT pull power cable once installed.
1.1.7.
DO NOT pull power plugs from sockets by the power cable.
1.1.8.
DO NOT use worn or damaged leads, plugs or connections. Immediately replace or have repaired by a qualified Electrician.
Ensure the unit is correctly earthed and wired according to the diagram figure 1 below.
a)
Connect the GREEN/YELLOW earth wire to the earth terminal 'E'.
b)
Connect the BROWN live wire to live terminal 'L'.
c)
Connect the BLUE neutral wire to the neutral terminal 'N'.
After wiring, check there are no bare wires, that all wires have been correctly connected and that
the wire restraint is tight.
1.2.
GENERAL SAFETY.
WARNING! Turn off the mains power supply before changing tubes, servicing or performing any maintenance.
!
Maintain the light in good condition (Repairs must only be undertaken by a qualified electrician).
"
Replace or repair damaged parts. Use genuine parts only, non authorised parts may be dangerous and will invalidate the warranty.
"
Ensure the light is installed correctly in accordance with these instructions.
"
Only install the light on a vertical surface. DO NOT fix the light on any horizontal surface i.e. ceiling, or overhang.
"
Light becomes very hot. Installation must be away from flammable or combustible materials such as wood, cloth, paper etc.
"
DANGER! DO NOT direct the light into a persons eyes. This unit has a very intensive light output, which if incorrectly used could cause eye damage.
!
DO NOT install the light where it is likely to be knocked or hit.
#
DO NOT install in bathrooms, shower rooms, sauna or such locations.
#
DO NOT install near an exhaust outlet. i.e. Boiler flue, dryer outlet, etc.
#
DO NOT touch the light when operating, allow to cool before touching, light operates at high temperature.
#
DO NOT handle halogen bulbs as the natural oil from your fingers and hands will shorten the bulb life. Handle only with a soft cloth.
#
DO NOT use the light without the front glass shield. Avoid touching the glass shield as handling may reduce its serviceable life and cause the glass to crack.
#
DO NOT use the light near flammable, combustible or explosive liquids, solids, gases or equipment.
#
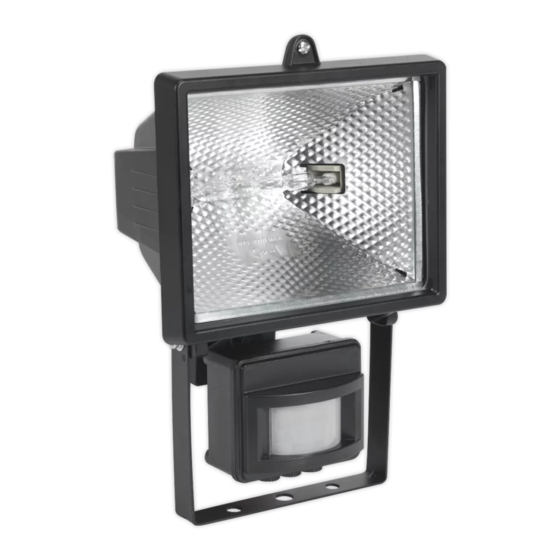
2. INSTALLATION INSTRUCTIONS
WARNING! DO NOT connect unit to the mains power supply before installation. When ready, the lamp must only be connected to the mains by a qualified electrician.
!
2.1.
Fitting
Give careful consideration to the position of unit to ensure you obtain maximum benefit from the lighting range, and that an appropriate electrical power source can be provided.
DO NOT install near an exhaust outlet. i.e. Boiler flue, dryer outlet, etc as variance in temperature will effect the sensitivity of light. The light must be mounted on a vertical surface only
i.e. on a wall etc. DO NOT mount on a horizontal surface i.e. ceiling or an overhang, DO NOT mount so that the face of the lamp is pointing upwards, or is facing towards the
mounting surface. An approximate appropriate mounting height from the ground is 2.5m.
To protect surfaces and objects from the light's heat, fix at following minimum distances between light and any surface/object, (fig 2).
500mm minimum between the top of the light and any overhead surface, or objects, i.e. ceilings, overhangs.
200mm between sides of light and end or side walls, surface or objects.
2 metres minimum between the front of the light and any object to be illuminated.
Fix the light to vertical surface with appropriate fixings. Do not tilt the light back beyond 30
Ensure the unit is connected to the electrical supply by a qualified electrician.
2.2.
Sensor
The sensor may be angled independently of the light. Mounted at approximately 2.5m above the ground the sensor will have approx 12m range (fig 5) with a 120
The sensor range can be reduced or optically adapted to local conditions by adjusting the sensor angle accordingly.
Further adjustment may be made by tuning the three switches located on the underside of the sensor as follows: (refer to figure 7).
Switch 1. Time adjuster: To adjust the amount of time light will stay on when activated. Minimum is 6 seconds maximum is 20 minutes.
Switch 2. Daylight adjustment: To adjust the sensor to come on in accordance with the diminishing daylight. From 0 to 30 LUX.
Switch 3. Sensitivity. The sensor range will vary with temperature and factors such as passing cars, shade from large trees etc. During cold weather the sensor range will be
greater than when hot in summer temperatures. For example during hot weather the forward detection range could fall from 12 to 6m and as such the sensor should be
checked and adjusted. Note: the sensitivity factor is far greater when an object passes across the detection area (fig 6.A) than when an object approaches towards the detector (B).
fig 2.
fig 3.
fig 4.
WALL MOUNTED FLOODLIGHT WITH
( PIR ) SENSOR M
or forward more than 45
O
fig 5.
MD520C-230V
odel:
fig 1.
(figs 3 and 4).
O
fig 6.
spread (fig 6)
O
fig 7.
MD520C - 2 - 10/10/07
Advertisement

Summary of Contents for Sealey MD520C-230V
- Page 1 ( PIR ) SENSOR M odel: Thank you for purchasing a Sealey product. Manufactured to a high standard this product will, if used according to these instructions and properly maintained, give you years of trouble free performance. IMPORTANT: PLEASE READ THESE INSTRUCTIONS CAREFULLY. NOTE THE SAFE OPERATIONAL REQUIREMENTS, WARNINGS, AND CAUTIONS.
- Page 2 Avoid touching the glass shield (fig 8.2) as handling may reduce its serviceable life and cause the glass to crack. If necessary clean the shield (when cold) with alcohol and a soft cloth. If the glass is damaged, replace it immediately. Use genuine Sealey replacement glass DO NOT use other glass, and DO NOT use the light without the glass shield.