Table of Contents
Advertisement
Available languages
Available languages
Quick Links
Advertisement
Chapters
Table of Contents

Related Manuals for Philips NORELCO S5090


Summary of Contents for Philips NORELCO S5090
- Page 1 Tripleheader shaver Tripleheader shaver S5090...
- Page 5 English 6 Español 28...
-
Page 6: Table Of Contents
English Contents IMPORTANT SAFETY INSTRUCTIONS______________________ General description (Fig. 1)__________________________________ Introduction_________________________________________________ The display__________________________________________________ Charging_____________________________________________________ Using the product___________________________________________ Shaving______________________________________________________ Using the click-on attachments____________________________ Cleaning and maintenance_________________________________ Storage______________________________________________________ Replacement________________________________________________ Accessories__________________________________________________ Assistance___________________________________________________ Disposal_____________________________________________________ Full Two-Year Warranty_____________________________________ 45-DAY MONEY-BACK GUARANTEE_______________________ IMPORTANT SAFETY INSTRUCTIONS When using an electric product, basic precautions should always be followed, including the following: Read all instructions before using this product. - Page 7 - Use this product for its intended household use as described in this manual. Do not use attachments or cleaning cartridges not recommended by Philips North America LLC. - Never operate this product if it has a damaged power cord, if...
- Page 8 English - Always check shaving heads and cutters before using the product. Do not use the product if cutters or combs are damaged, as injury may occur. - Always attach power cord to product first, then to power outlet. To disconnect, set all controls to 'off' position. Then remove power cord from power outlet.
- Page 9 - If the product becomes abnormally hot, gives off an abnormal smell, changes color or if charging takes much longer than usual, stop using and charging the product and contact your local Philips dealer. - Do not place products and their batteries in microwave ovens or on induction cookers.
-
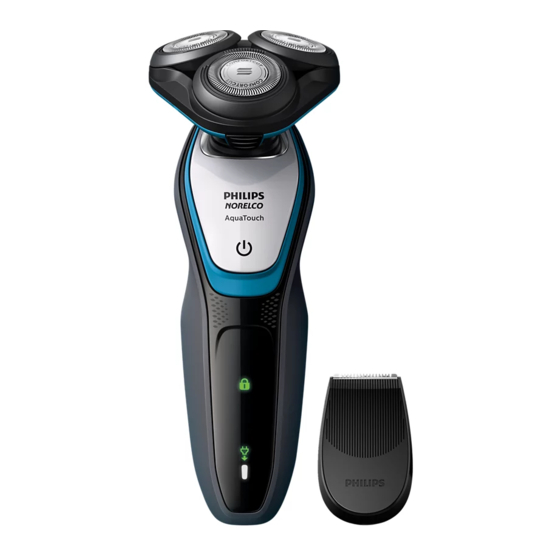
Page 10: General Description (Fig. 1)
11 Small plug 12 Power cord Introduction Congratulations on your purchase and welcome to Philips Norelco! To fully benefit from the support that Philips Norelco offers, register your product at www.philips.com/register. The display Battery charge indicator Quick charge: When the shaver does not contain enough energy for one shave, the battery charge indicator flashes quickly. - Page 11 English Battery fully charged When the battery is full, the battery charge indicator lights up continuously. Note: When the battery is full, the display turns off automatically after 30 minutes. Battery low When the battery is almost empty, the battery charge indicator flashes orange.
-
Page 12: Charging
English - While you activate the travel lock, the travel lock symbol lights up continuously. When the travel lock is activated, the travel lock symbol flashes. Deactivating the travel lock 1 Press the on/off button for 3 seconds. - While you deactivate the travel lock, the travel lock symbol lights up briefly and the shaver produces a short sound. -
Page 13: Using The Product
- 21 Day Trial and Conversion Process. It is a fact that your skin and beard need time to adjust to a new grooming system. - Use your new shaver exclusively for 3 weeks to fully enjoy the closeness of a Philips Norelco shave. -
Page 14: Shaving
Philips Norelco shaving system. - If you are still not convinced after 21 days, Philips Norelco will refund you the full purchase price as long as the request is received within 45 days of purchase. - Page 15 English - For the best results on skin comfort, pre- trim your beard if you have not shaved for 3 days or longer. Dry shaving 1 Turn on the shaver. 2 Move the shaving heads over your skin in circular movements to catch all hairs growing in different directions.
-
Page 16: Using The Click-On Attachments
English 3 Rinse the shaving unit with warm water to ensure that the shaving unit glides smoothly over your skin. 4 Turn on the shaver. 5 Move the shaving heads over your skin in circular movements to catch all hairs growing in different directions. -
Page 17: Cleaning And Maintenance
English 3 Insert the lug of the attachment into the slot in the top of the shaver. Then press down the attachment to attach it to the shaver (‘click’). Using the precision trimmer attachment You can use the precision trimmer to groom your beard, sideburns and mustache. - Page 18 English Do not touch shaving heads with hard objects as this may dent or damage the precision-made slotted shaving head. Do not use abrasives, scourers or aggressive liquids such as gasoline or acetone to clean the shaver. Cleaning the shaver Clean the shaver after every use for optimal performance (see 'Cleaning and maintenance').
- Page 19 English 4 Rinse the hair chamber with warm water. 5 Rinse the shaving head holder with warm water. 6 Carefully shake off excess water and let the shaving head holder air-dry completely. Note:Never dry the shaving unit with a towel or tissue, as this may damage the shaving heads.
- Page 20 English 3 Pull the shaving head holder off the bottom part of the shaving unit. 4 Turn the retaining rings counterclockwise and remove them. 5 Remove the shaving heads from the shaving head holder. Each shaving head consists of a cutter and guard. Note: Do not clean more than one cutter and guard at a time, since they are all matching sets.
- Page 21 English 8 Place the shaving heads in the shaving head holder. Note: Make sure that the projections of the shaving heads fit exactly into the recesses of the shaving head holder. 9 Place the retaining rings back onto the shaving head holder and turn them clockwise ('click').
- Page 22 English Note: Hold the shaving head holder in your hand when you reinsert the shaving heads and reattach the retaining rings. Do not place the shaving head holder on a surface, as this may cause damage to the shaving heads. 10 Reinsert the hinge of the shaving head holder into the slot of the shaving unit.
-
Page 23: Storage
English For optimal performance, lubricate the teeth of the attachment with a drop of sewing machine oil (not included) every six months. Storage Storage Put the protection cap on the shaver to protect the heads. Note: Always let the shaver air-dry before you put the protective cap on it. -
Page 24: Accessories
See chapter "Thorough Cleaning" for instructions on how to remove the retaining rings and shaving heads. Always replace the shaving heads with original Philips Norelco shaving heads only (see 'Accessories'). This product has no other user-serviceable parts. For assistance call 1-800-243-3050. -
Page 25: Disposal
Full Two-Year Warranty Philips North America LLC warrants this new product (except shaving heads) against defects in materials or workmanship for a period of two years from the date of purchase, and agrees to repair or replace any defective product without charge. -
Page 26: 45-Day Money-Back Guarantee
Damage occurring during shipment is not covered by this warranty. NOTE: No other warranty, written or oral, is authorized by Philips Personal Health, a division of Philips North America LLC. This warranty gives you specific legal rights, and you may also have other rights which vary from state to state. - Page 27 We cannot be responsible for lost mail. The product must be postmarked no later than 45 days after the date of purchase. Philips reserves the right to verify the purchase price of the product and limit refunds not to exceed suggested retail price.
-
Page 28: Instrucciones Importantes De Seguridad
Español Contenido INSTRUCCIONES IMPORTANTES DE SEGURIDAD_________ Descripción general (Fig. 1)__________________________________ Introducción_________________________________________________ La pantalla___________________________________________________ Carga________________________________________________________ Uso del producto____________________________________________ Afeitado_____________________________________________________ Uso de los accesorios de ajuste de clic.____________________ Limpieza y mantenimiento_________________________________ Almacenamiento____________________________________________ Sustitución___________________________________________________ Accesorios___________________________________________________ Asistencia____________________________________________________ Desecho_____________________________________________________ Garantía Total de Dos Años________________________________ GARANTÍA DE DEVOLUCIÓN DE SU DINERO POR 45 DÍAS INSTRUCCIONES IMPORTANTES DE... - Page 29 - Use este producto para su uso previsto en el hogar, según se describe en este manual. No use accesorios o los cartuchos de limpieza que no estén recomendados por Philips North America LLC.
- Page 30 Español - Nunca utilice este producto si el cable o el enchufe de carga están dañados, si no funciona correctamente, si se cayó, si está dañado o si se sumergió en agua mientras estaba conectado a la alimentación eléctrica. Para solicitar asistencia, comuníquese al 1-800-243-3050.
- Page 31 Philips de su localidad. - No coloque los productos y sus baterías en hornos microondas ni en ollas de inducción.
-
Page 32: Descripción General (Fig. 1)
Español - Cuando manipule las baterías, asegúrese de que sus manos, el producto y las baterías estén secas. - Para evitar que las baterías se calienten o liberen sustancias tóxicas o peligrosas, no las modifique, perfore ni dañe los productos y las baterías y no las desarme, ponga en cortocircuito, las sobrecargue ni las invierta. -
Page 33: Introducción
12 Cable de alimentación Introducción ¡Felicitaciones por su compra y bienvenido a Philips Norelco! Para obtener el máximo beneficio del soporte que ofrece Philips Norelco, registre el producto en www.philips.com/register. La pantalla Carga Carga rápida: Cuando la afeitadora no tiene suficiente energía para un afeitado, el indicador de carga de la batería destella... - Page 34 Español Batería baja Cuando la batería está casi agotada, el indicador de carga de batería destella en color naranja. Recordatorio 'Desconecte para usar' El símbolo 'desconecte para usar' destella para recordarle desconectar el producto del tomacorriente de pared antes de que pueda encenderlo.
-
Page 35: Carga
Español - Cuando desactiva el bloqueo de viaje, la afeitadora emite un sonido y el símbolo de bloqueo de viaje se ilumina.La afeitadora se enciende y ya está lista para usarse de nuevo. Carga Antes de usarla por primera vez, cargue la rasuradora durante un mínimo de 2.5 horas sin interrupción y hasta que el indicador de nivel de batería indique carga total. -
Page 36: Uso Del Producto
- Prueba de 21 días y proceso de adaptación. Es un hecho que la piel y la barba tardan algún tiempo en acostumbrarse al nuevo sistema de arreglo personal. - Utilice su nueva afeitadora únicamente 3 semanas para disfrutar completamente de un afeitado Philips Norelco al ras. -
Page 37: Afeitado
- Sea perseverante. Si alterna entre métodos de afeitado durante el período de adaptación, será más difícil acostumbrarse al sistema de afeitado de Philips Norelco. - Si después de 21 días todavía no está satisfecho con los resultados, Philips Norelco le reembolsará el precio total de la compra, siempre que la solicitud de reembolso se reciba dentro de los 45 días... - Page 38 Español de seguridad, no es posible usar la afeitadora mientras está conectada al enchufe de pared para cargarse. Para obtener los mejores resultados de confort sobre la piel, recorte su barba si no se ha afeitado durante 3 días o más. Afeitado seco 1 Encienda la afeitadora.
- Page 39 Español 2 Aplique espuma o gel de afeitar sobre la piel. 3 Enjuague la unidad de afeitado con agua tibia para asegurar que se deslice suavemente sobre su piel. 4 Encienda la afeitadora. 5 Mueva los cabezales de afeitado sobre la piel con movimientos circulares para llegar a todos los vellos en las diferentes direcciones de crecimiento.
-
Page 40: Uso De Los Accesorios De Ajuste De Clic
Español Uso de los accesorios de ajuste de clic. Quitar y poner los accesorios de ajuste de clic 1 Asegúrese de que la afeitadora esté apagada. 2 Extraiga el accesorio directo de la afeitadora. Nota: No gire el accesorio mientras lo extrae de la afeitadora. -
Page 41: Limpieza Y Mantenimiento
Español 3 Sostenga la cortadora de precisión perpendicular a la piel y muévala hacia abajo ejerciendo una presión suave. 4 Apague y limpie la cortadora después de cada uso. Limpieza y mantenimiento Una limpieza frecuente garantiza los mejores resultados de afeitado. Nunca limpie, retire ni reemplace la unidad de afeitado cuando la afeitadora esté... - Page 42 Español afeitadora quede protegida contra el daño del agua. Precaución: Revise siempre si el agua no está muy caliente, para evitar quemarse las manos. 1 Encienda la afeitadora. 2 Enjuague la unidad de afeitado con agua caliente. 3 Apague la afeitadora.Presione el botón de liberación para abrir la unidad de afeitado.
- Page 43 Español Nota:Nunca seque la unidad de afeitado con una toalla o pañuelo desechable, ya que esto puede dañar los cabezales de afeitado. 1 Cierre el sostenedor del cabezal ("clic") Método de limpieza a fondo Nota: Le aconsejamos que limpie los cabezales de afeitado a fondo una vez al mes o cuando la afeitadora ya no afeite tan bien como antes.
- Page 44 Español 4 Gire los anillos de retención a la izquierda y retírelos. 5 Quite los cabezales de afeitado del soporte del cabezal de afeitado. Cada cabezal de afeitado consiste de un cortador y un protector. Nota: No limpie más de un cortador y protector a la vez, ya que todos son pares.
- Page 45 Español Nota: Asegúrese de que los salientes de los cabezales de afeitado encajen exactamente en las ranuras del sostenedor del cabezal de afeitado. 9 Coloque los anillos de retención de nuevo en el cabezal de afeitado y gírelos hacia la derecha ("clic").
- Page 46 Español 10 Reinserte la bisagra del sostenedor de afeitado en la ranura de la unidad de afeitado. Cierre los sostenedores del cabezal. Limpieza del accesorio de recorte de precisión Precaución: Nunca seque el accesorio de recorte de precisión con una toalla o paño, ya que esto puede dañar el dentado.
-
Page 47: Almacenamiento
Español Almacenamiento Almacenamiento Coloque la tapa protectora de la afeitadora para proteger los cabezales. Nota: Siempre deje que el aparato se seque al aire antes de colocar la tapa. - Asegúrese de que el producto esté apagado. Retire el cable del enchufe eléctrico y del producto antes de guardarlo en un lugar seguro y seco donde no pueda aplastarse, golpearse o dañarse. -
Page 48: Accesorios
"Limpieza a fondo" para ver las instrucciones sobre cómo remover los anillos de retención y los cabezales de afeitado. Siempre reemplace los cabezales de afeitado con cabezales originales de Philips Norelco solamente (ver 'Accesorios'). Este producto no contiene otras piezas que requieran mantenimiento. Para solicitar asistencia, comuníquese al 1-800-243-3050. -
Page 49: Desecho
Garantía Total de Dos Años Philips North America LLC garantiza este producto nuevo (excepto los cabezales de afeitado) contra defectos en los materiales o en la mano de obra por un período de dos años desde la fecha de compra y acepta... - Page 50 Cualquier daño que ocurra durante el envío no será cubierto por esta garantía. NOTA: Philips Personal Health, una división de Philips North America LLC no extienden ninguna otra garantía, escrita ni oral. Esta garantía le proporciona derechos legales específicos;...
-
Page 51: Garantía De Devolución De Su Dinero Por
El paquete del producto debe contar con matasellos que no supere los 45 días a partir de la fecha de compra. Philips se reserva el derecho a verificar el precio de compra del producto y limita los reembolsos al precio de venta minorista sugerido. - Page 54 P.O. Box 10313, Stamford, CT 06904 This symbol on the product’s nameplate means it is listed by Underwriters’ Laboratories, Inc. Norelco and Tripleheader are registered trademarks of Philips North America LLC. PHILIPS and Philips shield are registered trademarks of Koninklijke Philips N.V.