
Related Manuals for Motorola MBP7


Summary of Contents for Motorola MBP7
- Page 1 User’s Guide Digital Audio Baby Monitor MBP7 The features described in this User’s Guide are subject to modifications without prior notice.
- Page 2 Please retain your original dated sales receipt for your records. For warranty service of your Motorola product, you will need to provide a copy of your dated sales receipt to confirm warranty status. Registration is not required for warranty coverage.
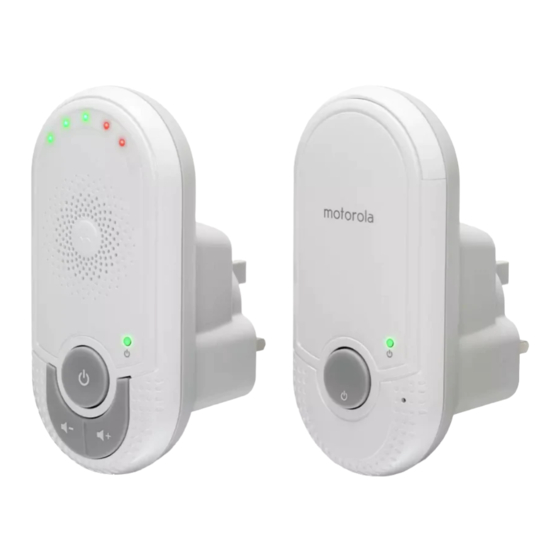
- Page 3 Overview of the Parent Unit Volume + + Sound Level Indicator 3 GREEN and 2 RED LEDs indicate Press to increase the speaker the audio level being picked up by volume. Volume - - the microphone of baby unit. The more LEDs that light up, the louder Press to decrease the speaker the sound is.
- Page 4 On when the baby unit is switched on. Power Press and hold to power on/off the motorola baby unit. Important guidelines for installing your Digital Audio Baby Monitor • To use your baby unit and parent unit together, you must be able to establish a radio link between them, and the range will be affected by environmental conditions.
-
Page 5: Table Of Contents
Table of contents 1. Safety Instructions ..................6 2. Getting Started..................7 Baby Unit Power Supply ................7 3. Using the Digital Audio Baby Monitor ............8 Power on/off the parent unit..............8 Power on/off the baby unit ................ 8 Adjust speaker volume................8 4. -
Page 6: Safety Instructions
1. Safety Instructions Presence of un-insulated "dangerous voltage" within the product’s enclosure that may be of sufficient magnitude to constitute a risk of electric shock to persons. WARNING: Presence of important operating and maintenance (servicing) instructions in the literature accompanying the appliance. This digital audio baby monitor is compliant with all relevant standards regarding electromagnetic fields and is, when handled as described in the User’s Guide, safe to use. -
Page 7: Getting Started
2. Getting Started Baby Unit Power Supply Mains Power UK Plug Choose a proper location with easy access to a mains socket. Plug the baby unit into the mains socket in your baby’s room. Ensuring sufficient clearance is given for it to detect sound and no more than 1 metre from the baby’s cot. -
Page 8: Using The Digital Audio Baby Monitor
3. Using the Digital Audio Baby Monitor Please read these instructions carefully, and be aware that this baby monitor is only intended as an aid. It is not a substitute for responsible, correct parental supervision. Power on/off the parent unit When the parent unit is off, press and hold until the Link Indicator is on. -
Page 9: Disposal Of The Device (Environment)
4. Disposal of the Device (Environment) At the end of the product lifecycle, you should not dispose of this product with normal household waste. Take this product to a collection point for the recycling of electrical and electronic equipment. The symbol on the product, user's guide and/or box indicates this. -
Page 10: Cleaning
5. Cleaning Clean the Digital Audio Baby Monitor with a slightly damp cloth or with an anti- static cloth. Never use cleaning agents or abrasive solvents. Cleaning and care • Do not clean any part of the product with thinners or other solvents and chemicals - this may cause permanent damage to the product which is not covered by the warranty. -
Page 11: Help
6. Help Link light on the parent unit does not come on • Check whether the parent unit is powered on. Link light on the parent unit flashes • The parent unit and the baby unit may be out of range with each other. Reduce the distance between the units, but not closer than 1.5 metre. -
Page 12: General Information
On the Web: www.motorolahome.com/support Consumer Products and Accessories Limited Warranty ("Warranty") Thank you for purchasing this Motorola branded product manufactured under license by Binatone Electronics International LTD ("BINATONE") What Does this Warranty Cover? Subject to the exclusions contained below, BINATONE warrants that this Motorola branded product ("Product") or certified accessory ("Accessory") sold... - Page 13 PROVIDED UNDER THIS EXPRESS LIMITED WARRANTY IS THE EXCLUSIVE REMEDY OF THE CONSUMER, AND IS PROVIDED IN LIEU OF ALL OTHER WARRANTIES, EXPRESS OR IMPLIED. IN NO EVENT SHALL MOTOROLA OR BINATONE BE LIABLE, WHETHER IN CONTRACT OR TORT (INCLUDING...
- Page 14 (c) use of the Products or Accessories for commercial purposes or subjecting the Product or Accessory to abnormal usage or conditions; or (d) other acts which are not the fault of MOTOROLA or BINATONE., are excluded from coverage.
- Page 15 Products or Accessories with (a) serial numbers or date tags that have been removed, altered or obliterated; (b) broken seals or that show evidence of tampering; (c) mismatched board serial numbers; or (d) nonconforming or non-Motorola branded housings, or parts, are excluded from coverage. Communication Services.
- Page 16 General Information...
-
Page 17: Technical Specifications
8. Technical Specifications RF frequency band 1881.792 MHz - 1897.344 MHz Channels Operating temperature 5ºC - 45ºC Baby unit voltage Input: 100-240V AC, 50/60Hz, 150mA; (Adapter rating) Output: 6V DC, 450mA Parent unit voltage Input: 100-240V AC, 50/60Hz, 150mA; (Adapter rating) Output: 6V DC, 450mA. - Page 18 Manufactured, distributed or sold by Binatone Electronics International LTD., official licensee for this product. MOTOROLA and the Stylised M Logo, are trademarks or registered trademarks of Motorola Trademark Holdings, LLC. and are used under license. All other trademarks are the property of their respective owners.