Table of Contents
Advertisement
Quick Links
Advertisement
Table of Contents

Related Manuals for Acer CHROMEBOX CXI4


Summary of Contents for Acer CHROMEBOX CXI4
- Page 1 User’s Manual...
- Page 2 Images provided herein are for reference only and may contain information or features that do not apply to your computer. Acer Group shall not be liable for technical or editorial errors or omissions contained in this manual.
-
Page 3: Table Of Contents
Browse as a guest ........5 Sign in to your Google Account ....5 Open and edit Microsoft Office files using Google’s office compatibility mode ... 20 Your Acer Chromebox tour Convert Microsoft Office files to Google Front view ..........6 Drive formats..........20 Rear view.......... -
Page 4: Getting Started
4 - Getting started E T T I N G S T A R T E D Turn on your Chromebox On the Chromebox, the power button is located at the front side of your product. A "welcome" screen will appear when the Chromebox first boots up. -
Page 5: Browse As A Guest
Getting started - 5 Browse as a guest You can also use the Chromebox without a Google Account by selecting Guest mode. Sign in to your Google Account If you already have a Google Account, enter your username and password in the sign-in box that appears and click the Next button. If your device is a Chromebox Enterprise, click More options and select Enterprise enrollment. -
Page 6: Your Acer Chromebox Tour
6 - Your Acer Chromebox tour O U R C E R H R O M E B O X T O U R Now that you are done setting it up, let us show you around your new Acer Chromebox. -
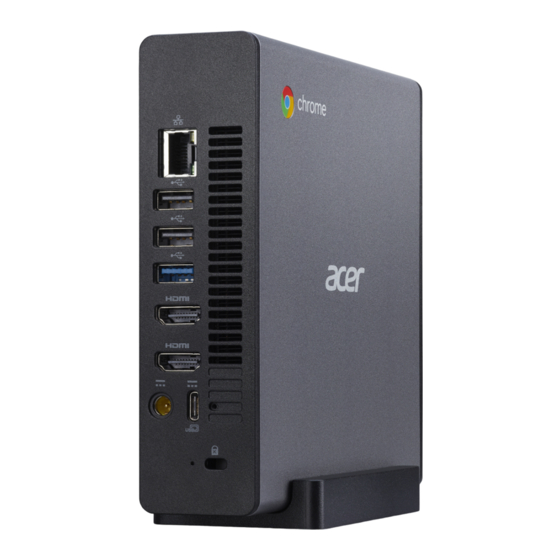
Page 7: Rear View
Your Acer Chromebox tour - 7 Rear view # Icon Item Description Ethernet (RJ-45) Connects to an Ethernet 10/100/ port 1000-based network. Connects to USB devices. (Vary depending on models.) USB port If a port is black it is USB 2.0 compatible, if it is blue it is also USB 3.2 compatible. - Page 8 8 - Your Acer Chromebox tour # Icon Item Description Kensington lock Connects to a Kensington- slot compatible security lock.
-
Page 9: The Chrome Os Desktop
The Chrome OS Desktop - 9 O S D H R O M E E S K T O P Window controls Shelf Window controls 9 10 11 Number Description Goes Backward and Forward in the current web browsing sessions’s history (closing and reopening the Chrome browser begins a new session). -
Page 10: Shelf
10 - The Chrome OS Desktop Number Description Maximizes the window to take up the entire screen. Click again to return window to previous position. Also, select and hold to display a left and right arrow next to the icon. These neatly align the window to take up half the left side of the screen or the right side, respectively. -
Page 11: Pinned Apps
The Chrome OS Desktop - 11 Pinned apps You can pin or unpin apps on the shelf. To pin an app to the shelf 1. Select the Launcher icon. 2. Click to select All Apps (or type the name of the desired app). 3. -
Page 12: 12 - Apps & Extensions
12 - Apps & extensions & P P S E X T E N S I O N S You can enhance your Chromebox with extra web applications (Chrome apps, for short), features for the browser (also known as extensions) and apps designed for Android™ (Play Store apps). Chrome apps work like regular software programs for desktop computers, except they run entirely on the web. -
Page 13: Installing Apps From Google Play Store
Apps & extensions - 13 Installing apps from Google Play Store 1. Select the Launcher icon. 2. Click to select All Apps (or type "Play Store"). 3. Select Play Store. 4. You can browse apps by category or search for an app by keyword. 5. -
Page 14: Creating A New Document
14 - Apps & extensions Because your Chromebox makes heavy use of the web, you can easily access files both from Google Drive and those that are stored locally by using the Files app on your Chromebox. To use the Files app, select the Files icon in the apps list, or use the keyboard shortcut <Alt>... -
Page 15: Gmail
Apps & extensions - 15 Gmail Composing an email 1. Select the Launcher icon. 2. Click to select All Apps (or type "Gmail"). 3. Select the Gmail icon and then Compose. 4. Enter the recipient’s email address, the subject, and the message. 5. - Page 16 16 - Apps & extensions File type Supported formats Other .txt, .pdf (read-only)
-
Page 17: Chrome Os Tips And Tricks
Chrome OS tips and tricks - 17 H R O M E T IP S A N D T R I C K S Your Chromebox is a new type of computer that works somewhat differently than what you may be used to, so you might like to know how easy and useful things are when using it. -
Page 18: How To Share Documents With Other Users
18 - Chrome OS tips and tricks 4. Select My Drive (or whatever sub-folder you’ve created to put your files in). Since your files are saved in Google Drive, they are saved online and available anywhere you have internet access. To access your files from any internet-connected computer do the following: 1. -
Page 19: How To Listen To Music
Chrome OS tips and tricks - 19 How to listen to music 1. Press the Search key on your keyboard or select the Launcher icon. 2. Click to select All Apps (or type "Play Music"). 3. Select Play Music Note Play Music may not be available in all countries and regions. -
Page 20: Working With Microsoft Office (Word, Excel, And Powerpoint) Documents
20 - Chrome OS tips and tricks Working with Microsoft Office (Word, Excel, and Powerpoint) documents Open and edit Microsoft Office files using Google’s office compatibility mode 1. Press the Search key on your keyboard or select the Launcher icon. 2. -
Page 21: Opening Microsoft Office Files Using Microsoft's Office Online Apps From The Chrome Web Store Or Google Play Store
Chrome OS tips and tricks - 21 4. After creating the content of your document, select File > Download as and select the type of format you want to save as. 5. The file is saved to the download section of the Files app. Opening Microsoft Office files using Microsoft’s Office Online apps from the Chrome Web Store or Google Play Store... -
Page 22: Gmail Offline
22 - Chrome OS tips and tricks Gmail Offline Note The first time you use Gmail Offline you MUST be connected to the internet to enable offline viewing. 1. Go to Gmail and select Settings > Settings. 2. Select Offline tab. 3. - Page 23 Chrome OS tips and tricks - 23 5. Make your desired changes. The next time you are online and have Google Drive open, your local changes will upload to Google Drive. Note If you make changes to a Google document while offline and someone else makes changes to the document as well (for example, if the document is shared with someone else), the next time you are online and have Google Drive open, your changes will merge with the other person’s changes.
-
Page 24: Settings
24 - Settings E T T I N G S Use the settings menu to adjust the various options for your Chromebox. To access the settings menu do the following: 1. Select the Status area of the shelf in the lower-right corner of the screen. -
Page 25: Changing The Clock Settings
Settings - 25 Changing the clock settings You can change the time format and time zone on your Chromebox. If the date or time is incorrect on your Chromebox, try adjusting the time zone. To change the time zone: 1. Select the Status area of the shelf in the lower-right corner of the screen. -
Page 26: Setting Up A Printer
26 - Settings 5. Once you find a theme that you’d like to try out, select it and then select Add to Chrome. Setting up a printer You can use the Google Cloud Print service to send print requests to many types of traditional cabled printer and wireless "cloud ready"... -
Page 27: Manual Update
Do not modify your Chromebox’s hardware yourself. Doing so will cause the update function to no longer work. Please get in touch with your dealer or an authorized service center. Visit www.acer.com to find an authorized service site. Resetting your Chromebox... - Page 28 28 - Settings 4. In the Reset settings section, select Powerwash. 5. Select Restart. 6. In the box that appears, select Powerwash > Continue.
-
Page 29: Assembling The Vesa Mount
Assembling The VESA Mount - 29 V E S A M S S E M B L I N G O U N T Your Chromebox can be fitted with a VESA-compatible mount that allows you to mount it behind a compatible monitor or TV. Note If your display’s VESA mounting holes are currently used for a stand, you will not be able to attach your Chromebox to the rear of the display. - Page 30 30 - Assembling The VESA Mount 2. Attach the mounting bracket to the back of your display using the screws as illustrated. step 2 step 1 Suggestion: acer B series monitor 3. Fix the screws to the back of your Chromebox as illustrated.
- Page 31 Assembling The VESA Mount - 31 4. Position the Chromebox onto holes on the VESA mount and then push it right to fix the Chromebox. The Chromebox and mount must be vertical. push right 5. Fasten the VESA lock bracket to secure your Chromebox on the VESA mount firmly.
- Page 32 32 - Assembling The VESA Mount 6. Tighten the VESA lock bracket and VESA bracket with provided hexagon screws or phillips screws depending on package contents. phillips screw hexagon screw...
-
Page 33: Help
Help - 33 E L P Online and offline help Additional help is available both online and offline. Chromebox Help is installed on your Chromebox and doesn’t require internet access. It covers basic troubleshooting as well as more detailed information about Chrome OS and using your Chromebox.