Huawei SUN2000L-3KTL Quick Manual
Hide thumbs
Also See for SUN2000L-3KTL:
- User manual (151 pages) ,
- User manual (99 pages) ,
- User manual (89 pages)

Related Manuals for Huawei SUN2000L-3KTL


Summary of Contents for Huawei SUN2000L-3KTL
- Page 1 SUN2000L-(2KTL-5KTL) Quick Guide Issue: 05 Part Number: 31508725 Date: 2020-03-19 HUAWEI TECHNOLOGIES CO., LTD.
-
Page 2: Packing List
4. Before installing the device, check that the package contents are intact and complete against the packing list. If any damage is found or any component is missing, contact your dealer. 5. Huawei shall not be liable for any device damage caused by the violation of instructions in this document. -
Page 3: Installing The Device
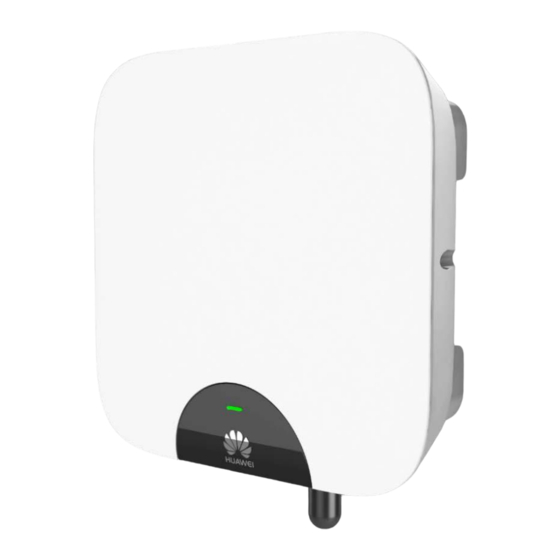
Overview (1) Front panel (2) LED (3) Mounting bracket (4) Mounting plate (5) Heat sink (6) Ventilation valve (7) DC switch (DC SWITCH) (8) DC input terminals (9) DC input terminals (PV1+/PV1–) (PV2+/PV2–) (10) Battery terminals (BAT+/BAT–) (11) COM port (COM) (12) AC output port (AC) (13) Antenna port (ANT) (14) Alarm port (ALARM) -
Page 4: Installing The Mounting Bracket
Dimensions If multiple inverters need to be installed, see SUN2000L-(2KTL-5KTL) User Manual for the installation dimensions. Installing the Mounting Bracket Wall-mounted Installation Avoid drilling holes in the utility pipes and/or cables attached to the back of the wall. -
Page 5: Installing The Sun2000L
Support-mounted Installation Prepare M8 stainless bolt assemblies (including flat washers, spring washers, and M8 bolts) with appropriate lengths as well as matched flat washers and nuts based on the support specifications. You are advised to apply anti-rust paint on the hole positions for protection. Installing the SUN2000L •... -
Page 6: Installing The Wlan Antenna
Installing the WLAN Antenna Antenna port (ANT) Ensure that the WLAN antenna is installed securely. If the antenna washer is not installed, the antenna will lose the waterproof function. Connecting Cables Preparing Cables Prepare cables based on site requirements. Conductor Cross- Outer Cable Type... -
Page 7: Installing The Pe Cable
Installing the PE Cable Do not connect the neutral wire to the enclosure as a PE cable. Otherwise, electric shocks will be caused. Ground point • The PE point at the AC output port is used only as a PE equipotential point, and cannot substitute for the PE point on the enclosure. - Page 8 Two-Core Cable (L and N) Click 2. Connect the AC connector to the AC output port, and then Check the route of the AC output power cable. AC output port (AC)
-
Page 9: Installing The Dc Input Power Cable
Plug insert To remove the AC connector, follow the steps of its installation in reverse order. Then remove the plug insert as shown in the right figure. Installing the DC Input Power Cable 1. Ensure that the PV string is well insulated to ground. 2. - Page 10 using metal stamping forming contacts Positive connector Positive metal terminal Negative Click connector Negative metal terminal Pull the DC input power Ensure that the cable will cable back to ensure that not be extracted after it is connected securely. crimped. Ensure that the cables are correctly connected.
- Page 11 (Optional) Installing the Battery Cable • Use insulation tools to operate batteries. • Ensure that the battery cable is correctly connected. Avoid reverse polarity. • If the battery is connected with reverse polarity, the inverter may be damaged. Assemble the blue positive and negative connectors by following the instructions in section 4.4 "Installing the DC Input Power Cable."...
- Page 12 COM Port Pin Definitions COM port (COM) No. Label Definition Description 485B1 RS485B, RS485 differential signal– Connect to the RS485 signal port on the energy meter. 485A1 RS485A, RS485 differential signal+ Connect to the RS485 signal port and 485B2 RS485B, RS485 differential signal– enable signal port on a battery.
- Page 13 ALARM Port Pin Definition Alarm port (ALARM) No. Label Definition Description ALARM– Alarm signal– Connect to the power port on an alarm beacon ALARM+ Alarm signal+ 485B3 RS485B, RS485 differential signal– Connect to the RS485 signal port on SmartPSB2000L smart PV safety box. 485A3 RS485B, RS485 differential signal–...
-
Page 14: Verifying The Installation
Verifying the Installation Acceptance Criteria The SUN2000L is installed correctly and securely. The WLAN antenna is installed correctly and securely. Cables are routed properly as required by the customer. Cable ties are secured evenly and no burr exists. The ground cable is connected correctly and securely. The DC switch and all the switches connecting to the SUN2000L are OFF. - Page 15 5. Observe the LEDs to check the SUN2000L operating status. All status labels are available on the left side of the SUN2000L. Type Status (Blinking at Long Intervals: On for Meaning 1s and then Off for 1s; Blinking at Short Intervals: On for 0.2s and then Off for 0.2s) Running LED1...
-
Page 16: Customer Service Contact Information
Customer Service Contact Information Region Country Hotline Email France Germany Spain eu_inverter_support@huawei.com 0080033888888 Europe Italy United Kingdom Netherlands Others For details, visit solar.huawei.com. Australia au_inverter_support@huawei.com 1800046639 Turkey tr_inverter_support@huawei.com 0080021686868 Malaysia /1800220036 Asia Pacific (+66) 26542662 apsupport@huawei.com (Local Call) Thailand 1800290055 (Toll-free... - Page 17 Huawei Technologies Co., Ltd. Huawei Industrial Base, Bantian, Longgang, Shenzhen 518129, People's Republic of China solar.huawei.com...