
Related Manuals for Huawei ETS2028


Summary of Contents for Huawei ETS2028
- Page 1 Wonderful Communication, Mobile Life. Welcome to HUAWEI ETS2028/2228/2528 Fixed Wireless Terminal. HUAWEI ETS2028/2228/2528 Fixed Wireless Terminal User Guide...
- Page 2 Copyright © 2006 Huawei Technologies Co., Ltd. All Rights Reserved No part of this manual may be reproduced or transmitted in any form or by any means without prior written consent of Huawei Technologies Co., Ltd. Trademarks and HUAWEI are trademarks of Huawei Technologies Co., Ltd.
-
Page 3: Table Of Contents
Table of Contents 1 Warnings and Precautions .....................1 2 Introduction ...........................7 Packing List ........................7 Appearance of the FWT ....................8 Icons..........................12 3 Installation...........................14 Installing the UIM Card (Optional)................14 Installing the Power Adapter or the Spare Battery............14 Installing the Antenna....................16 Placing the FWT......................17 Validating........................18 4 Basic Operations .........................19 Powering the FWT On or Off..................19... - Page 4 Deleting a Contact .......................31 Copying a Contact .......................31 Groups..........................32 Memory Status......................32 Saving My FWT Number....................33 8 Settings ..........................34 Call Settings.........................34 Profile Settings ......................35 Security Settings ......................37 Supplementary Services Settings ................38 9 FM Radio(Optional)......................40 Switching the Radio On/Off..................40 Searching for a Channel ....................40 Setting a Frequency .....................41 Adding a Channel ......................42 Deleting a Channel ......................42...
-
Page 5: Warnings And Precautions
Warnings and Precautions Before using HUAWEI Fixed Wireless Terminal (hereinafter referred to as FWT), read the following cautions and let your children know these, so that you can use your FWT correctly and safely. Basic Cautions According to the packing list, check items in the package box to make sure that they are complete and undamaged. - Page 6 Switch off your FWT near medial devices. Observe any instructions wherever the use of wireless device is prohibited. Traffic Safety Do not use your FWT while driving. Secure the FWT on its holder. Do not place the FWT on the seat or other places where it can get loose in a sudden stop or collision.
- Page 7 Without permission, you are not allowed to modify the architecture and security design of FWT. You must bear any consequence resulted from the operation without permission Your FWT is designed to conform to the authoritative international radio frequency (RF) specifications. Use FWT accessories approved by Huawei only.
- Page 8 The antenna(s) used for this transmitter must be installed to provide a separation distance of at least 20cm from all persons. Emergency Call You can use your FWT for emergency calls. However, connections in all conditions cannot be guaranteed. You should never rely solely on the FWT for essential communications.
- Page 9 Power Adapter Use AC power as specified for the power adapter. Any violation of this rule may result in fire or malfunction of the power adapter. Do not short-circuit the power adapter. Short-circuiting the power adapter may cause fire or malfunction of the power adapter.
- Page 10 Statement This device complies with part 15 of the FCC Rules. Operation is subject to the following two conditions: (1) This device may not cause harmful interference, and (2) this device must accept any interference received, including interference that may cause undesired operation.
-
Page 11: Introduction
Introduction Packing List The FWT package box contains the following items. If any of the items is lost or damaged, contact your local dealer. Item Quanti Item Quantit Main unit, handset, Certificate of and coiled cord Quality Power adapter Spare battery Fixed Wireless Antenna Terminal User... -
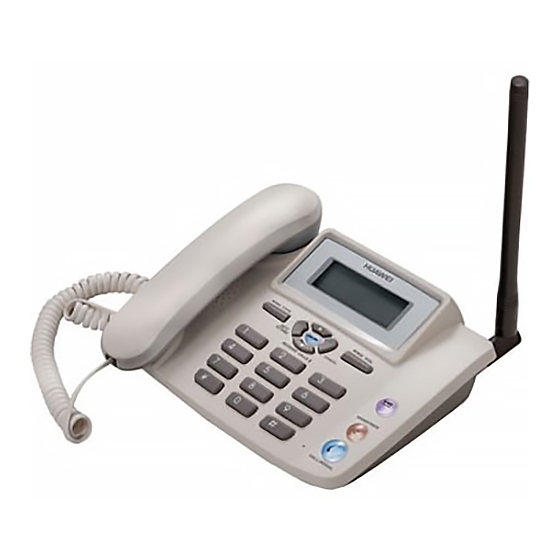
Page 12: Appearance Of The Fwt
Appearance of the FWT Front View Item Description antenna To receive signals. Display To display information. screen In the standby mode, press it to Left soft key access the main menu. In the non-standby mode, press it to perform the operation displayed on the lower left corner of the screen. - Page 13 Item Description Up key: In the standby mode, press it Scroll key to access the Calendar screen; during a call, press it to increase the volume. Down key: In the standby mode, press it to enable the radio (or alarm clock);...
- Page 14 Item Description In the standby mode, press it to HANDFRE make or answer a call without lifting E key the handset. When dialing a number, press it to cancel the dialing. During a call, press it to end the current call. Press it to make or answer a call.
- Page 15 Back View Item Description Antenna To receive signals. Hook To fix the FWT when installed vertically. UIM case slot To house the UIM card Battery case To house the spare battery. Spare battery To supply the FWT with power. Battery cord jack To connect to the battery cord.
-
Page 16: Icons
Item Description Handset To make a call or answer a call by lifting it. Antenna jack To connect to the antenna DB9 serial port To maintain the FWT through it. Power jack connect power adapter for power supply. Icons Icon Description Indicates the signal strength. -
Page 18: Installation
Installation Installing the UIM Card (Optional) Caution: Consult your service provider to decide whether to use a user identity module (UIM) card. The UIM card and its golden contact can be easily damaged by a scratch or bend. Be careful when installing or removing the UIM card. - Page 19 If the FWT is connected to the power adapter and the spare battery is inserted, the FWT is powered by the power adapter, and meanwhile, the spare battery is charged. Charge the spare battery for at least eight hours for the first time.
-
Page 20: Installing The Antenna
Removing the Spare Battery Press and hold to power off your FWT and then disconnect the FWT from the power socket. Then remove the battery house cover. Disconnect the battery cord and take out the spare battery. Installing the Antenna Power off your FWT and disconnect the FWT from the power socket. -
Page 21: Placing The Fwt
Checking the Signal Strength After installing the antenna, press and hold to power on your FWT. Wait until the signal strength icon appears or you can hear the dialing tone when you lift the handset. If the signal strength icon does not appear after five minutes or you hear the failure tone when you lift the handset, it indicates that the FWT is not receiving signals. -
Page 22: Validating
According to the distance between the two hooks (7.7 cm), hammer two nails into the wall with 3 mm end left out. 7.7cm Snap the hooks to the nails. Validating After installing the FWT, you can make a call to check whether it is correctly installed. -
Page 23: Basic Operations
Basic Operations Powering the FWT On or Off When the FWT is powered off, press and hold to power it In the standby mode, press and hold to power it off. Making a Call Making a Call Through the Keypad In the standby mode, press number keys to enter a phone number. -
Page 24: Answering A Call
function for contacts saved in the FWT. Select Menu > Phone Book > Speed Dial. Press the Up/Down key to scroll up or down the items. If a number key is not assigned to a contact, press select a contact from the phone book. If a number key is assigned to a contact, press for the following options:... -
Page 25: Locking The Keypad
Phone Book: Access the Phone Book screen. Messages: Access the Messages screen. Third Party Call: The function is network dependent. For details, consult your service provider. Voice Privacy: The function is network dependent. For details, see "Voice Privacy" on page 34. Locking the Keypad Even when the keypad is locked, you can lift the handset, press or press... -
Page 26: Text Entry
Text Entry Text Input Mode While entering text, you can press the # key to change the input mode. The following table lists the input modes and their indicators. Indicator Text Input Mode eZiEn Smart English English upper case English lower case Numbers Note: In the edit mode, press... - Page 27 Press the Up/Down key or the * key to select the word. Press the right key to confirm your selection. The word is displayed in the input area. Alternatively, press the 0 key to confirm your selection and enter a space behind the word. Note: After you enter several letters, the FWT can give other letters to make out the candidate words.
- Page 28 In the "ABC" or "abc" input mode, press the number key repeatedly until the desired digit appears on the screen. In the "eZiEn" input mode, press the number key and then press the Up/Down key until the desired digit appears on the display screen.
-
Page 29: Messages
Messages Writing and Sending a Message Select Menu > Messages > Write Message. Write the message. You can enter up to 160 English letters. When writing the message, you can press for the following operations: Insert Template: Insert a commonly used phrase. Insert Phone Number: Insert a contact number from the phone book. -
Page 30: Deleting A Message
appears on the display screen. If the icon blinks, it indicates that the message memory is full. Do the following to view the inbox: Select Menu > Messages > Inbox. Press the Up/Down key to scroll up or down the messages. Press (View) to view the message. -
Page 31: Message Settings
Select Call Voice Mail Center and press (Select) to call the voice mail center. Setting or Viewing the Voice Mail Number Select Menu > Messages > Voice Mail > Voice Mail Number. If the voice mail number is already set, you can view and edit it;... - Page 32 contacts saved in the FWT to a message group. Select Menu > Messages > Message Settings > Group Settings. Press the Up/Down key to scroll up or down the message groups. Press (Options) to select View, Add, Rename or Delete All. Setting the Auto Save Function Select Menu >...
- Page 33 The priority function is network dependent. For details, consult your service provider. Setting the Delivery Ack Select Menu > Messages > Message Settings > Delivery Ack. You can set whether to receive a delivery report after a message is sent. Setting the Memory Status Select Menu >...
-
Page 34: Phone Book
Phone Book Adding a Contact A contact is saved to the memory in use. Select Menu > Phone Book > Add New. Enter the name and press (OK). Set other options: If the memory in use is the FWT, you can set: Name, General Number, Home Number, Office Number, and Memo (you need to set at least one phone number). -
Page 35: Editing A Contact
Editing a Contact Select Menu > Phone Book > Search to search for the contact to edit. Press (Options) and select Edit. Press (Save) to save the contact or press (Back) to cancel. Deleting a Contact Delete a Contact Select Menu > Phone Book > Search to search for a contact to delete. -
Page 36: Groups
Press (Options) and select Copy To UIM or Copy To Phone. If the contact is saved in UIM card, select Copy To Phone to copy it to the FWT. If the contact is saved in FWT, select Copy To UIM to copy it to the UIM card. Press (Yes) to copy the contact or press (No) to... -
Page 37: Saving My Fwt Number
Viewing the Memory Status Select Menu > Phone Book > Memory Status to view the memory status. Saving My FWT Number Select Menu > Phone Book > My Phone Num. Press (Edit) to edit the FWT number. Press (OK) to save the FWT number. -
Page 38: Settings
Settings Call Settings Minute Alert If the minute alert function is activated, your FWT notifies you of the call duration by giving an alert 10 seconds before the end of each minute. Select Menu > Settings > Call Settings > Minute Alert. Select one of the following options: On: Activate the minute alert function. -
Page 39: Profile Settings
Select Menu > Settings > Call Settings >Auto Dial. Select one of the following options: “Off”, “After 3 Seconds”, “After 4 Seconds”, “After 5 Seconds”, After 6 Seconds”, “After 7 Seconds”, “After 8 Seconds” and “After 9 Seconds”. Shortcut Key Settings The FWT provides shortcut keys for your convenience. - Page 40 customize a profile. Selecting a Profile In the standby mode, select Menu > Profiles. Press the Up/Down key to scroll up or down the profiles: General, Outdoor, and Quiet. Press (Select) and select Set to activate the profile. Note: In the standby mode, press and hold the * key to activate the quiet mode.
-
Page 41: Security Settings
Security Settings Note: The emergency call function of the FWT is not affected by the operation of FWT lock function. Setting the FWT Lock The FWT lock protects your FWT from unauthorized usage. If necessary, you can activate the FWT lock. You can change the default FWT lock code (000000) into a numeric string of 4 to 8 digits. -
Page 42: Supplementary Services Settings
Note: If you enter wrong PIN codes three times consecutively, the FWT prompts you to enter the correct PUK code. If you enter wrong PUK code several times, consult your service provider for the correct PUK code. If you enter wrong PUK codes 10 times consecutively, the UIM card is invalidated. - Page 43 carrier. The supplementary services need special commission. This section only introduces some typical supplementary services. Caller ID display: When there is an incoming call, the FWT displays the phone number of the caller on the screen. Three way calling: Three parties can hold a conversation at the same time.
-
Page 44: Fm Radio(Optional)
FM Radio(Optional) Switching the Radio On/Off Switching the Radio On In the standby mode, select Menu > FM Radio. The FWT displays "Radio On!". The radio is switched on and the broadcasting screen is displayed. Select a channel to listen to the radio broadcast. Switching the Radio Off In the standby mode, select Menu >... -
Page 45: Setting A Frequency
Press (Options) and select Manual Tuning. You can tune the radio channel manually. The FWT searches for an available channel. Press the Up/Down key to switch a channel. Press (Set) to add the channel to the channel list or press (Back) to stop tuning and return to the broadcasting screen. -
Page 46: Adding A Channel
Adding a Channel After searching for or set a frequency, press (Options) and select Save Channel. Press the Up/Down key to scroll up or down the channel list. Press (OK) to complete the settings. If you set the frequency of the selected channel, the FWT prompts "Replace existing channel?"... -
Page 47: Fun & Utility
Fun & Utility Alarm Clock After the alarm clock is activated, it rings at the specified time when your FWT is powered on. You can set up to five alarm clocks. Select Menu > Fun&Utility > Alarm. Press the Up/Down key to scroll up or down the alarm clocks. - Page 48 Press (Options) to select: Add Schedule, View Current Month, View All, Delete All, Delete Passed, Memory Status and Go To Date.
-
Page 49: Menu Commands
Menu Commands Phone Book See "Phone Book" on page 30. Messages See "Messages" on page 25. Call History Press the Up/Down key to scroll up Missed Calls or down the records (up to 20). Received Calls Press to dial a record. You can save, delete or send a Dialed Calls message to a record. - Page 50 Fun & Utility Alarm See "Alarm Clock" on page 43. Schedule See "Schedule" on page 43. Calculator You can use the calculator for basic calculations. Press the # key to enter the decimal point. Press the * key to select operators such as add, subtract, multiply and divide.
- Page 51 Settings Display You can set backlight, contrast, date format, time format, and banner. You can set the backlight to off, always on, or ff if there is no operation on the FWT for 10 seconds, 20 seconds or 30 seconds. You can press the left/right key to increase or decrease the contrast.
-
Page 52: Maintenance And Troubleshooting
Maintenance and Troubleshooting Maintenance Place the FWT in a clean and dry environment. The temperature of the place should be no higher than 55°C or lower than -10°C. If the FWT is covered with dust, please clean it with fine clean cloth. - Page 53 The external voltage of the power adapter is low or unstable; disrupting the normal functioning of the FWT. Check whether the external voltage of the power adapter is normal. You can also install the spare battery in the FWT. There is no signal icon on the display screen. Make sure that the antenna is installed properly.
- Page 54 There is only the battery icon on the display screen. It indicates that the FWT is powered by the spare battery. If the FWT is powered solely by the spare battery and the battery icon is blinking without any bar inside, it indicates that the battery level is low.
-
Page 55: Specifications
Specifications Item Description Dimensions (W × D × H) 214 mm × 156 mm × 77 mm Weight Less than 700 g Placement mode Horizontal or wall mounting Input voltage Switch power supply AC: 90 V–264 V DC: 12 V Spare battery Type: NiMH Capacity: 3.6 V 1000 mAh...