Table of Contents
Advertisement
Quick Links
Advertisement
Table of Contents

Related Manuals for Dell 1609WX


Summary of Contents for Dell 1609WX
- Page 1 Dell™ 1609WX Projector User’s Guide...
- Page 2 © 2008 Dell Inc. All rights reserved. Reproduction in any manner whatsoever without the written permission of Dell Inc. is strictly forbidden. Trademarks used in this text: Dell and the DELL logo are trademarks of Dell ® Inc.; DLP, DLP logo and DarkChip™2 are either trademarks for Texas...
-
Page 3: Table Of Contents
Connecting Your Projector Connecting a Computer Connecting a DVD Player Using Your Projector Turning Your Projector On Turning Your Projector Off Adjusting the Projected Image .... - Page 4 OTHERS Troubleshooting Your Projector Changing the Lamp Specifications Contacting Dell Appendix: Glossary Contents ......
-
Page 5: About Your Projector
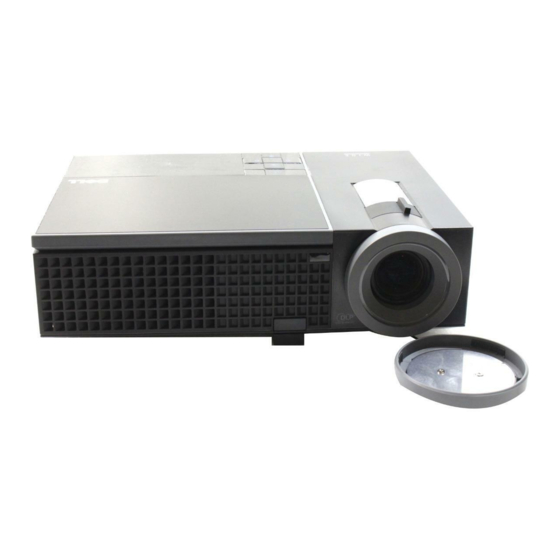
Before connecting your projector ensure that all the necessary components are available. Your projector ships with the components shown below. Contact Dell (see Contacting Dell on page 47) if any of the components are missing. Your Dell™ 1609WX projector ships with the following components:... -
Page 6: About Your Projector
Do not use the projector near appliances that generate a lot of heat. Do not use the projector in areas where there is an excessive amount of dust. The dust may cause the system to fail and projector will automatically shutdown. -
Page 7: Connecting Your Projector
Connecting Your Projector DVI-D In VGA - A Dell 1609WX DVI-D input connector VGA-A output (monitor loop-through) VGA-A input (D-sub) connector VGA-B input (D-sub) connector S-video connector Composite video connector Audio input connector Audio output connector USB remote connector RS232 connector... -
Page 8: Connecting A Computer
VGA to VGA cable USB to USB cable NOTE: The USB cable is not provided by Dell. NOTE: The USB cable must be connected if you want to use the Next Page and Previous Page features on the remote control. -
Page 9: Connecting A Computer Using A Dvi-D Cable
DVI-D cable USB to USB cable NOTE: The USB cable and DVI-D cable are not provided by Dell. NOTE: The USB cable must be connected if you want to use the Next Page and Previous Page features on the remote control. -
Page 10: Connecting A Computer Using An Rs232 Cable
Connecting a Computer Using an RS232 Cable DVI-D In VGA - A Power cable RS232 cable NOTE: The RS232 cable is not provided by Dell. You can buy the RS232 cable (6ft) from the Dell website. Connecting Your Projector VGA - A S-Video In Video In... -
Page 11: Monitor Loop-Through Connection Using Vga Cables
Monitor Loop-Through Connection Using VGA Cables DVI-D In VGA - A Power cable VGA to VGA cable VGA - A S-Video In Video In VGA - B Connecting Your Projector Audio In Audio Out RS-232 Remote... -
Page 12: Connecting A Dvd Player
DVI-D In VGA - A Power cable S-video cable NOTE: The S-video cable is not provided by Dell. You can buy the S-Video Extension (50ft/100ft) cable from the Dell website. Connecting Your Projector VGA - A S-Video In Video In... -
Page 13: Connecting A Dvd Player Using A Composite Cable
DVI-D In VGA - A Power cable Composite video cable NOTE: The Composite cable is not provided by Dell. You can buy the Composite Video Extension (50ft/100ft) cable from the Dell website. VGA - A VGA - B S-Video In... -
Page 14: Connecting A Dvd Player Using A Component Cable
Power cable VGA to YPbPr cable NOTE: The VGA to YPbPr cable is not provided by Dell. You can buy the VGA to YPbPr Extension (50ft/100ft) cable from the Dell website. NOTE: You can connect the component cable to either VGA-A Input or VGA-B Input. - Page 15 YPbPr to YPbPr cable YPbPr to VGA adapter NOTE: The YPbPr to YPbPr cable and the VGA to YPbPr adapter are not provided by Dell. NOTE: You can connect the component cable to either VGA-A Input or VGA-B Input Video In...
-
Page 16: Connecting A Dvd Player Using A Hdmi Cable
Connecting a DVD Player Using a HDMI Cable DVI-D In VGA - A Power cable HDMI cable DVI-D adapter NOTE: The HDMI cable and DVI-D adapter are not provided by Dell. Connecting Your Projector Video In Audio In VGA - A VGA - B S-Video In... -
Page 17: Using Your Projector
If you have multiple sources connected to the projector, press the Source button on the remote control or control panel to select the desired source. The Dell Logo will continue for 30 seconds while power on. If the "Searching for signal..." message appears on the screen, ensure that the appropriate cables are securely connected. -
Page 18: Adjusting The Projected Image
Adjusting the Projected Image Raising the Projector Height Press the Elevator button. Raise the projector to the desired display angle, and then release the button to lock the elevator foot into position. Use the tilt adjustment wheel to fine-tune the display angle. -
Page 19: Adjusting The Projector Zoom And Focus
Rotate the zoom tab to zoom in and out. Rotate the focus ring until the image is clear. The projector focuses at distances ranging between 3.3 ft to 39.4 ft(1.0 m to 12 m). Zoom tab... -
Page 20: Adjusting Projection Image Size
Adjusting Projection Image Size Using Your Projector 359.4"(913.0cm) 269.6"(684.7cm) 209.7"(532.6cm) 149.8"(380.4cm) 89.9"(228.2cm) 30.0 "(76.1cm) 27.3" (69.4cm) 3.3'(1.0m) DVI-D In VGA - A VGA - A VGA - B S-Video In Video In Audio In Audio Out RS-232 Remote Dell 1609WX... -
Page 21: Using The Control Panel
(684.7cm) (913.0cm) 191.2" 245.8" (624.3cm) (832.4cm) (580.6cm X (774.2cm X 282.3cm) 362.9cm) 483.9cm) (529.4cm X (705.9cm X 257.4cm) 330.9cm) 441.2cm) 13.78" 17.72" (35.0cm) (45.0cm) (60.0cm) 12.56" 16.15" (41.03cm) (54.71cm) 29.5' (9.0m) 39.4' (12.0m) Using Your Projector 359.4" 327.7" 23.62" 21.54"... - Page 22 • If the LAMP light is blinking amber, the projector automatically shuts down indicating a system failure. If this problem persists, contact Dell (see Contacting Dell on page 47). • A solid amber TEMP light indicates that the projector, lamp, or lamp driver are overheated.
- Page 23 You can also use the Digital RGB, Analog RGB, Composite, Component (YPbPr via VGA), and S-video sources when multiple sources are connected to the projector. Allows you to confirm a selected OSD option. Using Your Projector button to adjust button to toggle through...
-
Page 24: Using The Remote Control
Press to switch between Digital RGB, Analog RGB, Composite, S-video, Component (YPbPr via VGA). Press to synchronize the projector to the input source. Auto adjust does not operate if the OSD (On-Screen Display) is displayed. Press to select an item on the OSD. -
Page 25: Using The On-Screen Display
Turning Your Projector On on page 17 and Turning Your Projector Off on page 17. The Dell 1609WX Micro-projector has preset configurations that are optimized for displaying data (PC Graphics) or video (movies, games, etc.). Press the Video Mode button to toggle... -
Page 26: Main Menu
OURCE default) to autodetect the available input signals. If you press the Source button when the projector is on, it automatically finds the next available input signal. Select Off to lock the current input signal. If you press the Source... -
Page 27: Auto-Adjust
Front Projection-Ceiling Mount — The projector turns the image upside down for ceiling-mounted projection. • Rear Projection-Desktop — The projector reverses the image so that you can project from behind a translucent screen. • Rear Projection-Ceiling Mount — The projector reverses and turns the image upside down. -
Page 28: Picture (In Pc Mode)
– Component cable (720p/1080i/1080p) —Displays the projector model name, the present input source and ROJECTOR projector series number (PPID#). PICTURE (in PC Mode) Using the Picture menu, you can adjust the display settings of your projectors. The Picture menu, provides the following options: —Use... -
Page 29: Picture (In Video Mode)
—Press increase the amount of red in the image (Selectable for NTSC only). adjust the brightness of the image. to adjust the display contrast. to decrease the amount of color in the image and to decrease the Using Your Projector... -
Page 30: Display (In Pc Mode)
Custom (set your preferred settings). If you adjust the settings for White Intensity or Degamma, the projector automatically switches to Custom. NOTE: If you adjust the settings for White Intensity or Degamma, the projector automatically switches to Custom. —Allows you to manually select signal type RGB, YCbCr, or YPbPr. -
Page 31: Display (In Video Mode)
Custom (set your preferred settings). If you adjust the settings for White Intensity or Degamma, the projector automatically switches to Custom. NOTE: If you adjust the settings for White Intensity or Degamma, the projector automatically switches to Custom. —Manually select signal type RGB, YCbCr, or YPbPr. -
Page 32: Lamp
—Select Yes to set the Power Saving delay period. The delay period is OWER AVING the time you want the projector to wait without an input signal. By default, the delay period is set to 120 minutes. However, you can set this to 5, 15, 30, 45, 60, or 120 minutes. -
Page 33: Language
LANGUAGE The Language menu allows you to set the language for the OSD. Using Your Projector... -
Page 34: Others
USTOMIZED CREEN Select YES to capture the screen image as a My Customized logo. This screen replaces all the original screens with the Dell logo. You can recover the default screen by selecting Dell Logo on the pop-up screen. NOTE: To capture a full image, ensure the input signal that is connected to projector is 1280x800 resolution. - Page 35 NOTE: Password protection is disabled by default. If you enable this feature, you will be asked to enter the projector's password after you turn on the projector. First time password input request: Go to Others menu, press Enter and then select Password to Enable the password setting.
- Page 36 If you have entered incorrect password, you will be given another two chances. After the three invalid attempts, the projector will automatically turn off. NOTE: If you forget your password, contact DELL™ or qualified service personnel. To cancel the password function, select Off and enter the password to disable the function.
-
Page 37: Troubleshooting Your Projector
Troubleshooting Your Projector If you experience problems with your projector, see the following troubleshooting tips. If the problem persists, contact Dell. See Contacting Dell on page 47. Problem No image appears on the screen Possible Solution • Ensure that the lens cap is removed and the projector is turned on. - Page 38 Possible Solution Press the Auto Adjust button on the remote control or the control panel. If you are using a Dell™ portable computer, set the resolution of the computer to WXGA (1280x800) or XGA (1024 x 768): Right-click the unused portion of your Windows desktop, click Properties and then select Settings tab.
- Page 39 Unplug the Power cable after 3minutes then turn the display on again. If this problem persists, contact Dell™ (see Contacting Dell on page 47). The projector has overheated. The display automatically shuts down. Turn the display on again after the projector cools down.
- Page 40 Problem The remote control is not operating smoothly or works only within a limited range Troubleshooting Your Projector (continued) Possible Solution The battery may be low. Check if the LED indicator from the remote is too dim. If so, replace...
-
Page 41: Changing The Lamp
Turn off the projector and disconnect the Power cable. CAUTION: The lamp becomes very hot when in use. Do not attempt to replace the lamp until the projector has been allowed to cool down for at least 30 minutes. Let the projector cool for at least 30 minutes. - Page 42 Replace with the new lamp. NOTE: Dell™ may require lamps replaced under warranty to be returned to Dell™. Otherwise, dispose or recycle the lamp. For more information, see Lamp Disposal on page 42. Tighten the two screws that secure the lamp.
-
Page 43: Specifications
Specifications Light Valve Brightness Contrast Ratio Uniformity Lamp Number of Pixels Displayable Color Color Wheel Speed Projection Lens Projection Screen Size Projection Distance Video Compatibility Power Supply Power Consumption Audio Noise Level 0.65" WXGA DMD Type A, DarkChip™2 2500 ANSI Lumens (Max.) 1900:1 Typical (Full On/Full Off) 85% Typical (Japan Standard - JBMA) 200-watt user-replaceable 3000-hour... - Page 44 Weight Dimensions (W x H x D) Environmental Regulatory I/O Connectors Specifications 4.95 lbs (2.25 kg) External 11.68 x 7.96 x 3.17 ± 0.04 inches (296.5 x 202 x 80.5 ± 1 mm) Operating temperature: 5 F- 95 Humidity: 80% maximum Storage temperature: 0 C to 60 F to 140...
- Page 45 Example: Power ON Command (Send low byte firstly) Enter the following code: 0xbe, 0xef, 0x10, 0x05, 0x00, 0xc6, 0xff, 0x11, 0x11, 0x01, 0x00, 0x01 • Control Commands List To view the latest RS232 code, go to the Dell Support site at: support.dell.com. Value 19200 None Specifications...
- Page 46 Compatibility Modes (Analog/Digital) Resolution 640X480 640X480 640X480 720X400 720X400 800X600 800X600 800X600 848X480 1024X768 1024X768 1024X768 1280X720 1280X768 1280X800 1280X1024 1280X1024 1280X1024 1360X768 1400X1050 1440X900 1680X1050 1600X1200 Specifications V. Frequency (Hz) 59.9 70.1 60.3 85.1 59.9 59.9 59.8 59.9 H. Frequency (KHz) 31.5 37.5 43.3...
-
Page 47: Contacting Dell
Dell product catalog. Dell provides several online and telephone-based support and service options. Availability varies by country and product, and some services may not be available in your area. To contact Dell for sales, technical support, or customer service issues: Visit support.dell.com. -
Page 48: Appendix: Glossary
NTSC, PAL and SECAM. Compressed Resolution— If the input images are of higher resolution than the native resolution of the projector, the resulting image will be scaled to fit the native resolution of the projector. The nature of compression in a digital device means that some image content is lost. - Page 49 (usually a wide-top narrow-bottom effect) of a projected image caused by improper projector to screen angle. Maximum Distance— The distance from a screen the projector can be to cast an image that is usable (bright enough) in a fully darkened room.
- Page 50 Zoom Lens Ratio— Is the ratio between the smallest and largest image a lens can projector from a fixed distance. For example, a 1.4:1 zoom lens ratio means that a 10 foot image without zoom would be a 14 foot image with full zoom.
- Page 51 DVI-D input connector 7 Power cord connector 7 RS232 connector 7 Security cable slot 7 S-video connector 7 USB remote connector 7 VGA-A input (D-sub) connector VGA-A output (monitor loop-through) 7 VGA-B input (D-sub) connector Contact Dell 5 Control Panel 21 Dell Index...
- Page 52 Noise Level 43 Number of Pixels 43 Power Consumption 43 Power Supply 43 Projection Distance 43 Projection Lens 43 Projection Screen Size 43 Regulatory 44 RS232 Protocol 45 Uniformity 43 Video Compatibility 43 Weight 44 support contacting Dell 47 telephone numbers 47...
- Page 53 Troubleshooting 37 Contact Dell 37 Index...