Table of Contents
Advertisement
Quick Links
Advertisement
Table of Contents

Related Manuals for LG FB162-X0U


Summary of Contents for LG FB162-X0U
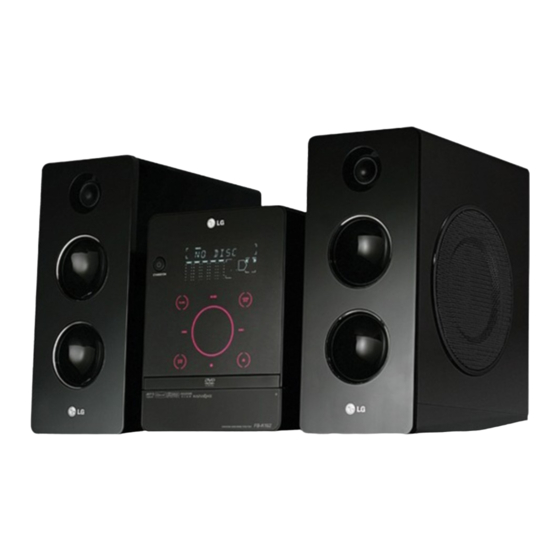
- Page 1 FB162_A0U.JA1CLLN http://www.lg.ca Mini Home Theater OWNER’S MANUAL MODEL: FB162 FB162-X0U/D0U/A0U FBS162V Before connecting, operating or adjusting this product, please read this instruction booklet carefully and completely. For service/ support Call: Toll Free Number 1-888-542-2623...
- Page 2 CAUTION: The apparatus should not be exposed to water CAUTION (dripping or splashing) and no objects filled with liquids, such as vases, should be placed on the apparatus. RISK OF ELECTRIC SHOCK DO NOT OPEN FCC WARNING: This equipment may generate or use radio frequency energy.
- Page 3 IMPORTANT SAFETY INSTRUCTIONS CAUTION: PLEASE READ AND OBSERVE ALL WARNINGS AND INSTRUCTIONS IN THIS OWNER’S MANUAL. AND THOSE MARKED ON THE PRODUCT. RETAIN THIS BOOKLET FOR FUTURE REFERENCE. This product has been designed and manufactured to assure personal safety. Improper use can result in electric shock or fire hazard.
-
Page 4: Table Of Contents
Introduction Maintenance and Service Maintenance and Service ....4 Refer to the information in this chapter before Before use .......5 contacting a service technician. -
Page 5: Before Use
Before use Types of Playable Discs To ensure proper use of this product, please read this (8 cm / 12 cm disc) owner’s manual carefully and retain it for future Video CD (VCD) reference. (8 cm / 12 cm disc) This manual provides information on the operation and maintenance of your unit. -
Page 6: Front Panel/Back Panel
Front Panel/ Back Panel OPEN MIC1 MIC2 21. Antenna terminal 1. 1 (POWER) 22. AUX IN (Auxiliary input) connector 2. VOLUME* 23. COMPONENT VIDEO OUT 3. FUNC. (FUNCTION) (PROGRESSIVE SCAN) connector (Y P (FM, AM, DVD/CD, USB, AUX, OSD iPod) 24. -
Page 7: Remote Control
Remote Control 1. POWER button 2. FUNCTION SELECT buttons (TUNER/ BAND,DVD, AUX, USB) 3. NUMERIC buttons (0-9) 4. EQ master, XDSS plus, XTS Pro, VSM buttons 5. SETUP button iPod 6. • ARROW buttons (v / V / b / B ) (Selects an option in the menu.) •... -
Page 8: Installation And Setup
Installation and Setup TV Connection Antenna (Aerial) Connections Connect the supplied FM/AM antennas for listening to Make one of the following connections, depending on the radio. the capabilities of your existing equipment. Note: Tip: • To prevent noise pickup, keep the AM loop antenna •... -
Page 9: Auxiliary Function
Auxiliary Function Using Microphone Connect an auxiliary device such as a TV or VCR via You can sing to a music source by connecting a the rear mounted AUX connector and press AUX [Refer microphone to the unit. to the example image(1) shown below]. 1. -
Page 10: Usb Function
USB Function Speaker System Connection Connect the speaker cables to the speaker terminals. You can enjoy the media files such as tunes (MP3/WMA/PHOTO/VIDEO file) saved in an MP3 Note: player or USB memory by connecting the storage • Be sure to match the speaker cable to the device to the USB port of this unit. -
Page 11: Setting The Clock
Setting the Clock 8. Press SET. - “OFF TIME” indicator appears for about 0.5 1. Press CLOCK. seconds in the display window and then 2. Select a 24 hour time system or a 12 hour time disappears. system by tapping ./>. 9. -
Page 12: Displaying Disc Information On-Screen
Displaying Disc Information GENERAL OPERATION On - screen 1. Press SETUP. The Setup menu appears. 2. Use v / V to select the desired option then press You can display various information about the disc B to move to the second level. The screen shows loaded on-screen. -
Page 13: Display
DISPLAY Progressive Scan Progressive Scan Video provides the highest quality pictures with less flickering. If you are using the COMPONENT VIDEO OUT jacks, but are connecting the unit to a standard (analog) television, set Progressive Scan to Off. If you are using the Component Video jacks for connection to a TV or monitor that is compatible with a progressive scan signal, set Progressive Scan to To Turn ON progressive scan:... -
Page 14: Audio
AUDIO 3. Select a rating from 1 to 8 using v / V. Rating 1-8: Rating one (1) has the most Each DVD disc has a variety of audio output options. restrictions and rating eight (8) is the Set the unit’s AUDIO options according to the type of least restrictive. -
Page 15: Others
OTHERS Semi Karaoke When a chapter/ title / track is fully finished ,this function shows the score in the screen with a fanfare sound. on : Turn the “Semi Karaoke”function on. When you finished singing a score will appear on the screen. off : Turn the “... -
Page 16: Operation
Operation General features Discs Buttons Operations Z (OPEN / CLOSE) Opens or closes the disc tray. X (PAUSE) During playback, press X to pause playback. Press X repeatedly to play Frame-by-Frame. DivX SKIP (. / >) During playback, press SKIP (. or >) to go to the next chapter/track or to return to the beginning of the current chapter/track. -
Page 17: Additional Features
Additional features Last Scene Memory This unit memorizes the last scene from the last disc Time Search DivX that is viewed. The last scene remains in the memory even if you remove the disc from the unit or switch off To start playing at any chosen time on the disc: the unit. -
Page 18: Playing An Audio Cd Or Mp3/Wma File
Playing an Audio CD or MP3/WMA Programmed Playback file The program function enables you to store your favorite tracks from any disc in the unit memory. A This unit can play Audio CDs or MP3/WMA files. program can contain 300 tracks. MP3/ WMA/ Audio CD 1. -
Page 19: Viewing A Jpeg File
Viewing a JPEG file Zoom Each time ZOOM is pressed the setting changes in This unit can play discs with JPEG files. the following order. Before playing JPEG recordings, read the note on Zoom on y Zoom off JPEG Recordings on the right. Press v, B or M to enlarge the video image. -
Page 20: Playing A Divx Movie File
Playing a DivX Movie file DivX file compatibility with this player is limited as follows: Using this unit you can play DivX file. • Available resolution size of the DivX file is under 1. Insert a disc and close the tray. The MOVIE menu 800x600 (W x H) pixel. -
Page 21: Using Ipod
Using iPod Note: You can enjoy playback of your iPod using the • It works with all iPod models that have a dock supplied remote control. connector. iPod is a trademark of Apple Computer, Inc, registered • Compatibility with your iPod may vary depending in the U.S. - Page 22 Playing the iPod in the OSD iPod iPod message When you connect the unit and mode Remote iPod TV to COMPONENT VIDEO Please use Monitor output You can operate your iPod by controlling OSD menu for viewing Video and photo IN/OUT in the Remote iPod from iPod.
-
Page 23: Presetting The Radio Stations
Presetting the Radio Stations Listening to the Radio You can preset 50 stations for FM and AM. Before 1. Press TUNER/BAND to select the frequency (AM or tuning, make sure that you have turned down the FM) you want. volume to the minimum. The last received station is tuned in. -
Page 24: Dimmer
Dimmer XDSS (Extreme Dynamic Sound This function will change the brightness of the display window on the front panel during in power-on status. System) Press the DIMMER repeatedly. Press XDSS plus to reinforce treble, bass and the Mute surround effect. The “XDSS ON” or “NORMAL” indicator lights. -
Page 25: Reference
Reference Language Codes Use this list to input your desired language for the following initial settings: Disc Audio, Disc Subtitle, Disc Menu. Language Code Language Code Language Code Language Code Abkhazian 6566 Fiji 7074 Lingala 7678 Singhalese 8373 Afar 6565 Finnish 7073 Lithuanian... -
Page 26: Troubleshooting
Troubleshooting Check the following guide for the possible cause of a problem before contacting service. Correction Symptom Cause • Plug the power cord securely into the No power. • The power cord is disconnected. wall outlet. • Insert a disc. (Check that the DVD or, •... - Page 27 Symptom Cause Correction • The antenna is positioned or connected • Connect the antenna securely. Radio stations cannot poorly. be tuned in. • Adjust the antennas and connect an external antenna if necessary. • The signal strength of the stations is too •...
-
Page 28: Specifications
Specifications Power supply Refer to main label Power consumption Refer to main label Net Weight 3.31 kg External dimensions (W x H x D) 170 x 253 x 265 mm Operating conditions Temperature: 5°C to 35°C, Operation status: Horizontal Operating humidity 5% to 85% Laser Semiconductor laser, wavelength 650 nm... - Page 29 P/NO : MFL35424728...