Table of Contents
Advertisement
Available languages
Available languages
Quick Links
Advertisement
Chapters
Table of Contents
Troubleshooting

Related Manuals for Philips AC1215/30


Summary of Contents for Philips AC1215/30
- Page 1 AC1215 AC1211 AC1215 คู ่ ม ื อ ผู ้ ใ ช้ EN User manual Buku Petunjuk Pengguna ZH-T 使用手冊 © 2017 Koninklijke Philips N.V. AC1211 All rights reserved. 4241 210 91812...
-
Page 3: Table Of Contents
Contents 9 Guarantee and service 1 Important Order parts or accessories 2 Your air purifier 10 Notices Product overview Electromagnetic fields (EMF) Controls overview Recycling 3 Getting started Installing the filter 4 Using the air purifier Understanding the air quality light 7 Turning on and off Changing the fan speed Light sensor... -
Page 4: Important
Make sure that foreign • appliance. objects do not fall into the If the power cord is • appliance through the air damaged, you must have outlet. it replaced by Philips, a... - Page 5 If the power socket used • Only use the original to power the appliance • Philips filters specially has poor connections, intended for this the plug of the appliance appliance. Do not use any becomes hot. Make other filters.
- Page 6 Do not use this appliance Do not use the appliance • • when you have used in wet surroundings or in indoor smoke-type insect surroundings with high repellents or in places ambient temperatures, with oily residues, burning such as the bathroom, incense, or chemical toilet, or kitchen.
-
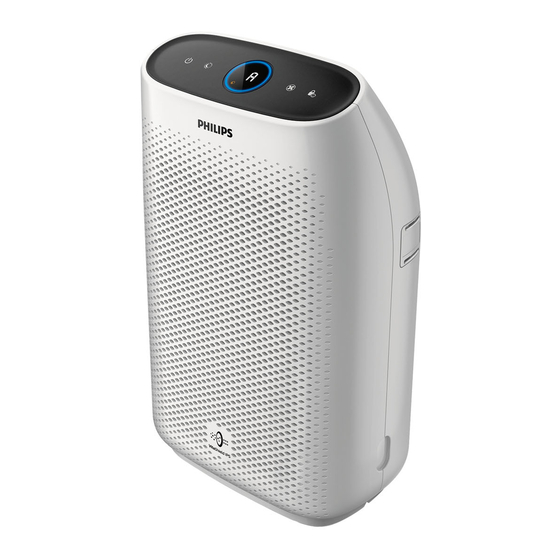
Page 7: Your Air Purifier
Air quality light Congratulations on your purchase, and welcome to Philips! Air outlet To fully benefit from the support that Air quality sensor Philips offers, register your product at www.philips.com/welcome. NanoProtect filter HEPA Series 1 (FY1400) Product overview Air inlet... -
Page 8: Getting Started
3 Getting started Reattach the front panel by pressing the top part of the panel onto the top of the air purifier (1). Then, gently push the panel against the body of the air purifier (2) Installing the filter (Fig.l). Wash your hands thoroughly after installing filters. -
Page 9: Using The Air Purifier
4 Using the air Put the plug of the air purifier in the wall outlet. purifier Touch to switch on the air purifier (Fig.m). » The air purifier beeps. » The air purifier operates under the auto mode by default. Understanding the air »... -
Page 10: Changing The Fan Speed
Changing the fan speed Light sensor There are several fan speeds available. With the light sensor, the air purifier can You can choose the auto mode (A), work according to the ambient light. speed 1, 2, 3 or turbo mode (t). When the ambient light dims for 10 seconds, all the lights on the control panel will be off slowly. -
Page 11: Set The Child Lock
Auto activating the night Set the child lock sensing mode When the air purifier operates in auto Touch the child lock button mode or allergen mode, if the light 3 seconds to activate child lock sensor detects the lights in your room (Fig.s). -
Page 12: Cleaning
5 Cleaning Cleaning the air quality sensor Note Clean the air quality sensor every 2 months for optimal functioning of the • Always turn the air purifier off and purifier. unplug the air purifier from the electrical outlet before cleaning. •... -
Page 13: Cleaning The Pre-Filter
To reattach the front panel, press Cleaning the pre-filter the top part of the panel onto the top of the air purifier (1). Then, gently push the panel against the Note body of the air purifier (2) (Fig.l). Put the plug of the air purifier in the •... -
Page 14: Replacing The Filter
6 Replacing the Filter alert light Action status filter For AC1215: Replace NanoProtect filter HEPA Series 3 (FY1410) A3 displays on Filter replacement the screen For AC1211: Replace NanoProtect filter indicator HEPA Series 1 (FY1400) This air purifier is equipped with a For AC1215: Replace filter replacement indicator to make C7 displays on... -
Page 15: Storage
7 Storage Turn off the air purifier and unplug from the wall outlet. Clean the air purifier, air quality sensor and pre-filter (see chapter ‘Cleaning’). Let all parts dry thoroughly before storing. Wrap the filter and pre-filter separately in air tight plastic bags. Store the air purifier, the filter and pre-filter in a cool, dry location. -
Page 16: Troubleshooting
This chapter summarizes the most common problems you could encounter with the air purifier. If you are unable to solve the problem with the information below, visit www.philips.com/support or contact the Consumer Care Center in your country. Problem Possible solution The air purifier •... - Page 17 Problem Possible solution The color of the air • The air quality sensor is dirty. Clean the air quality sensor quality light always (see chapter "Cleaning"). stays the same. • The first few times you use the air purifier, it may produce a plastic smell.
-
Page 18: Guarantee And Service
If to comply with all applicable legal there is no Consumer Care Centre in requirements and to stay well within the your country, go to your local Philips EMF standards applicable at the time of dealer. producing the products. - Page 19 Daftar Isi 8 Troubleshooting 1 Penting 9 Garansi dan servis 2 Alat pemurni udara Anda Tinjauan umum produk Memesan komponen atau aksesori Ikhtisar kontrol 10 Pemberitahuan 3 Memulai Medan elektromagnet (EMF) Memasang filter Mendaur ulang 4 Menggunakan alat pemurni udara Memahami lampu kualitas udara 24 Menghidupkan dan mematikan Mengubah kecepatan kipas...
-
Page 20: Penting
Jika kabel listrik rusak, Bahaya • Anda harus membawanya Jangan memasukkan • ke ke Philips untuk diganti, air atau cairan lain atau pusat layanan resmi deterjen yang mudah Philips atau orang yang terbakar ke dalam alat mempunyai keahlian... - Page 21 Anda Pastikan bahwa Anda menghidupkan alat. memasukkan steker Hanya gunakan filter • alat ke soket daya yang asli Philips yang khusus terhubung dengan benar. dimaksudkan untuk alat ini. Jangan gunakan filter lainnya.
- Page 22 Pembakaran filter dapat menggunakan gas, • menyebabkan bahaya perangkat pemanas, atau kepada manusia dan/ perapian. atau membahayakan Selalu cabut alat setelah • nyawa orang lain. Jangan digunakan dan sebelum menggunakan filter membersihkan atau sebagai bahan bakar atau melakukan pemeliharaan tujuan serupa lainnya. lainnya atau mengganti Hindari alat terbentur filter.
- Page 23 Alat ini tidak • menghilangkan karbon monoksida (CO) atau radon (Rn). Alat ini tidak dapat digunakan sebagai perangkat pengaman jika terjadi kecelakaan pada proses pembakaran dan bahan kimia berbahaya. Jika Anda perlu • memindah alat, lepaskan alat dari catu daya terlebih dahulu.
-
Page 24: Alat Pemurni Udara Anda
A Panel kontrol B Lampu kualitas udara C Keluaran udara Selamat atas pembelian Anda dan D Sensor kualitas udara selamat datang di Philips! Untuk memanfaatkan sepenuhnya Filter NanoProtect HEPA Seri 1 dukungan yang ditawarkan Philips, (FY1400) daftarkan produk Anda di F Masukan udara www.philips.com/welcome. -
Page 25: Memulai
3 Memulai Catatan • Pastikan bahwa sisi dengan klip mengarah ke Anda dan semua kait pra-filter telah dipasang dengan Memasang filter benar ke alat pemurni. Catatan Pasang kembali panel depan dengan menekan bagian atas • Pastikan alat pemurni udara telah panel ke atas pemurni udara (1). -
Page 26: Menggunakan Alat Pemurni Udara
4 Menggunakan Menghidupkan dan alat pemurni mematikan udara Catatan • Selalu letakkan alat pemurni udara di permukaan yang stabil, Memahami lampu horizontal, dan rata dengan bagian depan unit tidak menghadap kualitas udara dinding atau perabot. • Untuk kinerja pemurnian optimal, Warna lampu Tingkat kualitas tutup pintu dan jendela. -
Page 27: Mengubah Kecepatan Kipas
Manual Catatan • Sentuh tombol kecepatan kipas • Jika alat pemurni udara tetap secara berulang untuk memilih terhubung ke stopkontak listrik kecepatan kipas yang Anda perlukan setelah dimatikan, alat akan (Gbr.p). beroperasi dalam setelan sebelumnya saat dihidupkan Turbo (t) kembali. •... -
Page 28: Mode Pendeteksi Malam
Mode pendeteksi malam Catatan • Sensor cahaya mendeteksi cahaya Anda dapat mengaktifkan mode di kamar Anda setelah 11 jam dalam pendeteksi malam dengan dua cara. mode pendeteksi malam. • Jika lampu di kamar Anda Mengaktifkan mode pendeteksi menyala, alat pemurni udara akan malam secara manual menghentikan mode pendeteksi malam dan akan beroperasi dalam... -
Page 29: Membersihkan
5 Membersihkan Membersihkan sensor kualitas udara Catatan Bersihkan sensor kualitas udara setiap 2 bulan agar alat pemurni berfungsi • Selalu matikan alat pemurni udara secara optimal. dan cabut alat dari stopkontak listrik sebelum membersihkan. • Jangan sekali-kali merendam alat Catatan pemurni udara di dalam air atau •... -
Page 30: Membersihkan Pra-Filter
Catatan Catatan • Selalu pasang penutup sensor • Pastikan bahwa sisi dengan klip kualitas udara selama alat pemurni mengarah ke Anda, dan semua kait udara bekerja. pra-filter telah dipasang dengan benar ke alat pemurni udara. Membersihkan pra-filter Untuk memasang kembali panel depan, tekan bagian atas panel ke atas alat pemurni udara (1). -
Page 31: Mengganti Pra Filter
6 Mengganti pra Status lampu Tindakan tanda filter filter Untuk AC1215: Ganti filter NanoProtect HEPA Seri 3 (FY1410) A3 ditampilkan pada layar Untuk AC1211: Ganti Indikator penggantian Filter NanoProtect HEPA Seri 1 (FY1400) filter Untuk AC1215: Ganti C7 ditampilkan filter NanoProtect AC Alat pemurni udara ini dilengkapi pada layar (FY1413) -
Page 32: Penyimpanan
7 Penyimpanan Matikan alat pemurni udara dan cabut dari stopkontak. Bersihkan alat pemurni udara, sensor kualitas udara,dan pra-filter (lihat bab ‘Membersihkan’). Keringkan semua bagian sebelum disimpan. Bungkus filter dan pra-filter secara terpisah dalam kantong plastik kedap udara. Simpan alat pemurni udara, filter, dan pra-filter di tempat yang kering dan sejuk. -
Page 33: Troubleshooting
8 Troubleshooting Bab ini merangkum masalah umum yang mungkin Anda temukan pada alat pemurni udara. Jika Anda tidak dapat mengatasi masalah dengan informasi di bawah, kunjungi www.philips.com/support atau hubungi Pusat Layanan Konsumen di negara Anda. Masalah Solusi yang memungkinkan Alat pemurni udara •... - Page 34 Masalah Solusi yang memungkinkan Warna lampu • Sensor kualitas udara kotor. Bersihkan sensor kualitas kualitas udara udara (lihat bab "Membersihkan"). selalu sama. • Beberapa kali pertama Anda menggunakan alat pemurni udara, alat mungkin akan mengeluarkan bau plastik. Hal ini normal. Alat pemurni udara juga mungkin mengeluarkan Alat pemurni udara bau tidak sedap bila filternya kotor.
-
Page 35: Garansi Dan Servis
9 Garansi dan servis Jika Anda memerlukan informasi atau jika Anda mengalami masalah, harap kunjungi situs web Philips di www.philips.com atau hubungi Pusat Layanan Konsumen Philips di negara Anda (nomor teleponnya bisa Anda temukan di pamflet garansi internasional). Jika di negara Anda tidak terdapat Pusat Layanan Pelanggan, kunjungi dealer Philips setempat. -
Page 36: Pemberitahuan
Salah satu Prinsip Bisnis utama Philips adalah mengambil semua tindakan kesehatan dan keselamatan yang diperlukan bagi berbagai produk kami, agar sesuai dengan semua persyaratan... - Page 37 สารบั ญ 9 การรั บ ประกั น และบริ ก าร 1 ข้ อ สำ า คั ญ สั ่ ง ซื ้ อ ชิ ้ น ส่ ว นหรื อ อุ ป กรณ์ เ สริ ม 2 เครื ่ อ งฟอกอากาศของคุ ณ 10 คำ...
-
Page 38: ข้ อ สำ า คั ญ
ไฟให้ เ ครื ่ อ งไว้ ไ ม่ ด ี ปลั ๊ ก ของเครื ่ อ ง ผู ้ ช � า นาญของ Philips, ศู น ย์ บ ริ ก าร จะร้ อ น ตรวจสอบให้ แ น่ ใ จว่ า คุ ณ... - Page 39 เสร็ จ และก่ อ นการท� า ความสะอาด • Philips ที ่ ผ ลิ ต มาเพื ่ อ ใช้ ง านกั บ หรื อ การบ� า รุ ง รั ก ษาอื ่ น ๆ หรื อ การ เครื ่ อ งนี ้ เ ท่ า นั ้ น ห้ า มใช้ แ ผ่ น กรอง...
- Page 40 ห้ า มใช้ ง านเครื ่ อ งนี ้ ใ นที ่ เ ปี ย ก • ชื ้ น หรื อ ในที ่ ๆ มี อ ุ ณ หภู ม ิ ส ู ง เช่ น ห้ อ งน� ้ า หรื อ ห้ อ งครั ว เครื...
-
Page 41: เครื ่ อ งฟอกอากาศของคุ ณ
เพื ่ อ ให้ ค ุ ณ ได้ ร ั บ ประโยชน์ อ ย่ า งเต็ ม ที ่ จ ากบริ ก ารที ่ (FY1400) Philips มอบให้ โปรดลงทะเบี ย นผลิ ต ภั ณ ฑ์ ข องคุ ณ ที ่ www.philips.com/welcome G ทางลมเข้... -
Page 42: การเริ ่ ม ต้ น ใช้ ง าน
การเริ ่ ม ต้ น ใช้ ง าน การใช้ เ ครื ่ อ งฟอก อากาศ การติ ด ตั ้ ง แผ่ น กรอง ทำ า ความรู ้ จ ั ก ไฟแสดงคุ ณ ภาพ หมายเหตุ อากาศ • ตรวจสอบให้ แ น่ ใ จว่ า ได้ ถ อดปลั ๊ ก เครื ่ อ งฟอก อากาศออกจากเต้... -
Page 43: การเปลี ่ ย นความเร็ ว พั ด ลม
เสี ย บปลั ๊ ก ของเครื ่ อ งฟอกอากาศในเต้ า บนผนั ง โหมดป้ อ งกั น สารก่ อ ภู ม ิ แ พ้ สั ม ผั ส เพื ่ อ เปิ ด สวิ ต ช์ เ ครื ่ อ งฟอกอากาศ โหมดป้... -
Page 44: โหมดตรวจจั บ ยามค่ ำ า คื น
โหมดตรวจจั บ ยามคำ ่ า คื น ตั ้ ง ค่ า ล็ อ คป้ อ งกั น เด็ ก คุ ณ สามารถเปิ ด ใช้ ง านโหมดตรวจจั บ ยามค� ่ า คื น ได้ 2 สั ม ผั ส ปุ ่ ม ระบบป้ อ งกั น เด็ ก ค้... -
Page 45: การทำ า ความสะอาด
การทำ า ความสะอาด การทำ า ความสะอาดเซนเซอร์ ตรวจวั ด คุ ณ ภาพอากาศ ท� า ความสะอาดเซนเซอร์ ต รวจวั ด คุ ณ ภาพอากาศทุ ก ๆ หมายเหตุ 2 เดื อ น เพื ่ อ ประสิ ท ธิ ภ าพการท� า งานที ่ เ ป็ น เยี ่ ย มของ เครื... -
Page 46: ทำ า ความสะอาดแผ่ น กรองชั ้ น แรก
ในการติ ด ตั ้ ง แผงด้ า นหน้ า กลั บ เข้ า ที ่ ให้ ก ดด้ า น ทำ า ความสะอาดแผ่ น กรองชั ้ น บนของแผงเข้ า กั บ ด้ า นบนของเครื ่ อ งฟอกอากาศ แรก (1) จากนั ้ น ค่ อ ยๆ กดแผงเข้ า กั บ เครื ่ อ งฟอก อากาศ... -
Page 47: การเปลี ่ ย นแผ่ น กรอง
การเปลี ่ ย นแผ่ น สถานะสั ญ ญาณ Action กรอง ไฟเตื อ นแผ่ น กรอง ส� า หรั บ AC1215: ให้ เปลี ่ ย นแผ่ น กรอง NanoProtect HEPA ซี ร ี ่ ส ์ 3 (FY1410) A3 ปรากฏบนหน้ า สั... -
Page 48: การจั ด เก็ บ
การจั ด เก็ บ ปิ ด เครื ่ อ งฟอกอากาศและถอดปลั ๊ ก จากเต้ า เสี ย บ บนผนั ง ท� า ความสะอาดเครื ่ อ งฟอกอากาศ เซนเซอร์ ต รวจ วั ด คุ ณ ภาพอากาศและแผ่ น กรองชั ้ น แรก (ดู บ ท ‘การท�... -
Page 49: การแก้ ไ ขปั ญ หา
ในบทนี ้ เราได้ ร วบรวมปั ญ หาต่ า งๆ ที ่ อ าจเกิ ด ขึ ้ น กั บ เครื ่ อ งฟอกอากาศได้ หากยั ง ไม่ ส ามารถแก้ ป ั ญ หาได้ ด ้ ว ยข้ อ มู ล ด้ า นล่ า ง ให้ ไ ปที ่ www.philips.com/support หรื อ ติ ด ต่ อ ศู น ย์ บ ริ ก ารดู แ ลลู ก ค้ า ในประเทศของคุ ณ... - Page 50 ปั ญ หา วิ ธ ี แ ก้ ไ ขที ่ ส ามารถทำ า ได้ การใช้ ง านเครื ่ อ งฟอกอากาศ 2 ถึ ง 3 ครั ้ ง แรก เครื ่ อ งอาจเกิ ด กลิ ่ น พลาสติ ก เป็ น •...
-
Page 51: การรั บ ประกั น และบริ ก าร
หากคุ ณ ต้ อ งการทราบข้ อ มู ล หรื อ หากคุ ณ มี ป ั ญ หา โปรดเข้ า ชมเว็ บ ไซต์ ข อง Philips ได้ ท ี ่ www.philips.com หรื อ ติ ด ต่ อ ศู น ย์ บ ริ ก ารดู แ ลลู ก ค้ า ของบริ ษ ั ท Philips ในประเทศของคุ ณ (หมายเลข... -
Page 52: คำ า ประกาศ
ภั ณ ฑ์ น ั ้ น ๆ Philips มุ ่ ง มั ่ น ที ่ จ ะพั ฒ นา ผลิ ต และขายผลิ ต ภั ณ ฑ์ ท ี ่ ไม่ ส ่ ง ผลกระทบที ่ ร ้ า ยแรงต่ อ สุ ข ภาพ Philips ยื น ยั น ว่ า... - Page 53 內容 1 重要事項 9 保養及服務 訂購零件或配件 2 您的空氣淨化器 10 注意 產品概要 電磁場(EMF) 控制鍵概覽 環保 3 使用入門 安裝濾網 4 使用空氣淨化器 瞭解空氣質素燈 開關 改變風扇速度 光源感應器 夜間感測模式 設定兒童安全鎖 5 清潔 清潔空氣淨化器機身 清潔空氣質素感應器 清潔預過濾網 6 更換濾網 過濾網替換指示燈 替換過濾網 7 存放 8 疑難排解 ZH-T...
-
Page 54: 重要事項
重要事項 監督情況下對產品進行清潔 及維護。 請勿阻塞進氣口和排氣口, • 使用本產品前請先閱讀本用戶手冊,並保 例如在排氣口上面或進氣口 管以作將來參考。 前面放置物件。 危險事項 確保異物不會通過排氣口掉 • 請勿讓水或任何液體或易燃 入裝置內部。 • 清潔劑進入此產品,以避免 注意 觸電和/或火災的危險。 本產品並不是適當通風設 • 請勿用水或任何液體或(易 • 備、正規吸塵器或煮食時 燃)清潔劑清潔此產品,以 使用的抽油煙機或風扇的代 避免觸電和/或火災的危險。 替品。 請勿在本產品周圍噴射殺蟲 • 若為本產品提供電力的電源 • 劑或芳香劑等易燃物品。 插座沒有妥善連接,本產品 警告 的插頭便會發熱。請確保您 在連接本產品前,請檢查產 已妥善連接電源插座。 • 品註明的指示電壓與當地電 在乾燥、穩定、平滑和水平 •... - Page 55 僅使用專門針對本產品的原 請勿在洗手間或廚房等 • • 裝 Philips 濾網。請勿使用 濕潤環境或高溫環境使用 任何其他濾網。 本產品。 燃燒過濾器可能造成對健康 本產品不會去除一氧化碳 • • (CO) 或氡 (Rn)。在發生燃 無可挽回的危害及/或危及 他人生命。不要使用濾網作 燒過程和危險化學物質的事 為燃料或類似用途。 故中,不能將本產品作為安 避免以硬物碰撞產品(尤其 全裝置使用。 • 是產品的通風口和排氣口) 如果您需要移動本產品, • 請使用裝置背面的手柄來提 請先拔除其電源供應。 • 起或移動裝置。 不要拉扯電源線來移動 • 請勿將您的手指或其他物件 裝置。 • 放入通風口或排氣口,以免 更換或清潔濾網後,必須徹 •...
-
Page 56: 您的空氣淨化器
2 您的空氣淨化器 AC1211: A 控制面板 B 空氣質素燈 感謝您購買 Philips 產品,歡迎來到 Philips 世界! C 排氣口 要享受 Philips 為您提供的全面支援,請在 D 空氣質素感應器 以下網站 www.philips.com/welcome 註 冊您的產品。 NanoProtect 濾網 HEPA 系列 1 (FY1400) 產品概要 F 進氣口 G 前面板 AC1215: A 控制面板 控制鍵概覽 B 空氣質素燈... -
Page 57: 使用入門
3 使用入門 安裝濾網 提示 • 安裝濾網前,請確保空氣淨化器已經 從電源插座拔除。 • 確保濾網有標籤的一面是向著您。 拉動前面板的底部,然後輕輕從空氣淨 化器中移除(圖 c)。 按下夾子(1),再將預過濾網向您 的方向拉動(2)(圖 d,僅適用於 AC1215)。 取出所有濾網(圖 e 適用於 AC1215 圖 f 適用於 AC1211)。 移除濾網的所有包裝物料(圖 g 適用 於 AC1215,圖 h 適用於 AC1211)。 如型號為 AC1215,請先將較厚的濾網 裝入(FY1410)空氣淨化器內,然後 再安裝較薄的 AC 濾網(FY1413) (圖 i)。型號已在各個濾網上 列明。如型號為... -
Page 58: 使用空氣淨化器
4 使用空氣淨化器 提示 • 如空氣淨化器在「關閉」後繼續連接 至電源插座,空氣淨化器在再次「啟 動」時,將按之前的設定操作。 瞭解空氣質素燈 • 如空氣淨化器在運作期間意外關閉, 它會在電源恢復後自動重新啟動,並 按之前的設定操作。 空氣質素指示燈的 空氣質素水平 顏色 藍色 良好 改變風扇速度 藍紫色 適中 紅紫色 不健康 設有多個風扇速度 可選擇自動模式(A)、 風速 1、2、3 或 加速模式(t)。 紅色 非常不健康 自動(A) 開啟空氣淨化器時,空氣質素燈將自動亮 起,並順序顯示所有顏色。約 30 秒後,空 • 重複按下風扇速度按鈕 以選擇自動 氣質素感應器會根據周遭空中粒子的空氣 模式(圖 n)。 質素,選擇相應的顏色。... -
Page 59: 光源感應器
光源感應器 提示 • 晚間模式進行後 11 小時,燈光感應器 透過光源感應器, 本空氣淨化器便可按環 會偵測房內燈光。 境光線操作。 • 若房內的燈光已開啟,空氣淨化器便 環境光線變暗 10 秒後,控制面板上的所 會離開夜間感測模式,並按照原先設 有指示燈都會慢慢熄滅。在此期間,若按 定的模式運作。 隨後,空氣質素指示 下任何按鈕,所有指示燈便會再亮起。如 燈及顯示器便會亮起。 在 10 秒內不作任何操作,所有指示燈都會 • 要手動離開夜間感測模式,請輕觸 熄滅。 或 按鈕。 環境光線變亮並持續最少 10 秒後,所有指 示燈將會重新亮起。 設定兒童安全鎖 夜間感測模式 按住兒童安全鎖按鈕 3 秒,即可啟 啟用夜間感測模式的方法有兩種。 動兒童安全鎖(圖 s)。 »... -
Page 60: 清潔空氣淨化器機身
5 清潔 關閉空氣淨化器,並將其從牆身插座 拔出。 使用柔軟毛刷清潔空氣質素感應器進氣 口及排氣口(圖 u)。 提示 拆下空氣質素感應器護蓋(圖 v)。 • 進行清潔前,必須關閉空氣淨化器, 使用稍為濕潤的棉花棒清潔空氣質素感 應器和塵埃的出入口(圖 w)。 並將空氣淨化器從電源插座拔除。 • 請勿將空氣淨化器浸入水中或任何液 使用乾爽的棉花棒徹底擦乾所有部件。 體中。 重新裝上空氣質素感應器護蓋 • 請勿使用磨蝕性、刺激性或易燃清潔 (圖 x)。 劑(如漂白劑或酒精)清洗空氣淨化 器的任何一部分。 提示 • 只有預過濾網是可清洗的。空氣濾網 並不可以清洗。 • 空氣淨化器運作時,空氣質素感應器護 • 請勿以吸塵機清潔濾網或空氣質素感 蓋必須保持關閉。 應器。 清潔預過濾網 清潔空氣淨化器機身 提示 請定時清潔本空氣淨化器的內部和外部,... - Page 61 將預過濾網裝回空氣淨化器上 (圖 k )。 提示 • 確保向著您的是有夾子的一邊, 且所有預過濾網的鉤已妥善扣上空氣 淨化器。 將前面板的上方往空氣淨化器 (1) 的上 方按壓即可重新安裝。然後輕輕將面板 往空氣淨化器的機身按壓 (2) (圖 l)。 將空氣淨化器的插頭插入電源插座。 按下 3 秒,以重設預過濾網的清潔 時間(圖 {)。 安裝濾網後,必須徹底洗淨雙手。 ZH-T...
-
Page 62: 更換濾網
6 更換濾網 關閉空氣淨化器,並將其從牆身插座 拔出。 根據螢幕上的濾網警示燈狀態, 取出舊的空氣濾網(圖 | 適用於 AC1215,圖 } 適用於 AC1211)。 過濾網替換指示燈 棄置舊的濾網。 空氣淨化器設有過濾網替換指示燈,以確 提示 保空氣淨化濾網在空氣淨化器運作時處於 良好狀態。需要更換濾網時,顯示屏會顯 • 請勿觸摸折叠的過濾網表面,或去聞 示濾網代碼。 過濾網上的氣味,因為過濾網上聚集 如果 14 天內不更換濾網,空氣淨化器將會 了空氣中的污染物。 停止運作並自動鎖上。 移除新濾網的所有包裝物料 替換過濾網 (圖 g 適用於 AC1215,圖 h 適 用於 AC1211)。 將新濾網裝入空氣淨化器內(圖 i 提示 適用於... - Page 63 7 存放 關閉空氣淨化器,並將其從牆身插座 拔出。 清潔空氣淨化器、空氣質素感應器和預 過濾網(請參閱「清潔」章節)。 必須讓所有部件乾透方可儲存。 以不透氣的膠袋將濾網和預過濾網分開 包裝好。 將空氣淨化器、濾網和預過濾網儲存於 陰涼乾爽的地方。 處理濾網後,必須徹底洗淨雙手。 ZH-T...
-
Page 64: 疑難排解
8 疑難排解 本章節總結一些您在本空氣淨化器上最常見的問題。若您無法透過以下資訊解決問題,請瀏 覽 www.philips.com/support 或聯絡您所在國家/地區的顧客服務中心。 問題 可行解決方案 • 嘗試其他電源插座或檢查牆身開關。 空氣淨化器在插入牆 • 濾網警示狀態顯示濾網代碼。更換相關濾網,並重設濾網的使 身插座並開啟後不能 用時間(請參閱「更換濾網」章節)。 運作。 • 如果問題仍然持續,請聯絡您所在國家的客戶服務中心。 空氣淨化器即使開啟 • 濾網替換指示燈持續亮起,但您沒有更換相關濾網,空氣淨化 了也沒有正常運作。 器現已鎖上。在這情況,請更換該濾網並重設濾網使用時間。 空氣淨化器的電源意 • 空氣淨化器會自動重新啟動,當恢復電源後會繼續之前的 外關閉。 模式。 從排氣口排出的氣流 • 預過濾網處於骯髒的狀態。清潔預過濾網(請參閱「清潔」章 節,僅適用於 AC1215)。 比以前顯著減弱。 • 其中一個濾網沒有安裝到空氣淨化器中,或濾網沒有安裝妥 當。確保已按以下次序,正確安裝所有濾網,由最內部的濾網 開始安裝: 適用於 AC1215:... - Page 65 問題 可行解決方案 • 若空氣淨化器發出的聲響過大,請將風扇速度調至較低段速。 空氣淨化器聲浪 當在夜間時於房內使用空氣淨化器時,請選擇夜間感測模式或 太大。 選擇較低的風扇速度。 即使我已更換過濾 • 可能你沒有重置濾網的使用時間。為空氣淨化器接上電源, 網,空氣淨化器仍表 按下 啟動空氣淨化器,然後按下 3 秒。 示需要更換。 錯誤代碼 「E1」、 「E2」、「E3」 • 空氣淨化器故障。請聯絡你所在國家/地區的客戶服務中心。 或「E4」 顯示在 螢幕上。 ZH-T...
-
Page 66: 保養及服務
如果您需要資料或有疑問,請前往 Philips 網站 www.philips.com 或聯絡您的國家的 電磁場(EMF) Philips 顧客服務中心(您會在全球保障小 冊子上找到其電話號碼)。如果您的國家 這款 Philips 產品符合一切有關電磁場暴露 沒有顧客服務中心,請前往當地的 Philips 的適用安全標準及條例。 經銷商。 符合 EMF 標準 訂購零件或配件 Koninklijke Philips N.V. 專為消費者製造及 銷售許多產品 (例如任何電器用品),而這 如果您需要更換零件或想訂購額外配件, 些產品都能發出與接收電磁訊號。 請前往您的 Philips 經銷商或瀏覽 Philips 貫徹執行的一項主要商業準則是對 www.philips.com/support。 我們的產品採取所有必要的健康和安全措 如果您索取有關零件時遇上問題,請聯絡 施,遵循一切可行的法律規定,並在產品 您的國家/地區 Philips 顧客服務中心(您...