Table of Contents
Advertisement
Quick Links
www.DataSheet4U.com
DVD Stereo System
Operating Instructions
SC-VK90D
Model No.
SC-VK80D
SC-VK70D
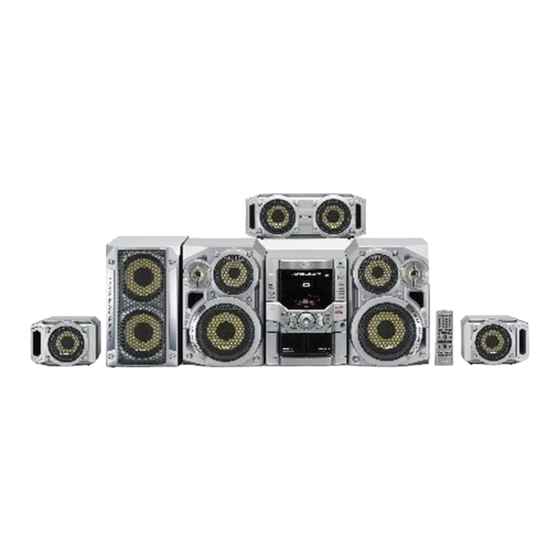
The above illustration of the unit is an example and shows SC-VK90D for Southeast Asia.
AUDIO / VIDEO
GN GC GCS
Region number supported by
this player
Region numbers are allocated to DVD players and
software according to where they are sold.
For the Middle East and South Africa
•
The region number of this player is "2".
•
The player will play DVD-Video marked
with labels containing "2" or "ALL".
Example:
2
For Southeast Asia
•
The region number of this player is "3".
•
The player will play DVD-Video marked
with labels containing "3" or "ALL".
Example:
For Australia, N.Z. and Oceania
•
The region number of this player is "4".
•
The player will play DVD-Video marked
with labels containing "4" or "ALL".
Example:
Before connecting, operating or adjusting this
product, please read these instructions completely.
Please keep this manual for future reference.
RQT7125-3B
2
3
4
2
3
4
2
3
4
Advertisement
Table of Contents

Related Manuals for Panasonic SA-VK90D


Summary of Contents for Panasonic SA-VK90D
- Page 1 www.DataSheet4U.com DVD Stereo System Region number supported by Operating Instructions this player Region numbers are allocated to DVD players and software according to where they are sold. SC-VK90D Model No. For the Middle East and South Africa • The region number of this player is “2”. SC-VK80D •...
- Page 2 SC-VK90D for Southeast Asia. carefully. : indicates features applicable to SC-VK90D only. VK90D : SC-VK80D only. VK80D VK70D : SC-VK70D only. System SC-VK90D SC-VK80D SC-VK70D Main unit SA-VK90D SA-VK80D SA-VK70D Front speakers SB-VK90 SB-VK80 SB-VK70 Center speaker SB-PC810 SB-PC810 ---- Surround speakers SB-PS810...
-
Page 3: Table Of Contents
Table of contents www.DataSheet4U.com Getting started Timer operations Accessories ................... 3 Using the timers ................34 The play/record timer/The sleep timer ........34 Glossary ..................4 Disc information ................5 Other functions Simple setup STEP1 Locating ..............6 Convenient functions ..............35 STEP2 Connecting the speakers and voltage Changing the sound range display .......... -
Page 4: Glossary
Glossary www.DataSheet4U.com Decoder WMA, MP3, CD text and JPEG information A decoder restores the coded audio signals on DVDs to normal. This ¡ Discs must conform to ISO9660 level 1 or 2 (except for extended is called decoding. formats). ¡ This unit is compatible with multi-session but if there are a lot of Dolby Digital sessions it takes more time for play to start. -
Page 5: Disc Information
7 7 7 7 7 DVD-R discs Including CD text Panasonic DVD-R recorded and finalized on a Panasonic DVD video recorder are played as DVD-Video on this unit. 7 7 7 7 7 CD-R and CD-RW discs CD-R/RW —... -
Page 6: Simple Setup
(SB-VK70) (SB-VK70) (SB-VK90/ Place on either side of listening position, or slightly to the rear, SB-VK80) SB-VK80) about 1 meter higher than ear level with the Panasonic logo Front speaker Front speaker facing towards the listening position. (left) Television (right) The effect varies with the type of music and music source. -
Page 7: Step2 Connecting The Speakers And Voltage Selection
www.DataSheet4U.com STEP Connecting the speakers and voltage selection Twist and pull off the vinyl tip of the speaker cords. For the Middle East, South Africa and Southeast Asia Before connecting the AC power supply cord, set the voltage. Voltage Selector Use a flat-head screwdriver to turn the voltage selector on the rear panel to the appropriate position for the area in which... -
Page 8: Step3 Television
www.DataSheet4U.com STEP Television Video cable 7 7 7 7 7 Connecting a television with a VIDEO IN terminal Connect directly to your television. Do not connect the unit through a video cassette recorder, because the picture may not be played correctly due to the copy guard. VID EO Television (not included) -
Page 9: Step4 Connecting The Antennas And Ac Power Supply Cord
www.DataSheet4U.com STEP Connecting the antennas and AC power supply cord AM loop antenna FM indoor antenna Power plug adaptor AC power supply cord For the Middle East, South For the Middle East, South Africa and Southeast Asia Africa and Southeast Asia For Australia, N.Z. -
Page 10: Step6 Quick Setup
www.DataSheet4U.com STEP QUICK SETUP f f f f f Press [ ] to turn on the unit. TV TV - - DVD/CD] to select “DVD/CD” as the Press [- DIMMER DIMMER TV/VIDEO TV/VIDEO SETUP SETUP SLEEP SLEEP CLOC CLOCK / PL AY/ AUTO OFF O OFF... -
Page 11: Step7 Setting The Time
www.DataSheet4U.com STEP Setting the time This is a 24-hour clock. Press [CLOCK/TIMER] to select “CLOCK”. TV TV DIMMER DIMMER TV/VIDEO TV/VIDEO SETUP SETUP SLEEP SLEEP CLOC CLOCK / PL AY/ Every time you press the button: AUTO OFF O OFF TIMER IMER CLOCK/TIMER... -
Page 12: Control Reference Guide
Control reference guide www.DataSheet4U.com Main unit AC supply indicator [AC IN] This indicator lights when the unit is connected to the AC mains supply. Standby/on switch [f f f f f /I] Press to switch the unit from on to standby mode or vice versa. In standby mode, the unit is still consuming a small amount of power. - Page 13 Control reference guide www.DataSheet4U.com Remote control Buttons such as function in exactly the same way as the buttons on the main unit. TV power on/off button [TV f f f f f ] ..........35 TV TV Sleep timer, Auto off, TV/Video input mode select button TV/VIDEO TV/VIDEO SETUP SETUP...
-
Page 14: Discs-Basic Play
Discs—Basic play www.DataSheet4U.com Press [-/J DVD/CD] (remote control: [- DVD/CD]). Play begins. (CD text only) WMA MP3 CD OPEN/ Group and track names are displayed on the television. CLOSE • Press [SHIFT]+[SUBTITLE] to turn the display on or off. • You can also use the navigation menus to control play DVD/CD (A page 21). -
Page 15: Position Memory Function
www.DataSheet4U.com Position Memory function Skipping items RAM DVD-A DVD-V VCD CD WMA MP3 RAM DVD-A DVD-V VCD CD WMA MP3 JPEG During play or while paused During play Press [ g g , 4 4 4 4 4 ] or [ f f , 3 3 3 3 3 ] on the remote control. -
Page 16: Discs-Convenient Functions
Discs—Convenient functions www.DataSheet4U.com Disc play mode function TV TV CD WMA MP3 TV/VIDEO TV/VIDEO SETUP SETUP DIMMER DIMMER SLEEP SLEEP CLOC CLOCK / PL AY/ AUTO OFF O OFF TIMER IMER Preparation: Press [- DVD/CD] and then [L]. DISC DISC DISC ECHO ECHO... -
Page 17: All Group Play/Random Play/Program Play
www.DataSheet4U.com All group play Press the numbered buttons to select a title, chapter, group or track ( then press [ENTER]). WMA MP3 DVD-A Example Press [PLAY MODE] to select “ALL-GROUP”. The unit plays tracks in all the groups on a disc. Press [- - - DVD/CD] to play. -
Page 18: Soundtracks/Subtitles/Repeat Play
Discs—Convenient functions www.DataSheet4U.com Signal type/data LPCM/PPCM/pDigital/DTS/MPEG: Signal type TV TV k (kHz): Sampling frequency TV/VIDEO TV/VIDEO SETUP SETUP DIMMER DIMMER SLEEP SLEEP CLOC CLOCK / PL AY/ b (bit): Number of bits AUTO OFF O OFF TIMER IMER ch (channel): Number of channels DISC DISC ECHO... -
Page 19: A-B Repeat Play
www.DataSheet4U.com A-B repeat play To mark the eleventh point and beyond CD WMA MP3 RAM DVD-A DVD-V VCD 1 Press [/, -] to select the marker pin icon. You can repeat a section between points A and B within a program, title or track. -
Page 20: Playing The Programs Or Play List On Dvd-Ram
Playing the programs or play list on DVD-RAM www.DataSheet4U.com Using the play list menu TV TV You can play a group of scenes, a play list, created on other TV/VIDEO TV/VIDEO SETUP SETUP DIMMER DIMMER SLEEP SLEEP CLOC CLOCK / PL AY/ AUTO OFF O OFF... -
Page 21: Wma/Mp3, Cd Text And Jpeg Navigation Menus
WMA/MP3, CD text and JPEG navigation menus www.DataSheet4U.com Track title search (CD text only) WMA MP3 CD TV TV Example: finding a track including the word “LOVE” TV/VIDEO TV/VIDEO SETUP SETUP DIMMER DIMMER SLEEP SLEEP CLOC CLOCK / PL AY/ AUTO OFF O OFF TIMER... -
Page 22: Playing Highmat Discs
WMA/MP3, CD text and JPEG navigation menus www.DataSheet4U.com Playing HighMAT discs TV TV TV/VIDEO TV/VIDEO SETUP SETUP DIMMER DIMMER Play HighMAT discs as HighMAT discs (A page 36, Others– SLEEP SLEEP CLOC CLOCK / PL AY/ AUTO OFF O OFF TIMER IMER HighMAT). -
Page 23: Using Gui (Graphical User Interface) Screens
Using GUI (Graphical User Interface) screens www.DataSheet4U.com Press [8 8 8 8 8 , 9 9 9 9 9 ] to select the setting. • Items with “8” or “9” above and below can be changed by TV TV [8, 9]. TV/VIDEO TV/VIDEO SETUP SETUP... -
Page 24: Disc Information/Unit Information
Using GUI (Graphical User Interface) screens www.DataSheet4U.com Unless otherwise indicated, select items with [/, -] and change with [8, 9]. Disc information Digital 1 ENG 1 : 46 : 50 1 ENG 3/2.1 ch Page Slideshow Slideshow Vocal 128kbps ON 0 sec 12 18 Return 44.1kHz... - Page 25 www.DataSheet4U.com Display menu Picture menu x1.00 Normal 4:3 Aspect Picture mode RAM DVD-A DVD-V VCD JPEG • N: Normal mode RAM DVD-A DVD-V VCD JPEG • Select how to show images made for 4:3 aspect screens S: Soft mode (Soft picture with fewer video artifacts) •...
-
Page 26: The Radio
The radio www.DataSheet4U.com AM allocation setting For the Middle East, South Africa and Southeast Asia Main unit only /REW/ By adjusting the allocation, you can enable this tuner to receive AM /FF/ broadcasts allocated in 10 kHz steps. TUNER BAND Press [TUNER BAND] to select “FM”. -
Page 27: Cassette Tapes
Cassette tapes www.DataSheet4U.com To stop tape playback Press [L STOP] (remote control: [L]). To select the reverse mode While TAPE is selected as the source DECK 1/2 Press and hold [PLAY MODE] on the remote control. Every time you press and hold the button: /REW/ /FF/ STOP... -
Page 28: Sound Field
Sound field www.DataSheet4U.com VK90D VK80D L L L L L To down-mix Dolby Digital or DTS (multiple-channel) signals to 2 channels Press [SHIFT]+[MIX 2CH]. VK90D VK80D SUPER VOLUME SURROUND DOWN, UP To cancel, press [SHIFT]+[MIX 2CH] again. VK70D DVD/CD ADVANCED When “NO DOWN MIX”... -
Page 29: Super Surround/Advanced Surround
Change settings www.DataSheet4U.com Center Focus Balance You can adjust the balance of the front speakers. VK90D VK80D 1 Press [SHIFT]+[CH SEL] to select “L” or “R”. (Discs where the dialogue is recorded in the center channel) 2 Press [/ / / , - - - ]. -
Page 30: Sound Quality
Sound quality www.DataSheet4U.com TV/VIDEO SETUP DIMMER SLEEP CLOCK / PL AY/ AUTO OFF TIMER Changing sound field and quality DISC ECHO DOUBLE SUPER Press [SOUND EQ] to select a setting. RE-MASTER PROGRAM V.MUTE SUBTITLE AUDIO SOUND EQ Each time you press the button: PLAY MODE MIX 2CH S.POS... -
Page 31: Recording
Recording www.DataSheet4U.com Select the source to be recorded. Radio recording: Tune in the station. (A page 26) Disc recording: Insert the disc(s) you want to record. Press [-/J DVD/CD] (remote control: [- DVD/CD]) and then /REW/ [L STOP] (remote control: [L]). /FF/ Prepare the desired disc recording mode. -
Page 32: (For The Middle East, South Africa And Southeast Asia) Enjoying Karaoke
Enjoying karaoke www.DataSheet4U.com (For the Middle East, South Africa and Southeast Asia) V. MUTE function: Remote control only Use this function when enjoying sources not formatted for karaoke. The voice portion of the track is blocked out but not the background music. -
Page 33: Enjoying Karaoke With Other Karaoke Sources
www.DataSheet4U.com Enjoying karaoke with other karaoke Adding an echo effect sources Remote control only Press [SHIFT]+[ECHO]. Each time you press the button: RAM VCD CD WMA MP3 TUNER CASSETTE AUX ECHO 1 → ECHO 2 → ECHO 3 → ECHO 4 → ECHO OFF (off) Preparation: ↑... -
Page 34: Using The Timers
Using the timers www.DataSheet4U.com To cancel the timer Press [rPLAY/REC] to clear the timer indicator from the display. TV TV PLAY/REC TV/VIDEO TV/VIDEO SETUP SETUP DIMMER DIMMER SLEEP SLEEP CLOC CLOCK / PL AY/ (The timer comes on at the set time everyday if the timer is on.) AUTO OFF O OFF TIMER... -
Page 35: Convenient Functions
Convenient functions www.DataSheet4U.com Muting the volume Remote control only Press [MUTING]. Headphones (not included) VOLUME DOWN, UP Volume is reduced to minimum. DISPLAY To cancel PHONES Press [MUTING] again or reduce the volume to minimum (--dB), then raise it to the required level. Muting is also canceled when you switched the unit to standby. -
Page 36: Changing Settings
Changing settings www.DataSheet4U.com This chart shows the settings for this unit. Change the settings to suit your preferences and to suit the unit to the environment in which it is being used. These settings are retained in memory until they are changed, even if the unit is turned off. See page 37 for details on menu operation. •... -
Page 37: Common Procedures/Entering A Password (Ratings)
www.DataSheet4U.com Entering a password (Ratings) TV TV DVD-V TV/VIDEO TV/VIDEO SETUP SETUP DIMMER DIMMER SLEEP SLEEP CLOC CLOCK / PL AY/ AUTO OFF O OFF TIMER IMER The password screen is shown when you select levels 0 to 7. SETUP DISC DISC ECHO... -
Page 38: Digital Output/Optional Antenna Connections
Changing settings www.DataSheet4U.com Digital output Optional antenna connections VK70D Use outdoor antenna if radio reception is poor. RAM DVD-A DVD-V VCD CD WMA MP3 FM outdoor antenna Change the settings when you have connected equipment through this unit’s OPTICAL OUT terminal. PCM Digital Output FM outdoor antenna (not included) -
Page 39: Using Other Equipment
Using other equipment www.DataSheet4U.com Before connection • Disconnect the AC power supply cord. • Turn off all equipment and read the appropriate operating instructions. • The equipment connections described are examples. • Peripheral equipment and optional cables sold separately unless otherwise indicated. Home Theater—Enjoying more powerful Using an external unit sound... -
Page 40: Troubleshooting Guide
Troubleshooting guide www.DataSheet4U.com Before requesting service, make the below checks. If you are in doubt about some of the check points, or if the remedies indicated in the chart do not solve the problem, consult your dealer for instructions. Power Page •... - Page 41 www.DataSheet4U.com Sound • Check the connections. No sound. • Distorted sound. Turn the volume up. — • Turn muting off. • Switch off the unit, determine and correct the cause, then switch the unit on. — Causes include: – Shorting (bare wires touching) of positive and negative speaker wires. –...
-
Page 42: Safety Precautions/Maintenance
Troubleshooting guide www.DataSheet4U.com Unit displays • Press [SHIFT]+[DIMMER] to brighten the display. The display is dark. • You inserted a disc the unit cannot play; insert one that can. “NO PLAY” • You inserted a blank DVD-RAM. — • You haven’t inserted a disc; insert one. —... -
Page 43: Specifications
Specifications www.DataSheet4U.com AMPLIFIER SECTION CASSETTE DECK SECTION VK90D Track system 4 Track, 2 Channel RMS Output Power both channel driven: 10 % Total Harmonic Heads Distortion Record/playback Solid permalloy head 80 W per channel (6 Ω) 1 kHz Front–HI CH Erasure Double gap ferrite head 60 W (12 Ω) - Page 44 Digital Surround” are registered trademarks of Digital Theater otherwise authorized by Macrovision Corporation. Reverse Systems, Inc. Copyright 1996, 2000 Digital Theater Systems, engineering or disassembly is prohibited. Inc. All rights reserved. Matsushita Electric Industrial Co., Ltd. Web Site: http://www.panasonic.co.jp/global/ RQT7125-3B L0503KE3073...