Table of Contents
Advertisement
Quick Links
Advertisement
Table of Contents

Related Manuals for Zanussi ZOB30601XU


Summary of Contents for Zanussi ZOB30601XU
- Page 1 User Manual GETTING STARTED? EASY. ZOB30601XU EN User Manual Oven...
-
Page 2: Safety Information
SAFETY INFORMATION Before the installation and use of the appliance, carefully read the supplied instructions. The manufacturer is not responsible for any injuries or damages that are the result of incorrect installation or usage. Always keep the instructions in a safe and accessible location for future reference. -
Page 3: Safety Instructions
Ensure that the appliance is switched off before replacing the • lamp to avoid the possibility of electric shock. Do not use a steam cleaner to clean the appliance. • Do not use harsh abrasive cleaners or sharp metal scrapers to •... -
Page 4: Internal Light
and moisture can build up behind a closed furniture panel and cause subsequent damage WARNING! Risk of injury, burns and to the appliance, the housing unit or the floor. electrical shock or explosion. Do not close the furniture panel until the appliance has cooled down completely after •... -
Page 5: Product Description
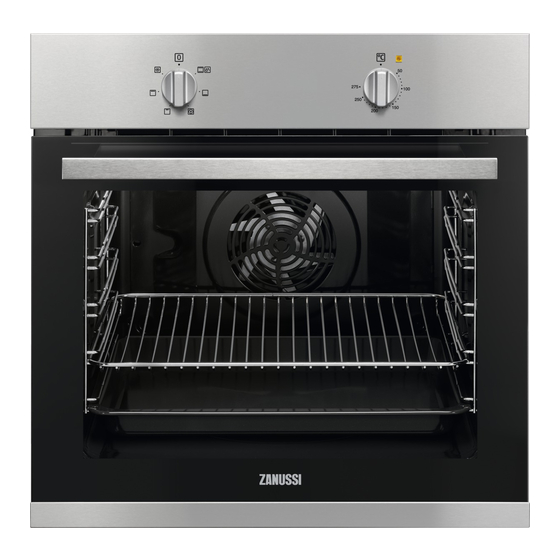
SERVICE • Use original spare parts only. • To repair the appliance contact an Authorised Service Centre. PRODUCT DESCRIPTION GENERAL OVERVIEW Control panel Knob for the oven functions Knob for the temperature Temperature indicator / symbol Heating element Lamp Aqua cleaning container Shelf support, removable Shelf positions ACCESSORIES... -
Page 6: Daily Use
DAILY USE 1. Turn the knob for the oven functions to select WARNING! Refer to Safety chapters. an oven function. 2. Turn the knob for the temperature to select a temperature. 3. To deactivate the appliance, turn the knobs for ACTIVATING AND DEACTIVATING THE the oven functions and temperature to the off APPLIANCE... -
Page 7: Additional Functions
Push the shelf between the guide bars of the shelf Wire shelf and deep pan together: support and make sure that the feet point down. Push the deep pan between the guide bars of the shelf support and the wire shelf on the guide bars above. - Page 8 • Clean the moisture after each use of the • Leave the meat for approximately 15 minutes appliance. before carving so that the juice does not seep • Do not put the objects directly on the appliance out. floor and do not put aluminium foil on the •...
- Page 9 Top / Bottom Heat True Fan Cooking Food Time (min) Comments Temperature Shelf posi- Temperature Shelf posi- (°C) tion (°C) tion Christmas 90 - 120 In a 20 cm cake / cake Rich fruit mould cake Plum 50 - 60 In a bread cake Small...
- Page 10 Top / Bottom Heat True Fan Cooking Food Time (min) Comments Temperature Shelf posi- Temperature Shelf posi- (°C) tion (°C) tion Eclairs - 2 and 4 35 - 45 In a baking two levels tray Plate tarts 45 - 70 In a 20 cm cake mould...
- Page 11 Flans Top / Bottom Heat True Fan Cooking Food Time (min) Comments Temperature Shelf posi- Temperature Shelf posi- (°C) tion (°C) tion Pasta flan 40 - 50 In a mould Vegetable 45 - 60 In a mould flan 50 - 60 In a mould Quiches 180 - 190...
- Page 12 Top / Bottom Heat True Fan Cooking Food Time (min) Comments Temperature Shelf posi- Temperature Shelf posi- (°C) tion (°C) tion Lamb 110 - 130 Chicken 70 - 85 Whole Turkey 210 - 240 Whole Duck 120 - 150 Whole Goose 150 - 200 Whole...
- Page 13 Quantity Time (min) Temperature Shelf posi- Food (°C) tion Pieces 1st side 2nd side Beef max. 10 - 12 6 - 8 steaks Sausages max. 12 - 15 10 - 12 Pork max. 12 - 16 12 - 14 chops Chicken 1000 max.
-
Page 14: Drying - True Fan Cooking
DRYING - TRUE FAN COOKING • For a better result, stop the oven halfway through the drying time, open the door and let it • Cover trays with grease proof paper or baking cool down for one night to complete the drying. parchment. -
Page 15: Stainless Steel Or Aluminium Appliances
STAINLESS STEEL OR ALUMINIUM 2. Set the function: APPLIANCES 3. Set the temperature to 90 °C. 4. Let the oven operate for 30 minutes. Clean the oven door with a damp cloth 5. Turn off the oven and let it cool down. or sponge only. -
Page 16: Replacing The Lamp
8. Clean the glass panel with water and soap. Dry the glass panel carefully. When the cleaning is completed, install the glass panel and the oven door. Do the above steps in the opposite sequence. The screen-printing zone must face the inner side of the door. -
Page 17: Troubleshooting
TROUBLESHOOTING WARNING! Refer to Safety chapters. WHAT TO DO IF... Problem Possible cause Remedy The oven does not heat up. The oven is deactivated. Activate the oven. The oven does not heat up. The fuse is blown. Make sure that the fuse is the cause of the malfunction. -
Page 18: Electrical Installation
The earth cord (green / yellow cable) must be 2 cm +/-1 longer than phase and neutral cables (blue and brown cables). SECURING THE APPLIANCE TO THE CABINET ENERGY EFFICIENCY PRODUCT FICHE AND INFORMATION ACCORDING TO EU 65-66/2014 Supplier's name Zanussi... -
Page 19: Environmental Concerns
Model identification ZOB30601XU Energy Efficiency Index 100.0 Energy efficiency class Energy consumption with a standard load, conventional 0.93 kWh/cycle mode Energy consumption with a standard load, fan-forced mode 0.85 kWh/cycle Number of cavities Heat source Electricity Volume 72 l Type of oven... - Page 20 WWW.ZANUSSI.COM/SHOP...