Table of Contents
Advertisement
Quick Links
Advertisement
Table of Contents

Related Manuals for LG Boost Mobile LS770


Summary of Contents for LG Boost Mobile LS770
- Page 1 LS770 User Guide UG template 13b_Boost...
-
Page 2: Table Of Contents
Table of Contents Get Started ..........................1 Your Phone at a Glance ...................... 1 Set Up Your Phone ......................1 Install the Battery ......................1 Charge your Battery ..................... 1 Activation and Service ......................1 Create Your Account and Pick Your Plan ..............2 Activate Your Phone .................... - Page 3 Enter Text With the On-screen Keyboard ................18 Phone Calls ..........................21 Make Phone Calls ......................21 Call Using the Phone Dialer ..................21 Call from Call Logs .....................21 Call from Contacts ......................22 Call Using a Speed Dial Number ................22 Call a Number in a Text Message or Email Message ..........22 Call Emergency Numbers ...................22 Receive Phone Calls ......................23 Voicemail ...........................24...
- Page 4 TTY Mode ........................36 Contacts............................37 Get Started with Contacts ....................37 Access Contacts ......................37 The Contacts List ......................38 Contacts List Options ....................38 Add a Contact ........................39 Save a Phone Number .......................40 Edit a Contact Entry ......................40 Communicate with Your Contacts ..................43 Import, Export, and Share Contacts ...................45 Import Contacts From Your Internal Storage ...............45 Export Contacts to Your Internal Storage ..............45 Share a Contact ......................45...
- Page 5 New Messages Notification ..................59 Manage Message Conversations ................59 Text and Multimedia Message Options ...............61 Social Networking Accounts ....................63 Facebook ........................63 Google Hangouts ......................64 Apps and Entertainment ......................66 Google Play Store ......................66 Find and Install an App ....................66 Create a Google Wallet Account .................67 Request a Refund for a Paid App ................67 Open an Installed App ....................68 Uninstall an App ......................68...
- Page 6 Browser ..........................76 Launch the Web Browser....................76 Learn to Navigate the Browser ...................76 Browser Menu ......................77 Select Text on a Web Page ..................78 Go to a Specific Website.....................78 Adjust Browser Settings ....................79 Create Website Settings .....................79 Reset the Browser to Default ..................79 Set the Browser Home Page ..................80 Create Bookmarks ......................80 Create a New Homepage ...................80...
- Page 7 Unmount the microSD Card ..................101 Use the Phone's microSD Card as a USB Drive ............101 Transfer User Contents From an Android Phone to Your LG LS770 ........ 102 Transfer Via PC or Laptop ..................102 Update Your Phone ......................103 Update Your PRL .....................
- Page 8 Incoming Voice Call Pop-up ..................106 Call Reject ........................ 107 Decline with Message ....................107 Privacy Keeper ......................107 Auto Answer ......................107 TTY Mode ......................... 107 Hearing Aids ......................108 Proximity Sensor ...................... 108 Voice Clarity ......................108 Save Unknown Numbers ..................109 Power Key Ends Call ....................
- Page 9 Accessibility ......................127 System Updates ....................... 129 Printing ........................130 About Phone ......................130 Important Information for the LG LS770 .................. 132 IMPORTANT SAFETY INFORMATION ................132 General Precautions ....................132 Maintaining Safe Use of and Access to Your Phone ..........132 Using Your Phone With a Hearing Aid Device ............
- Page 10 Roaming ........................147 About Data Services & Content ................147 Specific Terms & Restrictions On Using Data Services..........147 Software License ...................... 148 Fees, Activation & Miscellaneous Charges ............... 148 Usage Charges ......................148 Types of Charges ..................... 149 How We Calculate Your Charges ................149 Taxes &...
-
Page 11: Get Started
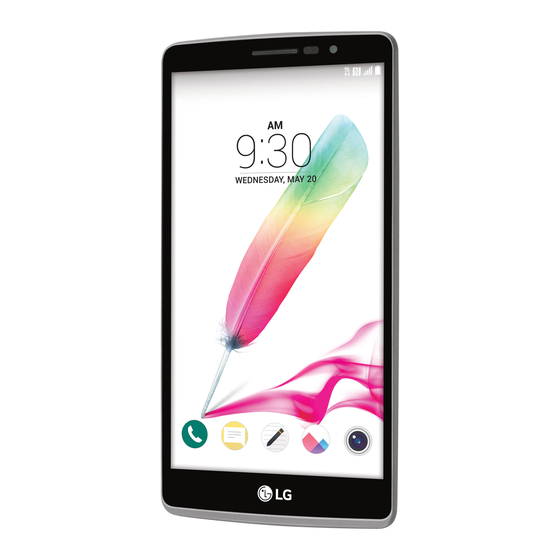
Get Started The following topics give you all the information you need to set up your phone and service the first time. Your Phone at a Glance The following illustration outlines your phone's primary external features and buttons. Set Up Your Phone You must first install and charge the battery to begin setting up your phone. -
Page 12: Create Your Account And Pick Your Plan
Create Your Account and Pick Your Plan Set up your Boost Mobile account. 1. From your computer, visit boostmobile.com/activate. 2. Enter your phone’s MEID and click start activation process. Your phone’s MEID (serial number) is printed on the sticker located on the back of your phone in the battery compartment. -
Page 13: Re-Boost
● Dial (#BAL) to check account balance. ● Dial (#ADD) to make a payment. ● Dial to launch Boost Zone or call Boost Customer Care (depending on your Settings) to get answers to other questions. From Your Computer ■ Log in with your wireless phone number and account PIN at boostmobile.com. From Any Other Phone ■... -
Page 14: Set Up Voicemail
Note: You may be able to complete the setup screens before your phone has been activated on your account. Note: During or after setup, you may see a Connections Optimizer notice. Read the notice and touch I Agree to allow your phone to connect automatically to the best available data network, including Wi-Fi. - Page 15 Important: Voicemail Password – It is strongly recommended that you create a password when setting up your voicemail to protect against unauthorized access. Without a password, anyone who has access to your phone is able to access your voicemail messages. For more information about voicemail, see Voicemail Visual...
-
Page 16: Phone Basics
Phone Basics Your phone is packed with features that simplify your life and expand your ability to stay connected to the people and information that are important to you. The following topics will introduce the basic functions and features of your phone. Your Phone's Layout The illustrations and descriptions below outline your phone's basic layout. -
Page 17: Turn Your Phone On And Off
● Flash helps illuminate subjects in low-light environments when the camera is focusing and capturing a picture or video. ● Back-Facing Camera Lens lets you take pictures and videos. ● 3.5 mm Headset Jack allows you to plug in either a stereo headset or an optional headset for convenient, hands-free conversations. -
Page 18: Touchscreen Navigation
If you have set up a screen lock, you will be prompted to draw the pattern or enter the password or PIN. See Select Screen Lock. Turn the Screen On Using the KnockOn Feature The KnockON feature allows you to double-tap the screen to easily turn the screen on or off. ●... -
Page 19: Lock And Unlock Your Phone
Flick Flicking the screen is similar to swiping, except that you need to swipe your finger in light, quick strokes. This finger gesture is always in a vertical direction, such as when flicking the contacts or message list. Rotate For most screens, you can automatically change the screen orientation from portrait to landscape by turning the phone sideways. -
Page 20: Your Home Screen
Note: The default Lock screen simply locks the screen to prevent unintentional actions. For more security to guard against unauthorized use, you can set an unlock requirement (such as a pattern, PIN, or password) that will need to be entered to unlock it. Your Home Screen The home screen is the starting point for your phone's applications, functions, and menus. -
Page 21: Customize Your Home Screen
Customize Your Home Screen You can customize your Home screen when you do the following. ● Create Shortcuts ● Add Widgets ● Create Contact shortcuts ● Change the Background (Wallpaper) ● Customize Application Icons Create Shortcuts Shortcuts are different from the Home screen Widgets. Shortcuts can access a specific contact, activate a feature, action, or launch an application. -
Page 22: Add And Remove Widgets On The Home Screen
To delete a shortcut: 1. Tap to access the Home screen. 2. Touch and hold the desired shortcut. This unlocks it from its location on the current screen. 3. Drag the icon over Remove and release it. Add and Remove Widgets on the Home Screen Widgets are self-contained applications that can be accessed through your Applications screen or on the Home or Extended screens. -
Page 23: Customize Applications Icons On The Home Screen
1. From the Home screen, tap > touch and hold > Home screen settings > Wallpaper. – or – Touch and hold an empty spot on the Home screen, then tap the Wallpapers tab. 2. Tap ID wallpapers, Live Wallpapers, Photos or Wallpapers gallery. ... -
Page 24: Access Recently-Used Applications
2. Tap the application icon again and select a preloaded icon sign. Access Recently-Used Applications Your phone keeps a running list of your most recently used applications. 1. Tap to open the recently-used applications window. 2. Tap an icon to open the related application. Home Screen Clean View You can see the wallpaper without items on the Home screen by pinching out. -
Page 25: Quick Access
Quick Access To view the quick access items, touch anywhere in the front key area and drag up. The following options are available: Google Now. Change the Screen Orientation This phone is capable of changing the orientation of screen content when the orientation of the phone itself has changed. - Page 26 Status Icons Icon Status Signal Strength – Shows your current signal strength (the more bars there are, the stronger the signal is). No Service – Your phone cannot find a usable signal. 4G LTE Connected – Indicates that 4G LTE data service is available. 4G LTE In Use –...
- Page 27 Notification Icons Icon Notification New Gmail Message – Indicates a new Gmail message. New Email – Indicates a new Email message. New Text or Multimedia Message – Indicates you have received a new text or multimedia message. High Priority Text or Multimedia Message - Indicates you have received a high priority text or multimedia message.
-
Page 28: Enter Text With The On-Screen Keyboard
By default, there are 2 types of touchscreen keyboards: QWERTY keyboard and Phone keyboard. To change the keyboard between QWERTY keyboard and Phone keyboard. 1. Touch on the LG Keyboard. 2. Tap Input language and keyboard layout, then tap next to the desired input language. - Page 29 1. Tap a text field where you want to enter text. 2. Enter the desired text. To enter numbers, symbols, and emojis, tap To enter letters again, tap Note: If you do not want the screen to change orientations automatically, uncheck the Auto- rotate screen.
- Page 30 Phone Keyboard To enter text, tap the key labeled with the desired letter until it appears on the screen. For example, tap once for "a", twice for "b", or three times for "c". Phone Basics...
-
Page 31: Phone Calls
Phone Calls With mobile service and your phone's calling features, you can enjoy clear phone calls across the country. Make Phone Calls There are several convenient ways to place calls from your phone. Call Using the Phone Dialer The most ―traditional‖ way to place a call is by using the phone's dialer screen. 1. -
Page 32: Call From Contacts
2. Touch Call logs to display the Call logs list. 3. Touch an entry to display the call details. 4. Touch the phone icon to place a call. Call from Contacts You can place phone calls directly from entries in your Contacts list. 1. -
Page 33: Receive Phone Calls
1. Unlock the screen. For more information, see Turn Your Screen On and Off. 2. Tap > 3. Touch Enhanced 9-1-1 (E911) Information This phone features an embedded Global Positioning System (GPS) chip necessary for utilizing E911 emergency location services where available. When you place an emergency 9-1-1 call, the GPS feature of your phone seeks information to calculate your approximate location. -
Page 34: Voicemail
Reject an Incoming Call ■ Swipe the decline call icon in any direction to reject the call. The call will be sent directly to voicemail. Reject a Call and Send a Text Message You can reject an incoming call and automatically send a text message to the caller. ■... -
Page 35: Retrieve Your Voicemail Messages
● By sounding the assigned ringer type. ● By displaying within the Notifications area of the Status bar when a single new unheard voicemail message is received. Note: When you are off network, you may not receive notification of new voicemail messages. It is recommended that you periodically check your voicemail by dialing 1 + area code + your wireless phone number. -
Page 36: Visual Voicemail
Visual Voicemail Visual Voicemail gives you a quick and easy way to access your voicemail. Now you can find exactly the message you are looking for without having to listen to every voicemail message first. This new feature periodically goes out to your voicemail, and gathers the caller information from all of the current voicemails. -
Page 37: Listen To Multiple Voicemail Messages
1. Tap > > Voicemail . You will see the voicemail inbox. 2. Touch a message to review it. Tip: There are several icons at the bottom of the review screen for maintenance, storage, messaging, and other options. For an explanation of all your options, touch >... -
Page 38: Configure Visual Voicemail Settings
Subscribe to subscribe to the premium Voice-to-Text transcription service. (Requires an additional monthly charge.) Delete to delete selected messages from your current list of available voicemail messages. Call to call the number the message came from. Share to share the message with others. -
Page 39: Change Your Main Greeting Via The Voicemail Menu
Send feedback to send some feedback to the Voicemail Feedback team. Updates to search for an upgrade to your Visual message software. About Voicemail to view build information about the current visual voicemail application. Note: Voicemail settings can also be accessed by tapping >... -
Page 40: In-Call Options
In-call Options While you're on a call, you will see a number of onscreen options. Touch an option to select it. ● Add call: Touch to initiate a conference call (3-way call). ● Merge calls: Join two currently active calls (conference). ●... -
Page 41: Caller Id
Note: The Headset button is activated to show the current call is routed to the connected Bluetooth headset. To route the current call back to the phone, touch Bluetooth to temporarily use the phone. Touch it again to route the call back to the connected Bluetooth headset. ... -
Page 42: Conference Calling
To switch back to the first caller: ■ Touch Swap calls. Note: For those calls where you don't want to be interrupted, you can temporarily disable Call Waiting by pressing before placing your call. Call Waiting is automatically reactivated once you end the call. Conference Calling With conference calling, also known as 3-way calling, you can talk to two people at the same time. -
Page 43: Call Forwarding
4. To end the three-way call, touch . To end only the last dialed call, touch Note: If one of the people you called hangs up during your call, you and the remaining caller stay connected. If you initiated the call and are the first to hang up, all callers are disconnected. Call Forwarding Call Forwarding lets you forward all your incoming calls to another phone number –... -
Page 44: Set Up Speed Dialing
Set Up Speed Dialing Your phone can store up to 99 phone numbers in speed dial locations. To assign a speed dial number to a contact: 1. Tap > 2. Touch and hold the contact whose phone number you want to store speed dial locations. 3. -
Page 45: Call Settings
Edit number before call to edit a number before you redial. Copy call number to copy the call number. Reject call to add to the call reject list. Delete call log to delete all the call logs. ... -
Page 46: Tty Mode
3. Configure your options. TTY Mode A TTY (teletypewriter, also known as a TDD or Text Telephone) is a telecommunications device that allows people who are deaf, hard of hearing, or who have speech or language disabilities, to communicate by telephone. Your phone is compatible with select TTY devices. -
Page 47: Contacts
Contacts The Contacts application lets you store and manage contacts from a variety of sources, including contacts you enter and save directly in your phone as well as contacts synchronized with your Google Account, your PC, compatible email programs (including Exchange Server), and your Facebook friends. -
Page 48: The Contacts List
The Contacts List Learn how to view and navigate through your phone's Contacts list. ■ Tap > > . You will see the Contacts list. Contacts List: The Contacts list displays all contacts currently stored in your phone, including Google contacts, Exchange ActiveSync contacts, Phone contacts, and Facebook contacts. -
Page 49: Add A Contact
Speed dial: Allows you to add a speed dial to your contacts. Manage contacts • Copy contacts: Allows you to copy contacts from one account to another. • Import/Export: Allows you to import and export contacts. • Join contacts: Allows you to join contacts to avoid duplicate entries for the same contact. -
Page 50: Save A Phone Number
5. When you have finished adding information, touch Save. Save a Phone Number You can save a phone number to Contacts directly from the phone dialpad. 1. Tap > 2. Enter a phone number. 3. To add the number to an existing contact, touch Update contact. To add a new contact, touch New contact. - Page 51 from the Google Account are synced to that account on the web, but the information from the Exchange account will remain unchanged. Edit a Contact 1. Tap > > 2. Touch and hold the contact whose details you want to edit. 3.
- Page 52 If the contact contains information from a read-only account, you will not be able to delete it; you will only be able to change the sync settings for that account or delete the account itself. If the contact contains information joined from a read-only account, a dialog box will inform you that you must separate the contact entry into individual contacts to delete the contact.
-
Page 53: Communicate With Your Contacts
Note: If there is no available space on a particular Home screen canvas, you must delete or remove an item before you can add another item. In this case, you have the option of switching to another Home screen canvas. Use Direct Dial To use Direct Dial, simply tap the contact on the Home screen. - Page 54 1. Tap a contact's picture to open Quick Contact for Android. 2. Tap the icon corresponding to the type of communication you want to start. Depending on the contact information saved, the available actions will be displayed above the name. To communicate with a contact: 1.
-
Page 55: Import, Export, And Share Contacts
For more information about sending text and multimedia messages, see Text and Multimedia Messaging. Import, Export, and Share Contacts If you have contacts stored in vCard format on the phone's internal storage, you can import them into your Contacts application on your phone. You can also export contacts in vCard format onto the phone internal storage. -
Page 56: Join And Separate Contacts
2. Open the contact you want to share. 3. Tap > Share. 4. Choose the method for sending. Join and Separate Contacts When you have two or more entries for the same contact, you can join them into a single entry. You can also separate contacts that were joined. -
Page 57: Accounts And Messaging
Accounts and Messaging With wireless service and your phone's messaging capabilities, you have the opportunity to share information through many different channels and accounts, including Gmail (Google), personal and corporate email, text and multimedia messaging, social networking accounts, and Google Hangouts™. Gmail/Google You will need a Google Account to access several phone features such as Gmail, Google Maps, Hangouts, and the Google Play applications. -
Page 58: Sign In To Your Google Account
Note: When setting up a new Google Account, either on your phone or online, you will be prompted to add a secondary email address. Enter a second Gmail address or any other email address from which you currently send and receive email. This address is used to authenticate your account should you ever encounter problems or forget your password. -
Page 59: Send A Gmail Message
Send a Gmail Message Use your phone to send Gmail messages. 1. Tap > > Google > Gmail 2. In the inbox, touch 3. Enter the message recipient's email address in the To field. If you are sending the email message to several recipients, separate the email addresses with a comma. -
Page 60: Email
4. After composing your message, touch Send Email Use the Email application to send and receive emails from your webmail or other accounts, using POP3 or IMAP, or access your Exchange ActiveSync account for your corporate email needs. Although there is a separate Gmail application, the Email application can manage both Internet based email services (Gmail™... -
Page 61: Corporate Email (Outlook)
If this is your first time to add an email account, tap Yahoo or Other on the Select email provider screen. If you have already added an email account in Email, tap > Settings > Add account . If the Select email provider screen is displayed, tap Other. 3. -
Page 62: Open Email
If your network requires SSL encryption, tap the Use secure connection (SSL) box to place a checkmark and activate this additional level of security. If your exchange server requires this feature, leaving this field unchecked can prevent connection. Note: Signal interruptions or incorrect username or password information can cause completion issues. -
Page 63: Create And Send Email
Create and Send Email Create and send email using any account you have set up on your phone. Increase your productivity by attaching files such as pictures, videos, or documents to email messages. 1. From the Inbox, tap 2. Enter the recipient's email address in the To field. ... - Page 64 Sync Your Accounts 1. Tap > touch and hold > System settings > Accounts & sync. 2. Tap Microsoft Exchange, then select the Corporate account to reveal the account's synchronization settings screen. 3. If you want to manually synchronize, tap >...
- Page 65 Security settings: Set digital signatures and encryption to secure email. Corporate directory: Searches online directory for the recipient input. Server policy: View the server policy currently applied. Notifications: Allows you to decide whether to notify you of new email. •...
-
Page 66: Text And Multimedia Messaging
VIP settings: Settings for only VIP contacts. Trusted certificates: Trusted certificate information is available. 4. Tap to return to the previous screen. Text and Multimedia Messaging With Text Messaging (SMS), you can send and receive instant text messages between your wireless phone and another messaging-ready phone. -
Page 67: Send A Multimedia Message (Mms)
Note: A counter appears in the text box to tell you how many characters you have entered and how many characters are left. Once you go over the 160-character limit, a new message is created but automatically joined into one when received. 5. -
Page 68: Save And Resume A Draft Message
6. In the Attach window, select the file attachments. 7. Touch Send MMS to send the MMS message. Create a Slideshow In a multimedia message, you can add slides, each containing a picture, video, or audio. 1. In the multimedia message you're composing, touch >... -
Page 69: New Messages Notification
2. Touch the message with the icon to resume editing it. New Messages Notification Depending on your notification settings, the phone will play a ringtone, vibrate, or display the message briefly in the Status Bar when you receive a new text or multimedia message. To change the notification for new text and multimedia messages, see Text and Multimedia Message Options... - Page 70 View a Multimedia Message (MMS) 1. Tap > > Messaging 2. On the Messaging screen, touch a multimedia message or message thread to open it. 3. Touch the attachment to open it. If the attachment is a vCard contact, it is imported to your phone's contacts list.
-
Page 71: Text And Multimedia Message Options
Delete a Single Message 1. While viewing a message thread, touch and hold the message that you want to delete. 2. Touch Delete on the options menu. 3. When prompted to confirm, touch Yes. If the message is locked, you will be prompted that the locked message will be deleted. - Page 72 ● Storage Delete old messages: Enable this option to delete older text messages when the limit for maximum number of text messages is exceeded. • Text message limit: Sets the maximum number of text messages that can be stored on the phone (per conversation). •...
-
Page 73: Social Networking Accounts
Notifications: Enable this option if you wish to receive a notification in the Status Bar when a new text or multimedia message arrives. • New message pop-up: Enable this option if you wish to see a new message as a pop-up. -
Page 74: Google Hangouts
Install the Facebook App on Your Phone Before you use Facebook on your phone, you must download and install the app from the Google Play Store app. 1. Tap > > Play Store 2. Touch the Search icon and search for "facebook". 3. - Page 75 4. Tap Accounts and Messaging...
-
Page 76: Apps And Entertainment
Apps and Entertainment All your phone's features are accessible through the Apps list. Note: Available applications and services are subject to change at any time. Google Play Store Google Play™ is the place to go to find new Android apps, books, movies, and music for your phone. -
Page 77: Create A Google Wallet Account
Note: You need a Google Wallet account to purchase items on Google Play. See Create a Google Wallet Account to set up a Google Wallet account if you do not have one. 6. The subsequent screen notifies you whether the app will require access to your personal information or access to certain functions or settings of your phone. -
Page 78: Open An Installed App
Open an Installed App There are options for opening an installed app. ■ Tap > , locate the app, and then touch its icon. – or – 1. Tap > > Play Store 2. Touch > My Apps > INSTALLED tab. 3. -
Page 79: Music
2. Touch the switch to turn Location services ON. Mode: Select High accuracy (GPS and networks), Battery saving (Networks only), Device sensors only (GPS only), or Accelerated location. Recent Location Requests: Displays apps that have recently requested your location information. -
Page 80: Web And Data
Web and Data Your phone's data capabilities let you wirelessly access the Internet or your corporate network through a variety of connections, including Wi-Fi, 4G LTE, Data Services (3G Network), and Virtual Private Networks (VPN). The following topics address your phone's data connections and the built-in Web browser. Additional data-related features can be found in Accounts and Messaging,... -
Page 81: Add A Wi-Fi Network
When you're connected to a network, you can tap the network name in the Wi-Fi settings screen for details about the speed, security, address, and related settings. To receive notifications when open networks are in range: By default, when Wi-Fi is on, you receive notifications in the Status Bar when your phone detects an open Wi-Fi network. -
Page 82: Wi-Fi Direct
● Connect by WPS button: Set up a connection to a WPS (Wi-Fi Protected Setup) router or other equipment. ● Connect by WPS PIN: View the PIN used by your device to set up a PIN-secured connection to a Wi-Fi router or other equipment. ●... -
Page 83: Your Data Services User Name
For more information about the availability of 4G LTE in your location, visit boostmobile.com/activate. Note: The availability and range of 4G LTE depends on a number of factors including your distance to the 4G LTE base station, and infrastructure and other objects through which the signal passes. -
Page 84: Virtual Private Networks (Vpn)
Your phone is connected to the 4G LTE network. When the signal bands are animated, your phone is scanning and connecting. During data transfer, the animated icon is not used (for example, when you are opening a Web page). When the signal bands are gray, your phone is connected to the network, signal is weak. When both the bands and the 4G LTE icon are gray, you there is no coverage and you are disconnected from the 4G LTE network. -
Page 85: Add A Vpn Connection
5. Touch and select Install from storage to install saved credentials. You can then download and install the certificates needed to access your local network. Your network administrator can tell you how to do this. Add a VPN Connection Use the Wireless & networks settings menu to add a VPN connection to your phone. 1. -
Page 86: Browser
Browser Your phone's Web browser gives you full access to both mobile and traditional websites on the go, using 3G, 4G LTE, or Wi-Fi data connections. Launch the Web Browser Launching the browser is as easy as touching an icon. ■... -
Page 87: Browser Menu
To zoom out: 1. Place your thumb and index finger on the screen. 2. Bring them together (pinch) to zoom out. Go Back To go back one page: ■ Touch on your phone. Repeat this process to keep going back through your Web page history of recently visited pages. -
Page 88: Select Text On A Web Page
● Share: Allows you to send a URL via any supported apps. ● Find on page: Allows you to search the current Web page for a word. ● Desktop view: Allows you to view the current page in desktop view. ●... -
Page 89: Adjust Browser Settings
Adjust Browser Settings You can control many of the settings for your browser through the browser settings menu, including general page settings, privacy and security, accessibility settings, advanced settings such as JavaScript and plug-ins, and bandwidth management. 1. Tap > >... -
Page 90: Set The Browser Home Page
Set the Browser Home Page Customize your Web experience by setting your browser's home page. 1. Tap > > Browser 2. From any open Web page, touch > Settings > General > Set homepage. 3. Select one of the available options and enter the necessary information. Create Bookmarks Make browsing easier by setting up and using custom bookmarks. - Page 91 2. Tap either the Bookmarks or History tab. 3. Touch and hold an entry from the list to display a context menu. 4. Tap Set as homepage to assign the selected entry as your new homepage. Web and Data...
-
Page 92: Camera And Video
Camera and Video You can use the camera or camcorder to take and share pictures and videos. Your phone comes with a 5 megapixel camera with an auto-focus feature that lets you capture sharp pictures and videos. Note: Be sure to clean the lens with a microfiber cloth before taking pictures. A lens cover with smudges from fingers can cause blurry pictures with a "halo"... -
Page 93: Camera And Video Settings
Cheese shutter: Allows you to take pictures with voice commands. When on, just say "Cheese", "Smile", "Whiskey", "Kimchi", or "LG" to take a picture. Timer: Set your camera's timer. This is ideal if you want to be a part of the picture or video. -
Page 94: Gesture Shot
Gesture Shot The Gesture shot feature allows you to take a picture with a hand gesture using the front camera. To take a photo, raise your hand, with an open palm, until the front camera detects it and a box appears on the screen. Then close your hand into a fist and a timer will start, allowing you time to get ready. -
Page 95: Tools And Calendar
Tools and Calendar Learn how to use many of your phone's productivity-enhancing features. Voice Command You can search for and dial a contact by speaking, rather than by manually dialing a contact or opening installed applications. Place a Call by Speaking 1. -
Page 96: Change Calendar View
Note: To go to any day in any Calendar view, tap > Go to date. Change Calendar View You can change the calendar view. ■ Tap > Day, Week, Month, Year, Agenda. Each view displays the events in your calendar for the period of time that you specify. ... - Page 97 Week View Month View Tools and Calendar...
- Page 98 Year View Agenda View Tools and Calendar...
-
Page 99: View Event Details
View Event Details You can view more information about an event in a number of ways, depending on the current view. ■ In Agenda, Day, Week view, Year view, or Month view, tap an event to view its details. Create an Event You can use the Calendar tool on your phone to create events that appear on your phone and in your Google Calendar on the web. -
Page 100: Edit Or Delete An Event
The event will be added to your Calendar. You can also access and configure the event from Google Calendar on the web. Edit or Delete an Event You can edit or delete an event that you created on the phone or on the web. You can also edit or delete events created by others, if they have given you permission. -
Page 101: Synchronize Calendars
1. If you receive notifications in the Status Bar, drag the Notifications Panel down to your notifications. Tap the event notification to open the list of Calendar notifications. 2. Tap an event in the Calendar Notifications list to view more information about that event. 3. -
Page 102: Folders
Clear search history: Allows you to remove all the searches you have performed. About Calendar: Display calendar application version. ● Open the Calendar, and tap > Settings > Event notification settings. Default reminder time: Allows you to select the default time set for event reminders. ... - Page 103 2. Tap an existing alarm to change its time and other attributes or tap Add alarm to add a new one. 3. Set the time of the alarm. You can change the time by scrolling up/down the hour and minute and AM/PM field or tap the hour and minutes fields to enter the time with the keyboard.
- Page 104 Change the Clock Settings 1. Tap > > Clock 2. Tap > Settings. 3. You can set the following options: Alarm in silent mode: Tap to place a checkmark and allow your phone to play alarms even when it is in Silent mode. ...
-
Page 105: File Manager
As you enter letters, the cities which starts from the letters are displayed. – or – Scroll through the cities list and tap the city. 4. You can add cities as many as you want. Repeat steps 2 and 3. Start Stopwatch 1. -
Page 106: Search In File Manager
● View by: Allows you to display your files as a List or in a Grid. ● Share: Allows you to select files and folders to share with others. ● Upload: Allows you to upload files to cloud storage. ● Zip: Allows you to select files and folders to compress into a .zip file. -
Page 107: Bluetooth Settings Menu
Bluetooth Status Indicators The following icons show your Bluetooth connection status at a glance: – Bluetooth is active – Bluetooth is connected Bluetooth Settings Menu The Bluetooth settings menu allows you to set up many of the characteristics of your phone's Bluetooth service. -
Page 108: Change The Device Name
Touch > Help to view help information for the Bluetooth feature. Change the Device Name The device name identifies your phone to other devices. 1. Tap > touch and hold > System settings > Bluetooth. 2. Touch > Edit phone name. 3. -
Page 109: Disconnect From A Bluetooth Device
Disconnect from a Bluetooth Device You can manually disconnect from a Bluetooth device through the Bluetooth settings menu. Disconnect a Paired Phone Disconnecting a paired device breaks the connection between the device and your phone, but retains the pairing. At a later point when you wish to reconnect the device, there is no need to setup the connection information again. -
Page 110: Microsd Card
When the call is routed to a Bluetooth headset, the Bluetooth button indicates it's on, and the Bluetooth call icon is displayed in the Status Bar. When Bluetooth is turned off, the call is routed through either the earpiece or speaker, the call area is surrounded by a green box, the Bluetooth button indicates it's off, and the Call icon is displayed in the Status Bar. -
Page 111: Format The Microsd Card
Format the microSD Card Formatting a microSD card permanently removes all files stored on the card. 1. Tap > touch and hold > System settings > Storage. 2. Scroll down the screen, touch Erase SD card > Erase SD card. 3. -
Page 112: Transfer User Contents From An Android Phone To Your Lg Ls770
Transfer User Contents From an Android Phone to Your LG LS770 If you want to transfer your user contents (i.e., pictures) from an Android phone to your LG LS770, you can perform one of the following steps. Transfer Via PC or Laptop You can transfer user contents via a desktop or laptop using a USB cable. -
Page 113: Update Your Phone
Update Your Phone From time to time, updates may become available for your phone. You can download and apply updates through the Settings > System updates menu. Update Your PRL This option allows you to download and update the PRL (preferred roaming list) automatically. 1. -
Page 114: Update Your Lg Software
This option allows you to update the Android Operating System (OS) on your phone via an over- the-air connection. 1. Tap > touch and hold > System settings > System updates > Update LG software. 2. Follow the onscreen instructions. Tools and Calendar... -
Page 115: Settings
Settings The following topics provide an overview of items you can change using your phone's Settings menus. Wireless Networks This group of settings lets you control your phone's Wi-Fi settings, Bluetooth, VPN, Mobile networks, and more. Airplane Mode Airplane Mode (Flight mode) allows you to use many of your phone's features, such as games and music when you are in an airplane or in any other area where making or receiving calls or data is prohibited. -
Page 116: Bluetooth Settings
Bluetooth Settings Your phone's Bluetooth capabilities let you use wireless headsets, send and receive pictures and files, and more. For details on your phone's Bluetooth settings, see Bluetooth Settings Menu. Mobile Data You can check the current data usage, set to enable/disable mobile data, or set the mobile data limit. -
Page 117: Call Reject
Call Reject You can set call rejection and manage the reject list. 1. Tap > touch and hold > System settings > Call > Call reject. 2. Tap Call reject mode and set an option. 3. Tap Reject calls from to set up the rejection list. Decline with Message You can send out a simple text message when you want to ignore an incoming call and respond to the caller with a text instead. -
Page 118: Hearing Aids
Turn TTY Mode On or Off 1. Tap > touch and hold > System settings > Call > TTY mode. 2. Tap TTY Off to turn TTY mode off or tap TTY Full, TTY HCO or TTY VCO to set a TTY mode. -
Page 119: Save Unknown Numbers
2. Tap the Voice clarity checkbox to turn it on. (A blue checkmark will appear.) Save Unknown Numbers You can set the phone to save the phone numbers not saved in Contacts yet. To save unknown numbers: 1. Tap > touch and hold >... -
Page 120: Bluetooth Tethering
2. Tap the Wi-Fi hotspot switch to activate it. After a moment, the phone starts broadcasting its Wi-Fi network name (SSID), so you can connect it with up to eight (8) computers or other phones. 3. To change the network name (SSID) or secure its Wi-Fi network, tap Set up Wi-Fi hotspot. -
Page 121: Vpn Settings
2. Tap the Mobile data checkbox to enable/disable the feature. 4G Settings Allows you to view your 4G LTE network provider and IP address. 1. Tap > touch and hold > System settings > More... > Mobile networks. 2. Tap 4G settings to check your network provider and IP address. Network Mode Allows you to choose your preferred network mode. -
Page 122: Ringtone & Vibration Settings
Sound Profile 1. Tap > touch and hold > System settings. 2. From the DEVICE section, tap Sound > Sound profile. 3. Tap one of the three options. To switch to silent mode: 1. Tap > touch and hold > System settings. 2. - Page 123 Ringtone The phone ringtones alert you of incoming calls. To select a ringtone for voice calls: 1. Tap > touch and hold > System settings. 2. From the DEVICE section, tap Sound > Ringtone. 3. Tap a ringtone to select it and to hear it. If you want to set the ringtone, tap OK. If not, select another ringtone or tap Cancel.
-
Page 124: Display Settings
Vibrate on Tap Vibrate when tapping the Home touch buttons and during other UI interactions. 1. Tap > > Settings 2. From the DEVICE section, tap Sound. 3. Tap the Vibrate on tap checkbox to turn on the feature. (A blue checkmark will appear.) Sound Effects This menu lets you select whether you hear tones when touching numbers on the dialpad, selecting on-screen options, and more. - Page 125 4. Tap OK. Screen Timeout Select how long the display screen remains backlit after you touch the screen or press a key before the screen darkens. 1. Tap > touch and hold > System settings. 2. From the DEVICE section, tap Display > Screen timeout. 3.
-
Page 126: Home Screen
Daydream Screensaver will be on when the phone is sleeping while docked and/or charging. 1. Tap > touch and hold > System settings. 2. From the DEVICE section, tap Display > Daydream. 3. To activate daydream feature, tap the Daydream switch 4. -
Page 127: Lock Screen
Screen Swipe Effect Choose the desired type of effect to display when you swipe from one Home screen canvas to the next. 1. Tap > touch and hold > System settings. 2. From the DEVICE section, tap Home screen > Screen swipe effect. 3. - Page 128 None: No lock screen. Swipe: Swipe any part of the screen to unlock the screen. Face Unlock: Unlocks the screen through facial recognition. Follow the prompts. You are asked to set a Pattern and/or PIN as a backup. ...
- Page 129 3. Release the Power/Lock Key only when the LG logo is displayed, then immediately press and hold the Power/ Lock Key again. 4. Release all keys when the Factory hard reset screen is displayed. 5. Press the Volume Buttons to highlight Yes, then press the Power/Lock to continue.
-
Page 130: Gestures
3. Tap each shortcut key to select the desired shortcut key. 4. After personalizing, tap Save. Contact Info For Lost Phone Select whether to display the owner information on the lock screen and customize the owner information. 1. Tap > touch and hold >... -
Page 131: Storage
3. Tap the Silence incoming calls checkbox to set this feature on. (A blue checkmark will appear.) Snooze or Stop Alarm You can set the phone to snooze or stop the alarm by just flipping the phone. 1. Tap > touch and hold >... -
Page 132: Battery
Battery The Battery menu lets you view any battery information and configure options. 1. Tap > touch and hold > System settings. 2. From the DEVICE section, tap Battery. 3. Tap Battery percentage on status bar to display the battery percentage indicator on the Status Bar. -
Page 133: Default Message App
5. Read the disclaimer and tap OK. Default Message App This menu allows you to choose your default messaging application. 1. Tap > > Settings 2. From the DEVICE section, tap Default message app. 3. Tap the desired option. Personal Settings This group of settings lets you configure accounts &... -
Page 134: Security
Mode – Set the location mode from High accuracy (GPS and networks), Battery saving (Networks only), and Device sensors only (GPS only). You can also ® enable Accelerated location to use the Qualcomm IZat™ hardware accelerated location service. Security Use the Security settings to configure how to help secure your phone and its data. -
Page 135: Language & Input Settings
Allows spelling correction when using the on-screen keyboard. Keyboard & Input Methods Shows the default keyboard type. Checkmark the keyboard you want to use from Google Keyboard, Google voice typing, LG Keyboard or Swype. Tap to configure each keyboard's settings. -
Page 136: Backup & Reset
Backup & Reset The privacy settings on your device allow you to back-up your data, automatically restore data, and erase all the data on your phone. Back Up My Data You can back up app data, Wi-Fi passwords, and other settings to Google servers. 1. -
Page 137: System Settings
4. Enter your unlock sequence if you have configured one, then tap Erase everything and OK to confirm. System Settings This group of settings lets you configure date & time, accessibility and more. You can activate the phone, update the phone, or view the phone information. Shortcut Key Get quick access to the Camera by pressing and holding the Volume Buttons when the screen is off or locked. - Page 138 Touch zoom: Allows you to zoom in or out by triple tapping the screen. Message/call voice notifications: Announces incoming calls and messages out loud. Screen shade: Sets the device to 0% brightness to save battery power and help those with impaired vision.
-
Page 139: System Updates
Home Key . Choose Off, Show all, TalkBack, Invert colors, Touch assistant, or Accessibility settings. One-touch input: Each finger touch enters letters/characters on the LG Keyboard. Services Displays the services installed for Accessibilities use. System Updates From time to time, updates may become available for your phone. -
Page 140: Printing
> System settings > System updates > Update Firmware. 2. Follow the on-screen instructions. Update LG Software This option allows you to download and update the LG software. 1. Tap > touch and hold > System settings > System updates > Update LG software. - Page 141 1. Tap > touch and hold > System settings > About phone. 2. Tap the desired menu. Settings...
-
Page 142: Important Information For The Lg Ls770
Important Information for the LG LS770 IMPORTANT SAFETY INFORMATION This booklet contains important operational and safety information that will help you safely use your phone. Failure to read and follow the information provided in this booklet may result in serious bodily injury, death, or property damage. - Page 143 Although it’s rare, your phone and accessories could generate sparks. Sparks can cause an explosion or fire, resulting in bodily injury or even death. These areas are often, but not always, clearly marked. They include: ● Fueling areas such as gas stations. ● Below deck on boats. Important Information for the LG LS770...
-
Page 144: Using Your Phone With A Hearing Aid Device
Using Your Phone With a Hearing Aid Device Your LG LS770 has an M4/T4 rating. While some wireless phones are used near some hearing devices (hearing aids and cochlear implants), users may detect a buzzing, humming, or whining noise. - Page 145 Any combined rating equal to four is considered usable. Thus, if you pair an M3 hearing aid with an M3 phone, you will have a combined rating of six for “excellent use.‖ This is synonymous for T ratings. Important Information for the LG LS770...
-
Page 146: Caring For The Battery
Don’t use the battery charger in direct sunlight or in high humidity areas, such as the bathroom. ● Never dispose of the battery by incineration. ● Keep the metal contacts on top of the battery clean. Important Information for the LG LS770... - Page 147 Improper battery use may result in a fire, explosion or other hazard. Battery Information and Care Always unplug the charger from the wall socket after the phone is fully changed to save unnecessary power consumption of the charger. Important Information for the LG LS770...
-
Page 148: Radio Frequency (Rf) Energy
(RF) energy set by the Federal Communications Commission (FCC) of the U.S. Government. These FCC exposure limits are derived from the recommendations of two expert organizations, the National Counsel on Important Information for the LG LS770... - Page 149 *In the United States and Canada, the SAR limit for mobile phones used by the public is 1.6 watts/kg (W/kg) averaged over one gram of tissue. The standard incorporates a substantial margin of safety to give additional protection for the public and to account for any variations in measurements. Important Information for the LG LS770...
-
Page 150: Owner's Record
The model number, regulatory number, and serial number are located on a nameplate inside the battery compartment. Record the serial number in the space provided below. This will be helpful if you need to contact us about your phone in the future. Model: LG LS770 Serial No.: Important Information for the LG LS770... -
Page 151: Manufacturer's Warranty
(6) The customer shall bear the cost of shipping the product to the Customer Service Department of LG. LG shall bear the cost of shipping the product back to the consumer after the completion of service under this limited warranty. - Page 152 (11) Consumables (such as fuses). 3. WHAT LG WILL DO: LG will, at its sole option, either repair, replace or refund the purchase price of any unit that is covered under this limited warranty. LG may choose at its option to use functionally equivalent re-conditioned, refurbished or new units or parts or any units.
-
Page 153: General Terms And Conditions Of Service
Correspondence may also be mailed to: LG Electronics Service- Mobile Handsets, P.O. Box 240007, Huntsville, AL 35824 DO NOT RETURN YOUR PRODUCT TO THE ABOVE ADDRESS. Please call or write for the location of the LG authorized service center nearest you and for the procedures for obtaining warranty claims. 7.11 Warranty Laws The following laws govern warranties that arise in retail sales of consumer goods: ●... -
Page 154: Basic Definitions
(a) accept the Agreement through any printed, oral, or electronic statement, for example, on the Web by electronically marking that you have reviewed and accepted; (b) attempt to or in any way use the Services; (c) pay for the Services; or (d) open Important Information for the LG LS770... -
Page 155: Service Activation
Services. You are responsible for any changes to your Services made by a person you authorize, and those changes will be treated as modifications to this Agreement. Important Information for the LG LS770... -
Page 156: Restrictions On Using Services
—may result in dropped and blocked connections, slower Service speeds, or otherwise impact the quality of Service. Services Important Information for the LG LS770... -
Page 157: Roaming
Specific Terms & Restrictions On Using Data Services In addition to the rules for using all of our other Services, unless we identify the Service or Device that you have selected as specifically intended for that purpose (for example, wireless Important Information for the LG LS770... -
Page 158: Software License
Services through a credit card, debit card, or other payment method. If you have incurred charges or fees that were not charged prior to your account balance reaching a zero balance, we may deduct these Important Information for the LG LS770... -
Page 159: Types Of Charges
These data charges are in addition to any Important Information for the LG LS770... -
Page 160: Taxes & Government Fees
Your Service will be interrupted if you fail to maintain a positive account balance or timely pay applicable subscription charges for each effective period. When this service interruption occurs, you will be given a period of time (which varies depending on your service Important Information for the LG LS770... -
Page 161: Establishing Or Replenishing Account Balances
For additional information on what we do to protect our customers, networks, Services and equipment, see our Acceptable Use Policy and Visitors Agreement at our website. Important Information for the LG LS770... -
Page 162: Your Privacy
Device is out of your possession or control, for example, when you relinquish, exchange, return, or recycle your Device. By submitting your Device to us, you agree that our employees, Important Information for the LG LS770... -
Page 163: Location-Enabled Services
Device within 60 days from the date we froze your account, your account will be deactivated, we may assess a charge equal to the balance in your account (which is not refundable), and, if applicable, you will lose your phone number. Important Information for the LG LS770... -
Page 164: Disclaimer Of Warranties
NATURE WHATSOEVER ARISING OUT OF OR RELATED TO PROVIDING OR FAILING TO PROVIDE SERVICES IN CONNECTION WITH A DEVICE, INCLUDING, BUT NOT LIMITED TO, LOST PROFITS, LOSS OF BUSINESS, OR COST OF REPLACEMENT PRODUCTS AND SERVICES. Important Information for the LG LS770... -
Page 165: Dispute Resolution And Arbitration
A Notice of Dispute to Boost should be sent to: General Counsel; Arbitration Office; 12502 Sunrise Valley Drive, Mailstop VARESA0202-2C682; Reston, Boostia 20191. Boost will provide a Notice of Dispute to you in accordance with the ―Providing Important Information for the LG LS770... - Page 166 The arbitrator’s decision and award is final and binding, with some limited court review under the FAA, and judgment on the award may be entered in any court with jurisdiction. Important Information for the LG LS770...
-
Page 167: No Trial By Jury And No Class Actions
Agreement is held invalid or unenforceable, the rest of this Agreement remains in full force and effect. This Agreement isn’t for the benefit of any third party except our corporate parents, affiliates, subsidiaries, agents, and predecessors and successors in interest. You can’t assign Important Information for the LG LS770... - Page 168 The rights, obligations, and commitments in the Agreement that—by their nature—would logically continue beyond the termination of Services (for example, those relating to billing, payment, 911, dispute resolution, no class action, no jury trial) survive termination of Services. Important Information for the LG LS770...
-
Page 169: Copyright Information
In addition to the source code, all referred license terms, warranty disclaimers and copyright notices are available for download. LG Electronics will also provide open source code to you on CD-ROM for a charge covering the cost of performing such distribution (such as the cost of media, shipping, and handling) upon email request to opensource@lge.com. - Page 170 Index 4G LTE, 72 Call Waiting, 31 About Phone, 130 Caller ID, 31 Access Contacts, 37 Camera and Video Settings, 83 Access Gmail, 48 Change Calendar Settings, 91 Access Recently-Used Applications, 14 Change Calendar View, 86 Accessibility, 127 Change the Device Name, 98 Accounts &...
- Page 171 Disconnect Bluetooth Connection During an Learn to Navigate the Browser, 76 Active Call, 99 Listen to Multiple Voicemail Messages, 27 Disconnect from a Bluetooth Device, 99 Location, 123 Display Settings, 114 Lock and Unlock Your Phone, 9 Edit a Contact Entry, 40 Lock Screen, 117 Edit or Delete an Event, 90 Make Phone Calls, 21...
-
Page 172: Index
Touchscreen Navigation, 8 Your Data Services User Name, 73 Transfer User Contents From an Android Your Home Screen, 10 Phone to Your LG LS770, 102 Your Phone at a Glance, 1 Transfer Via PC or Laptop, 102 Your Phone's Layout, 6...