
Related Manuals for HP Q2429A


Summary of Contents for HP Q2429A
- Page 1 All manuals and user guides at all-guides.com q2429a • q2430a • q2436a • q2437a maintain mantenimiento maintenance wartung manutenzione lea esto primero...
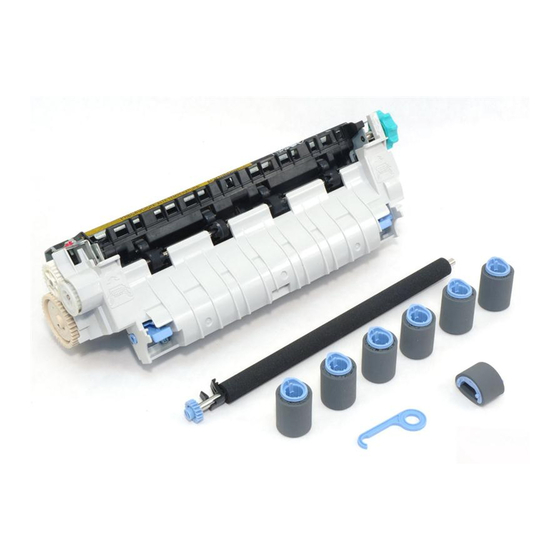
- Page 2 All manuals and user guides at all-guides.com This package contains one fuser, one transfer Note: The cost of this kit is not covered under Turn the printer power off. WARNING! After you roller, one plastic transfer-roller tool, one pickup the original printer warranty or under most turn the printer power off, allow the fuser to cool roller, six feed rollers, and one pair of extended warranties.
- Page 3 All manuals and user guides at all-guides.com Turn the printer so that its rear cover faces you. Disconnect all cables from the rear of the To replace the transfer roller: Turn the printer so Lift and pull to remove the optional duplexer, if it printer.
- Page 4 All manuals and user guides at all-guides.com Use the plastic transfer-roller tool (1) to lift the Put on the gloves and remove the protective Make sure that the black collar on the left side is left end of the metal shaft upward (2). Slide the sheet from the new transfer roller.
- Page 5 All manuals and user guides at all-guides.com Install the print cartridge, and then close the top To replace the tray-1 pickup roller: If an optional If an optional envelope feeder is not installed, cover. envelope feeder is installed, remove it by open tray 1 and remove the envelope-entrance pressing the envelope-feeder release button (1) cover.
- Page 6 All manuals and user guides at all-guides.com Locate the pickup roller at the center of tray 1. Release the roller by sliding apart the two Place the new pickup roller onto the shaft. Align latches located on each side at the top of the the pin that is located on each side at the roller.
- Page 7 All manuals and user guides at all-guides.com Insert the envelope-entrance cover (1) or the To replace the feed rollers in tray 2: Remove Pinch the blue latch that is on the left side of the optional envelope feeder (2). tray 2 from the printer. Find the cover that is feed roller (1).
- Page 8 All manuals and user guides at all-guides.com Slide a new feed roller onto the shaft. Note: It is Move the front of the printer to the edge of the Pinch the blue latch on the left side of the feed important that this roller locks into place.
- Page 9 All manuals and user guides at all-guides.com Slide a new feed roller onto the shaft and rotate Insert tray 2. If no optional trays are installed, To replace the feed rollers in an optional the roller until it locks into place. Note: It is go to step 31.
- Page 10 All manuals and user guides at all-guides.com To replace the feed rollers in an optional Push down on the release lever and open the On the inside of the door, open the small cover 1500-sheet feeder: If an optional 1500-sheet door of the 1500-sheet feeder.
- Page 11 All manuals and user guides at all-guides.com Pinch the blue latch that is on the side of the Slide the new feed roller onto the shaft. Locate the roller at the top-center inside the feed roller and slide the roller off the shaft. Note: It is important that this roller locks into 1500-sheet feeder.
- Page 12 All manuals and user guides at all-guides.com Slide a new feed roller onto the shaft and rotate Close the door of the 1500-sheet feeder. To replace the fuser: Open the rear output bin the roller until it locks into place. Note: It is and pull the extension outward until it stops.
- Page 13 All manuals and user guides at all-guides.com Remove the rear output bin and extension by Firmly grasp each side of the fuser. Push the Remove all packing material from the new bending the middle of the bin down and blue levers upward and pull the fuser straight fuser.
- Page 14 All manuals and user guides at all-guides.com Push the new fuser firmly into the printer until Install the rear output bin. Pull gently on the bin Connect the cables to the rear of the printer. the blue levers on both sides click into place. to make sure that the hinge pins are fully inserted.
- Page 15 All manuals and user guides at all-guides.com Install the optional duplexer, if it was removed. To finish the installation: Turn the printer power To verify that installation is complete, print a on while holding down for several seconds, configuration page from the control panel. until all three control panel lights turn on and Press to open the printer menus.
- Page 16 If you purchased an exchangeable kit, you can maintenance” is reset to zero. If the number is installed or not completely seated, jams can return your old fuser to HP for credit. Pack the not reset, repeat step 39, or see the support occur.
- Page 17 All manuals and user guides at all-guides.com...
- Page 18 All manuals and user guides at all-guides.com...
- Page 19 All manuals and user guides at all-guides.com...
- Page 20 All manuals and user guides at all-guides.com copyright © 2002 Hewlett-Packard Company www.hp.com *Q2436-90901* *Q2436-90901* Q2436-90901...