
Related Manuals for Electrolux EHTA060


Summary of Contents for Electrolux EHTA060
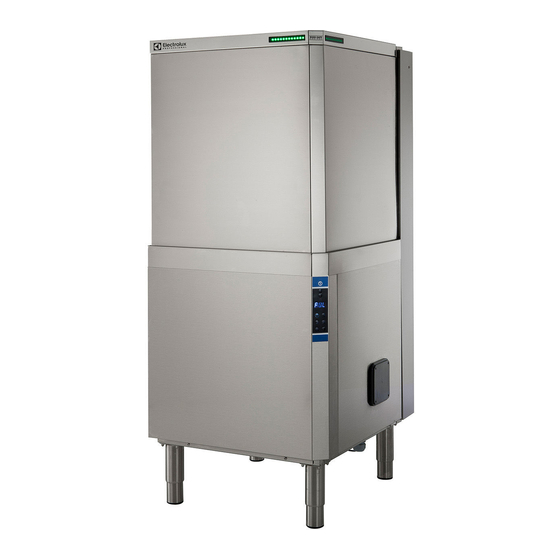
- Page 1 Hood Dishwasher EHTA060 - ZHT060 - VHT060 Installation and operating manual * 59566V600- 2020.06 *Original instructions...
- Page 2 Installation diagram Manual hood type...
- Page 3 Installation diagram Automatic hood type...
- Page 4 CWI = Cold water Inlet pipe ⌀=3/4″ G EI = Electrical Inlet WI = Water Inlet pipe ⌀=3/4″ G EQ = Equipotential screw D = Drain pipe internal ⌀=40 mm(ʌ) - 20 mm(*) XD = Inlet pipe for detergents (ʌ) Only for model with free-fall drainage XR = Inlet pipe for rinse-aid (*) Only for model with drain pump XI = Inlet pipe for delime...
- Page 5 Foreword The installation, use and maintenance manual (hereinafter Manual) provides the user with information necessary for correct and safe use of the machine (or “appliance“). The following must not be considered a long and exacting list of warnings, but rather a set of instructions suitable for improving machine performance in every respect and, above all, preventing injury to persons and animals and damage to property due to im- proper operating procedures.
-
Page 6: Table Of Contents
Contents A SAFETY INSTRUCTIONS ........................8 General safety ..........................8 B GENERAL INFORMATION ........................8 Introduction ..........................8 General safety instructions ......................8 Additional indications........................8 Definitions........................... 8 Machine and Manufacturer‘s identification data ................... 9 Appliance identification ........................9 B.6.1 How to identify the technical data.................... 9 B.6.2 How to interpret the factory description .................. - Page 7 Maintenance ..........................27 K.3.1 Repair and extraordinary maintenance .................. 27 K.3.2 Parts and accessories ......................27 K.3.3 Prolonged period of inactivity ....................27 Boiler drainage........................... 27 Preventive maintenance....................... 27 Introduction ..........................28 Waste storage..........................28 Procedure regarding appliance dismantling macro operations .............. 28 L TROUBLESHOOTING ..........................
-
Page 8: Asafety Instructions
The following symbols are Manufacturer Electrolux Professional SpA or any other used in the manual to indicate and identify service centre authorised by Electrolux Professional SpA. the various types of hazards:... -
Page 9: Machine And Manufacturer's Identification Data
Type ref. 6.9 kW Electrolux Professional spa - Viale Treviso, 15 Electrolux Professional spa - Viale Treviso, 15 - 33170 Pordenone (Italy) The dataplate gives the product identification and technical data; listed below is the meaning of the various information given on it. -
Page 10: Copyright
• 1 = automatic hood compliance with regulations in force in the country of use. Electrolux Professional SpA declines any liability for inaccur- Energy Saving Device [ESD] acies contained in the manual, if due to printing or translation •... -
Page 11: Ctechnical Data
PPE). Failure to use the personal protection equipment by operators, specialized personnel or users can involve exposure to chemical risk and cause possible damage to health (depending on the model). TECHNICAL DATA Main technical characteristics Model EHTA060 VHTA060 ZHTA060 Supply voltage: 400V 3N~... -
Page 12: Characteristics Of Power Supply
380 – 415V 3N 220 – 240V 3 220 – 240V 1N 6.9 kW 5x2.5 mm 16A 3P + N 4x4 mm 20A 3P 3x6 mm 40A 1P + N 9.9 kW 5x2.5 mm 20A 3P + N 4x6 mm 32A 3P 3x10 mm 60A 1P + N... -
Page 13: Transport: Instructions For The Carrier
Transport: instructions for the carrier Shifting The operator must: WARNING • have a general view of the path to be followed; Do not stand under suspended • stop the manoeuvre in case of hazardous situations. loads during loading/ unloading WARNING operations. -
Page 14: Appliance Space Limits
CAUTION • Carefully remove the protective film from the outer panels Do not install the appliance over 2000 without tearing it, to avoid leaving traces of glue. meters above sea level. Appliance space limits • A suitable space must be left around the appliance (for operations, maintenance, etc.). -
Page 15: Disposal Of Packing
Disposal of packing Plumbing circuits The packing must be disposed of in compliance with the Hood dishwasher with drain pump current regulations in the country where the appliance is used. All the packing materials are environmentally friendly. They can be safely kept, recycled or burned in an appropriate waste incineration plant. -
Page 16: E.10.1 Connections Provided For Energy Control
Power supply 380-415V 3N Connect the energy peak controller across terminals 11 and 12. Open the power supply terminal board and insert the jumpers CAUTION provided as follows: one jumper between terminals 2 and 4 A normally open (n. o.) contact of the and another between terminals 4 and 6. -
Page 17: Fcontrol Panel
CONTROL PANEL Control panel description Legend A = On / Off F = “Boiler temperature“ indicator light M = Drain / self-cleaning cycle B = Open hood G = Wash cycle 1 N = “Delime“ cycle C = Close hood H = Wash cycle 2 P = ACTIVE / WASH SAFE CONTROL D = “Tank temperature“indicator light... -
Page 18: Gcommissioning
Wash cycle 3 Drain / self-cleaning cycle This button starts Wash cycle 3. When the cycle is selected, This button starts a drain/self-cleaning cycle. When the cycle is the button indicator is lit up. This cycle is recommended for selected, the button indicator is lit up. washing very dirty dishes. -
Page 19: Electrical Connections For Automatic Detergent And Rinse-Aid Dispensers
hardness of the supply water (check the characteristics on the G.2.1 Electrical connections for automatic detergent product label). and rinse-aid dispensers Terminals are available on the power supply terminal board for CAUTION the electrical connection of external dispensers working at 220 The peristaltic dispensers (detergent and –... -
Page 20: Hbefore First Use
To obtain excellence washing performance, use detergent, rinse aid and descaling agent sug- Parameter description Value gested by Electrolux Professional. In the Electrolux Unit of measure Professional web site, open the “Accessories and of dispensers Consumables“ web page and navigate into the... -
Page 21: Note For External Dispenser
3. select the parameter dIn; • if dEt=182 the detergent dispenser only operates during filling electrovalve operation for restoring the boiler level; terminals 7-9 of the main terminal board are powered at the same time; • if rAi=61 the rinse-aid dispenser only operates during filling electrovalve operation for restoring the boiler level;... -
Page 22: Safety Signs To Be Placed On The Machine Or Near Its Area
WARNING To guarantee machine efficiency and correct operation, periodical maintenance must be carried out according to the Several illustrations instructions given in this manual. manual show the machine, or Make sure to periodically check correct operation of all the safety devices and the insulation of electrical cables, which parts of it, without guards or with must be replaced if damaged. -
Page 23: Residual Risks
Residual risks Residual risk Description of hazardous situation The machine has several risks that were not completely eliminated from a design standpoint or with the installation of Burns The operator deliberately or unin- adequate protection devices. Nevertheless, through this tentionally touches some manual the Manufacturer has taken steps to inform operators components inside the machine or of such risks, carefully indicating the personal protection... -
Page 24: Starting
(sec) NOTE! Carry out a couple of cycles without dishes to flush out any industrial grease which has remained in Wash cycle (EHTA060 - the tank and piping. ZHTA060) For lightly soiled items • Open the water supply tap. • Activate the main switch by turning it to position “I“. -
Page 25: Type Of Racks And Loading
• Remove the basket with dishes and remove the overflow “2“ – Cycle 2 (refer to G Commissioning). Close the hood. Activate the delime cycle by pressing the delime button for at least 5 seconds. – Cycle 3 • To stop the wash cycle, just press the selected cycle button or lift the hood. -
Page 26: Kmachine Cleaning And Maintenance
• YELLOW container for cutlery: insert items, with the Available as accessories: dividers for glasses and rack for handles pointing downwards, in each container. dishes with maximum diameter of 320 mm. NOTE! if only one type of dish rack is to be used, it is advisable to choose the GREEN rack. -
Page 27: Cleaning The Nozzle Jets
NOTE! • Switch off the dishwasher by pressing the On/Off button. It is also advisable to sign a preventive and scheduled maintenance contract with the Cus- tomer Care Service K.3.1 Repair and extraordinary maintenance • Switch off at the mains. Repair and extraordinary Maintenance have to be carried out •... - Page 28 Introduction The machine's parts must be disposed of in a differentiated way, according to their different characteristics (e. g. metals, WARNING oils, greases, plastic, rubber, etc.). Different regulations are in force in the various countries, Dismantling operations must be therefore comply with the provisions of the laws and compe- carried specialised tent bodies in the country where scrapping takes place.
- Page 29 Alarms NO WATER • Check that the tap is open. • Check that the water inlet filter is clean. • Check the minimum mains pressure. • Check that the overflow pipe is inserted (only for appliances without drain pump). INEFFICIENT DRAINAGE •...
- Page 32 Electrolux Professional SPA Viale Treviso 15 33170 Pordenone www.electroluxprofessional.com...