
Related Manuals for Hitachi JR Automation Esys TPM-HH-700-000


Summary of Contents for Hitachi JR Automation Esys TPM-HH-700-000
- Page 1 1000 Brown Rd. Auburn Hills, MI 48326 248.754.1900 Jrautomation.com TPM Handheld User Manual Model: TPM-HH-700-00 TPM Handheld User Manual - prelim 2 Page 1 of 17 Printed: 11/16/22 3:38 PM...
-
Page 2: Table Of Contents
1000 Brown Rd. Auburn Hills, MI 48326 248.754.1900 Jrautomation.com Revisions Revision Date Revised By: Description Prelim 12/29/21 Mark Compton Preliminary Contents Revisions ............................... 2 Contents ................................ 2 General Information & Considerations ......................3 Safety ................................3 Handheld Overview............................4 Battery Save Feature ..........................5 Keypad .............................. -
Page 3: General Information & Considerations
1000 Brown Rd. Auburn Hills, MI 48326 248.754.1900 Jrautomation.com General Information & Considerations 1. This device complies with part 15 of the FCC Rules. Operation is subject to the following two conditions: (1) This device may not cause harmful interference, and (2) this device must accept any interference received, including interference that may cause undesired operation. -
Page 4: Handheld Overview
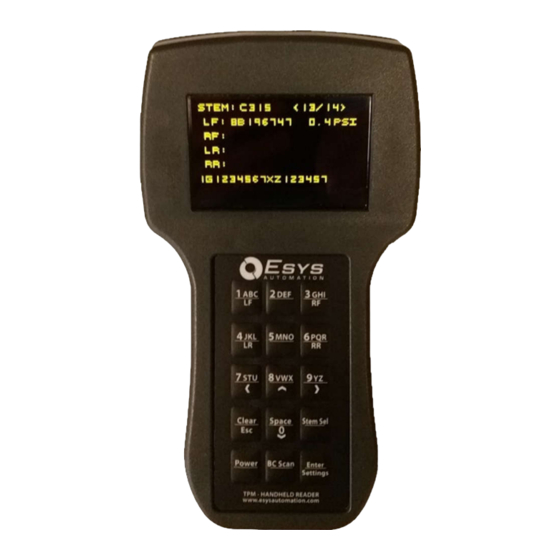
1000 Brown Rd. Auburn Hills, MI 48326 248.754.1900 Jrautomation.com Handheld Overview The Esys TPM Handheld Reader is built specifically for the manufacturing environment. It is typically used in conjunction with our in-line TPM Antenna Systems or by itself in very low production environments. -
Page 5: Battery Save Feature
1000 Brown Rd. Auburn Hills, MI 48326 248.754.1900 Jrautomation.com Serial Mounting Magnet Number secures handheld when docked in the cradle 12Vdc Serial (RS-485) Charging Pins Communication Pins The integrated barcode scanner can scan 1D and 2D barcodes for the vehicle identifier. Through the option menu, the system can be setup so the barcode is forced to be scanned before TPM stems are read. -
Page 6: Keypad
1000 Brown Rd. Auburn Hills, MI 48326 248.754.1900 Jrautomation.com Keypad The keypad allows for control of the handheld. Each button on the keypad may have multiple functions. These different functions are used depending on the current screen or function that is being used by the operator. -
Page 7: Settings Menu
1000 Brown Rd. Auburn Hills, MI 48326 248.754.1900 Jrautomation.com The figure bellows shows the keypad, and gives some information on the special functions of the keys. ‘LF, RF, LR, & RR’ Initiates a ‘Arrow’ keys allow movement stem read and associates of the cursor through prompts those reads with the and selection lists. - Page 8 1000 Brown Rd. Auburn Hills, MI 48326 248.754.1900 Jrautomation.com As can be seen, there are several functions within this menu. Simply use the ‘arrow’ keys to scroll through the menu with the cursor. Once the desired setting has the cursor on it, use the ‘enter’ key to go to that particular settings submenu, or change its current setting.
- Page 9 1000 Brown Rd. Auburn Hills, MI 48326 248.754.1900 Jrautomation.com Force Vehicle ID When this is set to Y, then the operator must scan or enter a vehicle ID before the handheld will allow a stem read to work. Min ID Chars This sets the minimum number of characters accepted by the handheld as a valid vehicle ID.
- Page 10 1000 Brown Rd. Auburn Hills, MI 48326 248.754.1900 Jrautomation.com Recv Enabled This setting is for diagnostic use only. The handheld has 2 receivers on it, receiver A and receiver B. This setting is to allow a test a receiver individually. Under normal production, this setting needs to be set to BOTH.
-
Page 11: Using The Handheld To Repair A Vehicle Record
1000 Brown Rd. Auburn Hills, MI 48326 248.754.1900 Jrautomation.com Using the Handheld to Repair a Vehicle Record 1. Power on the handheld. Wait for handheld to boot. The startup splash screen is displayed. Once the handheld has finished booting the Vehicle Entry screen will be displayed 2. - Page 12 1000 Brown Rd. Auburn Hills, MI 48326 248.754.1900 Jrautomation.com To switch from the currently selected recipe press the ‘˅’ (down arrow bu on) to highlight the desired stem type. Then press ‘ENTER’ to select the C433 recipe 34. The asterisk * symbol indicates which stem is currently selected.
- Page 13 1000 Brown Rd. Auburn Hills, MI 48326 248.754.1900 Jrautomation.com 4. Next, read a stem. Place the handheld reader near the stem with the magnet touching the tire. Press the corresponding wheel location button to initiate a read. It is important to press the corresponding wheel location, since this associate the stems serial number to that wheel.
- Page 14 1000 Brown Rd. Auburn Hills, MI 48326 248.754.1900 Jrautomation.com 5. Once all missing stems have been read, dock the handheld in the docking station to start the upload to PLC. The screen will display ‘UPLOADING DATA’ when the upload starts. 6.
-
Page 15: Deleting A Record
1000 Brown Rd. Auburn Hills, MI 48326 248.754.1900 Jrautomation.com Note: The handheld is capable of storing up to 50 vehicles worth of data. Steps 1 – 6 can be completed on each vehicle requiring repair up to 50. Once all vehicles are scanned proceed to step 7 to upload all repair data. -
Page 16: Appendix A: Product Data Sheet
1000 Brown Rd. Auburn Hills, MI 48326 248.754.1900 Jrautomation.com Appendix A: Product Data Sheet The table below summarizes the general product data and specifications: Attribute: Data: Manufacturer Name Esys Automation LLC Model # TPM-HH-700-000 Brand Name (Marketed by) JR Automation Country of Origin Country of Assembly Trade Name... - Page 17 TPM Handheld Reader Read Position Position the handheld with the magnet against the tire and directly above the TPM stem.