D-Link DXS-1210 Series Manual
Hide thumbs
Also See for DXS-1210 Series:
- User manual (119 pages) ,
- Hardware installation manual (50 pages)

Related Manuals for D-Link DXS-1210 Series


Summary of Contents for D-Link DXS-1210 Series
- Page 1 D X S - 1 2 1 0 S e r i e s L 2 1 0 G i g a b i t E t h e r n e t S w i t c h S e r i e s V e r .
-
Page 3: Table Of Contents
Table of Contents D-Link DXS-1210 Series User Manual Table of Contents Table of Contents ............................. i About This Guide ............................. 1 Terms/Usage ..............................1 Copyright and Trademarks ..........................1 Product Introduction ........................... 2 DXS-1210-10TS ............................. 3 Front Panel ..............................3 Rear Panel .............................. -
Page 4: Table Of Contents
Management > Telnet/Web ........................33 Management > Session Timeout ......................33 Management > D-Link Discover Protocol Settings................... 34 L2 Features > FDB > Static FDB > Unicast Static FDB ................34 L2 Features > FDB > Static FDB > Multicast Static FDB ................. 35 L2 Features >... - Page 5 Table of Contents D-Link DXS-1210 Series User Manual L2 Features > STP > MST Configuration Identification................41 L2 Features > STP > STP Instance ......................42 L2 Features > STP > MSTP Port Information ..................42 L2 Features > Loopback Detection ......................42 L2 Features >...
- Page 6 Table of Contents D-Link DXS-1210 Series User Manual Security > Trusted Host ..........................91 Security > Traffic Segmentation Settings ....................92 Security > Storm Control Settings ......................92 Security > DoS Attack Prevention Settings ....................93 Security > SSL > SSL Global Setting ....................... 94 Security >...
-
Page 7: About This Guide
Reproduction in any manner whatever without the written permission of D-Link Corporation is strictly forbidden. Trademarks used in this text: D-Link and the D-LINK logo are trademarks of D-Link Corporation; Microsoft and Windows are registered trademarks of Microsoft Corporation. Other trademarks and trade names may be used in this document to refer to either the entities claiming the marks and names or their products. -
Page 8: Product Introduction
D-Link Green Technology includes a number of innovations to reduce energy consumption on DXS-1210 series such as reducing power when a port does not have a device attached, or adjusting the power usage according to the length of Ethernet cable connected to it. -
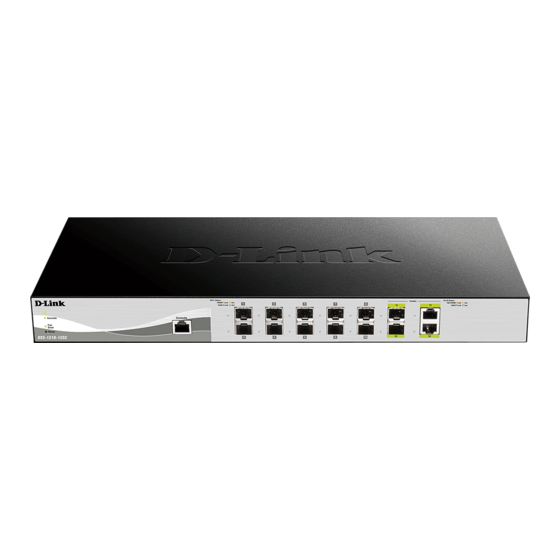
Page 9: Dxs-1210-10Ts
1 Product Introduction D-Link DXS-1210 Series User Manual DXS-1210-10TS 8-Port 10GBASE-T and 2-Port SFP + Fiber port L2 10 Gigabit Ethernet Switch. Front Panel Figure 1.1 – DXS-1210-10TS Front Panel Power LED : The Power LED lights up when the Switch is connected to a power source. -
Page 10: Rear Panel
1 Product Introduction D-Link DXS-1210 Series User Manual Reset: By pressing the Reset button, the Switch will change back to the default configuration and all changes will be lost. Rear Panel Figure 1.4 – DXS-1210-12TC Rear Panel Power: Connect the AC power cord to this port. -
Page 11: Hardware Installation
2 Hardware Installation D-Link DXS-1210 Series User Manual Hardware Installation This chapter provides unpacking and installation information for the D-Link DXS-1210 Series Switch. Safety Cautions To reduce the risk of bodily injury, electrical shock, fire,and damage to the equipment, observe the following precautions: •... -
Page 12: Step 1: Unpacking
D-Link reseller for replacement. One D-Link DXS-1210 Series switch One Multilingual Getting Started Guide User Guide CD with DNA (D-Link Network Assistant) Program Power Cord and Power Cord Retainer Rack-mount kit and Rubber Feet If any item is found missing or damaged, please contact the local reseller for replacement. -
Page 13: Step 3 - Plugging In The Ac Power Cord
2 Hardware Installation D-Link DXS-1210 Series User Manual Figure 2.3 – Mount the Switch in the rack or chassis Step 3 – Plugging in the AC Power Cord The Switch can now be connected to the AC power. Connect the AC power cord to the rear of the switch and to an electrical outlet (preferably one that is grounded and surge protected). -
Page 14: Getting Started
This chapter introduces the management interface of D-Link DXS-1210 Series Switch. Management Options The D-Link DXS-1210 Series. Switch can be managed through any port by using the Web-based Management, or through any PC using CLI commands. Each switch must be assigned its own IP Address, which is used for communication with the Web-Based Management or a SNMP network manager. -
Page 15: Smart Wizard
English. Figure 3.3 – Login Dialog Box Smart Wizard After a successful login, the Smart Wizard will guide you through essential settings of the D-Link DXS-1210 Series Switch. Please refer to the Smart Wizard Configuration section for details. Web-based Management By clicking the Exit button in the Smart Wizard, you will enter the Web-based Management interface. -
Page 16: Configuration
4 Configuration D-Link DXS-1210 Series User Manual Configuration The features and functions of the D-Link DXS-1210 Series Switch can be configured for optimum use through the Web-based Management Utility. Smart Wizard Configuration After a successful login, the Smart Wizard will guide you through essential settings of the D-Link DXS-1210 Series Switch. -
Page 17: User Accounts Settings
4 Configuration D-Link DXS-1210 Series User Manual Figure 4.2 – SNMP Settings in Smart Wizard User Accounts Settings The User Accounts Settings page allows you to quickly specify the user account function. Enter the User Name, Privilege, Password Type and Password. Click Apply & Save to save the configuration. -
Page 18: Tool Bar > Save Menu
Click the D-Link logo at the upper-left corner of the screen to be redirected to the local D-Link website. Tool Bar > Save Menu The Save Menu provides Save Configuration and Save Log functions. -
Page 19: Tool Bar > Tool Menu
4 Configuration D-Link DXS-1210 Series User Manual Figure 4.6 – Save Configuration Destination: Select the destination to save the configuration to. Startup-config: Check the box to enable the startup configuration function. Click the Apply button to save your settings. Tool Bar > Tool Menu The Tool Menu offers global function controls such as Reset, Reboot Device, Configuration Backup and Restore, Firmware Backup and Upgrade. -
Page 20: Firmware Upgrade & Backup > Firmware Upgrade From Tftp
4 Configuration D-Link DXS-1210 Series User Manual Figure 4.10 – Tool Menu > Firmware Upgrade & Backup > Firmware Upgrade from HTTP Note: The Switch will reboot after restoring the firmware, and all current configuration will be lost. Firmware Upgrade & Backup > Firmware Upgrade from TFTP Upgrade firmware by using TFTP.