Table of Contents
Troubleshooting

Related Manuals for Haier HCI604TG3


Summary of Contents for Haier HCI604TG3
- Page 1 Induction Cooktop Instruction Manual / Installation Manual MODEL HCI302TB3 HCI604TB3 HCI604TG3 HCI604FTB3 HCI905FTB3 NZ AU Safety and Warnings Your safety is important to us. Please read this information before using your cooktop.
-
Page 2: Installation
INSTALLATION WARNING: Electrical Shock Hazard • Disconnect the appliance from the mains electricity supply before carrying out any work or maintenance on it. • Connection to a good earth wiring system is essential and mandatory. • Alterations to the domestic wiring system must only be made by a qualified electrician. - Page 3 switch) and contact a qualified technician. • Switch the cooktop off at the wall before cleaning or maintenance. • Failure to follow this advice may result in electrical shock or death. WARNING:Health Hazard • This appliance complies with electromagnetic safety standards. •...
- Page 4 • Never use your appliance as a work or storage surface. • Never leave any objects or utensils on the appliance. • Never use your appliance for warming or heating the room. • After use, always turn off the cooking zones and the cooktop as described in this manual (i.e.
- Page 5 • The appliance is not intended to be operated by means of an external timer or separate remote-control system. CAUTION: The cooking process has to be supervised. A short term cooking process has to be supervised continuously.
-
Page 6: Product Dimensions
Product Dimensions HCI302TB3... - Page 7 HCI302TB3 HCI302TB3 PRODUCT DIMENSIONS Overall height of cooktop Overall width of cooktop Overall depth of cooktop Height of chassis Width of chassis Depth of chassis Height of cooktop glass 13.5 Depth of front overhang of cooktop glass 13.5 Depth of rear overhang of cooktop glass 13.5 Depth of side overhang of cooktop glass...
- Page 8 HCI604TB3/HCI604TG3...
- Page 9 HCI604TB3/HCI604TG3 HCI604TB3/HCI604TG3/HCI604FTB3 PRODUCT DIMENSIONS Overall height of cooktop Overall width of cooktop Overall depth of cooktop Height of chassis Width of chassis Depth of chassis Height of cooktop glass 16.5 Depth of front overhang of cooktop glass 16.5 Depth of rear overhang of cooktop glass 16.5...
- Page 10 HCI604FTB3...
- Page 11 HCI604FTB3 HCI604TB3/HCI604TG3/HCI604FTB3 PRODUCT DIMENSIONS Overall height of cooktop Overall width of cooktop Overall depth of cooktop Height of chassis Width of chassis Depth of chassis Height of cooktop glass 16.5 Depth of front overhang of cooktop glass 16.5 Depth of rear overhang of cooktop glass 16.5...
- Page 12 HCI905FTB3...
- Page 13 HCI905FTB3 HCI905FTB3 PRODUCT DIMENSIONS Overall height of cooktop Overall width of cooktop Overall depth of cooktop Height of chassis Width of chassis Depth of chassis Height of cooktop glass 19.5 Depth of front overhang of cooktop glass 19.5 Depth of rear overhang of cooktop glass 19.5 Depth of side overhang of cooktop glass...
-
Page 14: Cutout Dimensions
HCI302TB3 47min (-2 +3) (-2 +3) HCI604TB3 50 min (-2 +3) (-2 +3) HCI604TG3 50 min (-2 +3) (-2 +3) HCI604FTB3 50 min HCI905FTB3 50 min Note: 60cm models will fit into existing benchtop cut outs which may be A =... - Page 15 Clearance Dimensions Under all circumstances, make sure the cooktop is well ventilated and the air inlet and outlet are not blocked. Ensure the cooktop is in a good work state. As shown below Note: The distance between the hotplate and the range hood above the cooking surface should be at least 600mm(A).
- Page 16 Before you install the cooktop • The cooktop must be installed by qualified personnel or technicians. • The benchtop is square and level, and no structural members interfere with space requirements • The work surface is made of a heat-resistant material •...
-
Page 17: Fastening The Cooktop To The Bench
Fastening the cooktop to the bench 1. Place the cooktop on a soft and stable surface, you can use the packaging. 2. Mount the supplied brackets (B) and tighten the screws (A) onto the cooktop, as shown in below image. 3. -
Page 18: Connecting The Cooktop To The Mains Power Supply
Connecting the cooktop to the mains power supply IMPORTANT! ● This cooktop must be connected to the mains power supply only by a suitably qualified person. ● This cooktop must be earthed. ● Before connecting the cooktop to the mains power supply, check that: ●... - Page 19 Single phase connection Two phase connection Model: HCI604TB3 / HCI604TG3/HCI604FTB3 / HCI905FTB3 Model: HCI302TB3...
- Page 20 When you have installed the cooktop • The power supply cable is not accessible through cupboard doors or drawers • There is adequate flow of fresh air from outside the cabinetry to the base of the cooktop • If the hob is installed above a drawer or cupboard space, a thermal protection barrier is installed below the base of the hob •...
-
Page 21: Product Overview
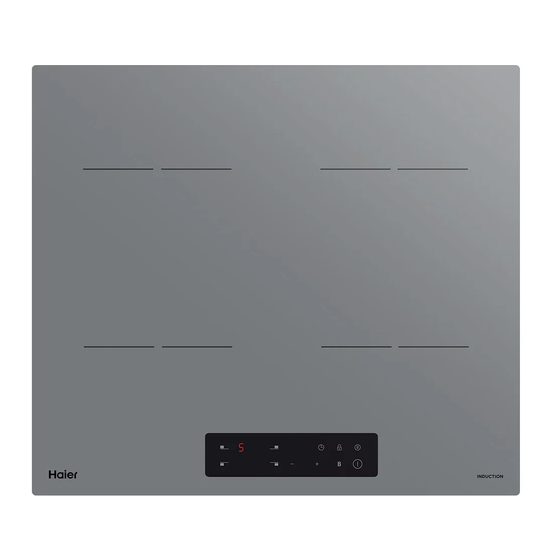
Product Overview Top View HCI302TB3 1.2000 W zone 2.1500 W zone 3.Glass plate 4.Control panel / Displays Control Panel 1. ON/OFF control 2. Heating zone selection controls 3. Power/Timer setting controls 4. Keylock control 5. Timer control... - Page 22 Top View HCI604TB3/HCI604TG3 1.2000 W boost to 2600W zone 2.1500 W boost to 2000W zone 3.2000 W boost to 2600W zone 4.1500 W boost to 2000W zone 5.Glass plate 6.Control panel / Displays Control Panel 1. Heating zone selection controls 2.
- Page 23 Top View HCI604FTB3 1.2000 W boost to 2600W zone 2.1500 W boost to 2000W zone 3.2000 W boost to 2600W zone 4.1500 W boost to 1800W zone 5.Flex zone 6.Glass plate 7.Control panel / Displays Control Panel 1. Heating zone selection controls 2.
- Page 24 Top View HCI905FTB3 1.2000 W boost to 2600W zone 2.1500 W boost to 2000W zone 3.2000 W boost to 2600W zone 4.1500 W boost to 1800W zone 5.2300W boost to 3000W zone 6.Flex zone 7.Glass plate 8.Control panel / Displays Control Panel 1.
-
Page 25: Using The Touch Controls
A Word on Induction Cooking Induction cooking is a safe, advanced, efficient, and economical cooking technology. It works by electromagnetic vibrations generating heat directly in the pan, rather than indirectly through heating the glass surface. The glass becomes hot only because the pan eventually warms it up. iron pot magnetic circuit ceramic glass plate... -
Page 26: Choosing The Right Cookware
Choosing the Right Cookware • Only use cookware with a base suitable for induction cooking. Look for the induction symbol on the packaging or on the bottom of the pan. • You can check whether your cookware is suitable by carrying out a magnet test. - Page 27 However the bottom of the pan must have a minimum diameter according to the corespond cooking zone. To obtain the best efficiency of your hob, please place the pan in the centre of the cooking zone. The base diameter of induction cookware. HCI302TB3 HCI604TB3, HCI604TG3 Cooking zone Minimum (mm) Cooking zone Minimum (mm)
-
Page 28: Using Your Induction Cooktop
Using your Induction Cooktop To start cooking 1. Touch the ON/OFF control. After power on, the buzzer beeps once, all displays show “ – “ or “ – – “, indicating that the cooktop has entered into standby mode. 2. Place a suitable pan on the cooking zone that you wish to use. -
Page 29: When You Have Finished Cooking
“0”, then shows “H”. and then 3. For model HCI604TB3/HCI604TG3, you can also turn off the heating zone instantly by selecting the cooking zone which you want to turn off then touching “-” and “+” at the same time. - Page 30 Using the Power Management For model HCI604TB3/HCI604TG3 Using power management you can set the total power to 2.5kW/ 3.0kW/ 4.5kW/ 6.5kW and 7.4kW. The default total power setting is the maximum power level. Setting the total power level to fit your requirement 1.
- Page 31 Power management Rules If total power exceeds the limitation of 2.5kw, 3.0kw, 4.5kw, 6.5kw (depending on which level you’ve set), you are not able to increase power stage of any zone. If you increase it by touching ‘+’, the cooktop will beep 3 times and indicator will show a flashing ‘Pn’.
- Page 32 The power display will show “P” to indicate that the zone is set to Boost mode. 3.1For HCI604TB3/HCI604TG3, the Boost power level will last for 5 minutes and then the zone will go back to the power level 9.
-
Page 33: Restrictions When Using
5 or below. Otherwise the boost function will be unable to activate. When the group is in flex mode, both zones can be set to boost. Specially for HCI604TB3/HCI604TG3, the boost function will have a different limitation in each group according to the Power Management of 2.5kW/ 3.0kW/... - Page 34 The five zone model is also divided into two groups. In group a, if using boost on one zone, first make sure that the other zone is set to power level 5 or below. When group a is in flex mode, both zones can be set to Boost function. In group b, you can only use Boost function for one zone at a time.
- Page 35 Flex Zone • This area can be used as a single zone or as two different zones, according to cooking needs. • The flex zone is made of two independent inductors that can be controlled separately. When working as a single zone, as cookware is moved from one zone to another within the flexible area the cooktop will keep the power level for the cookware constant.
- Page 36 As two independent zones To use the flexible area as two different zones with different power settings, press the flex zone icon again and the zones will return into their previous settings. Using the Flex Zone 啊 1.Choose one zone that you want to use the flex zone function, then touch the flex zone icon.
-
Page 37: Using The Grill Function
Using the Grill Function The grill function sets the cooktop flex zone to a preset 2 hour power profile suitable for grilling. Choose the heating zone that you wish to use Grill, hold the flex zone icon for 3 sec.The display shows “ ”... -
Page 38: Using The Pause Function
Using the Pause Function Pause function can be used at any time during cooking. It allows the cooking to stop instantly and then resume at the previous power settings. 1. Make sure the cook zone is powered on. Touch the PAUSE icon, the cooking zone indicator will show “ll”.And then the operation of the induction cooktop will be disabled for all cooking zones, except the PAUSE, on/off and lock keys. - Page 39 Use the Keep Warm Function 1.1 For model HCI604FTB3/HCI604FTG3:Touch the desired zone select icon, then touch the keep warm icon . The zone will start keep warm mode and "A"will show on the display. 1.2 For model HCI905FTB3/HCI905FTG3:Touch the desired zone select icon, then hold the keep warm icon for 3 sec.
-
Page 40: Locking The Controls
• When the controls are locked, all the controls except the ON/OFF control are disabled. To lock the controls For model HCI302TB3, HCI604TB3, HCI604TG3, HCI604FTB3 Touch the keylock control , The timer indicator will show “ Lo “ For model HCI905FTB3 Hold the keylock control for 3 sec. -
Page 41: Detection Of Small Articles
Detection of Small Articles When an unsuitable size or non-magnetic pan (e.g. aluminium), or some other small item (e.g. knife, fork, key) has been left on the hob, the hob will automatically go into standby mode in 1 minute. The fan will keep running and cooling down the induction hob for a further 1 minute, and then will be off. -
Page 42: Using The Timer As A Minute Minder
Using the Timer You can use the timer in two different ways: 1. You can use it as a minute minder. In this case, the timer will not turn any cooking zone off when the set time is up. 2. You can set it to turn one cooking zone off after the set time is up. •... - Page 43 display. 3. Set the time by touching the “-” or “+” control. Hint: Touch the “-” or “+” control once to decrease or increase by 1 minute. Touch and hold the “-” or “+” control, the timer will decrease or increase by 10 minutes.
- Page 44 If you want to check the set time of another heating zone, touch its heating zone selection control. The timer will indicate its set time. (set to 6 minutes) (set to 3 minutes) 2. When cooking timer expires, the corresponding heating zone will automatically switch off and show “H”.
-
Page 45: Cooking Guidelines
Cooking Guidelines Take care when frying as the oil and fat heat up very quickly, particularly if you’re using PowerBoost. At extremely high termperatures oil and fat will ignite spontaneously and this presents a serious fire risk. Cooking Tips • When food comes to the boil, reduce the temperature setting. •... -
Page 46: Heat Settings
Heat Settings The settings below are guidelines only. The exact setting will depend on several factors, including your cookware and the amount you are cooking. Experiment with the induction hob to find the settings that best suit you. Heat setting Suitability •... -
Page 47: Care And Cleaning
Care and Cleaning What? How? Important! Everyday soiling on 1. Switch the power to the • When the power to the cooktop is glass (fingerprints, cooktop off. switched off, there will be no ‘hot marks, stains left by 2. Apply a cooktop cleaner surface’... -
Page 48: Troubleshooting
Trouble Shooting Problem Possible causes What to do The induction hob No power. Make sure the induction hob is cannot be turned on. connected to the power supply and that it is switched on. Check whether there is a power outage in your home or area. -
Page 49: Fault Codes And Troubleshooting
The induction hob or a Technical fault. Please note down the error cooking zone has letters and numbers, switch turned itself off the power to the induction hob unexpectedly, a tone off at the wall, and contact a sounds and an error qualified technician. -
Page 50: Technical Specification
Supply Voltage 220-240V~, 50-60Hz Installed Electric Power 3000-3800W Product Size L×W×H(mm) 288X520X60 Cut out Dimensions AxB(mm) X500 Cooking Hob HCI604TB3,HCI604TG3 Cooking Zones 4 Zones Supply Voltage 220-240V~, 50-60Hz 1.6kw:1440-1760W or Installed Electric Power 2.0kw:1800-2200W or 2.5kw:2250-2750W or 3.0 kw:2700-3300W or 4.5kw:4050-4950W or... - Page 51 Cooking Hob HCI905FTB3 Cooking Zones 5 Zones Supply Voltage 220-240V~, 50-60Hz Installed Electric Power 6800-7400W Product Size L×W×H(mm) 900X520X60 Cut out Dimensions AxB(mm) X490 Weight and Dimensions are approximate, as shown above.
-
Page 52: Manufacturer's Warranty
You must produce both warranty card and proof of purchase in the event of a warranty repair being required. When you purchase any new Haier Product you automatically receive a two year Manufacturer's Warranty covering parts and labour for servicing. - Page 53 correcting such unauthorised repairs. Normal recommended maintenance as set out in the Product’s User Guide. Repairs when the appliance has been dismantled, repaired or serviced by other than an AUTHORISED CUSTOMER SERVICE CENTRE or the selling dealer. G Pick up and delivery. H Transportation or travelling costs involved in the repair when the product is installed outside the AUTHORISED CUSTOMER SERVICE CENTRE’S normal service area.
-
Page 54: Customer Care
You have read the problem solving section in your User Guide. If after checking these points you still need assistance, please refer to your nearest Haier Authorised Repairer. In New Zealand, if you need assistance...* Call your retailer who is trained to provide information on your appliance, or if we... - Page 55 Product Details Model ---------------------------------------Serial No. ----------------------------- Date of Purchase----------------------------Purchaser----------------------------- Dealer---------------------------------------Suburb--------------------------------- Town----------------------------------------Country-------------------------------- Thank you for choosing Haier. We are confident that you will enjoy many years of good service from your appliance.
- Page 57 Code:Z308720995 Edition:V18 Publication Date October 12, 2022...