Siemens Pointek CLS200 Operating Instructions Manual
Hide thumbs
Also See for Pointek CLS200:
- Quick start manual (200 pages) ,
- Operating instructions manual (129 pages) ,
- Instruction manual (114 pages)
Table of Contents
Advertisement
Quick Links
Pointek CLS200/CLS300 digital
Point level
Capacitance switches
Pointek CLS200/CLS300 digital
Operating Instructions
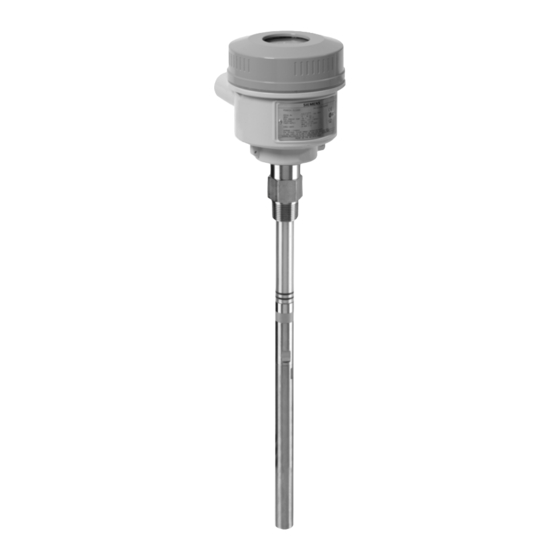
7ML5640 (CLS200, rod version)
7ML5641 (CLS200, cable version)
7ML5642 (CLS200, rod version, sanitary connection)
7ML5643 (CLS200, sliding coupling)
7ML5660 (CLS300, rod version)
7ML5661 (CLS300, cable version)
05/2021
A5E47904060-AA
Safety notes
The manual
Abbreviations and
identifications
Pointek CLS200/300
Installation
Wiring
Local operation
Wiring
Remote operation
PROFIBUS PA Parameters
Technical data
Technical reference
Maintenance and repairs
Profibus PA profile
structure
Hazardous area installation
Dimensions
Shortening the cable
Product documentation and
support
1
2
3
4
5
6
7
8
9
10
11
A
B
C
D
E
F
G
Advertisement
Table of Contents

Related Manuals for Siemens Pointek CLS200


Summary of Contents for Siemens Pointek CLS200
- Page 1 Pointek CLS200/CLS300 digital Safety notes The manual Abbreviations and identifications Point level Pointek CLS200/300 Installation Capacitance switches Pointek CLS200/CLS300 digital Wiring Local operation Wiring Operating Instructions Remote operation PROFIBUS PA Parameters Technical data Technical reference Maintenance and repairs Profibus PA profile...
- Page 2 Note the following: WARNING Siemens products may only be used for the applications described in the catalog and in the relevant technical documentation. If products and components from other manufacturers are used, these must be recommended or approved by Siemens. Proper transport, storage, installation, assembly, commissioning, operation and maintenance are required to ensure that the products operate safely and without any problems.
-
Page 3: Table Of Contents
Safety marking symbols ....................... 7 The manual ............................8 Application examples ......................9 Abbreviations and identifications ....................... 10 Abbreviations and identifications ..................10 Pointek CLS200/300 ..........................11 Pointek CLS200/300 applications..................12 Alarm signalling ......................... 12 Features ..........................13 System implementation ..................... 13 4.4.1... - Page 4 Configuration example ...................... 70 PROFIBUS PA Parameters ........................71 10.1 Measured Values ....................... 71 10.1.1 Functions .......................... 71 10.1.2 Changing parameter settings ..................... 72 10.1.3 Filling level status ......................72 10.1.4 Lock ..........................79 Pointek CLS200/CLS300 digital Operating Instructions, 05/2021, A5E47904060-AA...
- Page 5 CLS200 electrode ....................... 88 CLS300 electrode ....................... 89 Sensor test ........................90 PROFIBUS PA electronics: mode of operation ..............91 Pointek CLS200 digital pressure versus temperature curves ..........92 A.9.1 CLS200 compact and extended rod versions, threaded ............92 A.9.2 CLS200 cable version, threaded ..................
- Page 6 Dimensions ............................116 CLS200 ..........................116 CLS300 ..........................127 Shortening the cable ......................... 138 Pointek CLS200 Digital, cable version ................138 Pointek CLS300 Digital, cable version ................142 Product documentation and support ....................143 Product documentation ....................143 Technical support ......................144 Glossary .............................
-
Page 7: Safety Notes
Means important information about the product or that part of the operating manual. Safety marking symbols In manual On Product Description Caution: refer to accompanying documents (manual) for details. Earth (ground) Terminal Protective Conductor Terminal Pointek CLS200/CLS300 digital Operating Instructions, 05/2021, A5E47904060-AA... -
Page 8: The Manual
Note Please follow the installation and operating procedures for a quick, trouble-free installation and to ensure the maximum accuracy and reliability of your Pointek CLS200/ 300. This manual applies to the Pointek CLS200/300 Digital models only. Pointek CLS200/300 is available in two models, Standard and Digital. For information on the CLS200/300 Standard model, please see manual 7ML19985JH02. -
Page 9: Application Examples
Sections in this manual are designated as follows: 1. Digital: Information is applicable to any CLS200/300 Digital unit (indicated by Digital in the page footers) – Pointek CLS200/300 (Page 11) - an introduction to Pointek CLS200/300 Digital model and to the manual – Technical data (Page 80) –... -
Page 10: Abbreviations And Identifications
Farads Farad Process Device Manager configuration tool PEEK Polyaryletherether- organic polymer ketone Polyphenylene Sulfide polymer PTFE Polytetrafluoroethylene thermoplastic fluoro- polymer PVDF Polyvinylidene Fluoride engineered fluoropoly- Pointek CLS200/CLS300 digital Operating Instructions, 05/2021, A5E47904060-AA... -
Page 11: Pointek Cls200/300
For information on the CLS200/300 Standard, please see manual 7ML19985JH02. • Pointek CLS200/300 is to be used only in the manner outlined in this instruction manual, otherwise protection provided by the equipment may be impaired. • This product is intended for use in industrial areas. Operation of this equipment in a residential area may cause interference to several frequency-based communications. -
Page 12: Pointek Cls200/300 Applications
③ Hub or gland/optional M12 plug Refer to Approvals (Page 86) for CE applications. Pointek CLS200/300 applications Pointek CLS200/300 is designed for level detection and simple pump control in a variety of applications: • Liquids, solids (powder and granules), slurries, interface detection (for example, oil/ water), and foam detection •... -
Page 13: Features
• Patented Active Shield minimizes the effect of product build-up at the sensor mounting point (CLS300 only) Refer to Approvals (Page 86) for CE applications. System implementation Pointek CLS200/300 supports PROFIBUS communication protocol, and SIMATIC PDM software. Pointek CLS200/CLS300 digital Operating Instructions, 05/2021, A5E47904060-AA... -
Page 14: Programming
4.4.1 Programming Pointek CLS200/300 carries out its level measurement function according to the set of built-in parameters. You can make parameter changes locally via the local user interface, or from a remote location via a PC using SIMATIC PDM software. -
Page 15: Installation
When lifting CLS200 from a horizontal position, support it at these three points: ① At the process connection of flange ② Midway along the rod ③ At the end of the rod before the sensor Pointek CLS200/CLS300 digital Operating Instructions, 05/2021, A5E47904060-AA... -
Page 16: Location
• Provide a sun shield to protect the transmitter from direct heat radiation. Precautions: • Avoid mounting Pointek CLS200 in locations subject to strong vibrations in the vicinity, whenever possible. • Do not exceed the permissible ambient temperature limits (see Environmental in Technical data (Page 80) for details). -
Page 17: Mounting
Installation 5.1 Pointek CLS200 5.1.3.2 Mounting Pointek CLS200 (compact threaded probe shown) High level alarm Low level alarm ① Normal process level ② Vertical ③ Normal process level ④ Horizontal For high level alarm (level exceeds normal process level): • normally mounted into the vessel top, or •... -
Page 18: Mounting Restrictions
Installation 5.1 Pointek CLS200 5.1.3.3 Mounting restrictions Note • Keep the sensor at least 50 mm (2") away from any nozzle or tank wall. • If multiple units are used, allow at least 100 mm (4") between them, to prevent interference. -
Page 19: Cls200 Dimensions
See also Mechanical (Page 82) 5.1.3.4 CLS200 Dimensions Dimensions for all versions of the Pointek CLS200 Digital can be found in CLS200 (Page 116). 5.1.4 Process cautions CLS200 NOTICE • The maximum allowable torque on a horizontally installed rod is 15 Nm. - Page 20 Installation 5.1 Pointek CLS200 Pointek CLS200/CLS300 digital Operating Instructions, 05/2021, A5E47904060-AA...
-
Page 21: Pointek Cls300
• normally mounted into the vessel top, or • mounted through the tank wall at the detection level For low level alarm (level drops below normal process level): • mounted through the tank wall at the detection level Pointek CLS200/CLS300 digital Operating Instructions, 05/2021, A5E47904060-AA... -
Page 22: Mounting Restrictions
• Keep the sensor at least 50 mm (2") away from any nozzle or tank wall. • If multiple units are used, allow at least 500 mm (20") between them, to prevent interference. Pointek CLS200/CLS300 digital Operating Instructions, 05/2021, A5E47904060-AA... - Page 23 Installation 5.2 Pointek CLS300 Multiple Units Sensors must be 500 mm (20") Mount diagonally is space is restricted. apart. Pointek CLS200/CLS300 digital Operating Instructions, 05/2021, A5E47904060-AA...
-
Page 24: Process Cautions Cls300
• Keep unit out of path of falling material, or protect probe from falling material. • Consider material surface configuration when installing unit. • Tensile load must not exceed probe or vessel rating. Pointek CLS200/CLS300 digital Operating Instructions, 05/2021, A5E47904060-AA... - Page 25 Installation 5.2 Pointek CLS300 Pointek CLS200/CLS300 digital Operating Instructions, 05/2021, A5E47904060-AA...
-
Page 26: Cls300 Dimensions
5.2 Pointek CLS300 Note Buildup of material in Active Shield area does not affect switch operation. 5.2.4 CLS300 Dimensions Dimensions for all versions of the Pointek CLS300 Digital can be found in CLS300 (Page 127). Pointek CLS200/CLS300 digital Operating Instructions, 05/2021, A5E47904060-AA... -
Page 27: Wiring
• Cable entry devices and closing elements of unused apertures must meet a temperature range from min. -40 to 10 K above maximum ambient temperature. Pointek CLS200/CLS300 digital Operating Instructions, 05/2021, A5E47904060-AA... -
Page 28: Cable Entries
2. Feed cable through dome nut and clamping insert. Fold braided shield over clamping insert. Make sure that braided shield overlaps the O-ring by 3/32" (2 mm) and covers the entry 360 degrees. 3. Push clamping insert into body and tighten dome nut. Assemble into housing. Pointek CLS200/CLS300 digital Operating Instructions, 05/2021, A5E47904060-AA... - Page 29 (2) to the entry (5), and turn a further 1/2 to 3/4 turn with a wrench. Note Support the cable to prevent it from twisting. To ease the wiring inside the enclosure, it may be beneficial to strip the inner sheath of the cable. Pointek CLS200/CLS300 digital Operating Instructions, 05/2021, A5E47904060-AA...
- Page 30 Alarm output solid-state switch ② Test output ③ Sensor ④ Reed contact ⑤ Connect the power cable to these terminals. (Polarity is not important.) Note Switch and potentiometer settings are for illustration purposes only. Pointek CLS200/CLS300 digital Operating Instructions, 05/2021, A5E47904060-AA...
-
Page 31: Connection To Screw Terminals
8. Replace the Local User Interface (LUI). 9. To adjust the transmitter locally, using the keypad, see Programming via the Local User Interface (LUI) (Page 38). After adjustment, replace the enclosure lid and tighten the lid clip. Pointek CLS200/CLS300 digital Operating Instructions, 05/2021, A5E47904060-AA... - Page 32 For FM/CSA: see FM/CSA connection drawing (Page 115) Connect protective earth wire to terminal provided in housing and marked with: Use a crimp type cable socket for 4 mm screw diameter, ring form, or U-form (e.g. DIN 46234) Pointek CLS200/CLS300 digital Operating Instructions, 05/2021, A5E47904060-AA...
-
Page 33: Profibus Pa Connection Via M12 Plug
(to avoid interference), in some cases, it may be preferable to ground one side only, to avoid ground loops. This is particularly important if the device is mounted on cathodically protected tanks. Pointek CLS200/CLS300 digital Operating Instructions, 05/2021, A5E47904060-AA... -
Page 34: Local Operation
The local digital display shows one of the following: • the measured value and associated units • the logical level (sensor covered/ uncovered) • the numerical value and mode number • an error message and status information. • software revision number Pointek CLS200/CLS300 digital Operating Instructions, 05/2021, A5E47904060-AA... -
Page 35: Run Mode Display
The default startup display is the measured value display. It shows the value (in counts when Sensor (Sens) has been selected in Mode 13. Sensor uncovered Sensor covered ① Communication indicator ① Bar graph ② Down arrow indicates alarm output switch open Pointek CLS200/CLS300 digital Operating Instructions, 05/2021, A5E47904060-AA... - Page 36 Edge) are indicated as black vertical lines on the upper part of the graph; Rising Edge is the is the point where the output state is switched on and Falling Edge is the point where it is switched off. Pointek CLS200/CLS300 digital Operating Instructions, 05/2021, A5E47904060-AA...
- Page 37 See Counts in Counts (Page 88) for more details. See Discrete Input Function Block in Block model for recording and processing measured values (Page 100). See Transducer Block (TB) in Block model for recording and processing measured values (Page 100). Pointek CLS200/CLS300 digital Operating Instructions, 05/2021, A5E47904060-AA...
-
Page 38: Program Mode Display (Local Operation)
The keypad consists of three input keys below the display: M, ⇑,and ⇓. A flashing digit indicates the position of the cursor. M - Mode key ⇑ - increment key ⇓ - cursor movement/accept value Pointek CLS200/CLS300 digital Operating Instructions, 05/2021, A5E47904060-AA... -
Page 39: Mode Selection And Adjustment
HW Write Either key activates keylock. Hold for 5 – – = disabled (parameter changes al- Protection seconds to lowed) release L = enabled (parameter changes inhibit- Pointek CLS200/CLS300 digital Operating Instructions, 05/2021, A5E47904060-AA... - Page 40 Lock, explains how to release this using SIMATIC PDM. In measuring mode, if neither L, LA, LL, Lc or Li, appears in the Mode indicator display field, local operation is possible. Pointek CLS200/CLS300 digital Operating Instructions, 05/2021, A5E47904060-AA...
-
Page 41: Status Codes
1 F_004 Value too large to fit in LCD display (>99999 or <- Change display value units 99999) F_008 Local adjustment of parameters blocked by SIMATIC Enable “Local operation” with SIMATIC PDM Pointek CLS200/CLS300 digital Operating Instructions, 05/2021, A5E47904060-AA... -
Page 42: Mode 2: Sensor Test (Default: Off)
SENSOR TEST FAILED, as rolling text. Sensor test using PROFIBUS PA • Please see Sensor test (Page 79) for details. Note Output state does not change when sensor test is initiated. Test magnet is supplied with the instrument. Pointek CLS200/CLS300 digital Operating Instructions, 05/2021, A5E47904060-AA... -
Page 43: Mode 4: Rise Time (Default: 0.0 S)
The bar graph, and numerical value in counts, continue to respond instantaneously to changes in level. 7.2.7 Mode 10: HW Write Protection (default: OFF, display – –) Note When HW Write Protection is enabled, L appears in the Mode display field, in normal measuring mode. Pointek CLS200/CLS300 digital Operating Instructions, 05/2021, A5E47904060-AA... -
Page 44: Mode 13: Display Source (Default: 0)
Bar graph and ON or OFF Value From Transducer Block: Sensor SENS none Bar graph and counts value Value From Transducer Block: electronics TMP E K, °C, °F, or °R Temperature in units temperature: Electronics tempera- ture Pointek CLS200/CLS300 digital Operating Instructions, 05/2021, A5E47904060-AA... -
Page 45: Mode 14: Unit (Default: °C)
• Ensure that you set a unique node address to the device. Otherwise, the devices with the same addresses will cause confusion on the bus. Applies to PROFIBUS PA applications only. If in standalone application (no network), leave the node address at the default value. Pointek CLS200/CLS300 digital Operating Instructions, 05/2021, A5E47904060-AA... -
Page 46: Mode 16: Profibus Ident Number (Default: 1)
7.2 Programming via the Local User Interface (LUI) 7.2.11 Mode 16: PROFIBUS Ident Number (default: 1) Determines which of two device operating modes to select. Pointek CLS200/300 Digital recognizes two operating modes in relation to the DP Master: Mode Description Conforms to profile version 3.0 Class... - Page 47 7. After editing the least significant digit (or leaving it unchanged), press ⇓ to terminate the procedure and save the new value. The display now shows the new value for the 0% Application Range setting. 8. Press M to exit. Pointek CLS200/CLS300 digital Operating Instructions, 05/2021, A5E47904060-AA...
-
Page 48: Mode 20: 100% Application Range Setting
7. After editing the least significant digit (or leaving it unchanged), press ⇓ to terminate the procedure and save the new value. The display now shows the new value for the 100% Application Range setting. 8. Press M to exit. Pointek CLS200/CLS300 digital Operating Instructions, 05/2021, A5E47904060-AA... -
Page 49: Mode 23: Alarm Output Trigger (Default: Diag)
Sensor Value above sensor range tic interrupt) Sensor Value below sensor range Electronics temperature above nominal range Electronics temperature below nominal range Memory check of RAM, ROM, EEPROM not passed (test running in background) Pointek CLS200/CLS300 digital Operating Instructions, 05/2021, A5E47904060-AA... -
Page 50: Mode 24: Contact Type (Default: Close)
If you change this parameter, the position of the switch changes immediately. Adapted applications or devices can react unintentionally. Note This adjustment is independent of the Inversion Output parameter of the Discrete Input Function Block, which can only be set remotely. Pointek CLS200/CLS300 digital Operating Instructions, 05/2021, A5E47904060-AA... -
Page 51: Mode 25: Switch Point Off To On/Switch Point 1/Rising Edge (Default: 55%)
• After editing or leaving the least significant digit unchanged, press ⇓ to terminate procedure and save the new value. • You see the new setting for Switch Point 1. • Repeat the process, or press M to exit. Pointek CLS200/CLS300 digital Operating Instructions, 05/2021, A5E47904060-AA... -
Page 52: Mode 26: Switch Point On To Off/ Falling Edge (Default: 45%)
You can select between the numeric format described above, or text as English, German, French, Spanish, or Italian strings. The strings are represented as rolling text. Language format Display message numeric U_075 Italian ItALI Spanish ESPAn French FrAnC German dEUtS English EnGLI Pointek CLS200/CLS300 digital Operating Instructions, 05/2021, A5E47904060-AA... - Page 53 To select the status format: • Select Mode 27. • The current setting is shown in the primary reading field. • Press ⇑ or ⇓ to select a new format. • Press M to save and exit. Pointek CLS200/CLS300 digital Operating Instructions, 05/2021, A5E47904060-AA...
-
Page 54: Cls200 Digital Switching Point Setup
/ wet solids • high viscosity and high conductivity liquids Interface detec- sensor immersed in the mate- • liquid A / liquid B tion rial with the highest dielectric • foam / liquid constant Pointek CLS200/CLS300 digital Operating Instructions, 05/2021, A5E47904060-AA... - Page 55 Off switch point) of 10% must be maintained for reliable operation. In some situations, it may be desirable to increase the hysteresis between the two switch points to prevent false tripping (e.g. turbulence in the process). 5. Adjust the other parameters of the device as desired. Pointek CLS200/CLS300 digital Operating Instructions, 05/2021, A5E47904060-AA...
-
Page 56: Cls300 Digital Switching Point Setup
Interface detec- Sensor immersed in the mate- • liquid A / liquid B tion rial with the highest dielectric • foam / liquid constant Pointek CLS200/CLS300 digital Operating Instructions, 05/2021, A5E47904060-AA... - Page 57 (e.g. turbulence in the process). • All parameters should be set up to account for a possible deviation of ±1% of the actual measurement under reference conditions. 6. Adjust the other parameters of the device as desired. Pointek CLS200/CLS300 digital Operating Instructions, 05/2021, A5E47904060-AA...
-
Page 58: Wiring
Note • Lay PROFIBUS PA cable separately from power cable with voltages greater than 60 V. • Avoid locating Pointek CLS200/300 Digital near large electrical equipment wherever possible. • Connect the cable shield to earth (for example, to the housing by means of a metallic screwed gland). -
Page 59: Profibus Pa Connection To Screw Terminals
8. Replace the digital display. 9. If you want to adjust the transmitter locally using the keypad, go to Programming via the Local User Interface (LUI) (Page 38): if not, replace the enclosure lid. Pointek CLS200/CLS300 digital Operating Instructions, 05/2021, A5E47904060-AA... - Page 60 Wiring 8.1 Connecting to a PROFIBUS PA network ① Alarm output solid-state switch ② Test output ③ Sensor ④ Reed contact ⑤ PROFIBUS PA Pointek CLS200/CLS300 digital Operating Instructions, 05/2021, A5E47904060-AA...
-
Page 61: Profibus Pa Connection Via M12 Plug
(to avoid interference), in some cases, it may be preferable to ground one side only, to avoid ground loops. This is particularly important if the device is mounted on cathodically protected tanks. Pointek CLS200/CLS300 digital Operating Instructions, 05/2021, A5E47904060-AA... -
Page 62: Remote Operation
PROFIBUS PA is an open industrial protocol. Full details about PROFIBUS PA can be obtained from PROFIBUS International at www.profibus.com (www.profibus.com). Pointek CLS200/300 Digital is a Class B, Profile Version 3.01, PA device. It supports Class 1 Master for cyclic and acyclic data exchange, and Class 2 for acyclic services: (see Cyclic versus acyclic data (Page 63) for details). -
Page 63: Setting The Profibus Address
• Configuration and maintenance information is needed infrequently, and is set up as acyclic data. Acyclic data transmission Pointek CLS200/300 supports up to four simultaneous connections by a Class 2 Master (C2 connection). It supports one connection by a Class 1 Master (C1 connection). Pointek CLS200/CLS300 digital... -
Page 64: Status
Cyclic data transmission transfers the user data relevant for process automation between the Class 1 Master (control or automation system) and the transmitter. When you configure Pointek CLS200/300 on the PROFIBUS PA bus, there is one slot available for modules, and the Level Status module is automatically inserted. -
Page 65: Status Byte
Corrective Measure display Is used if no other information is available B_015 Bad; Device failure; Device has an irreparable Error. Replace the electronics. Value constant B_016 Bad; Sensor failure Sensor test failed Check sensor Pointek CLS200/CLS300 digital Operating Instructions, 05/2021, A5E47904060-AA... - Page 66 Diagnostics In addition to information on the usability of the measured value, Pointek CLS200/300 can actively report information on its own status. Diagnostics are important information, which an automation system can use to introduce remedial measures.
- Page 67 Function check Invalid process conditions Byte 3 Extended diag- nostics available With a warm start, the volatile data is preserved. With a cold start, all volatile data is lost. Pointek CLS200/CLS300 digital Operating Instructions, 05/2021, A5E47904060-AA...
- Page 68 To return to normal operation, disable the simulation with SIMATIC PDM Note The instrument status can be simulated using SIMATIC PDM. This allows you to test the reaction of the automation system to errors. Pointek CLS200/CLS300 digital Operating Instructions, 05/2021, A5E47904060-AA...
- Page 69 Remote operation 9.2 Status Self tests Pointek CLS200/300 carries out the following self tests: Self Tests Self test func- Algorithm Frequency Diagnostic error Corrective meas- tion message Measure the If electronics temperature Every meas- Electronics tem- Reduce ambient electronics exceeds 85 °C...
-
Page 70: Configuration Example
To configure and use PROFIBUS PA with an S7-300/400 PLC 1. If Pointek CLS200/300 is not listed in the STEP 7 device catalog, you can download the DeviceInstall file from the Siemens Milltronics website and run it from your computer. Go to CLS200 web page (https://new.siemens.com/global/en/products/automation/process-... -
Page 71: Profibus Pa Parameters
It is essential to check settings during the process itself, and confirm that they are correct, before regular operation commences. The full range of Pointek CLS200/300 functions is available only via remote operation using PROFIBUS PA. To use PROFIBUS PA, you will need a PC configuration tool: we recommend SIMATIC PDM. For more information see SIMATIC PDM (Page 62). -
Page 72: Changing Parameter Settings
Initial setup can be carried out prior to mounting into the process, but it is extremely important to calibrate the unit and adjust the sensitivity on the product itself. • First launch SIMATIC PDM, connect to Pointek CLS200/300, and upload data from the device (the status fields change to Loaded). - Page 73 • Go to Input > Transducer Block: Discrete Input > Delay > Rise Time (Off to On) and set the value from 0 to 100 seconds. • Go to Fall Time (On to Off), and set the value from 0 to 100 seconds. • Press Enter: the status field reads Changed. Pointek CLS200/CLS300 digital Operating Instructions, 05/2021, A5E47904060-AA...
- Page 74 Output simulation allows you to provide process values for the cyclic class 1 Master, to test how the automation program processes those values. Carry out the following settings: 1. Open the Device Menu Simulation. 2. Select the register Output. 3. Set the target mode to MAN (manual). Pointek CLS200/CLS300 digital Operating Instructions, 05/2021, A5E47904060-AA...
- Page 75 With a parameterizable slope you can make the simulation value dynamic. It runs from a starting value to an end value in a step function, dwelling on each step for the preset period of time. At the end value the direction is reversed. Pointek CLS200/CLS300 digital Operating Instructions, 05/2021, A5E47904060-AA...
- Page 76 3. Set Simulation Electronic Temperature, then set the parameters: – either enter a fixed value for Electronics Temperature fixed – or adjust the ramp parameters for Electronic Temperature ramp 4. Transfer the settings to the device. Pointek CLS200/CLS300 digital Operating Instructions, 05/2021, A5E47904060-AA...
- Page 77 6. Click on Transmit. 7. Track the effect of the adjustment by looking at the Sensor Value Discrete. The application range is defined by the 0% and 100% settings (see Adjust 0 % application range setting). Pointek CLS200/CLS300 digital Operating Instructions, 05/2021, A5E47904060-AA...
- Page 78 • Resetting the PROFIBUS address to 126 Factory reset (restart/cold startup) If Pointek CLS200/300 has been adjusted to such an extent that it can no longer fulfil its measuring tasks, you can use Factory Reset to recreate the delivery status. It resets most parameters to the factory setting.
-
Page 79: Lock
PROFIBUS PA Parameters 10.1 Measured Values 10.1.4 Lock Secures Pointek CLS200/300 from changes. Lock Options Parameter name Effect Turn on/off Digital display HW Write Protec- Parameter changes using SIMATIC PDM, and Keypad Mode 10 tion settings via local operation, are both disa- bled. -
Page 80: Technical Data
Technical data Note Siemens makes every attempt to ensure the accuracy of these specifications, but reserves the right to change them at any time. 11.1 Pointek CLS200/300 11.1.1 Power Bus voltage general purpose 12 to 30 V DC, 12.5 mA intrinsically Safe 12 to 24 V DC, 12.5 mA, FISCO field device... -
Page 81: Interface
Technical data 11.1 Pointek CLS200/300 11.1.3 Interface Configuration • locally, using local user interface (LUI), for standalone operation, or • remotely, using SIMATIC PDM on a Profibus PA network Local Digital Display • LCD Output (bus) PROFIBUS PA (IEC 61158 CPF3 CP3/2) -
Page 82: Alarm Outputs
Technical data 11.1 Pointek CLS200/300 11.1.4 Alarm outputs solid-state switch galvanically isolated non-polarity sensitive transistor rated 30V DC or peak AC max., 82mA max voltage drop below 1 V typical @ 50 mA With intrinsically safe: barrier required • for ATEX: U... - Page 83 Technical data 11.1 Pointek CLS200/300 Electrode - CLS300 digital Model Length Process Connections Tensile Wetted Parts (max) (max) Rod (19 mm/ 1000 • Threaded: ¾”, 1", or 1 ½" BSPT • 316L stainless steel 0.75” dia.) mm/40” (R), BSPP (G) or NPT; 1 ¼” NPT •...
- Page 84 (outdoor applications). For CE requirements the use of EMC rated cable entries is required for all CLS200 devices. Weight Weight varies based on configuration. For example: compact Pointek CLS200, 100 mm (4”) insertion 1 kg (2.20 lb.) approx. length, ¾” process connection Pointek CLS200/CLS300 digital...
-
Page 85: Environmental
Installation category Pollution degree 11.1.8 Process Note Refer to Pointek CLS200 digital pressure versus temperature curves (Page 92) and Pointek CLS300 digital pressure versus temperature curves (Page 95). Relative dielectric constant (ε 1.5 minimum CLS200 temperature: without temperature extended –40 to 85 °C (–40 to 185 °F) -
Page 86: Approvals
Barrier or Intrinsically Safe power supply required for Intrinsically Safe protection Note EN 61326 (CE EMC) testing was conducted on the Pointek CLS200 while mounted in a metallic vessel and wired using shielded cable, where the cable was terminated in an EMC cable gland at the device entry point. -
Page 87: Technical Reference
For definitions relating to capacitance, see the Glossary. The relative dielectric constant of air (vacuum) is 1: all other materials have a higher value. Pointek CLS200/CLS300 digital Operating Instructions, 05/2021, A5E47904060-AA... -
Page 88: High Frequency Oscillator
The Pointek CLS200 electrode is the primary sensor of the system. It supplies the electrical capacitance value. The reference is the environment at the time of setup. The design of the Pointek CLS200 probe makes it very sensitive to changes in capacitance in the immediate vicinity of the electrode tip. -
Page 89: Cls300 Electrode
Active Shield section. This effectively eliminates any electrical potential difference between the shield and the measurement section and prevents additional changes in capacitance occurring, especially when material builds up at the probe entrance to the tank. Pointek CLS200/CLS300 digital Operating Instructions, 05/2021, A5E47904060-AA... -
Page 90: Sensor Test
You can initialize a sensor test by activating the reed contact with a magnet from outside the housing. For details, see Magnet-activated sensor test in Mode 2: Sensor test (default: OFF) (Page 42). A test magnet will be supplied with the instrument. Pointek CLS200/CLS300 digital Operating Instructions, 05/2021, A5E47904060-AA... -
Page 91: Profibus Pa Electronics: Mode Of Operation
① Sensor ② Isolation ③ Micro controller ④ PROFIBUS PA interface ⑤ Non-volatile memory ⑥ Digital display ⑦ Keyboard for local operation ⑧ Read relay ⑨ Isolation ⑩ Alarm output solid-state switch Pointek CLS200/CLS300 digital Operating Instructions, 05/2021, A5E47904060-AA... -
Page 92: Pointek Cls200 Digital Pressure Versus Temperature Curves
Technical reference A.9 Pointek CLS200 digital pressure versus temperature curves Pointek CLS200 digital pressure versus temperature curves A.9.1 CLS200 compact and extended rod versions, threaded ① Atmospheric ② Permitted operating pressure ③ Permitted operating temperature A.9.2 CLS200 cable version, threaded ①... -
Page 93: Cls200 Sanitary Compact And Extended Rod Versions
Technical reference A.9 Pointek CLS200 digital pressure versus temperature curves A.9.3 CLS200 sanitary compact and extended rod versions ① Atmospheric ② Permitted operating pressure ③ Permitted operating temperature A.9.4 CLS200 compact and extended rod, ASME welded flange ① Atmospheric ②... -
Page 94: Cls200 Cable, Asme Welded Flange
Technical reference A.9 Pointek CLS200 digital pressure versus temperature curves A.9.5 CLS200 cable, ASME welded flange ① Atmospheric ② Permitted operating pressure ③ ASME 150 lb ④ Permitted operating temperature The curve denotes the minimum allowable flange class for the shaded area below. -
Page 95: Cls200 Cable, En Welded Flange
The curve denotes the minimum allowable flange class for the shaded area below. A.10 Pointek CLS300 digital pressure versus temperature curves A.10.1 CLS300 standard, extended rod and cable versions, threaded ① Atmospheric ② Permitted operating pressure ③ Permitted operating temperature Pointek CLS200/CLS300 digital Operating Instructions, 05/2021, A5E47904060-AA... -
Page 96: Cls300 High Temperature Rod Version, Threaded
CLS300 standard, extended rod and cable versions, ASME welded flange ① Atmospheric ② Permitted operating pressure ③ ASME 300 lb ④ ASME 150 lb ⑤ Permitted operating temperature The curves denote the minimum allowable flange class for the shaded area below. Pointek CLS200/CLS300 digital Operating Instructions, 05/2021, A5E47904060-AA... -
Page 97: Cls300 High Temperature Rod Version, Asme Welded Flange
CLS300 standard, extended rod and cable versions, EN welded flange ① Atmospheric ② Permitted operating pressure ③ PN 40 ④ PN 16 ⑤ Permitted operating temperature The curves denote the minimum allowable flange class for the shaded area below. Pointek CLS200/CLS300 digital Operating Instructions, 05/2021, A5E47904060-AA... -
Page 98: Cls300 High Temperature Rod Version, En Welded Flange
CLS300 high temperature rod version, EN welded flange ① Atmospheric ② Permitted operating pressure ③ PN 40 ④ PN 16 ⑤ Permitted operating temperature The curves denote the minimum allowable flange class for the shaded area below. Pointek CLS200/CLS300 digital Operating Instructions, 05/2021, A5E47904060-AA... -
Page 99: Maintenance And Repairs
Please note the following: • The user is responsible for all changes and repairs made to the device. • All new components must be provided by Siemens Milltronics Process Instruments Inc. • Restrict repair to faulty components only. -
Page 100: Profibus Pa Profile Structure
The Transducer Block also carries out the required temperature measurement functions and monitors the permitted temperature limits. Pointek CLS200/CLS300 digital Operating Instructions, 05/2021, A5E47904060-AA... -
Page 101: Parameters For Local Digital Display
The figure below shows the signal flow of measured values from the sensor through the Transducer Block into the output value (Primary Value). The parameters of the individual functions (switch behavior and delay) can be changed via acyclic access (SIMATIC PDM). Pointek CLS200/CLS300 digital Operating Instructions, 05/2021, A5E47904060-AA... - Page 102 Drag indicators occurred. See Counts in Counts (Page 88) for more detail. See Drag indicators (Peak indicators) in Filling level status (Page 72) for more detail. Pointek CLS200/CLS300 digital Operating Instructions, 05/2021, A5E47904060-AA...
-
Page 103: Discrete Input Function Block
Setting Description Output value AUTO automatic the automatically recorded measured value manual a manually set, fixed simulation value function block disabled the preset safety value. • The result is the output parameter (OUT). Pointek CLS200/CLS300 digital Operating Instructions, 05/2021, A5E47904060-AA... -
Page 104: Hazardous Area Installation
2023 2024 2025 2026 2027 2029 manufac- ture Marking code Intrinsically safe supply For intrinsically safe models, power must be supplied from an Intrinsically Safe power source, otherwise protection is no longer guaranteed. Pointek CLS200/CLS300 digital Operating Instructions, 05/2021, A5E47904060-AA... - Page 105 The installer is responsible for providing appropriate strain-relief to prevent pulling or twisting. • Versions with blanking element mounted by default. Blanking elements are not to be used with any form of adaptors or reducers. Pointek CLS200/CLS300 digital Operating Instructions, 05/2021, A5E47904060-AA...
- Page 106 This shall be verified by measurement when installed. Pointek CLS200/CLS300 digital Operating Instructions, 05/2021, A5E47904060-AA...
-
Page 107: Cls200 Approvals
Integral version II 3 G Ex ic nA IIC TX Gc Remote version Electronics enclosure II 3 G Ex ic nA IIC TX Gc Level probe II 3 G Ex ic IIC TX Gc Pointek CLS200/CLS300 digital Operating Instructions, 05/2021, A5E47904060-AA... -
Page 108: Atex: Permitted Zones For Installation (Cls200)
D.2 CLS200 approvals D.2.2 ATEX: permitted zones for installation (CLS200) Rod version Ambient side Dust applications Gas applications Marking Da/Db Ga/Gb Category Zone Process side Dust applications Gas applications Category Zone Cable version Pointek CLS200/CLS300 digital Operating Instructions, 05/2021, A5E47904060-AA... -
Page 109: Flame Proof And Dust Ignition Proof (Cls200)
-40 to +80 °C (-40 to +176 °F) T90 °C For process temperature > 85 °C: only applicable for versions with thermal isolator With option FFKM O-ring seal: lower process temperature limited to - 20 °C (-4 °F) Pointek CLS200/CLS300 digital Operating Instructions, 05/2021, A5E47904060-AA... -
Page 110: Intrinsically Safe
-40 to +60 °C (-40 to +140 °F) For process temperature > 85 °C: only applicable for versions with thermal isolator With option FFKM O-ring seal: lower process temperature limited to - 20 °C (-4 °F) Pointek CLS200/CLS300 digital Operating Instructions, 05/2021, A5E47904060-AA... -
Page 111: Inmetro (Cls200)
-40 to +40 °C (-40 to +40 °F) -40 to +40 °C (-40 to +40 °F) -40 to +85 °C (- 40 to +185 °F) -40 to +125 °C (- 40 to +257°F) Pointek CLS200/CLS300 digital Operating Instructions, 05/2021, A5E47904060-AA... -
Page 112: Cls300 Approvals
II 1/2 D Ex ia IIIC TX Da/Db High temperature version II 1 G Ex ia IIC TX Ga II 1/2 D Ex ia IIIC TX Da/Db D.3.2 ATEX: permitted zones for installation (CLS300) Pointek CLS200/CLS300 digital Operating Instructions, 05/2021, A5E47904060-AA... -
Page 113: Flame Proof, Dust Ignition Proof And Intrinsically Safe (Cls300)
With option FFKM O-ring seal: lower process temperature limited to -20 °C (-4 °F) For process temperature > 85 °C. Only applicable for versions with thermal isolator or for High temperature version Only applicable for High Temperature version Pointek CLS200/CLS300 digital Operating Instructions, 05/2021, A5E47904060-AA... -
Page 114: Inmetro (Cls300)
Installation shall be done according to FM/CSA connection drawing (Page 115). Ambient temperature range Temperature class -40 to +40 °C (-40 to +40 °F) -40 to +85 °C (- 40 to +185 °F) Pointek CLS200/CLS300 digital Operating Instructions, 05/2021, A5E47904060-AA... -
Page 115: Fm/Csa Connection Drawing
Hazardous area installation D.4 FM/CSA connection drawing FM/CSA connection drawing Pointek CLS200/CLS300 digital Operating Instructions, 05/2021, A5E47904060-AA... -
Page 116: Dimensions
Dimensions CLS200 Enclosure, threaded process connection ① 2 cable entries 1/2" NPT or M20x1.5 ② Thermal isolator Pointek CLS200/CLS300 digital Operating Instructions, 05/2021, A5E47904060-AA... - Page 117 Dimensions E.1 CLS200 Compact version, threaded ① Electronics/enclosure ② PPS or optional PVDF probe Pointek CLS200/CLS300 digital Operating Instructions, 05/2021, A5E47904060-AA...
- Page 118 Extended rod version, threaded ① Y01 (insertion length) Min. insertion length = 200 mm (7.87") Max. insertion length = 5500 mm (216") ② 316L stainless steel extension ③ PPS or optional PVDF probe Pointek CLS200/CLS300 digital Operating Instructions, 05/2021, A5E47904060-AA...
- Page 119 Dimensions E.1 CLS200 Sanitary compact version ① 316L stainless steel sanitary process connection ② PPS or optional PVDF probe Pointek CLS200/CLS300 digital Operating Instructions, 05/2021, A5E47904060-AA...
- Page 120 Y01 (insertion length) Min. insertion length = 110 mm (4.3") Max. insertion length = 5500 mm (216") ② 316L stainless steel sanitary process connection ③ 316L stainless steel extension ④ PPS or optional PVDF probe Pointek CLS200/CLS300 digital Operating Instructions, 05/2021, A5E47904060-AA...
- Page 121 Sliding coupling version, threaded ① Y01 (insertion length) Min. insertion length = 350 mm (13.82") Max. insertion length = 5500 mm (216") ② 316L stainless steel sliding coupling ③ PPS or optional PVDF probe Pointek CLS200/CLS300 digital Operating Instructions, 05/2021, A5E47904060-AA...
- Page 122 ② FEP insulated cable ∅ 6 mm (0.3") Min. insertion length = 500 mm (19.69") ③ 316L stainless steel sensor weight Max. insertion length = 3500 mm (1378") ④ PPS or optional PVDF probe Pointek CLS200/CLS300 digital Operating Instructions, 05/2021, A5E47904060-AA...
- Page 123 1/2" NPT or M20x1.5 ② Thermal isolator Flange facing table Flange facing (raised face) Flange class Facing thickness Δ ASME150/300 2 mm (0.08") Δ ASME600/900 7 mm (0.28") Δ PN16/40 2 mm (0.08") Pointek CLS200/CLS300 digital Operating Instructions, 05/2021, A5E47904060-AA...
- Page 124 Dimensions E.1 CLS200 Compact version, welded flange ① Electronics/enclosure ② PPS or optional PVDF probe Pointek CLS200/CLS300 digital Operating Instructions, 05/2021, A5E47904060-AA...
- Page 125 Extended rod version, welded flange ① Y01 (insertion length) Min. insertion length = 200 mm (7.87") Max. insertion length = 5500 mm (216") ② 315L stainless steel extension ③ PPS or optional PVDF probe Pointek CLS200/CLS300 digital Operating Instructions, 05/2021, A5E47904060-AA...
- Page 126 FEP insulated cable ∅ 6 mm (0.3") Min. insertion length = 500 mm (19.69") ③ 316L stainless steel sensor weight Max. insertion length = 30000 mm (1181") ④ PPS or optional PVDF probe Pointek CLS200/CLS300 digital Operating Instructions, 05/2021, A5E47904060-AA...
-
Page 127: Cls300
Dimensions E.2 CLS300 CLS300 Threaded process connection ① 2 cable entries 1/2 NPT or M20x1.5 ② Thermal isolator Pointek CLS200/CLS300 digital Operating Instructions, 05/2021, A5E47904060-AA... - Page 128 Min. = 350 mm (14") Max. = 1000 mm (39.37") ⑥ Measuring length ⑦ Probe Extended Active Shield (Y02): standard length 125 mm (4.92") Optional Active Shield lengths: 250 mm (9.84") or 400 mm (15.75") Pointek CLS200/CLS300 digital Operating Instructions, 05/2021, A5E47904060-AA...
- Page 129 Min.= 350 mm (14") Max.= 1000 mm (39") ③ Thermal isolator ⑥ Measuring length ④ Y02 Extended Active Shield: standard length 125 mm (4.92") Optional Active Shield lengths: 250 mm (9.84") or 400 mm (15.75") Pointek CLS200/CLS300 digital Operating Instructions, 05/2021, A5E47904060-AA...
- Page 130 Extended Active Shield: standard length 125 mm (4.92") Optional Active Shield lengths: 250 mm (9.84") or 400 mm (15.75") ③ Y01 (insertion length) Min. = 1000 mm (40") Max. = 25000 mm (984") ④ Measuring length ⑤ Stainless steel weight Pointek CLS200/CLS300 digital Operating Instructions, 05/2021, A5E47904060-AA...
- Page 131 ∅ 10 mm (0.35") Max. = 25000 mm (984") ③ Y02 ⑤ Measuring length Extended Active Shield: standard length 125 mm (4.92") Optional Active Shield lengths: 250 mm (9.84") or 400 mm (15.75") Pointek CLS200/CLS300 digital Operating Instructions, 05/2021, A5E47904060-AA...
- Page 132 Dimensions E.2 CLS300 Flanged process connections ① 2 cable entries 1/2" NPT or M20x1.5 ② M20: 135 mm (5.32") 1/2" NPT: 150 mm (5.91") ③ Thermal isolator Pointek CLS200/CLS300 digital Operating Instructions, 05/2021, A5E47904060-AA...
- Page 133 Max. = 1000 mm (39.37") ③ Lid clip ⑦ Measuring length ④ Lid ⑤ Y02 Extended Active Shield: standard length 105 mm (4.13") Optional Active Shield lengths: 230 mm (9.06") or 380 mm (14.96") Pointek CLS200/CLS300 digital Operating Instructions, 05/2021, A5E47904060-AA...
- Page 134 Min. = 250 mm (9.8") Max. = 1000 mm (39.37") ③ Thermal isolator ⑥ Measuring length ④ Y02 Extended Active Shield: standard length 105 mm (4.13") Optional Active Shield lengths: 230 mm (9.06") or 380 mm (14.96") Pointek CLS200/CLS300 digital Operating Instructions, 05/2021, A5E47904060-AA...
- Page 135 Extended Active Shield: standard length 105 mm (4.13") Optional Active Shield lengths: 230 mm (9.06") or 380 mm (14.96") Insertion length does not include any raised face/gasket face dimension, see Flange Facing table. Pointek CLS200/CLS300 digital Operating Instructions, 05/2021, A5E47904060-AA...
- Page 136 Extended active shield: standard length 105 mm (4.13") Optional active shield lengths: 230 mm (9.06") or 380 mm (14.96") ④ Insertion length does not include any raised face/gasket face dimensions. ⑤ Measuring length Pointek CLS200/CLS300 digital Operating Instructions, 05/2021, A5E47904060-AA...
- Page 137 Dimensions E.2 CLS300 Pointek CLS200/CLS300 digital Operating Instructions, 05/2021, A5E47904060-AA...
-
Page 138: Shortening The Cable
Shortening the cable Pointek CLS200 Digital, cable version CAUTION Possible only with the general purpose configuration; please verify against product nameplate. Preparation Determine the required cable length, and subtract that amount from the actual length, to find the excess length to cut off. - Page 139 Shortening the cable F.1 Pointek CLS200 Digital, cable version Steps 1. Unscrew the cable gland compression nut to relieve the sealing cone and release the cable. ① Cable gland compression nut ② Probe sleeve ③ Probe, lower assembly 2. Unscrew the probe sleeve from the lower assembly using two 17 mm (0.67") wrenches across the flat surfaces, as shown below.
- Page 140 Shortening the cable F.1 Pointek CLS200 Digital, cable version 3. Remove the heat shrink insulation covering the solder connections. ① Lead ② 9.5 mm (0.37") heat shrink insulation ③ Cable core ④ Tension block ⑤ Steel spacer 4. Unsolder the connections.
- Page 141 Shortening the cable F.1 Pointek CLS200 Digital, cable version 11.Prepare the leads for soldering, and if heat shrink is used to insulate splices, remember to slip on the heat shrink before soldering the leads. 12.Make the solder connections and position the heat shrink to completely insulate each solder connection before shrinking it.
-
Page 142: Pointek Cls300 Digital, Cable Version
Make sure that no cable strands are pushed out of their position in the cable and that the cable is fully inserted. 5. Re-fasten the weight by tightening the three set screws. Pointek CLS200/CLS300 digital Operating Instructions, 05/2021, A5E47904060-AA... -
Page 143: Product Documentation And Support
Entering a serial number 1. Open the PIA Life Cycle Portal (https://www.pia-portal.automation.siemens.com). 2. Select the desired language. 3. Enter the serial number of your device. The product documentation relevant for your device is displayed and can be downloaded. -
Page 144: Technical Support
In addition to our technical support, Siemens offers comprehensive online services at Service & Support (http://www.siemens.com/automation/service&support). Contact If you have further questions about the device, contact your local Siemens representative at Personal Contact (http://www.automation.siemens.com/partner). To find the contact for your product, go to "all products and branches" and select "Products &... -
Page 145: Glossary
“the units are implicit in pF”, the units are implied, or assumed to be pF, because there is no other option. miscible capable of being mixed. Pointek CLS200/CLS300 digital Operating Instructions, 05/2021, A5E47904060-AA... - Page 146 PROFIBUS slave on every bus scan, along with the main process variable (output of the Analog Input Function Block). stillpipe a grounded metal tube with openings. Pointek CLS200/CLS300 digital Operating Instructions, 05/2021, A5E47904060-AA...
-
Page 147: Index
Customer Support, (Refer to Technical support) cyclic data transmission, 64 GSD file, 62 data transmission, 64 delay setting local operation, 43 high frequency oscillator, 88 delay settings Hotline, (Refer to Support request) PROFIBUS PA, 73 Pointek CLS200/CLS300 digital Operating Instructions, 05/2021, A5E47904060-AA... - Page 148 17, 18, 21 Internet, 144 mounting restrictions, 22 shortening the cable, 138 multiple units, 23 SIMATIC PDM overview, 62 simulation PROFIBUS PA, 74 operating principles, 87 status, 64 status byte, 65 status codes overview, 65 Pointek CLS200/CLS300 digital Operating Instructions, 05/2021, A5E47904060-AA...
- Page 149 144 tension block, 139 transducer block electronics temperature, 102 function groups, 102 wiring PROFIBUS connection, 58 PROFIBUS PA warnings and notes, 58 requirements, standalone unit, 27 wiring (PROFIBUS PA) warnings and notes, 58 Pointek CLS200/CLS300 digital Operating Instructions, 05/2021, A5E47904060-AA...
- Page 150 Index Pointek CLS200/CLS300 digital Operating Instructions, 05/2021, A5E47904060-AA...