Table of Contents
Advertisement
Quick Links
Advertisement
Table of Contents

Related Manuals for NEC DT 2000


Summary of Contents for NEC DT 2000
- Page 1 Digital Talk 2000 Owner's Manual...
-
Page 2: Battery Disposal
BE COLLECTED, RECYCLED OR DISPOSED OF IN AN ENVIRONMENTALLY SOUND MANNER. Battery Recommendations: The NEC Digital Talk 2000 Series IS-136 TDMA cellular phone you have purchased is designed to deliver quality performance and provide you with years of use. To maintain optimum performance, NEC recommends only using NEC Authentic Accessories with all NEC cellular phones. -
Page 3: Exposure To Radio Frequency Energy
READ THIS INFORMATION BEFORE USING YOUR HAND-HELD PORTABLE CELLULAR TELEPHONE First introduced in 1984, the hand-held portable cellular telephone is one of the most exciting and innovative electronic products ever developed. With it you can stay in contact with your office, your home, emergency services, and others. For the safe and efficient operation of your phone, observe these guidelines. -
Page 4: Hearing Aids
If your phone has an extendable antenna, extend it fully. Some models allow you to place a call with the antenna retracted. However, your phone operates more efficiently with the antenna fully extended. Hold the phone as you would any other telephone. While speaking directly into the mouthpiece, position the antenna up and over your shoulder. -
Page 5: Blasting Areas
RF energy may affect improperly installed or inadequately shielded electronic operating and entertainment systems in motor vehicles. Check with the manufacturer or its representative to determine if these systems are adequately shielded from external RF energy. You should also check with the manufacturer of any equipment that has been added to your vehicle. -
Page 6: Potentially Explosive Atmospheres
Research sponsored by the Wireless Technology Research, LLC ("WTR"), indicates that some wireless telephones cause interference with pacemakers. Accordingly, NEC America endorses the following recommendations issued by the WTR: Wireless phones should be kept at a safe distance from a pacemaker. -
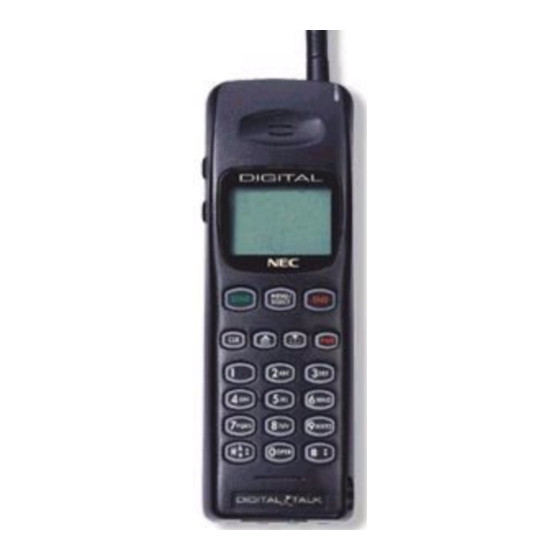
Page 7: Controls And Features
CONTROLS AND FEATURES Volume Rechargeable Battery Pack Battery Charging Jack CONTENTS Antenna Earpiece Receiver Liquid Crystal Display Call Control Keys Function Keys Dialing/SMS Scroll Keys Symbol Keys/ Scroll Keys Microphone Battery Locking Catch Sounder/Speaker External Connector Battery Charging Contacts... - Page 8 DISPLAY INDICATORS Signal Strength Indicator Clock Alarm Indicator Battery Charge Indicator Full Lock Indicator Partial Lock Indicator Digital Service Indicator Analog Service IndicatorH Home Service IndicatorR Roam Service Indicator Function Mode Indicator In Conversation Indicator Call Timer Indicator Short Message Indicator Voice Mail Indicator Repeat Dial System Indicator...
-
Page 9: Table Of Contents
Getting Started Installing and Removing the Battery The Battery Charge Indicator Charging and Recharging the Battery Display Indicators Quick Reference Guide List of Menu Functions Operation of the Phone Turning On or Off Placing a Call Receiving a Call Signal Strength Volume Keys Last Number Redial Speed Dialing... -
Page 10: Getting Started
Exiting Message Review Mode Sort Order Feature Voice Mail Feature Roll Off Feature Word Wrap Feature SMS Initialize Feature SID Management (System Identifier) Non-Public Mode NAM Programming Maintenance Care and Maintenance Troubleshooting Limited Warranty Technical Information NEC Service Support GETTING STARTED... -
Page 11: Installing And Removing The Battery
The battery pack is a sealed unit with no serviceable parts inside. Do not attempt to open the case. WARNING: Use only NEC approved batteries, antennas, and chargers. The use of any other types will invalidate any approval or warranty applying to the telephone. -
Page 12: The Battery Charge Indicator
The Battery Charge Indicator is visible on the upper right corner of the display. When the battery charge falls to a preset level, the phone displays a warning message, RECHARGE BATTERY, and an audible double beep sounds six times at 10- second intervals. -
Page 13: Quick Reference Guide
Shows cellular signal strength. Analog/Digital Service Indicator Current Date Current Time FEB 0 2 12:00 a m SYSTEM? System Identifier NOTE: If system identifier alphanumeric name exceeds 10 digits, the system identifier name is not displayed. Analog/Digital Conversation Indicator In Conversation Indicator Home/Roam Indicator Analog/Digital... - Page 14 Turn on/off Make call End call Answer call Clear digit Clear display Last number redial Adjust earpiece volume Press VOL (In conversation) Adjust ringer volume Adjust keytone volume Press VOL (In Standby) Retrieve Text Msgs Retrieve Voice Mail Call Lists ____________________The Memory___________________ Store a phone number Key in number and/or (name [using automatically in next...
-
Page 15: List Of Menu Functions
TOTAL TIME Home,Roam ALARM CLOCK On,Off,Alm ALPHA TAG Names TONE FUNCTION Alert,Escalating, DTMF,Call Tone,Ring Volume CALL PROCESSING Auto ans, Any key answer, Sys Sel,Multi NAM, One touch, Language, Backlight LOCK PHONE Call lists,Auto lock, Fixed dial,End to End, Memo lock,Temp Code, Initialize,Total Time, Wake up msg DATE AND TIME... -
Page 16: Operation Of The Phone
OPERATION OF THE PHONE 1) Press the PWR key and hold it for at least 2 seconds. The phone will carry out a short self-test sequence, then briefly display a default wake-up message or your wake-up message if you have programmed one into the phone. 2) When the Signal Strength Indicator, Date and Time Home or Roam indicator appears on the display, the phone is ready for use. -
Page 17: Receiving A Call
If the No Service Bars appear, cellular service area. If the lock indicators, the display, your phone has been electronically LOCKED (see Locking/Unlocking the Phone). You can still make emergency calls when the phone is locked. 1) When there is an incoming call, the phone rings, and the CALL message flashes on the display. -
Page 18: Last Number Redial
LAST NUMBER REDIAL The last number dialed can be redialed automatically without re-entering it. (The number can still be retrieved even if the phone has been switched off and back on.) 1) With the display cleared, press SND. 2) The number you last called will appear on the display and is automatically redialed. -
Page 19: Menu Facility
The menu allows you to operate or check the setting of certain features. Although the menu method can take longer than the alternative shortcut method, it is often easier to remember. 1) Press FCN (Hold). 2) The display will read FCN 1 Total Time with the 1 flashing. Use # or to step forward or backward through the list of function menus. -
Page 20: The Memory
Menu Function/Description Language Backlight Lock Code Function Time Stamp Clear Auto Lock Fixed Dial End to End Memo Lock Temp Code Initialize Total Time Clear Wake Up Message Clock Set Special Function Call Type Voice Mail Number Roll Off Order Word Wrap SMS Initialize SID Management... -
Page 21: Storing Information
STORING INFORMATION 1) Key in the phone number. 2) Press FCN + 3. 3) Enter in the name (see Keying in Names, page 15). 4) If you want the information stored in the first available memory location, simply press FCN+MEM (hold). 5) The message Stored will be shown on the display along with the first vacant memory location. -
Page 22: Recalling Phone Numbers From Memory
1) After entering phone number and/or name (or after recalling a phone number) 1 2 3 4 5 6 7 WORK 2) Press FCN+MEM+ W. 3) Press group number (Example 1). The phone searches the vacant memory according to the entered number. -
Page 23: Keying In Names
1) Press MEM + Memory Location Number (for example, 12 if known). If not known use # or W W W W W to find the desired memory location. 1) Press FCN + 3. The cursor appears on the display to indicate that the phone is in the name or character entry mode. -
Page 24: Editing Names Or Numbers
EDITING NAMES OR NUMBERS If you make a mistake while keying in a name or a number, you can correct it as follows: 1) Press CLR to delete the last character or digit. 2) Press and hold CLR to clear the whole display. Note that this clears both the name and the number entered. -
Page 25: Recalling A Memory Location Number
RECALLING A MEMORY LOCATION NUMBER 1) Press MEM. The display will show. 2) Key in memory location number (Example 12). If the memory location is empty, the display will show. 3) Call the number by pressing SND. SCANNING PHONE NUMBERS SEQUENTIALLY 1) To scan the entire memory, press MEM + 0 + 1 to display the contents of the first memory location. -
Page 26: Scratchpad
2) Pressing # or W W W W W will allow you to scroll through the memory. 3) When you find the name you want, make the call by pressing SND. SCRATCHPAD Digits can be entered during a conversation. These digits appear on the display and are also transmitted over the air (if the End-to-End setting has not been turned off). - Page 27 FULL LOCK When the phone is fully locked, only emergency calls (911) can be made, but any call can be received. Note that with the phone in full lock, emergency calls to 911 can be sent, but the dialed digits, 911, do not appear on the display. Storing to memory is also not available when the phone is fully locked.
- Page 28 PARTIAL LOCK When the phone is partially locked, only emergency calls (911) and any numbers stored in memory locations 1 through 9 can be made, but any call can be received. Note that with the phone in partial lock, emergency calls to 911 can be sent, but the dialed digits, 911, do not appear on the display.
-
Page 29: Length Of Your Calls
LENGTH OF YOUR CALLS The phone allows you to check the duration of your current call. Upon making or receiving a call, the current call timer begins counting. This is shown on the display. Talk time of call in progress At the end of the call, the timer stops counting. -
Page 30: Setting The Backlight
2) Enter your 4-digit lock code. Note: For security the display will not show the 4-digit lock code. 3) Press 8. 4) Press MEM. Your total call time counters are now reset to zeros. 5) Press CLR (Hold) to return to standby mode. SETTING THE BACKLIGHT When any key except PWR is pressed, the phone keypad and display backlight is illuminated for ease in viewing. -
Page 31: Setting The Key Tone Volume Level
To turn the backlight setting on or off with the phone connected to a vehicle power adapter: 1) Press FCN + 5. 2) Press 9. 3) Press MEM to turn the backlight setting on or off; press CLR to save the selection and return to the standby mode. SETTING THE KEY TONE VOLUME LEVEL These tones sound each time you press a key. -
Page 32: Selecting Alert Tone Type
2) Use MEM key to select Off,Min,Low,Mid or Max. 3) Press 1 to hear the ring tone. 4) Press CLR to exit and save selection If you select Off, when a call is coming in, the display will flash, the CALL message will appear and flash. SELECTING ALERT TONE TYPE The Alert Tone on your phone can be selected from four different tone combinations. -
Page 33: Dtmf Tone Transmission
To Change the Network: 1) Press FCN + 5. FCN 5 _ Call Proc Function 2) Press 5. FCN 5 5 Multi NAM 3) Press MEM to select between NAM 1 and NAM 2. FCN 55 Multi NAM Note: If only one NAM has been programmed and you press the MEM key, an alarm tone will sound and the display will show NAM-1. -
Page 34: Tone Generator
2) Enter in your lock code. Note: The lock code is supplied by the dealer. If you forget your lock code contact your dealer. The factory default lock code is 0000. 3) Press 4. 4) Press MEM to turn End to End on or off. Note: End to End has to be in the ON state before DTMF Tones can be transmitted, or the PAUSE/MEM LINK feature is operational. -
Page 35: Pauses
1) Press FCN + 4. 2) Press 3. 3) Press MEM to turn Long DTMF on or off. 4) Press CLR. The phone returns to normal standby. Second, recall a number from a memory location and send it as a DTMF tone. (MEM, and the memory location number). Send the DTMF tones by pressing SND. -
Page 36: Memory Linking
For example, this function may be used for calling a paging system and sending commands, ID numbers (PIN), and/or numeric messages: “123456789” + “P” + “123456789#” + SND + SND (1) This is the phone number to be called via the cellular system. (2) This character indicates a Manual Pause. -
Page 37: System Selection (Including Roaming)
There is usually an additional charge for roaming calls. Note: The ESN for your phone is located in the battery compartment of the phone, and comprises of the first 8 digits preceded by NEC’s company code of 229. -29-... - Page 38 To Change the System Selection: 1) Press FCN + 5. 2) Press 4. The phone will display its current roaming mode. 3) Press MEM to advance through the system selections. Home Only This service is limited to the Home Area. Will go to "No Svc"...
-
Page 39: Call Lists
Standard Standard allows the phone to first search for a free channel in the Home system. If the phone cannot find a free channel, it searches the other system. Note: The home system depends on the current NAM selection. The ROAM indicator [A] or [B] will be displayed when you are using a system that is not your home system. -
Page 40: Muting/Unmuting
3) Press # or W W W W W to scroll through calls. 2:30 a 2141234567 NEC ELECT Outgoing 4) Press SND to call a displayed phone number; press FCN + MEM + Memory Location (for example, 12) or FCN + MEM (hold) to store a number;... -
Page 41: Low Battery Alarm
2) Press FCN + 9. This switches the microphone back on. FULL MUTE: 1) Press FCN + 9 (Hold) This switches off both the microphone and earpiece or speaker. 2) Press FCN + 9. This switches the microphone, earpiece and speaker back on. LOW BATTERY ALARM The Low Battery Alarm warns the user when the battery power is getting low, by emitting a short double tone. -
Page 42: Error Tone
ALARM CLOCK, AUTO POWER ON, AND AUTO POWER OFF FUNCTION The alarm clock function allows the user to set the time at which the phone alarm sounds with the phone alarm being used as an alarm clock. The phone powers on automatically if the power is off at the alarm set time. - Page 43 4) Press VOL. The flashing moves to the minutes field. 5) Enter Alarm Time (i.e., 31). (00 to 59 are valid entries for Minutes.) 6) Press VOL. The phone alarm is set at 11:31 AM and the flashing minute field stops flashing. The setting mode ends and the display shows: flashing 7) Pressing MEM turns the Alarm Indicator on or off.
-
Page 44: Setting Automatic Power On
Setting Automatic Power On: The phone user can set a specified time that the phone automatically powers on each day. Once the selection is set, the phone automatically powers on every day at the same time. This function can be set and reset by pressing MEM. 1) Press FCN + 2. -
Page 45: Setting Automatic Power Off
5) Press VOL. The flashing moves to the minutes field. 6) Enter Automatic On Time (Example 59) (00 to 59 are valid entries for Minutes.) 7) Press VOL. The phone sets at 8:59PM and the flashing minute stops flashing. The setting mode ends and the display shows: flashing 8) Pressing MEM turns the automatic power on feature on or... - Page 46 1) Press FCN + 2. flashing 2) Press # or W W W W W . Place the flashing indicator to the OFF position. flashing 3) Press VOL. The flashing indicator moves to the hour field. flashes 4) Enter Automatic Off Time (i.e., 8). (01 to 12 are valid entries for hour.) Press MEM anytime the hour or minute field is flashing to change to either am or pm.
-
Page 47: Escalating Alert
7) Press VOL. The phone sets at 8:30PM and the flashing minute stops flashing. The setting mode ends and the display shows: flashing 8) Pressing MEM turns the automatic power off feature on or off by displaying the power off time when its on and all dashes when the feature is off. -
Page 48: Automatic Locking
3) Press MEM. This turns the function on or off. 4) Press CLR. The phone returns to normal standby. AUTOMATIC LOCKING With this function activated, the phone places itself into Full Lock condition automatically upon power on. The four (4) digit lock code or the three (3) digit Temporary Lock Code must be used to unlock the phone. -
Page 49: Fixed Digit Dialing
3) Press 2. 4) Press MEM. To turn Auto Lock on or off. 5) Press CLR. The phone returns to normal standby. FIXED DIGIT DIALING The phone allows you to restrict the number of digits on outgoing overseas calls or other long distance phone numbers. - Page 50 2) Enter four (4) digit lock code. Note: The lock code is supplied by the dealer. If you forget your lock code, contact your dealer. The factory default lock code is 0000. 3) Press 3. 4) Press the digit key as follows: For No Restriction (Normal), Press 0 + 0.
- Page 51 For 7-Digit Restriction, Press 0 + 7. flashing For 11-Digit Restriction, Press 1 + 1. flashing 5) Press MEM. The entered number stops flashing and the data is stored to memory. If a ‘0’ was entered, the display changes to indicate normal which is no dialing restriction. 6) Press CLR.
-
Page 52: Speed Dial Memory Locking
SPEED DIAL MEMORY LOCKING This function prevents, either partially or completely, unauthorized access to the speed dial numbers stored in the memory. This function also prohibits memory access, scrollpad memory access, last number dialed access, and call lists. There are three separate setting for the Speed Dial Memory Lock. -
Page 53: Temporary Lock Code Set
4) Press MEM. To Select Level of Speed Dial Memory Lock. F C N 6 5 M e m o L o c k o f f 5) Press CLR. The phone returns to normal standby. TEMPORARY LOCK CODE SET This function allows the user to program any three (3) digit temporary lock code to lock or unlock the phone without revealing your personal four (4) digit lock code. - Page 54 2) Enter four (4) digit lock code. Note: The lock code is supplied by the dealer. If you forget your lock code, contact your dealer. The factory default lock code is 0000. 3) Press 6. The phone shows current three (3) digit code. Factory default code is 000.
-
Page 55: Reset User Settings (Default)
RESET USER SETTINGS (DEFAULT) This function initializes all the phone’s user settings to their default state. 1) Press FCN + 6 and Enter your 4-digit Lock Code. 2) Enter your four (4) digit Lock Code. 3) Press 7. 4) Press MEM. The Phone Resets to the Defaults listed below: (1) Total Talk Time: [000h00m] (2) Call Lists: [00m00s]... -
Page 56: Wake-Up Message Programming
WAKE-UP MESSAGE PROGRAMMING This function allows the user to enter a Wake-Up Message. This message appears for 4.5 seconds each time the phone is turned on. 1) Press FCN + 6. 2) Enter four (4) digit lock code. Note: The lock code is supplied by the dealer. If you forget your lock code, contact your dealer. -
Page 57: Call Type
You can enter up to 30 characters with blank spaces and symbols also counted as characters. Pressing the CLR key allows you to clear the digits one at a time to correct any mistakes made. 6) Press MEM. The wake-up message will be stored into memory. -
Page 58: Automatic Repeat Dialing
3) Press CLR. The phone returns to normal standby. AUTOMATIC REPEAT DIALING The phone is capable of automatically redialing the same phone number up to three times with a 60-second interval between each try. After the third try, the phone will automatically cancel the repeat dial mode and go back to normal standby. -
Page 59: One-Touch Dialing
This process is repeated three (3) times. If after the third time the call is not answered the repeat dial mode ends and the “RD” indicator disappears from the display. If the calling number answers, Press CLR + FCN + 9 to talk. 3) Press CLR. -
Page 60: Multiple Language Selection
3) Press MEM. This turns One-Touch on or off. 4) Press CLR. The phone returns to normal standby. MULTIPLE LANGUAGE SELECTION Your phone has the capability of displaying three (3) different languages on the display. The user can select which language (English, French, Spanish) they feel most comfortable with, and the phone will remain in that language until changed. -
Page 61: Clock/Calendar Setting
4) Press CLR. The phone returns to normal standby in a different language. CLOCK/CALENDAR SETTING This function sets the year, month, day and time. The phone automatically sets the day of the week every time when the year, month and the day are set. The Year range is from 1996 to 2095. - Page 62 5) Press MEM to select either am or pm. 6) Press #. The minutes are now set and display moves to month. Nov is flashing 7) Enter Month Number (Example Jan=1,Feb=2,Mar=3 etc.). 5 is flashing 8) Press #. Month is now set and display shows day. 3 is flashing 9) Enter correct date (Example 1,10,21,30 etc.).
-
Page 63: Minutes Reminder Tone
11) Enter in correct year (Example 1996,1997,1998,etc.). 12) Press #. Year is now set and display goes back to hour and flashes. 9 is flashing Note: If correct year is already displayed press #. 13) Press CLR. The phone returns to normal standby with the correct date and time. -
Page 64: Sid Management
2) Press 4. The display shows the currently selected Call Tone mode. 3) Press MEM to select the setting on or off. 4) Press CLR The phone returns to normal standby. While in the conversation mode, a "Double Beep" will sound at the end of each minute. -
Page 65: Short Message Alerts
The number of messages that can be stored is determined by the number of text characters in the stored messages. For example, the phone can store up to one hundred and sixty 37- character messages, eighty 80-character messages, and 30 240-character messages. - Page 66 EMERGENCY MESSAGE EMERGENCY Messages Press MEM NOTE: Pressing MEM key allows you to go to the message view mode and the incoming message will be displayed on the screen. URGENT MESSAGE URGENT Messages Press MEM NOTE: Pressing MEM key allows you to go to the message view mode and the incoming message will be displayed on the screen.
-
Page 67: Message Memory
VOICE MAIL MESSAGES You Have Voice Mail Press SND to Access NOTE: By pressing the SND key, the phone will call the voice mail number programmed into your phone. If the voice mail number is not programmed into your phone an alarm tone will sound and the screen below will be displayed. -
Page 68: Periodic Message Notification
PERIODIC MESSAGE NOTIFICATION Your DT2000 cellular phone continually monitors for any unread messages you may have received and will provide user notification as follows: EMERGENCY MESSAGES Your cellular phone scans for any unread emergency messages every 30 seconds and if any are found the following screen will be displayed: NOTE: Pressing MEM key allows you to go to the message view mode and the incoming message will be... -
Page 69: Message View Mode Keypad Summary
1) Press: the UP [U] or DOWN [V] keys to advance through the message screens. Message Number NOTE: A line of six dashes separates the header from the message text. MESSAGE VIEW MODE KEYPAD SUMMARY When in the Message View Mode, the following keypad summary applies: o UP [U] - Scroll up one line. -
Page 70: Message Headers
2) Pressing the UP [U] or DOWN [V] keys allows you to scroll through the messages. 3) After entering the Message View Mode and no messages exist, the phone will sound an alarm tone and the following display will be shown: Two types of message headers are available in your phone, Normal or Expanded. -
Page 71: Message Separators
Msg Number Time Phone Rec Msg Time Base Rec Msg Message Type Manual Acknowledge Request Msg Text Follows MESSAGE SEPARATORS Messages will be divided by message separators MSGEND. This will allow the user to scroll up or down through the message memory. -
Page 72: Deleting Messages
DELETING MESSAGES UNLOCKED MESSAGES When you want to delete an unlocked message from the Short Messaging System, you must first be in the Message View Mode. After entering the Message View Mode, select the message you wish to delete. Press the CLR key. The display will indicate: If yes is selected the message will be deleted from memory. -
Page 73: Exiting Message Review Mode
If the SND key is pressed when no callback number is attached to a message an alarm tone will sound and the following message will be displayed on the screen for approximately two seconds. If the SND key is pressed and there is more than one callback number for the message, a menu that lists all the callback numbers will be shown. -
Page 74: Voice Mail Feature
VOICE MAIL FEATURE The Voice Mail Number feature allows you to enter your voice mailbox number and send it automatically. Press FCN + 8 + 4. 1) Enter in your voice mail number. Press MEM to store. 2) Press MEM + SND from standby mode to send your Voice Mail Number. -
Page 75: Word Wrap Feature
WORD WRAP FEATURE The Word Wrap feature allows you to automatically or manually select whether your message text lines return after so many characters have been entered automatically or you manually go from the end of one line to the beginning of another. -
Page 76: Non-Public Mode
1) Press FCN + 8 + 8. Press MEM to make the SID Feature Active or Overridden. Non-Public Mode of operation allows the user to access the services of a private base station if the user has authorization. To access the Non-Public menu from the standby screen: 1) Press MEM + VOL keys This screen will stay until you press any key, at which point a menu with a list of options will appear. - Page 77 The available options from the Non-Public menu are, System Acquire, System Search, and View Database. System Acquire allows the user to find a Private or Residential system that might be available for service if the user has rights to the base station. Once acquired, the system will be stored in the phone's memory and the new system will be available for use.
- Page 78 If there are systems available, they are presented to the user in the same menu format as the Non-Public menu. If the Continue Search option is selected, Non-Public systems on the next strongest system are displayed if they are available. If none are available, the "No Systems Available" message is displayed.
- Page 79 From the Non-Public menu, if the "System Search" is flashing and the MEM key is pressed the following screen appears and the MEM key is pressed the following screen appears: The display will remain until the user presses the CLR key to end the search or until available systems are found and the display will then show those available systems.
-
Page 80: Nam Programming
If there are systems stored, they will be displayed as in the menu below. The Non-Public mode menu keypad keys can be used to scroll this menu. This menu is for viewing purposes only, therefore the ENTER key (digit 5) will generate an alarm tone. -
Page 81: Troubleshooting
If the power does not come on or stay on: Make sure the battery is installed in the phone properly. Be sure the contacts are clean on the battery and the charger. Battery charge may be too low for operation. Listen for the low battery alarm or check battery level by pressing FCN. -
Page 82: Limited Warranty
1. What Products May Be Covered By This Limited Warranty? The following products (the "Products" or the "Product") purchased through an NEC America, Inc. (NECAM), Wireless Communications Division Authorized Dealer (the "Dealer") in the United States on or after January 1, 1997, may be... - Page 83 6. What Is Not Covered By This Warranty? (a) This warranty does not extend to: (i) Products which have been subjected to misuse, accident, physical damage, improper installation, abnormal operation or handling, neglect, inundation, fire, water, or other liquid intrusion, or; (ii) Products which have been damaged due to repair, altered, or modified by anyone other than an authorized service warranty component-level representative of...
- Page 84 7. How Do You Get Warranty Service? If Your Product requires warranty service, it must be returned to an NEC Authorized Service Center along with a description of the Product malfunction or difficulty. You are required to substantiate warranty status with a dated proof of purchase (as explained in item #3), inclusive of Product's serial number (if applicable).
-
Page 85: Technical Information
TECHNICAL INFORMATION Dimensions Weight Transmitting Power Operating Voltage Frequency Band Standard Battery Capacity Number of Channels Memory Locations Memory Capacity LICENSED UNDER ONE OR MORE OF THE FOLLOWOING U.S. PATENTS 4,954,951 4,942,516 4,396,976 4,371,923 4,739,396 4,675,863 160x50x30mm* (6.3"x2.0"x1.2") 10.0 ounces 0.6 W max. -
Page 86: Nec Service Support
NEC SERVICE SUPPORT NEC's Service Support group is ready to assist you with any additional information that you may need in the operation and integration of your NEC Cellular Telephone and NEC Authen- tic Accessories. Service Support can be obtained by contact-... - Page 87 Topic Aircraft Use on Alarm Battery, Low Clock Alert Call Escalating Tone Type Antenna Care Replacement Automatic Locking Power Off Power On Repeat Dialing 50 Battery Alarm. Low Charge Indicator 4 Charging Installing Recharging Removing Call Placing Receiving Length Of Lists Time Counter Care...
- Page 88 Topic Memory Deleting Group Hidden Digits Linking Names Recalling Scanning Scratchpad Speed Dialing Locking Menu Facility Functions Shortcuts Names Deleting Editing Keying In Scanning Storing Non-Public Mode 68 Arrow Keys Menu System Acquire 69 System Search 70 View Database 71 Operation, Phone 8 Own No.
-
Page 89: Basic Operation
NEC Model Digital Talk 2000 Series Manual OPERATION SUMMARY __________________________________________ NOTES: o [X][X] = Memory Address 01 to 99. [X] = Memory Address 1 to 9. KEY OPERATION TERMS: o Press = Press Key firmly. o Press (Hold) = Press and hold down key. - Page 90 OPERATION SUMMARY __________________________________________________________ MEMORY STORING AND RECALL: Store Number to Vacant Address: o Key-in Number. Press [FCN+MEM Hold]. (1st Vacant Location) Key-in Number. Press [FCN+MEM] + [Memory Location]. Store Number to Occupied Address: o Key-in Number. Press [FCN+MEM] + [Memory Location]. Press [MEM] again to overwrite.