Table of Contents
Advertisement
Quick Links
Ceiling Mount Bracket (for High Ceilings)
Thank you for purchasing this Panasonic Product.
To customers
J
The "Installation Instructions" is intended for use by installation personnel. Be sure to employ certified
personnel to perform the installation. After installation, have the installation personnel return these "Installation
Instructions" to you, and save it for future use. When moving or removing the projector, give this "Installation
Instructions" to the installation personnel and have them perform the procedure.
To installation personnel
J
Carefully read the "Installation Instructions" and install this product correctly and safely.
Be sure to read through the section entitled "Read this first!" (page 3) before proceeding with the installation.
After installation, return these "Installation Instructions" to the customer.
Installation Instructions
Model No.
ET-PKL100H
ENGLISH
TQZJ606-2
Advertisement
Table of Contents

Related Manuals for Panasonic ET-PKL100H


Summary of Contents for Panasonic ET-PKL100H
- Page 1 Ceiling Mount Bracket (for High Ceilings) ET-PKL100H Model No. Thank you for purchasing this Panasonic Product. To customers The “Installation Instructions” is intended for use by installation personnel. Be sure to employ certified personnel to perform the installation. After installation, have the installation personnel return these “Installation Instructions”...
-
Page 2: Table Of Contents
Contents Read this first! ....................3 Product description ................... 4 Installation ......................6 Setting up the screen ......................6 Screws tightening torques ....................6 Mounting the attachment plate to the ceiling ..............6 Adjustment pole preparation ....................8 Installing the adjustment poles to the attachment plate ............. 9 Installing the brackets to the projector ................ -
Page 3: Read This First
Electric shocks may result from contact with any metal objects inside the ceiling. r Panasonic Connect Co., Ltd. takes no responsibility for any accident or damage caused by the installation of the ceiling mount bracket using methods that are not described or methods that do not use the parts specified in these Installation Instructions. -
Page 4: Product Description
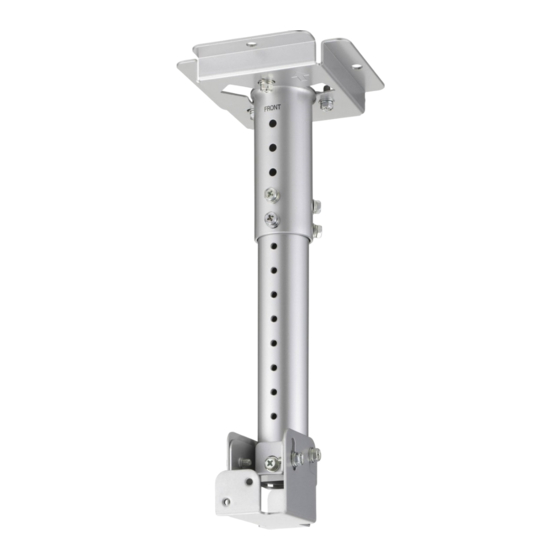
Product description This is a ceiling mount bracket for installing projectors. ■ Applicable ceiling mount brackets ET-PKL420B / ET-PKL430B ■ Structural components Parts name Form (number of parts) Applications The attachment plate is attached to the ceiling via four ceiling mount bolts. - Page 5 Product description (continued) ■ The user must also obtain the following parts. (sold separately) Installation work Required parts page Installing to a Ceiling mount bolt (×4), Hex nut (×16), Spring washer (×8) Installing the attach- wooden structure Flat washer (×16) ment plate to the Installing to a Ceiling mount bolt (×...
-
Page 6: Installation
Installation After checking the height, width and structure of the installation location, determine the appropriate positions for setting up the screen and installing the projector. Setting up the screen Set up the screen according to the specified method in a position which takes into account the projection distance and angle and the type of screen being used. - Page 7 Installation (continued) ■ Installing the attachment plate Depending on whether it is installed on a concrete or wooden ceiling structure, there are two different installation methods. Carry out by the appropriate installation method which is suited to each ceiling. z Installing to a wooden structure 1 Make holes in the ceiling surface for inserting the ceil- ing mount bolts.
-
Page 8: Adjustment Pole Preparation
Installation (continued) Adjustment pole preparation Install adjustment pole to adjustment pole and to angle adjusting bracket by following the procedure below. 1 Use the 4 supplied captive washer hex head bolts to secure the angle adjusting bracket to the inscription FRONT ... -
Page 9: Installing The Adjustment Poles To The Attachment Plate
Installation (continued) Installing the adjustment poles to the attachment plate Follow the procedure given below to install the adjustment poles to the attachment plate which has been installed to the ceiling. 1 Notice the shape of the protrusion on the adjustment pole , insert it into the center hole of the attachment Arrow... -
Page 10: Installing The Brackets To The Projector
Installation (continued) Installing the brackets to the projector After installing the projector mount bracket (sold separately) to the projector, install the angle adjusting bracket by following the procedure below. Angle adjusting bracket As shown in the figure on the left, temporarily se- cure the angle adjusting bracket to the projector Projector mount... -
Page 11: Adjusting The Installation Angle
Adjusting the installation angle z It is possible to adjust the horizontal swing and also the horizontal and vertical tilt of the ceiling mount bracket. z For the projector with the lens shift function, check that the projector lens is in the standard position* , and ad- just the positioning of the projected image and the screen. -
Page 12: Installation Of Ceiling Mount Bracket Drop-Prevention Kit
Installation of ceiling mount bracket drop-prevention kit Use the drop-prevention kit supplied with the projector mount bracket (sold separately) to prevent the projector from falling. Note z For attaching the wire rope to the projector, refer to the installation instructions for the separately sold projector mount bracket. -
Page 13: Specifications
Specifications Vertical length 80 mm (3- ") (20 mm ( ") intervals) Vertical tilt correction angle 5° above horizontal, 20° below horizontal Horizontal swing correction angle ± 5 ° Width: 150 mm (5- "); External dimensions Height: 293 mm - 373 mm (11- "... - Page 14 Panasonic Connect Co., Ltd. Web Site : https://panasonic.net/cns/projector/ SS0514JZ2042 -PT © Panasonic Connect Co., Ltd. 2022 Printed in Japan...