Logitech Z-640 Sound Speaker System Setup Guide
- Setup manual (10 pages) ,
- Setup (24 pages)
Advertisement
IMPORTANT SAFETY INFORMATION

ELECTRIC SHOCK HAZARD
- Read these instructions.
- Keep these instructions.
- Heed all warnings.
- Follow all instructions.
- Unplug the speakers from the computer and from the electrical outlet before cleaning them with a dry cloth.
- Install in accordance with the manufacturer's instructions.
- Place the speakers in a stable location so they will not fall causing damage to the speakers or bodily harm.
- Do not use the speakers near water, and do not immerse them in any liquid or pour any liquid on them.
- Do not block the openings in the speaker cabinets, never push objects into speaker vents or slots because of fire or electric shock hazards, and provide sufficient space around the speakers for proper ventilation.
- Do not install near any heat sources such as radiators, heat registers, stoves, or other apparatus (including amplifiers) that produce heat.
- Do not defeat the safety purpose of the polarized plug. A polarized plug has two blades with one wider than the other. The wide blade is provided for your safety. If the provided plug does not fit into your outlet, consult an electrician for replacement of the obsolete outlet.
- Operate the speakers only from the audio line out jack of the computer or of an audio device.
- Protect the power cord from being walked on or pinched particularly at plugs, convenience receptacles, and the point where they exit from the apparatus.
- Only use attachments/accessories specified by the manufacturer.
- For added protection during lightning storms, unplug the speakers from the electrical outlet and turn off the computer.
- Unplug this apparatus when unused for long periods of time.
- Servicing is required when the apparatus has been damaged in any way, such as power-supply cord or plug is damaged, liquid has been spilled or objects have fallen into the apparatus, the apparatus has been exposed to rain or moisture, does not operate normally, or has been dropped.
- Refer all servicing to qualified service personnel.
- The speakers should be disconnected from the mains by placing the subwoofer Master Power switch in the off position and unplugging the power cord of the speakers from the AC mains receptacle.

TO REDUCE THE RISK OF ELECTRIC SHOCK, DO NOT EXPOSE THIS APPARATUS TO RAIN OR MOISTURE.
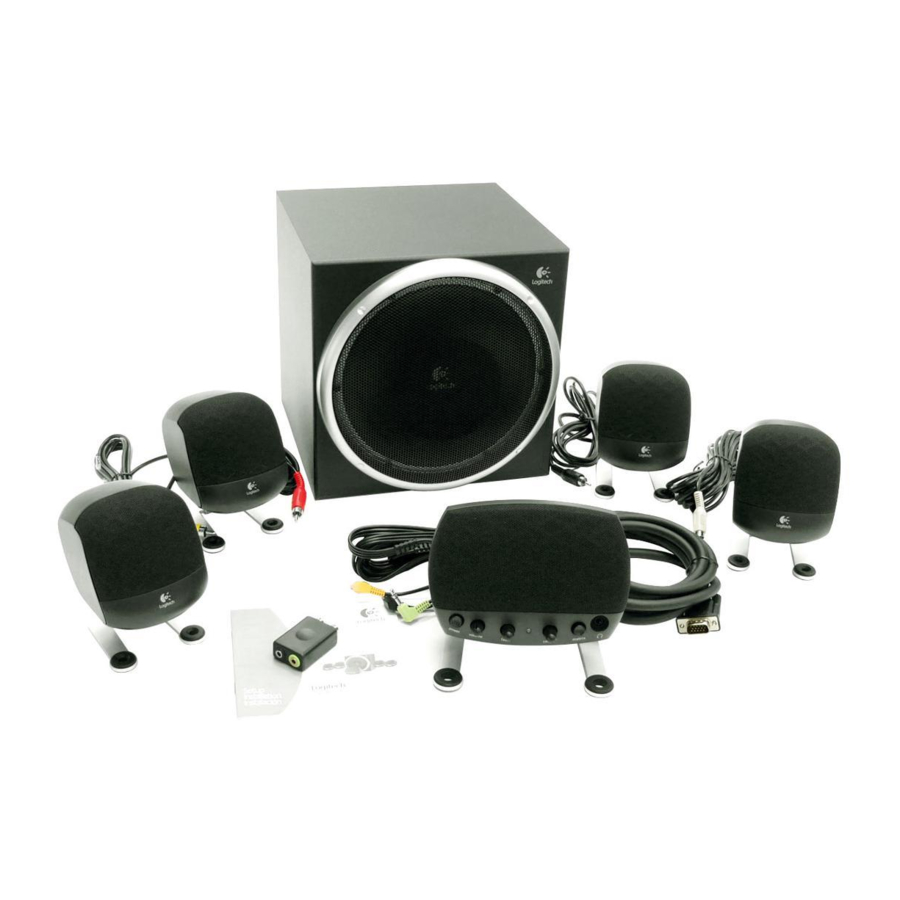
About your Logitech® Z-640 speaker system
The Z-640 system will raise your audio experience to new levels. To discover more Logitech products, visit us on the web at www.logitech.com.

- Subwoofer
- Right front speaker —black plug
- Right rear speaker —red plug
- Audio input cable to PC —green, black and orange plugs
- Center channel speaker —black d-sub connector
- Power cord
- Left rear speaker —white plug
- Left front speaker —yellow plug
- Subwoofer volume

- Power button
- System Volume knob
- Fader knob
- Power light
- Center volume knob
- Matrix button
- Headphone jack

Setting up your Logitech® Z-640 speakers

For your safety, set up the system before plugging it into a power source.
- Before attaching the cables to the subwoofer, position the two front satellite speakers on either side of your computer monitor about the same distance from each other as from you. Angle them to face you.
Place the other satellite speakers behind you and about the same distance apart as the front speakers.
Position the center channel speaker on top of your monitor or on your desk in between your monitor and keyboard. This speaker is the control center for your system, so you will want to place it within easy reach. Depending on where you place it, adjust the stand to direct the sound toward you. To adjust stand, remove screw holding it to satellite, reverse stand, and replace screw.
For best sound quality, place the subwoofer on the floor beneath your desk. Be sure to allow for adequate ventilation around it. - Insert the colored plug from each satellite speaker into the corresponding colored jacks on the back of the subwoofer. Connect the d-sub plug from the center speaker to the subwoofer as shown on the previous page. Carefully align the pins before inserting the plug, and screw down the connector.
-
- If you have a PC and a:
- 6-channel sound card: Connect the colored plugs from the audio input cable to the color-coded jacks on the sound card. To hear optimal sound from your 6channel sound card, make sure the Matrix button on the center speaker control is not depressed.
- 4-channel sound card: Connect the green plug from the audio input cable to the front jack and the black plug into your sound card's rear jack. To enable sound from the center channel speaker, depress the Matrix button on the center speaker.
- 2-channel sound card: Connect the green plug from the audio input cable to the "line out" jack on your sound card. To enable sound from the center channel speaker, depress the Matrix button on the center speaker. With a 2-channel sound card, you will not hear sound from the rear speakers.
- If you have a video game console (PlayStation®, PlayStation®2, Xbox™, or GameCube®):
- Connect the green and black plugs from the audio input cable to the 2 stereo mini jacks on the included video game adapter. Connect the red and white RCA audio cables from your video game console to the RCA audio jacks to the video game adapter. To enable sound from the center channel speaker, depress the Matrix button on the center speaker.
- If you have a PC and a:
- Plug the subwoofer's power cord into an electrical outlet.
Enjoying your Logitech® Z-640 speakers
Access these controls on the center channel speaker:
Power
Turns the system power on and off.
System Volume
Adjusts the overall system volume.
Fader
Adjusts the volume level of the rear speakers.
Center
Adjusts the volume level of the center speaker.
Matrix
If you do not have a 6-channel sound card, use the Matrix feature to provide a soundtrack for the center channel speaker. This feature creates sound for the center channel speaker from the front left and right speakers.
Headphone Jack
When headphones are used with your Z-640 system, the speakers will mute automatically for private listening. Note: The volume of your headphones is controlled by your sound card or video game and cannot be adjusted by the system volume knob on the center speaker. Instead, adjust the headphone volume on your sound card or video game.
Dolby® Digital
The Z-640 speakers support Dolby® Digital sound on your PC if your 6-channel sound card or DVD software can decode a Dolby® Digital soundtrack.
Specifications
Total RMS Power: 71.2 Watts
- Subwoofer: 25.7 watts RMS into 4 ohms at 100Hz at 10% THD (total harmonic distortion); 19.0 watts RMS into 4 ohms at 100 Hz at 1% THD
- Satellites: 45.5 watts RMS (2 x 7.3 w Front; 2 x 7.3 w Rear; 16.3 w Center) into 4 ohms at 1 kHz at 10% THD (total harmonic distortion); 32.7 watts RMS (2 x 5.6 w Front; 2 x 5.6 w Rear; 10.3 w Center) into 4 ohms at 1 kHz
Total Peak Power: 140 Watts at <10% THD
System THD: Better than 0.05% THD before clipping
Limited Warranty
Logitech warrants that any hardware product accompanying this documentation shall be free from significant defects in material and workmanship for a period of two (2) years from the date of purchase. Logitech's limited warranty is nontransferable and is limited to the original purchaser. This warranty gives you specific legal rights, and you may also have other rights which vary under local laws.

Documents / Resources
References
Download manual
Here you can download full pdf version of manual, it may contain additional safety instructions, warranty information, FCC rules, etc.
Advertisement
Thank you! Your question has been received!


Need Assistance?
Do you have a question about the Z-640 that isn't answered in the manual? Leave your question here.