
Related Manuals for KitchenAid KI422BBONA


Summary of Contents for KitchenAid KI422BBONA
- Page 1 Acessório para raspadinha KI422BBONA W11621205A.indb 1 W11621205A.indb 1 9/16/2022 3:18:39 PM 9/16/2022 3:18:39 PM...
-
Page 2: Parts And Features
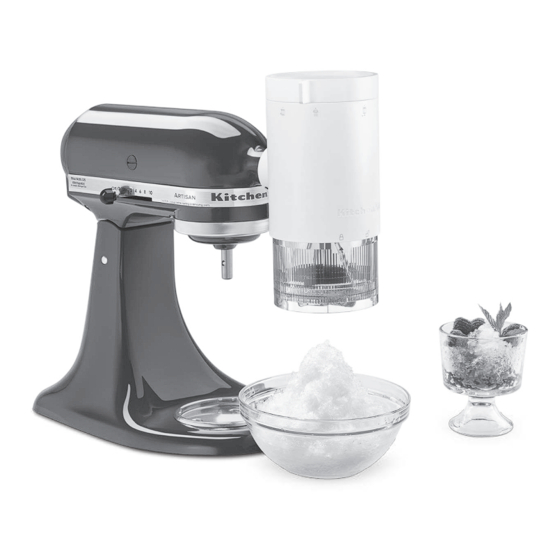
PARTS AND FEATURES Detachable Ice Cup Fine Shave Blade Ice Cup Pusher Coarse Shave Blade Main Upper Housing Ice Cup Sleeve Convenient Storage Box Plastic Ice Mold w/Lid (x4) W11621205A.indb 2 W11621205A.indb 2 9/16/2022 3:18:39 PM 9/16/2022 3:18:39 PM... -
Page 3: Product Safety
4. Never leave the appliance unattended while it is in operation. 5. Avoid contacting moving parts. Keep fingers out of discharge opening. 6. The use of accessories/attachments not recommended or sold by KitchenAid may cause fire, electric shock, or injury. -
Page 4: Electrical Requirements
10A, per ABNT (NBR • If the cord of this appliance is damaged, 14136). it must be replaced. Contact your nearest authorised KitchenAid Customer Your residence electrical installation must have Care Centre. a suitable electric outlet for this type of plug. -
Page 5: Getting Started
GETTING STARTED The Shave Ice Attachment is compatible with all household KitchenAid Stand Mixers. Set the Blades to Shave Ice as per requirement. NAME ICON INTENDED USE SPEED Coarse Shave For coarser ice shaving/ice chips. Blade For a fine, fluffy,... - Page 6 PRODUCT USAGE SET UP & ASSEMBLY - PREPARING TO MAKE SHAVE ICE Before using your Shave Ice Attachment, clean it by following the detailed instructions in “CARE & CLEANING” section. After removing the ice molds from the For Plain Ice recipes, allow ice to rest freezer, press firmly on the bottom and for up to 10 minutes - this is called sides to help release the puck from the...
- Page 7 PRODUCT USAGE Insert the Main Housing into the attachment hub, make sure the power shaft fits into the square hub socket. If Tighten the Stand Mixer attachment hub necessary, rotate the attachment back knob clockwise until the attachment is and forth for proper fitment. The pin on completely secured into the Stand Mixer.
- Page 8 PRODUCT USAGE ASSEMBLY Grip the blade from the bottom and slowly insert it into the bottom of the Ice Cup Insert the Ice Cup Sleeve into the by aligning the interlocking tabs. Once Detachable Ice Cup, then insert a inserted, rotate the blade to the left until you hear a "Click", to properly lock the prepared Ice Puck.
- Page 9 PRODUCT USAGE SHAVING ICE Electrical Shock Hazard Plug into an earthed outlet. Do not remove earth prong. Place a serving dish of your choice beneath the Shave Ice Attachment. Do Do not use an adapter. this before starting the mixer. Do not use an extension cord.
-
Page 10: Changing The Blade
See below for additional tips, tricks and recipes to help make the most of your Shave Ice experience. For even more recipes and inspiration, visit KitchenAid.com CHANGING THE BLADE Grip the blade from the bottom and rotate to the right to remove, or to the Each of the interlocking tabs is unique left to install. -
Page 11: Care And Cleaning
CARE AND CLEANING IMPORTANT: Allow the appliance to cool completely before putting on or taking off parts, and before cleaning the appliance. NOTE: Disassemble the unit properly before cleaning. For instructions, refer to the "SET UP & ASSEMBLY" section steps 7, 8, and optional. The following parts are Do not immerse Housing in water or dishwasher-safe, top rack only:... - Page 12 Please • If issues persist, please contact follow recipes as closely as possible to ensure great results. KitchenAid customer service. Visit www.KitchenAid.com for contact • For recipes with Alcohol, you should information specific to your region.
- Page 13 Allow the ice puck to rest at room temperature (temper) until the outside of the puck has a nice glossy sheen. Place the ice puck into KitchenAid Shave Ice Attachment. Place a bowl under the attachment, turn speed to 10, and shave the ice. Pack the ice into a small bowl or cup (a 4”...
- Page 14 Make the ice pucks. Pour juice into the Plastic Ice Molds and freeze for 12-24 hours. This recipe DOES NOT require tempering. Place the frozen juice puck into KitchenAid Shave Ice Attachment. Align the arrow on the canister with the unlocked symbol then twist counter clockwise to lock in place. Place a bowl under the attachment, turn speed to 10, and shave the juice.
-
Page 15: Peças E Funções
PEÇAS E FUNÇÕES Copo de gelo removível Lâmina de raspagem fina Empurrador do copo de gelo Lâmina de raspagem grossa Compartimento superior principal Bainha do copo de gelo Caixa de armazenamento Forma plástica de gelo com tampa (x4) W11621205A.indb 15 W11621205A.indb 15 9/16/2022 3:18:42 PM 9/16/2022 3:18:42 PM... -
Page 16: Segurança Do Produto
5. Evite o contato com as partes móveis. Mantenha os dedos longe da abertura de descarga. 6. O uso de acessórios não recomendados ou vendidos pela KitchenAid pode causar incêndios, choques elétricos ou lesões. 7. Não use o aparelho ao ar livre. -
Page 17: Requisitos Elétricos
Entre em contato com o centro de ter uma tomada adequada para este tipo atendimento ao cliente autorizado de plugue. Caso contrário, é sua respon- da KitchenAid mais próximo. sabilidade ter um instalado por um eletricista qualificado. W11621205A.indb 17 W11621205A.indb 17... -
Page 18: Uso Do Produto
INICIANDO O acessório Raspador de gelo é compatível com todas as batedeiras KitchenAid de uso doméstico e profissional. Configure as lâminas para raspar gelo conforme o requisito. NOME ÍCONE USO PRETENDIDO VELOCIDADE Lâmina de Para raspas de gelo mais grossas/lascas de gelo. - Page 19 Para a batedeira com tampa articulada do conector de acessórios: levante para abrir. Desligue a batedeira KitchenAid Para a batedeira com tampa removível (velocidade 0) e retire o plugue da do conector de acessórios: gire o botão tomada.
- Page 20 USO DO PRODUTO Insira o compartimento principal no conector de acessórios da batedeira, certifique-se de que o eixo de força se encaixe no soquete do conector Aperte o botão do conector de quadrado. Se necessário, gire o acessórios da batedeira no sentido acessório para frente e para trás para horário até...
- Page 21 USO DO PRODUTO MONTAGEM Segure a lâmina pela parte inferior e insira-a lentamente na parte inferior do copo de gelo, alinhando as abas de travamento. Insira a bainha do copo de gelo no copo Após ser inserida, gire a lâmina para a de gelo removível e, em seguida, insira esquerda até...
- Page 22 USO DO PRODUTO RASPAGEM DE GELO Perigo de choque elétrico Conecte a uma tomada aterrada. Coloque uma travessa de sua escolha sob Não remova o pino de o acessório de raspagem de gelo. Faça aterramento. isso antes de iniciar a batedeira. Não utilize adaptadores.
- Page 23 Para obter ainda mais receitas e inspiração, acesse KitchenAid.com.br/blog TROCA DA LÂMINA Segure a lâmina pela parte inferior e gire para a direita para remover ou para a Cada uma das abas de intertravamento esquerda para instalar.
-
Page 24: Cuidados E Limpeza
CUIDADOS E LIMPEZA IMPORTANTE: Permita que o aparelho esfrie completamente antes de colocar ou re- mover peças e antes de limpar o equipamento. NOTA: Desmonte a unidade corretamente antes de limpá-la. Para obter instruções, consulte as etapas 7, 8 e opcionais da seção ”CONFIGURAÇÃO E MONTAGEM”. As seguintes peças podem ser lavadas Não mergulhe o compartimento em na máquina de lavar louça, somente no... - Page 25 8% na mistura. Isso ajudará a garantir que a mistura congele com contato com o atendimento ao cliente da consistência suficiente para fazer a raspa. KitchenAid. Acesse www.kitchenaid.com.br para obter • Considere remover os discos de gelo informações de contato específicas na congelados das formas e armazená-los...
- Page 26 Faça os discos de gelo. Despeje o café nas formas de gelo de plástico e congele por 12 a 24 horas. Esta receita NÃO PRECISA temperar. Coloque o disco de café no acessório de raspagem de gelo KitchenAid. Coloque uma tigela sob o acessório, aumente a velocidade para 10 e raspe o café congelado.
- Page 27 1 disco de frutas congeladas Limonada à escolha, fria Coloque o disco de frutas no acessório de raspagem de gelo KitchenAid. Alinhe a seta no recipiente com o símbolo de destravamento e gire no sentido anti-horário para travar no lugar.
-
Page 28: Termo De Garantia
TERMO DE GARANTIA O seu produto KitchenAid é garantido contra defeitos de fabricação, pelo prazo de 12 meses, contado a partir da data da emissão da Nota Fiscal ou da entrega do produto, ao primeiro adquirente, sendo: • Os 03 (três) primeiros meses, - garantia legal;... - Page 29 CEP 04183-901 - São Paulo - SP - Caixa postal 5171 Capitais e regiões metropolitanas: 4004 1759 Demais localidades: 0800 722 1759 ©2022 Todos os direitos reservados. KITCHENAID e o design do batedeira são marcas comerciais nos EUA e em outros países. W11621205A.indb 29 W11621205A.indb 29...
- Page 30 W11621205A.indb 30 W11621205A.indb 30 9/16/2022 3:18:46 PM 9/16/2022 3:18:46 PM...
- Page 31 W11621205A.indb 31 W11621205A.indb 31 9/16/2022 3:18:46 PM 9/16/2022 3:18:46 PM...
- Page 32 ©2022 All rights reserved. KITCHENAID and the design of the Stand Mixer are trademarks in the U.S. and elsewhere. Todos os direitos reservados. KITCHENAID e o design do batedeira são marcas comerciais nos EUA e em outros países. W11621205A 09/22 W11621205A.indb 32...