Philips EasyKey 7000 Series User Manual
Facial recognition smart door lock
Hide thumbs
Also See for EasyKey 7000 Series:
- User manual (30 pages) ,
- User manual (14 pages) ,
- User manual (30 pages)

Related Manuals for Philips EasyKey 7000 Series


Summary of Contents for Philips EasyKey 7000 Series
- Page 1 Easy Key 7000 series Facial recognition smart door lock DDL709-FVP-7HWS User manual Sign your product up and get support at www.philips.com/support...
-
Page 3: Table Of Contents
Contents 6. Other features 1. Important Information Indoor infrared unlock Safety Outside forced lock Caution Mute button Disposal of used products and batteries Default settings Doorbell Video intercom 2. Assembly Display Packing list Exploded views 7. Indicators Notice before assembling Adjustable latch instructions Door lock status indicator Assembly procedure... -
Page 4: Important Information
◆ Do not hang objects on the handle in case it might affect the normal use of the lock. ◆ You can have your locks reclaimed at Philips authorized service centers. You will receive ◆ Please clean the product with soft cloth. -
Page 5: Assembly
2 Assembly Packing list This packing list is for reference only. Please refer to the actual packing items. ① Outside ② Inside ③ Drilling ④ Mortise escutcheon with escutcheon with template silicon pad silicon pad Easy Key Warranty Quick Start EasyKey EasyKey Card... -
Page 6: Exploded Views
Exploded views Battery cover*1 Square shaft*2 M6 screw tube*2 Li-polymer battery*1 M5 anchor screw*2 Outside escutcheon*1 M6 anchor screw*2 Fixing plate*1 Screw plug*1 Inside escutcheon*1 9. Mortise*1 Compressed spring*2 M5 screw tube*2... -
Page 7: Notice Before Assembling
Notice before assembling This product applies to doors with four opening directions: left-hand inswing, left-hand outswing, right-hand inswing, and right-hand outswing. Left-hand swing Right-hand swing Left-hand inswing Right-hand inswing Left-hand outswing Right-hand outswing Attention 1. Choose a proper installation kit base on the door thickness. 2. -
Page 8: Assembly Procedure
Assembly procedure The following assembly procedure applies to the right-hand swing doors. For left-hand swing doors, please read through the [Notice before assembling] and complete the adjustable latch instructions. To drill holes in the door according Attach the connecting screw tube on to the drilling template, mount the the outside escutcheon and put the mortise into the jamb, and tighten the... - Page 9 Insert the escutcheon connecting cables Put the compressed spring and and mortise connecting cables into the square shaft on the inside escutcheon corresponding socket of the inside escutcheon, accordingly. then connect the antenna, and align the square shaft hole on the inside escutcheon against the rotary hole on the mortise, so that the inside escutcheon is closely attached to the inner surface of the door.
-
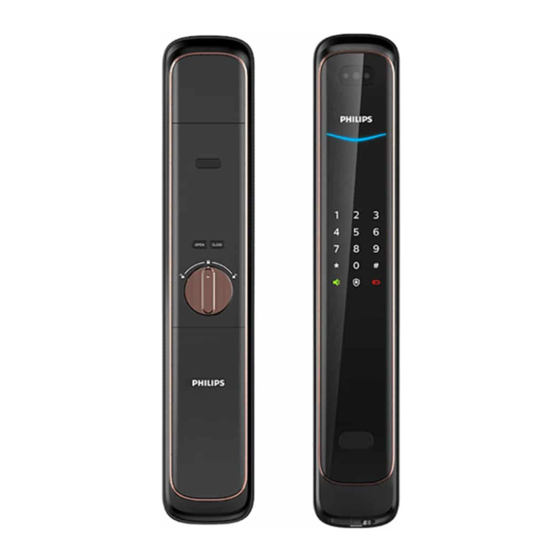
Page 10: Get To Know Your Smart Lock
3 Get to know your smart lock This packing list is for reference only. Please refer to the actual packing items. Outside escutcheon Camera ① ② Indicator ③ Fingerprint sensor ④ Keypad ⑤ Mute button ⑥ PIR sensor Facial recognition ⑦... -
Page 11: Settings
4 Settings Instructions before setting The system mode is divided into general mode and dual-verification mode. ◆ General mode Any enrolled access methods can unlock the door Any two enrolled access methods among PIN code, key tag, Dual verification mode fingerprint, and face ID can unlock the door ◆... -
Page 12: Master Mode
Master mode User settings Add a user PIN code Press [*] twice, enter the master PIN code, and then press [#] to confirm. Master PIN code Press [1] to enter user settings, and then press [1] to add a user, the door lock will After lighting up the keypad, press [*] twice automatically recognize the corresponding before entering other numbers, then enter... - Page 13 Add a one-time PIN code Add or change a master fingerprint Press [*] twice, enter the master PIN code, Press [*] twice, enter the master PIN code, and then press [#] to confirm. and then press [#] to confirm. Press [1] to enter user settings, then press Press [1] to enter user settings, then press [2] to add a one-time PIN code.
-
Page 14: Settings
Settings Language settings Enter a new master PIN code and confirm with [#]. Enter the new master PIN code again and confirm with [#]. Once heard a voice prompt of "succeeded", press [*] until Press [*] twice, enter the master PIN code, you exit master mode. - Page 15 Eco settings Infrared handle Press [*] twice, enter the master PIN code, Press [*] twice, enter the master PIN code, and then press [#] to confirm. and then press [#] to confirm. Press [2] to enter system settings, then press Press [2] to enter system settings, then press [3] to enter Eco settings.
- Page 16 1. After powering up the door lock, find the QR code on the back of the battery cover. 2. Open the "Philips EasyKey Plus" APP, and click [Add a Device] on the home page. 3. After scanning the QR code on the battery cover, follow the instructions of the APP to complete the binding process.
-
Page 17: Get To Use Your Lock
5 Get to use your lock Outdoor/ indoor unlock Outdoor unlock Fingerprint Key tag Face ID PIN code Facial Push/ recogni- pull to tion unlock Push/pull Keypad Push/pull Push/pull module Fingerprint to unlock to unlock to unlock sensor Card reader ①... -
Page 18: Inside Deadlock
Outside/Inside locking After closing the door, the latch bolt will automatically pop up to lock, and there will be a voice prompts "Door closed". Inside deadlock After the door is locked, long press the [CLOSE] button, and there will be a voice prompt of "Inside deadlock enabled". -
Page 19: Other Features
6 Other features Indoor infrared unlock Function: When this function is enabled, you could unlock the door from inside. How to use: When the touch sensor and infrared sensor are on, touching the touch Touch sensor sensor and infrared sensor on the handle can unlock the door. -
Page 20: Mute Button
Mute button Function: Press [0] to enable mute mode when before unlocking the door, this function applies to scenarios in which you don’t want to disturb your family. How to use: Mute: when the outside escutcheon is light up, press the [mute button] for 2 seconds to enter mute mode, it will follow by a voice prompt of "mute mode enabled". -
Page 21: Doorbell
Doorbell Function: The indoor speaker emits a ding- dong sound to remind the host that a visitor has arrived. How to use: Press the doorbell from outside, the indoor speaker will emit a ding- dong sound. Simultaneously, the camera of the door lock will capture the visitor's photo, and send the captured content to the bond APP. -
Page 22: Display
Display Function: When the visitor rings the doorbell, users can check the doorway from the indoor display. How to use: 1. When a visitor rings the doorbell, the indoor display will be on. Click the indoor screen button to turn on the display, and you can also view the doorway through the screen. -
Page 23: Indicators
7 Indicators Status indicator Blue: When the system wakes up, the indicator will turn blue, indicating that the door lock can be processed and operated; Status indicator Green: When the door lock is unlocked, the indicator will turn green, indicating that the door has opened; Red: When the door lock is locked, the indicator will turn red, indicating that the door has closed. -
Page 24: Indoor Deadlock Indicator
Indoor deadlock indicator In indoor deadlock mode, the digital functions of the outside escutcheon will be disabled. After waking up that system manually, the keypad will show the combination of “15937 (X)”, and follow by a voice prompt indicating that the inside deadlock is enabled. System-locking indicator The door lock will be locked for 100 seconds if there are 5... -
Page 25: Troubleshooting
8 Troubleshooting Alert types Outside forced lock mode Triggering: If the lock is under outside forced lock mode, unlocking from inside will trigger the alert. Alert mode: Continuously repeated alert. Off: The alert will be off by any access verification method. Low battery alert Triggering: When the system wakes up, the battery voltage will be automatically... - Page 26 Deadbolt abnormality alert Triggering: If the deadbolt works abnormally, the door fails to lock or unlock. Alert mode: Continuously repeated alert. Off: The alert will be automatically off. Motion detection alert Triggering: When a suspicious person is loitering around at the front door for a period that exceeds the set value, the loitering alert will be triggered.
-
Page 27: How To Apply External Power
How to apply an external power supply When the battery voltage is insufficient, and the door cannot open from outside, you can power up the lock through a 5V power bank as an external power supply. After opening the door lock, please replace the batteries immediately. - Page 28 Philips and the Philips Shield Emblem are registered trademarks of Koninklijke Philips N.V. and are used under license. This product has been manufactured by and is sold under the responsibility of Shenzhen Conex Intelligent Technology Co., Ltd. and Shenzhen Conex...