Table of Contents
Advertisement
Quick Links
Please keep this guide carefully with the product.
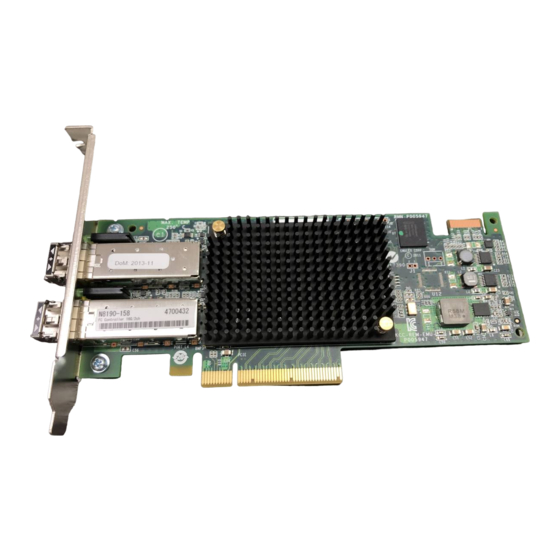
Fibre Channel Controller (2ch)
User's Guide
Preface
Thank you very much for purchasing the N8190-158 Fibre Channel Controller (2ch).
This is a guide to the safe and proper use of the N8190-158 Fibre Channel Controller (2ch) (hereafter, this
product). Be sure to read this guide before handling this product. Please refer to this document if there is
something that you do not understand or a problem occurs while using this product. Store this guide close
to this product for easy reference.
For an explanation on the handling of the basic processing unit (hereafter, Computer) that this product is
installed in, please refer to the User's Guide that came with the basic processing unit. In addition, be sure
to read the sections entitled "Safety Precautions" and "Precautions on Use" before handling this product.
Advertisement
Table of Contents

Related Manuals for NEC N8190-158


Summary of Contents for NEC N8190-158
- Page 1 Thank you very much for purchasing the N8190-158 Fibre Channel Controller (2ch). This is a guide to the safe and proper use of the N8190-158 Fibre Channel Controller (2ch) (hereafter, this product). Be sure to read this guide before handling this product. Please refer to this document if there is something that you do not understand or a problem occurs while using this product.
- Page 2 (2)The content of this document may be changed without prior notice. (3)No part of this document may be revised or reproduced without the permission of NEC Corporation. (4)Although great care has been taken to ensure the accuracy and completeness of the information contained in this document, please contact the dealer you purchased this product from if you have any questions or find mistakes or omissions.
-
Page 7: Safety Precautions - Read Carefully
Keep this user’s guide on hand so that you can refer to it when necessary. Be sure to read the "Safety Precautions" and "Precautions on Use." Safety Precautions - Read carefully - This section offers essential information for the safe and proper use of this product. Please refer to the section of "Names and Functions"... - Page 8 Attention Indicates general warnings and cautions. Indicates a hazard that can lead to burns. Indicates a hazard that can lead to electric shock. Indicates a hazard that can lead to fire. Prohibited Action Indicates a general prohibition. Indicates prohibition of disassembly or modification. Do not touch with wet hand.
-
Page 9: Safety Precautions
NEC assumes no liability for any accident resulting in personal injury, death, or property damage if this product has been used in the above conditions. - Page 10 When disconnecting a cable, push the latch, hold the connector, and pull it out straight. Use only the Fibre Channel cable authorized by NEC and connects it to the proper connector. Ignoring these instructions may cause a short circuit, resulting in a fire, electric shock, or malfunction.
-
Page 11: Precautions On Use - Operating This Product Properly
Precautions on Use - Operating this product properly - The following precautions must be observed when using this product. Ignoring these precautions while using this product will result in the destruction of assets (data and other devices). Please observe the following. This product is sensitive to static electricity. - Page 12 FCC Compliance Information Statement This equipment has been tested and found to comply with the limits for a Class A digital device, pursuant to Part 15 of the FCC Rules. These limits are designed to provide reasonable protection against harmful interference when the equipment is operated in a commercial environment.
-
Page 13: About This Guide
About This Guide This guide explains how to setup and use the N8190-158 Fibre Channel Controller (2ch) correctly. Be sure to read this guide before using the product, and keep the guide in a safe place after reading it. If the product is transferred to a third party, please transfer this guide along with it. -
Page 15: Packing Box Contents
Packing Box Contents There are various other accessories included in the packing box besides this product. Please refer to the packing list accompanying the box to make sure that all parts are included. Contact the dealer that you bought this product from if any parts are missing or damaged. Lifetime This product has a product lifetime of five years. - Page 16 ................. 1 ......................... 1 ..........................3 ..............9 ............................11 ............................. 11 ........................12 ............................12 ..........................12 ........................12 ............................12 ......................... 12 ............................12 ........................ 16 ............................. 16 ..........................16 ..........................17 ......................17 ........................ 19 ......................20 ...................
-
Page 17: Table Of Contents
Contents Safety Precautions - Read carefully - ................5 Safety Symbols ..........................5 Safety Precautions ......................... 7 Precautions on Use - Operating this product properly - ..............9 About This Guide ..........................11 Symbols Used in This Guide ......................11 Packing Box Contents ........................ - Page 33 Port1 Port0...
- Page 40 Port1 Port0...
-
Page 41: About This Product
5 - 95 % 1-2. Features The N8190-158 Fibre Channel Controller (2ch) is a Fibre Channel host bus adapter card. This product has two Fibre Channel interface connectors. Do not connect this product to a computer or Fibre Channel device that is not recommended by NEC Corporation. -
Page 42: Components
2. Components Please confirm that the following components are included with the product. If you find any of them are missing or damaged, please contact the retailer you bought the product from. 3. Names and Functions... - Page 43 Module to transmit and receive Fibre Channel signals. Need to remove temporarily when exchange a bracket or install this product into computer. Don’t insert the SFP+ module of this product to the other N8190-158 or the other Fibre Channel device.
-
Page 44: Setup
4. Setup Please follow the steps described below to set up this product. Explained in the User's Guide Selection and Installation of Bracket -> Page 43 Selection of bracket to use for this product. Confirm WWPN addresses (Port 0/Port 1) ->... -
Page 45: Selection And Installation Of Bracket
4-1. Selection and Installation of Bracket A standard bracket is installed on this product. When fixing this product to a PCI slot optimized for the low profile type, replace the bracket with the attached low profile one. The procedure is as follows. - Page 46 Install the low profile bracket to this product and tighten the two screws. Replace the two SFP+ modules removed in item 1. Return the lever of the SFP+ module to the home position, and then insert the SFP+ module until you hear it click. After insert all SFP+ modules, put dust covers to them.
-
Page 47: Confirm Wwpn Addresses (Port 0/Port 1)
4-2. Confirm WWPN addresses (Port 0/Port 1) By adding "1000" to the head of the IEEE address (Port0), you will get the WWPN address of port0. The WWPN address of Port1 is the next successive number of the Port 0. Example: IEEE”0090FA01347A”->Port0 WWPN”1000-0090-FA01-347A”... -
Page 48: Install The Card
4-3. Install the Card Install this product in the computer following the steps described on the next step. Do not handle this product during an electrical storm. When installing this product in the computer, please read the user's guide of the computer and unplug the power plug from the electrical outlet. - Page 49 Install this product in the PCI slot as following the instructions described in the user's guide of the computer. The method of installing and removing the PCI card and the location of the PCI slot differ in different computers. Please read the user's guide of the computer for confirmation.
-
Page 50: 4-4.Connecting Fibre Channel Devices
4-4.Connecting Fibre Channel Devices Install this product in the computer following the steps described on the next step. Do not handle this product during an electrical storm. When installing this product in the computer, please read the user's guide of the computer and unplug the power plug from the electrical outlet. -
Page 51: Installing The Driver
Do not connect this product to a computer or Fibre Channel device that is not recommended by NEC Corporation. If the product is connected to a computer or Fibre Channel device that is not recommended by NEC Corporation, the product may malfunction or fail. -
Page 52: Troubleshooting
5. Troubleshooting 5-1. Troubleshooting Error message is displayed at boot Refer to the user's guide of Computer for details of error messages. If you feel the PCI slot where this product is attached is the cause of the error, please check the following items;... - Page 53 Fibre Channel Device go missing Confirm the followings if the Fibre Channel device which was in use and connected to this product is not detected by the operating system or is inaccessible after rebooting Computer. Also, refer to the User’s Guide that came with the Fibre Channel device, and other guides of applications you use. <For Windows OS>...
-
Page 54: Appendix A Boot From Fibre Channel Device
Appendix A Boot from Fibre Channel device You can install and start up an operating system on the connected Fibre Channel device from this product. You need to change this product’s BIOS settings to this. Follow the instructions below to make correct settings. -
Page 55: Change Bios Settings
Change BIOS settings When you have done all of above-mentioned preparations, follow the instructions below to change this product’s BIOS settings (registering Boot device and enabling Boot BIOS). 1> Confirm that this product is properly connected with the Fiber Channel device. Then, turn on the computer. - Page 56 If the above menu is not displayed and the window has gone to the next one, press <Alt>, <Ctrl> and <Del> keys simultaneously to reboot the computer. Then, start the steps from the beginning. The LPe16002B of Function “00” is Port0 and Function “01” is Port1. The message sample is just for your reference.
- Page 57 5> Select “Configure Boot Devices” to display the Boot device’s settings window. If no Boot device can be detected from this product you selected above, you will see a message, “This Adapter is not ready, try again!” If you selected a wrong number in the above step, press <ESC>...
- Page 58 7> Select a Boot device. Make sure to select LUN 0 device for the Boot device. When you have selected a device, you see a window to enter a starting number for the device’s LUNs like: 8> Enter “00” (indicating LUN0) for the LUN starting number. Then, a window to select an LUN for the device is displayed.
- Page 59 10> Select “Boot this device via WWPN”. Then, you see Boot device’s settings window again. Confirm that the top item on the list is “USED”. 11> Press <ESC> key to return to the menu like:...
- Page 60 12> Select “Enable/Disable Boot from SAN “ . Then, you see the settings window like: 13> Select “Enable”. and confirm that “Boot BIOS is : Enabled” is displayed.
- Page 61 14> If any other ports of this product are connected to the Fibre Channel boot device, Press <ESC> key to return to the adapter list and setting ports by the same steps from 4>. 15> Now, you have made settings to start installing an operating system on your Fibre Channel device. Press <ESC>...
-
Page 62: Appendix B Confirm Wwpn Addresses After Setup
Appendix B Confirm WWPN addresses after setup You can confirm WWPN addresses of this product after install this product into the computer by latter procedures. Confirm WWPN addresses at the computer boot 1> Confirm that this product is properly installed. Then, turn on the computer. If the logo is displayed but the BIOS window is not, press <ESC>... - Page 63 3> When the computer detects that <Alt> or <Ctrl> and <E> keys are pressed, you see the following messages and the menu. Port1 Port0 WWPN address If the above menu is not displayed and the window has gone to the next one, press <Alt>, <Ctrl>...
- Page 64 Fibre Channel Controller (2ch) User’s Guide 856-180034-002- B 2016 年 3 月 第二版 March 2016 Second Edition 日 本 電 気 株 式 会 社 東京都港区芝五丁目7番1号 TEL (03) 3454-1111 (大代表) © NEC Corporation 2016 乱丁・落丁の場合は交換いたします。 このユーザーズガイドは再生紙を使用しています。 This guide is made with recycled paper. *856-180034-002- BM*...