Table of Contents
Advertisement
Quick Links
1.1 The CUW-AM
The CUW-AM motherboard is carefully designed for the demanding PC user who
wants advanced features processed by the fastest processors.
1.1.1 Specifications
•
Latest Intel Socket 370 Processor Support
®
Intel Pentium
III
Intel Celeron™
•
Latest Intel 810 Chipset! The 810 (GMCH+ICH) supports 66/100MHz FSB
and UltraDMA/66.
•
Integrated Graphics! Controller supports 3D hyper pipelined architecture, par-
allel data processing and compression, precise pixel interpolation, full 2D hard-
ware acceleration, and motion video acceleration.
•
Custom Graphics Driver! You can gain about 12% performance over that of
the standard graphics driver (2D highend graphics WinMark) using the custom
graphics driver. The custom graphics driver also provides more features and
provides selection of higher refresh rates and resolutions.
•
Versatile Memory Support! DRAM controller supports asymmetrical address-
ing and two DIMM sockets support Intel PC100-compliant SDRAMs (16, 32,
64, 128, or 256MB) up to 512MB. (supports a maximum of 4 sides)
•
Latest Low Pin Count Multi-I/O: Provides two high-speed UART compatible
serial ports and one parallel port with EPP and ECP capabilities.
•
Integrated IDE! Controller supports UltraDMA/66 up to 66MB/s, UltraDMA/
33 up to 33MB/s, and PIO Mode 4 up to 17MB/s.
•
Firmware Hub! Provides security and other latest power computing features.
•
Enhanced ACPI & Anti-Boot Virus Protection! Programmable BIOS (Flash
EEPROM), offering enhanced ACPI for Windows 98 compatibility, built-in firm-
ware-based virus protection, and autodetection of most devices for virtually au-
tomatic setup.
•
Highest Audio Quality! AC'97 DAC/ADC (software audio) built into the au-
dio codec reduces noise to improve audio quality and performance for a SNR
(signal to noise ratio) of +90dB. These features greatly improve voice synthesis
and recognition. If more quality is required, an optional onboard Crystal PCI
audio improves audio quality beyond software audio.
1. FEATURES
100MHz FSB
66MHz FSB
CUW-AM User's Manual
Coppermine core
FC-PGA
Mendocino core
PPGA
E546
1
Advertisement
Table of Contents

Related Manuals for Asus CUW-AM


Summary of Contents for Asus CUW-AM
- Page 1 E546 1. FEATURES 1.1 The CUW-AM The CUW-AM motherboard is carefully designed for the demanding PC user who wants advanced features processed by the fastest processors. 1.1.1 Specifications • Latest Intel Socket 370 Processor Support ® Intel Pentium 100MHz FSB...
- Page 2 Concurrent PCI! Concurrent PCI allows multiple PCI transfers from PCI mas- ter buses to memory to CPU. • SDRAM Optimized Performance! ASUS smart series motherboards support the new generation memory, Synchronous Dynamic Random Access Memory (SDRAM), which increases the data transfer rate to 800MB/s max using PC100 SDRAM.
- Page 3 BIOS or OS setting. When the power button is pressed for more than 4 seconds, the system enters the soft- off mode regardless of the BIOS setting. CUW-AM User’s Manual...
-
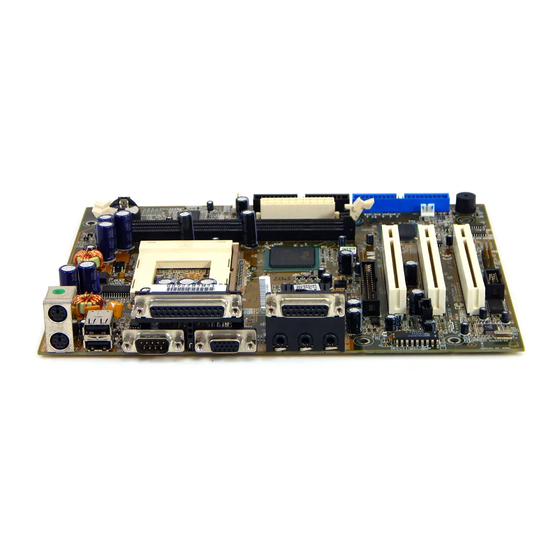
Page 4: Hardware Setup
2. HARDWARE SETUP 2.1 CUW-AM Motherboard Layout PS2KBMS T: Mouse USBV1 B: Keyboard Power CR2032 3V Controller Lithium Cell CMOS Power T: Port 1 B: Port 2 COM1 SYS_FAN Clock Generator PS_FAN Intel 810 Line Graphics & Memory LCDTV Line... -
Page 5: Layout Contents
22) HDLED (PANEL) p.18 IDE Activity LED (2 pins) 23) PLED (PANEL) p.19 System Power LED Lead (3-1 pins) 24) RESET (PANEL) p.19 Reset Switch Lead (2 pins) 25) ATXPWR p.20 ATX Power Supply Connector (20 pins) CUW-AM User’s Manual... -
Page 6: Hardware Setup Procedure
Failure to do so may cause severe damage to your motherboard, peripherals, and/or components. The onboard LED when lit acts as a reminder that the system is in suspend or soft-off mode and not powered OFF. CUW-AM User’s Manual... -
Page 7: System Memory (Dimm)
Total System Memory (Max 512MB) 2.5.1 General DIMM Notes • ASUS motherboards support SPD (Serial Presence Detect) DIMMs. This is the memory of choice for best performance vs. stability. • SDRAM chips are generally thinner with higher pin density than EDO (Extended Data Output) chips. -
Page 8: Dimm Installation
FRONT CUW-AM 60 Pins 20 Pins CUW-AM 168-Pin DIMM Sockets The DIMMs must be 3.3V Unbuffered for this motherboard. To determine the DIMM type, check the notches on the DIMMs (see figure below). 168-Pin DIMM Notch Key Definitions (3.3V) DRAM Key Position... -
Page 9: Central Processing Unit (Cpu)
Be careful not to scrape the motherboard when mounting a clamp- style processor fan or else damage may occur to the motherboard. Socket 370 CPU Socket 370 CPU (Top) (Bottom) Celeron Notch CUW-AM CUW-AM Socket 370 Coppermine Gold Arrow CUW-AM User’s Manual... -
Page 10: Expansion Card Installation Procedure
3. Carefully align the card’s connectors and press firmly. 4. Secure the card on the slot with the screw you removed above. 5. Replace the computer system’s cover. 6. Set up the BIOS if necessary. 7. Install the necessary software drivers for your expansion card. CUW-AM User’s Manual... -
Page 11: External Connectors
This connection is for a standard keyboard using an PS/2 plug (mini DIN). This connector will not allow standard AT size (large DIN) keyboard plugs. You may use a DIN to mini DIN adapter on standard AT keyboards. PS/2 Keyboard (6-pin Female) CUW-AM User’s Manual... - Page 12 One serial port is ready for a mouse or other serial devices. A second serial port is available using a serial port bracket connected from the motherboard to an expansion slot opening. Serial Port (9-pin Male) COM 1 CUW-AM User’s Manual...
- Page 13 Line In (light blue) allows tape players or other audio sources to be re- corded by your computer or played through the Line Out (lime). Mic (pink) allows microphones to be connected for inputting voice. Line Out Line In 1/8" Stereo Audio Connectors CUW-AM User’s Manual...
- Page 14 (Pin 5 is removed to prevent inserting in the wrong orienta- tion when using ribbon cables with pin 5 plugged). NOTE: Orient the red markings on the floppy ribbon cable to PIN 1 PIN 1 CUW-AM CUW-AM Floppy Disk Drive Connector CUW-AM User’s Manual...
- Page 15 CUW-AM Wake-On-LAN Connector 12) Serial Port Header (10-1 pin COM2) The optional serial port bracket can be used to add an additional serial port for additional serial devices. to COM2 Header PIN 1 CUW-AM CUW-AM Serial COM2 Bracket CUW-AM User’s Manual...
- Page 16 PS_FAN CUW-AM SYS_FAN +12V CPU_FAN Rotation CUW-AM 12-Volt Cooling Fan Power 14) LCD-TV Headers (Two 20-1 pin LCDTV) These headers require an optional LCD module for LCD output or a TV-out module for TV output. LCDTV CUW-AM CUW-AM LCD-TV Headers...
- Page 17 Left Audio Channel Ground Right Audio Channel CUW-AM Internal Audio Connector 16) USB Header (6-1 pin USBV1) If the USB port connectors on the back panel are inadequate, a USB header is available for additional USB port connectors. Connect the USB header to an optional USB connector set and mount it to an open slot on your chassis.
- Page 18 HDLED Power LED Requires an ATX power supply. CUW-AM System Panel Connectors 17) Message LED Lead (2-pin MLED) This indicates whether a message has been received from a fax/modem. The LED will remain lit when there is no signal and flash when there is data re- ceived.
- Page 19 +5.0 Volts +5V Standby +5.0 Volts Power Good -5.0 Volts Ground Ground +5.0 Volts Ground Ground Ground +5.0 Volts Power Supply On CUW-AM Ground Ground +3.3 Volts -12.0 Volts +3.3 Volts +3.3 Volts CUW-AM ATX Power Connector CUW-AM User’s Manual...
- Page 20 2. HARDWARE SETUP (This page was intentionally left blank.) CUW-AM User’s Manual...