Table of Contents
Advertisement
Quick Links
Advertisement
Table of Contents

Related Manuals for Canon Saddle Finisher-AF2


Summary of Contents for Canon Saddle Finisher-AF2
- Page 1 Saddle Finisher-AF2 SERVICE MANUAL MARCH 6, 2009...
- Page 3 Canon will release technical information as the need arises. In the event of major changes in the contents of this manual over a long or short period, Canon will issue a new edition of this manual.
- Page 4 Introduction Symbols Used This documentation uses the following symbols to indicate special information: Symbol Description Indicates an item of a non-specific nature, possibly classified as Note, Caution, or Warning. Indicates an item requiring care to avoid electric shocks. Indicates an item requiring care to avoid combustion (fire). Indicates an item prohibiting disassembly to avoid electric shocks or problems.
- Page 5 Introduction The following rules apply throughout this Service Manual: 1. Each chapter contains sections explaining the purpose of specific functions and the relationship between electrical and mechanical systems with refer- ence to the timing of operation. In the diagrams, represents the path of mechanical drive; where a signal name accompanies the symbol , the arrow indicates the direction of the electric signal.
-
Page 7: Table Of Contents
Contents Contents Chapter 1 Specifications 1.1 Product Specifications ..........................1- 1 1.1.1 Specifications (finisher) ............................1- 1 1.1.2 Specifications (saddle stitcher)..........................1- 2 1.2 Names of Parts ............................1- 4 1.2.1 External View................................1- 4 1.2.2 Cross Section ................................1- 5 Chapter 2 Installation 2.1 Making Pre-Checks ............................2- 1 2.1.1 Points to Note About Installation .......................... - Page 8 Contents 3.4.2 Basic Sequence of Operations ..........................3- 8 3.4.3 Horizontal Registration Detection ..........................3- 8 3.4.4 Side Registration Correction Operation Shift Operation ..................3- 10 3.4.5 Buffer Operation..............................3- 13 3.4.6 Switching Over the Paper Path..........................3- 15 3.4.7 Interval Speed Control ............................3- 16 3.5 Intermediate Process Tray Assembly.......................
- Page 9 Contents 4.3 Drive System ............................4- 10 4.3.1 Buffer Pass Motor..............................4- 10 4.3.1.1 Preparation for Removing Buffer Motor ..........................4- 10 4.3.1.2 Removing the Buffer Motor ..............................4- 10 4.3.2 Feed Motor ................................4- 11 4.3.2.1 Preparation for Removing Buffer Front Feed Motor....................... 4- 11 4.3.2.2 Removing the Buffer Front Feed Motor ..........................
- Page 10 Contents 4.4.5.1 Preparation for Removing the Feed Belt..........................4- 29 4.4.5.2 Removing the Feed Belt ................................ 4- 29 4.4.5.3 Before Removing the Belt Roller............................4- 30 4.4.5.4 Removing the Belt Roller ............................... 4- 30 4.4.6 Paddle Unit ................................4- 32 4.4.6.1 Preparation for Removing Paddle Unit ..........................4- 32 4.4.6.2 Removing the Paddle Unit ..............................
- Page 11 Contents 5.1.2 User Maintenance Item (saddle) ..........................5- 1 5.2 Maintenance and Inspection........................5- 1 5.2.1 Periodically Replaced Parts............................. 5- 1 5.2.1.1 Periodically Replaced PartsÅiFinisher)............................ 5- 1 5.2.1.2 Periodically Replaced Parts (Saddle) ............................5- 1 5.2.2 Durables .................................. 5- 1 5.2.2.1 Durables (Finisher) .................................. 5- 1 5.2.2.2 Durables (Saddle) ..................................
- Page 12 Contents...
-
Page 13: Chapter 1 Specifications
Chapter 1 Specifications... - Page 15 Contents Contents 1.1 Product Specifications..............................1-1 1.1.1 Specifications (finisher) ................................1-1 1.1.2 Specifications (saddle stitcher) ..............................1-2 1.2 Names of Parts ................................1-4 1.2.1 External View ....................................1-4 1.2.2 Cross Section ....................................1-5...
-
Page 17: Product Specifications
Chapter 1 1.1 Product Specifications 1.1.1 Specifications (finisher) 0020-3982 T-1-1 Item Specification Paper Size/ Size: Weight/ A3, B4, A4, A4R, B5, B5R, 13" x 19" (330.2 x 482.6 mm), 12" x 18" (304.8 x 457.2 mm), 11" x 17", LGL, LTR, LTRR, EXEC, EXECR, 12 Type 5/8"... -
Page 18: Specifications (Saddle Stitcher)
Chapter 1 Staple Position 1-Point Stapling (front) 5 2.0 5 2.0 A3, B4, A4, B5, / 11"x17", LTR A4R / LGL, LTRR 1-Point Stapling (rear) 5 2.0 5 2.0 A3, B4, A4, B5, / 11"x17", LTR A4R / LGL, LTRR 2-Point Stapling A3, A4 B4, B5... - Page 19 Chapter 1 Item Specification Capacity Per Tray No Collating, Collate, Group mode Tray A: If the High Volume Stack Mode is set to 'Off': A3, B4, A4, A4R, B5, B5R, 13" x 19" (330.2 x 482.6 mm), 12" x 18" (304.8 x 457.2 mm), 11" x 17", LGL, LTR, LTRR, EXEC, EXECR, 12 5/8"...
-
Page 20: Names Of Parts
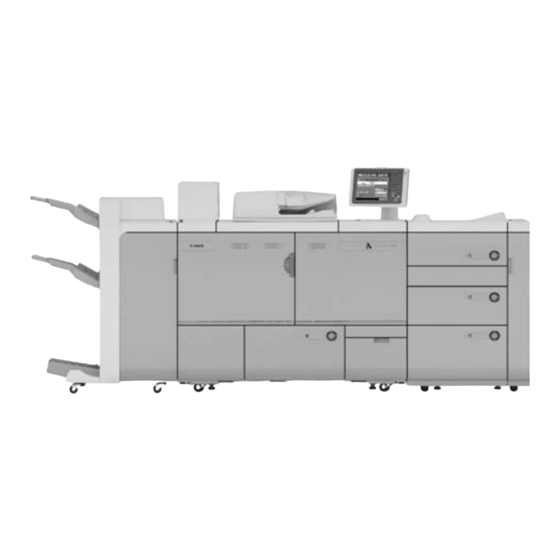
Chapter 1 1.2 Names of Parts 1.2.1 External View 0020-3985 F-1-1 [1] Tray B [5] Saddle delivery belt [2] Tray A [6] Upper cover [3] Top delivery outlet [7] Inlet transport unit [4] Bottom delivery outlet [8] Front cover... -
Page 21: Cross Section
Chapter 1 1.2.2 Cross Section 0020-3987 [10] [11] [12] [13] [14] [15] [16] [17] [18] [19] [28] [20] [21] [27] [26] [25] [24] [23] [22] F-1-2 [1] Feed belt [11] Delivery roller [21] Fold delivery roller [2] Sheaf eject roller [12] Buffer roller 1 [22] Adjust roller (upper) [3] Swing guide... -
Page 23: Chapter 2 Installation
Chapter 2 Installation... - Page 25 Contents Contents 2.1 Making Pre-Checks................................2-1 2.1.1 Points to Note About Installation..............................2-1 2.1.2 Installation Space ..................................2-1 2.2 Unpacking and Checking the Components ........................2-2 2.2.1 Checking the Contents ................................. 2-2 2.3 Installation Procedure ..............................2-3 2.3.1 Unpacking ....................................2-3 2.3.2 A note on Turning ON/OFF the Power of the Host Machine...................... 2-4 2.3.3 Before Installing the Finisher...............................
-
Page 27: Making Pre-Checks
0022-4114 CAUTION: - This manual has been issued by Canon Inc. for qualified persons to learn technical theory, installatin, maintenance, and repair of Products. - At servicing, be sure to turn OFF the power source according to the specified steps and disconnect the Power Plug. -
Page 28: Unpacking And Checking The Components
LED lamp label [14]*4 Saddle return attention label (Products for South Korea and Taiwan) [15]*5 Power cord [16] Power cord (USA only) [17] Staple cartridge [18]*4 Saddle staple cartridge *1: The figure shows Saddle Finisher-AF2 *2: 2 screws are for spare. -
Page 29: Installation Procedure
Chapter 2 with Finisher-AF1 only with Saddle Finisher-AF2 only EUR destination only. Use the appropriate power cord according to the country/region to install. Be sure to bring back the unused power <CD/Guide> -FCC Class A sheet(USA only) 2.3 Installation Procedure 2.3.1 Unpacking... -
Page 30: A Note On Turning On/Off The Power Of The Host Machine
Chapter 2 F-2-9 9) Along the slope, slide the equipment carefully from the palette. F-2-6 6) Move the equipment [1] in the direction of the arrow [A] and take out the 2 slope plates [2] stored at the center of the palette in the direction of the arrow [B]. - Page 31 Chapter 2 F-2-11 2) Open the finisher front cover [1]. F-2-13 4) Close the upper cover. 5) Pull out the saddle unit and remove the packing tapes [1]. F-2-12 3) Open the upper cover [1] and remove the packing tapes [2]. F-2-14 6) Put the saddle unit back.
-
Page 32: Connecting With The Host Machine
Chapter 2 F-2-17 2.3.4 Connecting with the Host Machine F-2-15 0020-6809 8) Remove the rear small cover [1] in the direction of the arrow. - 1 screw [2] CAUTION: - 2 hooks [3] Be sure the power of the host machine is turned OFF and the power plug is disconnected from the outlet. - Page 33 Chapter 2 F-2-20 <Rear side> F-2-18 2) Fit the positioning pin [1]. - 2 screws (RS tightening; M4X10) [2] F-2-19 3) While lifting the latch plate (front) [1] up, fit the positioning pin [2] of the F-2-21 host machine into the positioning hole [3] of the finisher to connect the finisher with the host machine.
- Page 34 Chapter 2 F-2-22 F-2-23 5) Close the front cover of the finisher. 7) Check the height between the finisher [1] and the host machine [2]. 6) Move the latch mount (rear) [1] in the direction of the arrow and insert it to the pin to fix it.
-
Page 35: Connecting With The Multi Drawer Document Insertion Unit
Chapter 2 F-2-27 3) Fit the positioning pin [1]. - 2 screws (RS tightening; M4X10) [2] F-2-25 2.3.5 Connecting with the Multi Drawer Document Insertion Unit 0020-6007 CAUTION: Be sure the power of the host machine is turned OFF and the power plug is disconnected from the outlet. - Page 36 Chapter 2 F-2-29 <Rear side> F-2-31 6) Close the front cover of the finisher. 7) Move the latch mount (rear) [1] in the direction of the arrow and insert it to the pin to fix it. - 1 screw [2] (use the screw removed in step 7) "Before Installing the Finisher") F-2-30 5) Secure the latch plate (front) [1].
-
Page 37: Connecting With The The Professional Puncher Integration Unit
Chapter 2 F-2-33 9) Install the rear small cover. 10) Install the shunt cable [1]. - 2 screws (RS tightening; M4X10) [2] F-2-35 2) Install positioning screw [1]. - 2 screws (RS tightening ; M4X10) [2]. F-2-34 2.3.6 Connecting with the the Professional Puncher Integration Unit 0020-6813 CAUTION:... - Page 38 Chapter 2 F-2-37 <Rear side> F-2-39 5) Close the front cover of the finisher. 6) Move the latch mount (rear) [1] in the direction of the arrow and insert it to the pin to fix it. - 1 screw [2] (use the screw removed in step 7) "Before Installing the Finisher") F-2-38 4) Secure the latch plate (front) [1].
-
Page 39: Connecting With The Paper Folding Unit
Chapter 2 CAUTION: Height difference should be within +/-2mm. Execute "Height Adjustment" if the difference is +/- 2mm or more. F-2-41 8) Install the rear small cover. 9) Install the shunt cable [1]. - 2 screws (RS tightening; M4X10) [2] F-2-43 2) Fit the positioning pin [1]. - Page 40 Chapter 2 F-2-45 4) While lifting latch mount (front) [1], fit the Paper Folding Unit's position- ing pin [2] into positioning board's hole [3] of the Finisher, to connect the Finisher with the Paper Folding Unit. <Front side> F-2-47 CAUTION: When connecting the inner side, take caution not to get the cable pinched.
- Page 41 Chapter 2 F-2-50 9) Insert the connector [1] to the finisher controller PCB, and fix the cable [2]. - 3 wire saddles [3] F-2-48 6) Close the front cover of the finisher. 7) Move the latch mount (rear) [1] in the direction of the arrow and insert it to the pin to fix it.
-
Page 42: Connecting With The High Capacity Stacker
Chapter 2 CAUTION: Confirm the engraved mark on each latch plate when attaching. For front [1]: F For rear [2]: R F-2-53 2.3.8 Connecting with the High Capacity Stacker F-2-55 0020-9251 3) Fit the positioning pin [1]. CAUTION: - 2 screws (RS tightening; M4X10) [2] Be sure the power of the host machine is turned OFF and the power plug is disconnected from the outlet. - Page 43 Chapter 2 F-2-57 <Rear side> F-2-59 6) Close the front cover of the finisher. 7) Move the latch mount (rear) [1] in the direction of the arrow and insert it to the pin to fix it. - 1 screw [2] (use the screw removed in step 7) "Before Installing the Finisher") F-2-58 5) Secure the latch plate (front) [1].
-
Page 44: Connecting With The Perfect Binder
Chapter 2 F-2-62 2.3.9 Connecting with the Perfect Binder 0020-9252 CAUTION: F-2-60 Be sure the power of the host machine is turned OFF and the power plug is 8) Check the height between the finisher [1] and the High Capacity Stacker. disconnected from the outlet. - Page 45 Chapter 2 F-2-65 <Rear side> F-2-63 2) Fit the positioning pin [1]. - 2 screws (RS tightening; M4X10) [2] F-2-64 3) While lifting the latch plate (front) [1] up, fit the Perfect Binder's position- ing pin [2] of the host machine into the positioning hole [3] of the finisher to connect the finisher with the Perfect Binder.
- Page 46 Chapter 2 CAUTION: Height difference should be within +/-2mm. Execute "Height Adjustment" if the difference is +/- 2mm or more. F-2-69 8) Install the rear small cover. 9) Remove the rear cover [1] of the Perfect Binder. - 5 screws [2] F-2-67 5) Close the front cover of the finisher.
-
Page 47: Connecting With The Document Insertion Unit
Chapter 2 F-2-72 2) Fit the positioning pin [1]. - 2 screws (RS tightening; M4X10) [2] F-2-71 11) Install the rear cover of the Perfect Binder. 2.3.10 Connecting with the Document Insertion Unit 0020-9253 CAUTION: Be sure the power of the host machine is turned OFF and the power plug is disconnected from the outlet. - Page 48 Chapter 2 F-2-74 <Rear side> F-2-76 5) Close the front cover of the finisher. 6) Move the latch mount (rear) [1] in the direction of the arrow and insert it to the pin to fix it. - 1 screw [2] (use the screw removed in step 7) "Before Installing the Finisher") F-2-75 4) Secure the latch plate (front) [1].
-
Page 49: Connecting Cable
Chapter 2 CAUTION: Height difference should be within +/-2mm. Execute "Height Adjustment" if the difference is +/- 2mm or more. F-2-78 8) Install the rear small cover. 9) Install the shunt cable [1]. - 2 screws (RS tightening; M4X10) [2] F-2-80 MEMO: Trailing edge connector is not used in the Integration Unit. - Page 50 Chapter 2 F-2-82 4) Connect the ARCNET cable [1] to the terminal [2] of the finisher, and turn the knob [3] in the direction of the arrow to secure. CAUTION: Be sure the power-off of the host machine and the unplugged power plug before connecting the ARCNET cable.
- Page 51 Chapter 2 F-2-87 <If connected to Paper folding Unit> F-2-90 <If connected to Document Insertion Unit> F-2-88 <If connected to High Capacity Stacker> F-2-91 7) Connect the power cable [1] to the finisher. CAUTION: Note for Europe, Asia/Oceania Regions Use the correct power cord to mach the location/area of installation. Make sure not to leave unused power cord at the site.
-
Page 52: Checking Connection
Chapter 2 F-2-92 8) Connect the power plug of the finisher to the outlet. 9) Turn ON the power in the order of the finisher, then the host machine. 2.3.12 Checking Connection 2.Height adjustment 1) Separate the finisher from the host machine. 0020-9384 1) Input Connection Step of Finisher. -
Page 53: Attaching The Labels Etc
Chapter 2 F-2-99 CAUTION: When loosening the caster fixing nut [1] at the front side of the saddle finisher, be sure to insert the spanner [3] into the opening just below the saddle bottom plate [2]. F-2-96 5) Remove the 2 caster covers [1] at the left side. (Figure shows in the case of using the saddle finisher) - 2 screws [2] 8) Rotate the adjusting bolt [1] with the spanner [2]. -
Page 54: Relocationg The Machine
Chapter 2 F-2-102 F-2-105 2) Affix the Guide map label [1] inside the finisher front cover. 5) Pull out the saddle unit [1]. F-2-103 3) Affix the Staple label [1] inside the front cover. F-2-106 6) Affix the Saddle return attention label [1]. F-2-104 4) Affix the LED lamp label [1]. -
Page 55: Chapter 3 Functions
Chapter 3 Functions... - Page 57 Contents Contents 3.1 Basic Construction .................................3-1 3.1.1 Overview...................................... 3-1 3.2 Electrical Control Unit ..............................3-1 3.2.1 Overview...................................... 3-1 3.2.2 Finisher Controller PCB ................................3-2 3.2.3 Saddle Stitcher Controller PCB ..............................3-2 3.3 Stacking Unit..................................3-3 3.3.1 Overview...................................... 3-3 3.3.2 Tray Ascent/Descent Control............................... 3-3 3.3.3 Auxiliary Tray Lift Control .................................
-
Page 59: Basic Construction
The electrical control block consists of 2 entities: finisher controller PCB and saddle stitcher controller PCB (Note). Electrical Stacking block control block Finisher controller PCB Transport block To host machine Intermediary Saddle stitcher tray block controller PCB Saddle stitcher block F-3-2 The descriptions on the saddle stitcher controller PCB apply to the Saddle Finisher-AF2. -
Page 60: Finisher Controller Pcb
Chapter 3 3.2.2 Finisher Controller PCB 0020-4675 The finisher controller PCB drives the various loads (motors, solenoids) of the machine in response to the commands from the host machine (copier), and indicates the states of the sensors and switches to the host machine. It also serves to control the punch unit and the saddle finisher controller PCB. -
Page 61: Stacking Unit
Chapter 3 3.3 Stacking Unit 3.3.1 Overview 0020-4687 The stacking block moves up and down the 2 delivery trays according to the instructions from the finisher controller PCB. Finisher controller PCB [10] [11] UN15 Tray A UN16 PS32 UN17 PS34 UN18 Tray B PS33... -
Page 62: Auxiliary Tray Lift Control
Chapter 3 Finisher controller PCB Tray A PS34 Tray B PS35 F-3-6 [1] Tray A lift motor drive signal [3] Tray B lift motor drive signal [2] Tray A lift motor rotation detection signal [4] Tray B lift motor rotation detection signal M22: Tray A lift motor PS34: Tray A lift motor rotation sensor M23: Tray B lift motor... -
Page 63: Tray Paper Surface Detection
Chapter 3 [1] Auxiliary tray solenoid drive signal SL9: Auxiliary tray solenoid M23: Tray lift motor MEMO: A stack with a folded sheet tends to be higher along its lead edge than its trail edge, blocking the discharge slot when it contains multiple folded sheets. (A subsequent sheet will likely hit the preceding sheet, causing a jam.) 3.3.4 Tray Paper Surface Detection 0020-4695... -
Page 64: Feeding Unit
Chapter 3 3.4 Feeding Unit 3.4.1 Overview 0020-4697 The machine's transport block serves to move paper to the stacking block or the saddle stitcher block according to the instructions from the finisher controller PCB. It also is used in conjunction with horizontal registration adjustment and alignment operation. The machine uses 6 sensors to check for jams in the paper path. - Page 65 Chapter 3 M4: Buffer motor M5: Delivery motor M6: Horizontal registration detection unit shift motor M7: Horizontal registration shift motor M8: Transport roller shift motor M26: Operation feed motor M27: Inlet motor separation motor Finisher controller PCB From inserter To tray A UN13 UN14 UN24...
-
Page 66: Basic Sequence Of Operations
Chapter 3 3.4.2 Basic Sequence of Operations 0020-4699 The transport block uses a sequence of operations that consists of the following 5: 1. Horizontal Registration Detection [1] Detects the position of the paper. 2. Horizontal Registration Correction [2] Corrects the position of the paper with reference to the result of horizontal registration detection. 3. - Page 67 Chapter 3 Finisher controller PCB UN12 F-3-12 [1] Shift roller unit [4] Standby position [2] Horizontal registration detection unit [5] Home position [3] Pape 2) The finisher controller PCB causes M6 to rotate clockwise so that UN12 moves to horizontal registration detection position (11 mm toward the inside from stand- by position), during which UN12 detects the edge of paper to be moved.
-
Page 68: Side Registration Correction Operation Shift Operation
Chapter 3 [1] Shift roller unit [4] Horizontal registration detection position [2] Horizontal detection unit [5] Standby position [3] Paper 3) The finisher controller PCB causes M6 to rotate counterclockwise to move PS5 to standby position. 3.4.4 Side Registration Correction Operation Shift Operation 0020-4701 1) After the finisher controller board has detected the trailing edge of the paper at the inlet sensor (PS3), the paper is fed on for 210mm and then the inlet roller disengage motor (M27) drives and disengages the disengage roller friction roller. - Page 69 Chapter 3 Finisher controller PCB F-3-15 [1] Shift roller unit [2] Side registration detection unit [3] Paper After Correction Before Correction F-3-16 [1] Correct position [2] Paper [3] Shift roller unit 4) Upon job offset selection, the shift roller unit is moved either forwards or in reverse, the same as for side registration shift. (Ref.) This causes the stacking position for each sheaf to change when the paper is output to the delivery tray.
- Page 70 Chapter 3 F-3-17 At this time, the degree of shift is decided after taking the side registration correction value into account. 3-12...
-
Page 71: Buffer Operation
Chapter 3 3.4.5 Buffer Operation 0020-4722 The finisher controller PCB keeps a sheet of paper in the paper path and forwards it together with the subsequent sheet of paper using the buffer motor (M4) and the buffer path switching solenoid (SL1) with the help of the buffer path 1 sensor PCB and the buffer path 2 sensor PCB (UN13, UN14). Finisher controller PCB UN13 UN14... - Page 72 Chapter 3 The buffer operation takes place as follows when 3 sheets of paper are moved: UN13 UN13 UN13 UN14 UN14 UN14 UN13 UN13 UN13 UN14 UN14 UN14 UN13 UN14 F-3-19 3-14...
-
Page 73: Switching Over The Paper Path
Chapter 3 3.4.6 Switching Over the Paper Path 0020-4723 1) The finisher controller PCB turns off or on the2 flappers (upper delivery flapper, lower delivery flapper) to switch over the destination of paper. F-3-20 [1] From the host machine [5] Lower delivery flapper [2] Paper [6] To tray B [3] To tray A... -
Page 74: Interval Speed Control
Chapter 3 3.4.7 Interval Speed Control 0020-4726 T-3-1 Speed Affected motor(s) Speed adjustment Delivery speed => 1000mm/s* Inlet feed motor (M1), shift feed Once the inlet sensor (PS3) comes ON, after feeding paper (paper delivery motor (M2) direction length [mm] - 40[mm]) 1000mm/s =>... - Page 75 Chapter 3 To tray A To tray A UN14 UN14 206.6mm UN24 UN24 From host To tray B To tray B machine 40mm To saddle stitcher block To saddle stitcher block [1] 1000 mm / s [3] 1500 mm / s To tray A To tray A UN14...
-
Page 76: Intermediate Process Tray Assembly
Chapter 3 3.5 Intermediate Process Tray Assembly 3.5.1 Overview 0020-4752 The intermediary tray block serves to shift or staple a stack of sheets in response to the instructions from the finisher controller PCB, and then sends the result to the stacking block. The paper path is fitted with 2 sensors for detection of a jam. Finisher controller PCB [10] [11]... -
Page 77: Basic Sequence Of Operations
Chapter 3 M15: Paddle lift motor M16: Paper trail edge retaining motor Finisher controller PCB PS17 F-3-24 [1] Lower delivery sensor signal [2] Handling tray sensor signal PS6: Lower delivery sensor PS17: Process tray paper 3.5.2 Basic Sequence of Operations 0020-4758 The intermediary tray block uses the following 4 sequences of operations: 1.Stacking Operation [1]... -
Page 78: Stacking Operation
Chapter 3 F-3-25 3.5.3 Stacking Operation 0020-4760 1) When the sheet coming from the transport block reaches the front of the lower path sensor PCB (UN22) (after the specified time elapses from the leading edge of paper is detected by the buffer path sensor 2), the paper trailing edge drop motor (M16) starts driving and it lifts the trailing edge drop plate. UN22 F-3-26 2) The transport belt feeds the paper to the stack delivery roller and the stack delivery roller discharges the paper to the outside of the machine. - Page 79 Chapter 3 F-3-28 At the second stack operation or later (some paper is already loaded on the operation tray), the swing guide is already lifted and the paddle and feed belt pushes the paper to the operation stopper. At this time, the height of the paddle, feed belt and upper guide is adjusted depending on the stack amount of the paper on the operation tray. F-3-29 [1] Paper [5] Upper guide...
- Page 80 Chapter 3 F-3-30 [1] Paper [4] Operation stopper [2] Stack delivery roller [5] Swing guide [3] Sort delivery roller 5) Front/rear alignment motor (M9/M10) drive and they move the alignment plate to the front/rear to align the paper. This operation is executed every time the paper is fed to the operation tray.
- Page 81 Chapter 3 Stack Delivery Auxiliary Function This machine is equipped with the stack delivery auxiliary mechanism as a means of preventing misalignment of extra-length paper. Misalignment occurs when the trail edge of paper hangs down on its own weight at the stack delivery operation. The paper is then pulled back in the direction of the arrow, causing its lead edge to move away from the stopper.
-
Page 82: Shift Operation
Chapter 3 3.5.4 Shift Operation 0020-4769 1) When the stack operation is complete, the alignment plate operates as a shift function (refer to the note). This moves the paper stack to the front or rear. This function is for the operation of tray B only. Tray A executes the alignment operation inside the feed assembly. F-3-32 [1] Alignment plate [2] Paper stack... -
Page 83: Stapling Operation
Chapter 3 3.5.5 Stapling Operation 0020-4770 1) At the end of alignment operation, the machine moves down the swing guide and performs stapling (Note 1). At this time, if the process stopper position is overlapping that staple position, the process stopper is moved away. F-3-33 [1] Swing guide [4] Stapler... - Page 84 Chapter 3 2) As needed, the staple unit is moved to empty itself of the waste staples in the waste staple case (Note 2). Note 1: The machine's stapling sequence consists of the following operations: driving a staple, cutting the staple tips, clinching the staple. [1] Stack of sheets [4] Cutting the staple tips [2] Staple...
-
Page 85: Delivery Operation
Chapter 3 3.5.6 Delivery Operation 0020-4771 1) The machine starts delivery of the stack at the end of alignment or stapling by rotating the delivery roller in the direction of the arrow.(At non-staple mode de- livery, the control of stack delivery roller angle switching is performed.) 2) In the event of stapling on one side*, the assist stopper synchronises with the sheaf delivery roller and moves in the direction of the arrow. - Page 86 Chapter 3 Swing guide Cam contact block Angle switch cam Stack delivery upper roller Process tray unit Stack delivery lower roller F-3-35 When the delivery angle adjustment motor (M28) starts driving, the cam on the shaft rotates and the swing guide is pushed, and then the stack delivery upper roller moves to the downstream together with the swing guide.
-
Page 87: Saddle Stitcher Unit
Chapter 3 3.6 Saddle Stitcher Unit 3.6.1 Overview 0020-4842 The saddle stitcher block serves to staple a stack of sheets according to the instructions from the saddle stitcher controller PCB, and moves the stack to the saddle delivery belt. The paper path is fitted with 8 sensors to check for a jam. Saddle Stitcher Controller PCB [10] [11] [12]... -
Page 88: Basic Sequence Of Operations
Chapter 3 M107: Saddle delivery belt motor M108: Saddle press motor M109: Stitcher motor M110: Saddle trailing edge holding motor M111: Saddle trailing edge moving motor M112: Saddle alignment roller motor M113: Saddle tapping motor M114: Saddle lead-in roller disengage motor SL103: Alignment roller disengage solenoid (upper) SL104: Alignment roller disengage solenoid (lower) SL104: Lead edge gripper solenoid... -
Page 89: Paper Feed Operation
Chapter 3 3.Stitching [3] Uses the stitcher to staple the middle of the stack. 4.Folding/Delivery [4] Folds the sheet in half, and sends the result to the saddle delivery tray. The particulars of the individual operations are as follows: F-3-39 3.6.3 Paper Feed Operation 0020-4852 1) The saddle leading edge stopper and saddle trailing edge stay move into position based on the paper size. - Page 90 Chapter 3 F-3-40 [1] Saddle trailing edge stay [2] Saddle leading edge stopper [3] Saddle roller guide 2) The paper is transported to the stitcher unit by the saddle feed roller. 3) Once the saddle inlet sensor (PS101) detects the paper, the saddle alignment roller rotates and drives the saddle pull roller disengage motor and the saddle align- ment roller disengage solenoid so that the paper is transported by the pull roller and alignment roller till it reaches the process stopper.
- Page 91 Chapter 3 PS101 F-3-41 [1] Paper [2] Saddle inlet roller [3] Pull roller [4] Alignment roller [5] Process stopper PS101: Saddle inlet roller Roller guide clearance control In case of thin paper (under 62 g/m2) if the clearance between the roller guide and the saddle process tray is too loose, the paper stack gets loose and the alignment operation does not function properly.
- Page 92 Chapter 3 Gear Slide rack Shutter shift block Shutter shift mount Roller guide Saddle process tray F-3-42 Clearance [A] between the roller guide and the saddle process tray changes in accordance with the position of shutter shift block (hereinafter called as shift block). The roller guide motor (M104) lifts the shift block.
-
Page 93: Alignment Operation
Chapter 3 Roller guide motor (M104) Slide rack Saddle roller guide HP sensor Shutter (PS107) shift block Shutter sift block Shutter shift mount Shutter shift mount Saddle process tray Roller guide Slide rack F-3-43 3.6.4 Alignment Operation 0020-4853 1) The machine opens the trailing edge retainer and disengages the alignment roller and lead-in roller. It then narrower the alignment guide in accordance with the paper size to align the paper stack. - Page 94 Chapter 3 F-3-44 [1] Pull roller [5] Tapping plate [2] Alignment roller [6] Trailing edge stay [3] Alignment guide [7] Paper [4] Leading edge stopper 2) The machine engages the alignment roller again and the paper is pushed to the leading edge stopper, and then the knocking plate taps the trailing edge of paper. F-3-45 3-36...
-
Page 95: Staple Operation
Chapter 3 [1] Pull roller [5] Tapping plate [2] Alignment roller [6] Trailing edge stay [3] Alignment guide [7] Paper [4] Leading edge stopper 3) The machine disengages the alignment roller and the trailing edge retainer holds the trailing edge of paper. F-3-46 [1] Pull roller [5] Tapping plate... -
Page 96: Paper Folding/Delivery Operations
Chapter 3 F-3-47 [1] Stitcher unit [2] Paper [3] Staples [4] Trailing edge stay 3.6.6 Paper Folding/Delivery Operations 0020-4855 1) The saddle roller guide [1] is lowered and then the leading edge gripper solenoid (Sl105) comes ON and the paper [3] is gripped by the gripper [2]. F-3-48 3-38... - Page 97 Chapter 3 [1] Saddle roller guide [2] Gripper 2) With the sheaf [2] held in place by the gripper [1] the paper positioning plate [3] lowers, moving the sheaf in the direction of the arrow. Thus, the stitching position [4] and the folding position [5] are aligned. F-3-49 [1] Gripper [4] Stitching position...
- Page 98 Chapter 3 F-3-50 [1] Paper sheaf [2] Paper guide plate [3] Paper fold roller 4) The sheaf transport roller and pre-press roller begin to rotate forwards, transporting the sheaf to the press unit. 3-40...
- Page 99 Chapter 3 F-3-51 [1] Paper sheaf [4] Press unit [2] Sheaf transport roller [3] Pre-press roller 5) When the sheaf reaches the press unit, the sheaf transport roller and pre-press roller stop rotating. Then, the press unit moves in the direction of the arrow. At this time, the press pressure roller within the press unit begins to rotate and applies pressure onto the sheaf.
- Page 100 Chapter 3 [3] Pre-press roller 6) After the press unit has moved in the direction of the arrow, the pre-press roller begins to rotate once more. This action delivers the sheaf to the saddle delivery belt. F-3-53 [1] Paper sheaf [3] Press unit [2] Pre-press roller 3-42...
-
Page 101: Detecting Jams
Chapter 3 3.7 Detecting Jams 3.7.1 Jam inspection in Finisher 0020-6605 To detect whether there is paper or not, or whether the paper can properly be fed or not, the followings are the detection sensor for paper. - Inlet Sensor (PS3). - Shift Unit Sensor (PS4). - Page 102 Chapter 3 Jam type Sensor Jam description Code Buffer Path 2 Sensor Stationary UN14 The paper doesn't come out from Buffer Path 2 Sensor (UN14) 1109 within the specified time (distance) after Shift Unit Sensor (PS4) detects the paper and do the feeding. Upper Delivery Sensor Delay Upper Delivery Sensor (PS5) doesn't detect the paper within the 100A...
-
Page 103: Stitcher Area Jam Detection
Chapter 3 3.7.2 Stitcher area jam detection. 0020-6606 To detect whether there is paper or not, or whether the paper can properly be fed or not, the followings are the inspection sensor for paper. - Saddle inlet sensor (PS101) - Saddle small sensor (PS103) - Saddle vertical path sensor (PS105) - Saddle leading edge path sensor (PS106) - Saddle plate home position sensor (PS110) - Page 104 Chapter 3 3-46...
-
Page 105: Chapter 4 Parts Replacement Procedure
Chapter 4 Parts Replacement Procedure... - Page 107 Contents Contents 4.1 Removing from the Host Machine..........................4-1 4.1.1 Finisher Assembly ..................................4-1 4.1.1.1 Removing From the Host Machine .................................4-1 4.2 External Covers................................4-2 4.2.1 Rear Cover ....................................4-2 4.2.1.1 Removing the Rear Cover ....................................4-2 4.2.2 Rear Upper Cover ..................................4-3 4.2.2.1 Removing the Rear Upper Cover (Right) ...............................4-3 4.2.2.2 Preparation for Removing the Rear Upper Cover (Left) ..........................4-3 4.2.2.3 Removing the Rear Upper Cover (Left)................................4-3...
- Page 108 Contents 4.3.7.1 Preparation for Removing the Front Alignment Motor ..........................4-13 4.3.7.2 Removing the Front Alignment Motor ................................. 4-13 4.3.8 Rear Alignment Motor................................4-15 4.3.8.1 Preparation for Removing the Rear Alignment Motor ..........................4-15 4.3.8.2 Removing the Rear Alignment Motor ................................4-15 4.3.9 Saddle Alignment Motor................................
- Page 109 Contents 4.4.12 Pressing Unit .................................... 4-36 4.4.12.1 Preparation for Removing Pressing Unit ..............................4-36 4.4.12.2 Removing the Pressing Unit..................................4-36 4.4.13 Pressing Roller Unit ................................. 4-37 4.4.13.1 Preparation for Removing the Pressing Roller Unit ...........................4-37 4.4.13.2 Removing the Pressing Roller Unit................................4-38 4.4.14 Folding Roller ..................................4-39 4.4.14.1 Preparation for Removing the Folding Roller.............................4-39 4.4.14.2 Removing the Folding Roller..................................4-39 4.5 Electrical System................................4-41...
-
Page 111: Removing From The Host Machine
Chapter 4 4.1 Removing from the Host Machine 4.1.1 Finisher Assembly 4.1.1.1 Removing From the Host Machine 0020-8226 CAUTION: If the power supply of the host machine is OFF, make sure that power plug is put out of the power outlet. 1) Remove the shunt cable [1]. -
Page 112: External Covers
Chapter 4 F-4-4 5) Open the front cover. 6) Removing 1 screw [2] from the latch mount (front) [1]. F-4-6 4.2 External Covers 4.2.1 Rear Cover 4.2.1.1 Removing the Rear Cover 0020-7821 1) Remove the rear cover [1]. - 8 screws [2] F-4-5 7) While lifting the latch mount (front) [1], disconnect the finisher from the host machine. -
Page 113: Rear Upper Cover
Chapter 4 F-4-8 4.2.2.2 Preparation for Removing the Rear Upper Cover (Left) 0020-7823 1) Remove the rear upper cover (right). (page 4-3)Reference[Removing the Rear Upper Cover (Right)] 4.2.2.3 Removing the Rear Upper Cover (Left) 0020-7824 1) Remove the rear upper cover (left) [1]. - 4 screws[2] F-4-7 CAUTION:... -
Page 114: Delivery Tray
Chapter 4 2) Remove the cable [1]. - 4 wire saddles [2] - 1 reuse band [3] - 1 connector [4] - 1 edge saddle [5] - 2 screws [6] F-4-14 7) Remove the upper cover unit [1] by sliding it as the direction of the arrow. CAUTION: F-4-11 Do not get the cable in the upper cover unit hooked into the hole in the... - Page 115 Chapter 4 F-4-18 4) Remove the cable [1]. - 2 screws [2] - 1 tooth washer [3] - 2 connectors [4] - 1 wire saddle [5] 1. Remove the Tray A Unit 1) Remove the support cover [1]. - 1 claw [2] F-4-16 2) Remove the stopper (upper) [1].
- Page 116 Chapter 4 F-4-23 F-4-21 2) Remove the cable [1]. 8) Remove the tray A unit [1] by lifting it to the upper direction. (page 5- - 1 screw [2] 7)Reference[Adjusting Position of Tray A, B] - 1 tooth washer [3] - 1 connector [4] CAUTION: Do not hit the upper cover [1] during the tray removal.
-
Page 117: Point To Take Caution On Tray A/B Cable
Chapter 4 4.2.4.3 Point to Take Caution on Tray A/B Cable 0020-8339 CAUTION: When installing tray A/B unit, be sure that the cables don't entangle. 4.2.4.4 Point to Take Caution on Handling Stack Wall Rail 0020-8340 CAUTION: Do not get the stack wall rail [1] scratch, or have a mark trace, etc. As scratch or mark trace will have affect in the loading work. -
Page 118: Stack Wall (Upper)
Chapter 4 4.2.5 Stack Wall (Upper) 4.2.5.1 Removing the Stack Wall (Upper) 0020-8345 1) While holding the tray from the below, insert the driver [2] to the hole [1] in the lower side, release the cam [3] as the direction of the arrow [A], lift down the tray as the direction of the arrow [B] to the position that it does not touch the stack wall (upper). -
Page 119: Saddle Inside Cover
Chapter 4 F-4-34 4.2.7.2 Removing the Saddle Inside Cover (Lower) 0020-8351 1) Open the front cover. 2) Remove the saddle inside cover (lower) [1]. - 1 knob [2] - 4 screws [3] F-4-32 2) Install the stack wall (lower) in the position that shutter drive roller [1] can F-4-35 be seen through the hole of stack wall (lower). -
Page 120: Inside Cover (Lower)
Chapter 4 3) Lift the upper cover [1] as the direction of the arrow, and remove the in- side cover (upper) [2]. - 4 screws [3] F-4-39 2) Remove the buffer motor unit [1]. - 1 connector [2] - 2 screws [3] F-4-37 4.2.9 Inside Cover (Lower) 4.2.9.1 Removing the Inside Cover (Lower) -
Page 121: Feed Motor
Chapter 4 4.3.2 Feed Motor - 1 edge saddle [2] - 2 wire saddles [3] 4.3.2.1 Preparation for Removing Buffer Front Feed Motor 0020-8846 1) Remove the rear upper cover (right). (page 4-3)Reference[Removing the Rear Upper Cover (Right)] 2) Remove the rear upper cover (left). (page 4-3)Reference[Removing the Rear Upper Cover (Left)] 4.3.2.2 Removing the Buffer Front Feed Motor 0020-8847... -
Page 122: Stack Delivery Motor
Chapter 4 F-4-49 2) Push the staple unit [1] until it heads the direction as shown in the figure. F-4-47 4.3.4 Stack Delivery Motor 4.3.4.1 Preparation for Removing the Stack Delivery Motor 0020-8894 1) Remove the stack wall (upper). (page 4-8)Reference[Removing the Stack Wall (Upper)] 2) Remove the stack wall (lower). -
Page 123: Front Alignment Motor
Chapter 4 F-4-55 4.3.7 Front Alignment Motor 4.3.7.1 Preparation for Removing the Front Alignment Motor F-4-52 0020-8359 3) Move the grip [1] as the direction of the arrow, and open the saddle stack 1) Remove the stack wall (upper). (page 4-8)Reference[Removing the guide assembly [2]. - Page 124 Chapter 4 F-4-58 F-4-57 4) Remove the process tray plate unit [1]. - 1 screw [2] (Loosen) - 1 belt [3] CAUTION: - 6 screws [4] Before performing step 3), be sure to check the position of the memory [1]. - 2 positioning plates [5] 3) Remove the solenoid unit [1].
-
Page 125: Rear Alignment Motor
Chapter 4 - 2 wire saddles [2] - 1 connector [3] - 2 screws [4] F-4-63 4.3.8 Rear Alignment Motor 4.3.8.1 Preparation for Removing the Rear Alignment Motor 0020-8361 1) Remove the stack wall (upper). (page 4-8)Reference[Removing the Stack Wall (Upper)] F-4-60 2) Remove the stack wall (lower). - Page 126 Chapter 4 F-4-66 F-4-65 4) Remove the process tray plate unit [1]. - 1 screw [2] (Loosen) - 1 belt [3] CAUTION: - 6 screws [4] Before performing step 3), be sure to check the position of the memory [1]. - 2 positioning plates [5] 3) Remove the solenoid unit [1].
-
Page 127: Saddle Alignment Motor
Chapter 4 F-4-71 4.3.9 Saddle Alignment Motor 4.3.9.1 Preparation for Removing Saddle Alignment Motor 0021-6250 1) Pull out the saddle unit. (service position) (page 4-32)Reference[Pull Out the Saddle Unit (Service Position)] 2) Remove the saddle inside cover (lower). (page 4-10)Reference[Remov- F-4-68 ing the Inside Cover (Lower)] 6) Remove the process tray (rear) [1]. -
Page 128: Shift Motor
Chapter 4 F-4-76 5) Remove the tray A/B shift motor [1]. - 2 screws [2] - 1 belt [3] F-4-73 2) While holding the tray from the below, release the cam [1] as in the direc- tion of the arrow, move it down until it hits. CAUTION: During removal of the tray A/B shift motor, the tension of the belt will loose, and might cause the tray unit to fall down. - Page 129 Chapter 4 F-4-78 2) Remove the latch mount support plate [1]. - 2 screws [2] F-4-80 4) Remove the feed stay (right upper). - 4 screws [2] F-4-79 3) Remove the rear cover support plate [1]. - 3 screws [2] F-4-81 5) Remove 2 connectors [1], and 2 screws [2].
- Page 130 Chapter 4 F-4-85 9) Remove the cable guide [1]. - 1 screw [2] F-4-82 6) Remove the detection drive assembly [1] as the direction of the arrow. - 2 screws [2] F-4-83 7) Remove the flexible cable [1]. F-4-86 10) Remove the horizontal registration shift unit [1] to the direction of the arrow.
-
Page 131: Preparation For Removing Horizontal Registration Shift Motor
Chapter 4 CAUTION: Caution during installation CAUTION: Caution during installing/removing shift motor When installing horizontal registration shift unit [1], adjust 2 places in the attachment plate. hole of inside end part [2] to 2 places in the positioning pin [3] of the front To install/remove the screw [2] of the belt mount assembly [1], it is side plate, and install them. -
Page 132: Removing The Shift Motor
Chapter 4 7) Remove the horizontal registration shift unit. (page 4-18)Reference[Re- moving the Horizontal Registration Shift Unit] 4.3.11.6 Removing the Shift Motor 0020-8421 1) Remove the shift motor [1]. - 2 screws [2] F-4-93 4.3.13 Belt Controller Unit 4.3.13.1 Preparation for Removing Belt Controller Unit F-4-91 0020-8439 1) Remove the stack wall (upper). - Page 133 Chapter 4 F-4-98 6) Move the belt variable lever [1] as the direction of the arrow. F-4-95 3) Remove 2 screws [1] from the front side. F-4-99 7) Remove 2 roller guides [1] as the direction of the arrow, release 2 belts [2] from belt variable lever [3].
-
Page 134: Document Feeding System
Chapter 4 F-4-103 CAUTION: Caution during installation Install the 2 belts [4] after adjusting them to the slope angle of guide surface [3] of guide lever (front) [1] and guide lever (rear) [2]. F-4-101 9) Remove the E ring [1] and bushing [2]. F-4-102 4.4 Document Feeding System 10) Remove the cable [2] from the 2 wire saddles [1], and remove the belt... -
Page 135: Removing The Engaging Roller
Chapter 4 2) Remove the saddle inside cover (lower). (page 4-9)Reference[Remov- ing the Saddle Inside Cover (Lower)] 4.4.1.2 Removing the Engaging Roller 0020-8575 1) Remove the resin ring [1] and ball bearing [2]. F-4-107 5) Remove the engaging roller (front) [1] to the front direction. - 1 screw [2] F-4-104 2) Remove the resin ring [1] of the back side of the saddle area and gear re-... -
Page 136: Process Tray Assembly
Chapter 4 F-4-113 6) Remove the E ring [2] and ball bearing [3] from the stack delivery roller F-4-110 [1]. 3) Remove the E ring [1], belt mount [2], belt [3], gear [4], square pin [5], ring [6], and plate [7]. F-4-114 4.4.3 Process Tray Assembly 4.4.3.1 Preparation for Removing the Process Tray... - Page 137 Chapter 4 2. After removing the process tray assembly, put 4 places of the protrusion [1] in the frame on the below part. F-4-115 2) Remove the process tray assembly [1]. - 6 connectors [2] - 4 screws [3] CAUTION: Caution during process tray installation 1.
-
Page 138: Process Tray
Chapter 4 3. Open the swing guide [1], and make sure that the pin lever [2] does not pile up onto the knurl belt drive assembly. F-4-117 2) Remove the process tray (front) [1]. - 2 screws [2] 4.4.4 Process Tray 4.4.4.1 Preparation for Removing the Process Tray (Front/Rear) 0020-8601... -
Page 139: Feed Belt
Chapter 4 F-4-119 2) Remove the process tray (rear) [1]. - 2 screws [2] F-4-121 2) Loosen the screw [1], move the coupling (rear) [2] to left direction. F-4-122 3) Rotate the coupling (front) [1] for the screw to move to the front direction, loosen the screw [2], move the coupling (front) [1] to the right direction. -
Page 140: Before Removing The Belt Roller
Chapter 4 F-4-124 5) Release the roller guide [1], remove the feed roller [2] together with belt from the shaft. 1) Remove the 2 delivery guides lower [1] and the 2 lower delivery guides [2]. - 2 claws each [3] F-4-125 6) Pass the feed belt (rear) [1] through the coupling [2]. - Page 141 Chapter 4 Note:Points to note when installing the delivery roller shaft Make sure to install it after adjusting the D-cut part of the delivery roller shaft with the groove on the mounting plate. 3) Remove the E-ring [1] and the washer [2]. F-4-131 How to remove the rear belt roller 6) Remove the E-ring [1].
-
Page 142: Paddle Unit
Chapter 4 F-4-133 8) Remove the E-ring [1] and shift the bearing [2]. F-4-136 4.4.7 Paddle 4.4.7.1 Preparation for Removing Paddle 0020-8728 1) Remove the stack wall (upper). (page 4-8)Reference[Removing the Stack Wall (Upper)] 2) Remove the stack wall (lower). (page 4-8)Reference[Removing the Stack Wall (Lower)] 3) Remove the process tray assembly. -
Page 143: Removing The Saddle Unit
Chapter 4 F-4-138 3) Pull out the auxiliary caster [1] as the direction of arrow [A], pull out the saddle unit as the direction of arrow [B]. F-4-141 4.4.8.2 Removing the Saddle Unit 0020-8735 1) While move the saddle unit to the host machine, move the screw [1] to the position where it can be seen from the hole [2], remove screw [1] and screw [3]. -
Page 144: Alignment Roller
Chapter 4 F-4-144 4) Hold the saddle unit [1] as shown on the figure, lift it as the direction of the arrow, make sure that it has parted from the rail, and carry it. F-4-146 2) Remove the alignment roller unit [1]. - 1 screws [2] F-4-145 4.4.9 Alignment Roller... -
Page 145: Thrust Unit
Chapter 4 4.4.10 Thrust Unit 4.4.10.1 Preparation for Removing the Thrust Unit 0020-8752 1) Open the front cover. 2) Pull out the saddle unit. 3) Remove the saddle inside cover (lower). (page 4-10)Reference[Remov- ing the Inside Cover (Lower)] 4.4.10.2 Removing the Thrust Unit 0021-4903 1) Remove the saddle stitcher controller PCB cover [1]. -
Page 146: Removing The Thrust Plate
Chapter 4 4) Remove the thrust unit. (page 4-35)Reference[Removing the Thrust Unit] 4.4.11.2 Removing the Thrust Plate 0020-8759 1) Rotate the gear [1] as the direction of the arrow, put the thrust plate [2] in the most outer position [A]. F-4-154 2) Before removing the thrust plate, mark the current position [1]. -
Page 147: Pressing Roller Unit
Chapter 4 F-4-162 7) Remove 2 positioning pins [1]. - 2 screws [2] F-4-159 4) Remove the belt [1]. F-4-160 F-4-163 5) Remove the roller fixing plate (rear) [1]. 8) Remove the pressing unit [1]. - 2 screws [2] F-4-164 F-4-161 4.4.13 Pressing Roller Unit 6) Remove 2 connectors [1] on the backside. -
Page 148: Removing The Pressing Roller Unit
Chapter 4 4.4.13.2 Removing the Pressing Roller Unit. 0020-8784 1) Remove the delivery guide (upper) [1]. - 4 screws [2] F-4-168 5) Remove the belt support plate [1]. - 1 screw [2] F-4-165 2) Remove the handle cover [1]. - 1 screw [2] F-4-169 6) Remove the slide shaft (lower) [1] as the direction of the arrow. -
Page 149: Folding Roller
Chapter 4 4.4.14 Folding Roller 4.4.14.1 Preparation for Removing the Folding Roller 0020-8788 2) Pull out the saddle unit. (service position) (page 4-32)Reference[Pull Out the Saddle Unit (Service Position)] 2) Remove the saddle inside cover (lower). (page 4-10)Reference[Remov- ing the Inside Cover (Lower)] 3) Remove the pressing unit. - Page 150 Chapter 4 F-4-179 7) Remove the unit fixing base (rear) [1] at the rear side of the saddle unit. - 2 screw [2] F-4-176 4) Remove the roller arm plate [1]. - 1 E ring [2] - 2 screws [3] - 1 tension spring [4] F-4-180 8) Remove the C ring [1], ball bearing [2] located in the rear side of the sad-...
-
Page 151: Electrical System
Chapter 4 F-4-183 F-4-187 11) Remove the C ring [1] and gear [2]. 4.5 Electrical System 4.5.1 Feed Motor Driver PCB 4.5.1.1 Preparation for Removing Feed Motor Driver PCB 0021-4901 1) Remove the rear cover. (page 4-2)Reference[Removing the Rear Cover] 4.5.1.2 Remove the Feed Motor Driver PCB 0021-4902 1) Remove the feed motor driver PCB [1]. -
Page 152: Static Charge Eliminator
Chapter 4 4.5.3.4 Removing the Stack Delivery Roller Lower Static Charge Eliminator 0021-4899 1) Reverse the stack wall (lower), and remover the stack delivery roller lower static charge eliminator [1]. - 2 claws [2] F-4-189 4.5.3 Static Charge Eliminator 4.5.3.1 Preparation for Removing the Stack Delivery Roller Upper Static Charge Eliminator 0020-8802 1) Remove the stack wall (upper). -
Page 153: Removing The Saddle Inlet Roller Static Charge Eliminator
Chapter 4 F-4-196 5) Tear off 2 saddle inlet roller static charge eliminators [1]. F-4-193 4.5.3.7 Removing the Saddle Inlet Roller Static Charge Eliminator 0020-8834 1) Open the front cover. 2) Pull out the saddle unit [1]. F-4-197 4.5.3.8 Preparation for Removing the Feed Guide Lower Static Charge Eliminator 0020-8808 1) Remove the saddle staple unit. -
Page 154: Removing The Delivery Static Charge Eliminator
Chapter 4 F-4-199 F-4-202 3) Move the grip [1] as the direction of the arrow, and open the saddle stacker guide assembly [2]. 4.5.4 Horizontal Registration Sensor Unit 4.5.4.1 Preparation for Removing the Horizontal Registration Sensor Unit 0020-8946 1) Separate this machine from the connecting device of the host machine. (page 4-1)Reference[Removing From the Host Machine] 2) Remove the rear upper cover (right). - Page 155 Chapter 4 F-4-204 3) Remove the rear cover [1]. - 8 screws [2] 4) Remove the 2 connectors [2] connected to the finisher controller [1]. F-4-205 CAUTION: During the rear cover installation, be sure that the edge of the cover [1] and the gasket [2] fit properly.
-
Page 156: Horizontal Registration Sensor Pcb
Chapter 4 4.5.5 Horizontal Registration Sensor PCB 4.5.5.1 Preparation for Removing the Horizontal Registration Sensor PCB 0021-6256 1) Separate this machine from the connecting device of the host machine. (page 4-1)Reference[Removing From the Host Machine] 2) Remove the rear upper cover (right). (page 4-3)Reference[Removing the Rear Upper Cover (Right)] 3) Remove the rear upper cover (left). - Page 157 Chapter 4 F-4-213 4-47...
-
Page 159: Chapter 5 Maintenance
Chapter 5 Maintenance... - Page 161 Contents Contents 5.1 User Maintenance ................................5-1 5.1.1 User Maintenance Items (finisher)............................... 5-1 5.1.2 User Maintenance Item (saddle) ..............................5-1 5.2 Maintenance and Inspection............................5-1 5.2.1 Periodically Replaced Parts ................................. 5-1 5.2.1.1 Periodically Replaced Parts(Finisher) ................................5-1 5.2.1.2 Periodically Replaced Parts (Saddle) ................................5-1 5.2.2 Durables .......................................
- Page 162 Contents 5.4.3 Solenoids (Saddle Unit) ................................5-53 5.4.4 PCBs (Saddle Unit)..................................5-54 5.5 Upgrading ..................................5-54 5.5.1 Upgrading ....................................5-54 5.6 Service Tools................................5-54 5.6.1 Solvents and Oils ..................................5-54...
-
Page 163: User Maintenance
Chapter 5 5.1 User Maintenance 5.1.1 User Maintenance Items (finisher) 0022-8582 T-5-1 Item Timing staple cartridge (replacement) when prompted (in host machine control panel) waste staple (disposal) when prompted (in host machine control panel) 5.1.2 User Maintenance Item (saddle) 0022-8689 T-5-2 Item Timing... -
Page 164: Adjustment
Chapter 5 5.3 Adjustment 5.3.1 Basic Adjustment 5.3.1.1 Height Adjustment 0021-1701 In the case of jam with this equipment, follow the steps below to execute height adjustment. 1. Checking the height 1) Check height between the finisher and the host machine. Check whether the height difference between the upper right surface [1] of the finisher and the upper left surface [2] of the host machine is within +/- 2mm. -
Page 165: Side Registration/Skew Adjustment
Chapter 5 8) Rotate the adjustment bolt [1] with the spanner (small) [2]. Adjust the height (that is measured in step 6)) to be within 83.6 +/- 0.3mm. - To raise the height: rotate in [A] direction - To lower the height: rotate in [B] direction (Amount of height change per rotation: approx. - Page 166 Chapter 5 - Side registration adjustment range (estimated value); -3 to +3 mm (1 scale is equivalent to 1mm). - Skew adjustment range (estimated value); -2 to +2 mm (1 scale is equivalent to 1mm). SW382 SW381 SW383 SW384 SW385 F-5-10 ENTER 3) Remove the switch cover [1] of the inner cover (lower).
-
Page 167: Adjusting Sensor Light Intensity
Chapter 5 CAUTION: Perform adjustment so that the total of the shifting amount (scale) of the latch base (front/rear) is within -2 to +2 mm. F-5-15 F-5-17 CAUTION: 5) Loosen the 2 screws [2] on the latch base (rear) [1]. Be careful not to drop the bearing [1] that is attached inside the knob. - Page 168 Chapter 5 1) Turn ON the power switch of the finisher then the host machine. 2) Open the front cover and put the door switch tool into the door switch [1]. F-5-19 3) Put the screwdriver [2] into the hole [1] on the lower surface of the tray and slide it toward [A] direction to release, and then move down tray A/ B in [B] direction.
-
Page 169: Adjustment At Time Of Parts Replacement
Chapter 5 T-5-6 Code Sensor Name Number Buffer path 1 sensor PCB (UN13) Buffer path 2 sensor PCB (UN14) Lower path sensor PCB (UN24) Side registration sensor PCB (UN12) Punch waste full level sensor PCB (UN21) 6 to 8 Tray A paper surface sensor (UN16) 9, A, b Tray B paper surface sensor (UN18) 5.3.2 Adjustment at Time of Parts Replacement... -
Page 170: Adjusting Position Of Stapler
Chapter 5 F-5-28 5.3.2.4 Speed Adjustment of Swing Guide 0021-1709 Execute this adjustment when replacing the swing guide motor or EEPROM on the finisher controller PCB. Adjusting method is as follows: 1) Turn ON the power of the finisher. 2) Turn ON the power of the host machine to be on to be on standby. 3) Open the front cover and put the door switch tool into the door switch [1]. -
Page 171: Adjusting Alignment Plate Position
Chapter 5 alignment motor, or replacing EEPROM on the finisher controller PCB. Adjusting method is as follows: 1) Turn ON the power of the finisher. 2) Turn ON the power switch of the host machine to be on standby. 3) Open the front cover and put the door switch tool into the door switch [1]. F-5-33 4) Remove the screw [2] to remove the switch cover [1]. - Page 172 Chapter 5 SW382 SW382 SW381 SW381 SW383 SW384 SW385 SW383 SW384 SW385 ENTER ENTER F-5-36 6) Press switch SW385 [1] to start width adjustment of the front alignment plate. SW382 SW381 SW383 SW384 SW385 ENTER F-5-39 F-5-37 9) Pressing push switch SW385 [1] determines shifting amount of the front alignment plate.
-
Page 173: Adjusting Position Of Feed Belt
Chapter 5 5.3.2.6 Adjusting Position of Feed Belt 0021-1711 Execute this adjustment when replacing the feed belt of the intermediate process tray or EEPROM on the finisher controller PCB, or in the case of variation in delivery stack. Adjusting method is as follows: SW382 1) Turn ON the power of the finisher. -
Page 174: Adjusting Staple Position (1-Stapling At The Rear)
Chapter 5 SW382 SW381 SW383 SW384 SW385 ENTER F-5-48 4) Remove the screw [2] to remove the switch cover [1]. F-5-46 8) Press switch SW385 [1] to complete adjustment of the feed belt. "0" indication on the LED means normal completion of the adjustment. SW382 F-5-49 5) Set DIP SW382 [1] on the switch PCB as shown in the figure below. -
Page 175: Adjusting Staple Position (1-Stapling At The Front)
Chapter 5 SW382 SW382 SW381 SW381 SW383 SW384 SW385 SW383 SW384 SW385 ENTER ENTER F-5-51 F-5-54 In the case of L-configuration size: 9) Place A4 paper [1] on the intermediate process tray. (Be sure to push in the paper to the rear side of the process tray) Then, press switch SW383 to execute stapling. - Page 176 Chapter 5 SW382 SW381 SW383 SW384 SW385 ENTER F-5-60 F-5-57 6) Press switch SW385 [1] to start adjustment of the stapling position at the 4) Remove the screw [2] to remove the switch cover [1]. front. SW382 SW381 SW383 SW384 SW385 ENTER F-5-61 7) Pressing switch SW383 [1] or SW384 [2] determines adjustment level.
-
Page 177: Adjusting Staple Position (2-Stapling Positions)
Chapter 5 SW382 SW381 SW383 SW384 SW385 ENTER F-5-63 9) Place A4 paper [1] on the intermediate process tray (Be sure to push in the paper to the rear side of the process tray). F-5-66 Then, press switch SW383 [1] to execute stapling. 4) Remove the screw [2] to remove the switch cover [1]. - Page 178 Chapter 5 SW382 SW382 SW381 SW381 SW383 SW384 SW385 SW383 SW384 SW385 ENTER ENTER F-5-69 6) Press switch SW385 [1] to start adjustment of the 2 stapling positions. SW382 SW381 SW383 SW384 SW385 ENTER F-5-71 F-5-70 8) Press switch SW385 [1] to move the stapler to the 2-stapling position. 7) Pressing switch SW383 [1] or SW384 [2] determines adjustment level.
-
Page 179: Adjusting Delivery Of Staple Stack (Lower Delivery)
Chapter 5 - 4mm for A-configuration, 72.7 +/- 4mm for L-configuration). If the sta- pling position is out of the specification, go through the procedure again from step 6). F-5-74 11) Once the adjustment is complete, press SW385 to complete the adjust- ment mode. -
Page 180: Adjusting Delivery Of Staple Stack (Saddle Delivery)
Chapter 5 SW382 SW381 SW383 SW384 SW385 ENTER F-5-81 11) If B (displacement amount between the 1nd sheet and the 3rd sheet) is out of the specified value, execute the following work: Press push switch SW385 [1] once to get into the adjustment mode for B (displacement amount between the 1nd sheet and the 3rd sheet). - Page 181 Chapter 5 SW382 SW381 SW383 SW384 SW385 ENTER F-5-83 4) Remove the screw [2] to remove the switch cover [1]. F-5-86 7) Set 3 sheets of A3-size originals on the ADF. Make settings on the control panel as follows: "Finish": "Staple sort", "Next": "Saddle Stitch", "2-sid- ed method": "2-sided to 2-sided".
-
Page 182: Adjusting Saddle Stitching Position
Chapter 5 SW382 SW381 F-5-88 SW383 SW384 SW385 [1] 1st sheet [2] 2nd sheet [3] 3rd sheet ENTER 10) If A (displacement amount between the 1st sheet and the 2nd sheet) or B (displacement amount between the 1st sheet and the 3rd sheet) is out of the specified value, execute the following work: F-5-90 Take out the paper and close the upper cover. - Page 183 Chapter 5 F-5-95 8) Press push switch SW384 [1] once to execute stapling. Note that if the push switch is pressed without the paper on the saddle unit, the machine goes to the position adjustment mode mentioned in step 11). SW382 SW381 F-5-92...
-
Page 184: Adjusting Saddle Folding Position
Chapter 5 amount for the specified value. Pressing SW383 [1] moves the staple position upward while pressing SW384 [2] moves the staple position downward. Adjustment range: +10 to -10 (correction amount per unit: 0.125mm) After the adjustment value is specified, go through the following procedure. -
Page 185: Adjusting Position Of Saddle Lead Edge Stopper
Chapter 5 SW382 SW381 SW383 SW384 SW385 ENTER F-5-106 3) Loosen the 2 fixing screws [1] of the lead edge stopper fixture by approx. quarter turn. F-5-104 9) Press push switch SW385 once to complete the adjustment mode. 5.3.2.14 Adjusting Position of Saddle Lead Edge Stopper 0021-1721 Execute this adjustment in the case of displacement in saddle fording posi- tion or replacing EEPROM on the finisher controller PCB. -
Page 186: Adjusting Position For Saddle Alignment Width
Chapter 5 5.3.2.15 Adjusting Position for Saddle Alignment Width 0021-1723 Execute this adjustment in the case of displacement in position for saddle alignment width. 1) Turn ON the power of the finisher. 2) Turn ON the power switch of the host machine to be on standby. SW382 3) Open the front cover and put the door switch tool into the door switch [1]. - Page 187 Chapter 5 SW382 SW381 SW383 SW384 SW385 ENTER F-5-114 10) Press switch SW385 once to complete the adjustment mode. 5-25...
-
Page 188: Adjustment After Replacing Eeprom (Ic107) On Finisher Controller Pcb
Chapter 5 6) Execute the following adjustments: 5.3.2.16 Adjustment After Replacing EEPROM (IC107) on - Adjusting sensor light intensity - Speed adjustment of swing guide Finisher Controller PCB - Adjusting alignment plate position 0021-1724 - Right angle adjustment of alignment plate Execute this adjustment when replacing EEPROM (IC107) on the finisher - Adjusting staple position (1-stapling at the rear) controller PCB. -
Page 189: Bufferless Mode
Chapter 5 5.3.2.17 Bufferless Mode 0021-1725 Execute this mode if meeting the following conditions: - In the case of alignment failure with the 2nd set (the first 3 sheets) when making multiple sets of copy. - In the case of corner bend of paper. SW382 - In the case of buffer path 2 sensors stationary jam (Jam Code: 1109). -
Page 190: Adjusting Assist Stopper Position
Chapter 5 5.3.2.18 Adjusting Assist Stopper Position 0021-1726 Execute this adjustment in the case of variation in the top sheet of the stapled delivery stack. Adjustment method is as follows: 1) Open the front cover. 2) Hold the lever [1] to pull out the saddle unit [2], and then open the saddle right guide [3]. - Page 191 Chapter 5 F-5-124 CAUTION: If the reference value [3] measured in the previous step is -A, move the stopper [2] in the direction of the white arrow. If the reference value [3] measured in the previous step is +A, move the stopper [2] in the direction of the black arrow.
-
Page 192: Adjusting Height Of Staple Inlet Guide
Chapter 5 5.3.2.19 Adjusting Height of Staple Inlet Guide 0021-1727 Execute this adjustment if meeting the following conditions: - In the case of failure in tray stacking with thin paper as shown in the figure below. - In the case of replacing EEPROM (IC107) on the finisher controller SW382 PCB. -
Page 193: Adjusting Paddle Height
Chapter 5 F-5-132 8) Press switch SW385 [1] again to complete this adjustment. SW382 SW381 SW383 SW384 SW385 F-5-136 5) Set DIP SW382 [1] on the switch PCB as shown in the figure below. ENTER F-5-133 5.3.2.20 Adjusting Paddle Height SW382 0021-1728 This adjustment is to be executed if any of followings occurs;... -
Page 194: Adjustment In The Case Of Failure In Stacking Performance Of Tray (Upper Curl)
Chapter 5 MEMO: In the case of failure as referred to above, make the adjustment in negative direction to clear the problem. SW382 F-5-142 MEMO: Executing this adjustment enables the finisher to increase feeding speed at SW381 the timing that the paper's trail edge reaches the delivery roller. As a result, the trail edge of paper does not stay around the delivery outlet and the tray stackability will improve. -
Page 195: Adjustment In The Case Of Failure In Stacking Performance Of Tray (Lower Curl)
Chapter 5 SW382 SW382 SW381 SW381 SW383 SW384 SW385 ENTER SW383 SW384 SW385 ENTER F-5-148 F-5-145 5.3.2.22 Adjustment in the Case of Failure in Stacking 6) Press switch SW385 [1] so that this adjustment is ready now. Performance of Tray (lower curl) 0021-1730 Execute this adjustment in the case of failure in tray stacking (lower curl) as SW382... -
Page 196: Adjustment In The Case Of Failure In Stacking Performance Of Tray (Run-On Of Paper When Using Thin Paper)
Chapter 5 SW382 SW381 SW383 SW384 SW385 ENTER F-5-154 8) Press switch SW385 [1] again to complete this adjustment. SW382 SW381 F-5-151 5) Set DIP SW382 [1] on the switch PCB as shown in the figure below. SW383 SW384 SW385 SW382 ENTER F-5-155... -
Page 197: Adjustment In The Case Of Canceling Limit For Tray Stack
Chapter 5 SW382 SW381 SW383 SW384 SW385 ENTER F-5-160 7) Pressing push switch SW384 [1] once displays "+1" on the LED [2]. F-5-157 4) Remove the screw [2] to remove the switch cover [1]. SW382 SW381 SW383 SW384 SW385 ENTER F-5-161 8) Press switch SW385 [1] again to complete this adjustment. - Page 198 Chapter 5 F-5-163 [1] Normal stacking [2] Stacking while stacking limit is cancelled MEMO: This adjustment is for the upper tray only. Thus, cancellation of the stacking limit for the lower tray is not available. Following table shows stacking capacity for the upper tray while the stacking limit is cancelled.
-
Page 199: Adjusting Alignment For Saddle Stapling
Chapter 5 SW382 SW381 F-5-171 4) Turn ON the power of the finisher. 5) Turn ON the power switch of the host machine to be on standby. SW383 SW384 SW385 6) Put the door switch tool into the door switch [1]. ENTER F-5-168 8) Press switch SW385 [1] again to complete this adjustment. - Page 200 Chapter 5 SW382 SW381 SW383 SW384 SW385 ENTER F-5-178 F-5-174 13) Press switch SW383 [1] several times to execute folding and delivery of 9) Follow the feed guide [2] to set the paper (A3 or LDR) [1]. (Be sure to paper.
-
Page 201: Adjusting Engagement/Disengagement Position Of Saddle Disengagement Roller
Chapter 5 - If the stapling position at the rear is displaced upward as shown in step 14) (in the case of displacement amount [B]) Remedy: Move the staple unit [1] in the direction of the arrow [B] to meet the specified value. 17) Reverse steps 1) to 8) and 15) so that the finisher is ready to work. -
Page 202: Adjusting Feeding Distance Of Saddle Disengagement Roller
Chapter 5 SW382 SW381 SW383 SW384 SW385 ENTER F-5-186 7) Pressing switch SW383 [1] or SW384 [2] determines adjustment level. By pressing SW383 once, the LED [3] indicates "-1" and the pressure applied to the disengagement roller [1] is reduced (the disengagement roller is moved in A direction). - Page 203 Chapter 5 5) Set DIP SW382 [1] on the switch PCB as shown in the figure below. M101 SW382 SW381 SW383 SW384 SW385 ENTER F-5-193 6) Press switch SW385 [1] so that this adjustment is ready now. F-5-190 SW382 Adjusting method is as follows: 1) Turn ON the power of the finisher.
-
Page 204: Setting Of Pressless Mode
Chapter 5 SW382 SW382 SW381 SW381 SW383 SW384 SW385 ENTER SW383 SW384 SW385 ENTER F-5-196 F-5-199 5.3.2.28 Setting of Pressless Mode 6) Press switch SW385 [1] so that this adjustment is ready now. 0021-1756 Execute this adjustment to eliminate paper wrinkle. Adjusting method is as follows: SW382 1) Turn ON the power of the finisher. -
Page 205: Adjusting Delivery Angle
Chapter 5 5.3.2.29 Adjusting Delivery Angle 0021-1762 Execute this adjustment to support paper curl issue depending on curl condi- tion. Adjusting method is as follows: SW382 1) Turn ON the power of the finisher. 2) Turn ON the power switch of the host machine to be on standby. 3) Open the front door and put the door switch tool into the door switch [1]. - Page 206 Chapter 5 F-5-207 <In the case of upper curl> F-5-208 8) Press switch SW385 [1] again to complete this adjustment. SW382 SW381 SW383 SW384 SW385 ENTER F-5-209 5-44...
-
Page 207: Setting Of Tray Speed
Chapter 5 5.3.2.30 Setting of Tray Speed 0021-1763 Execute this adjustment in the case of abnormal sound when the tray is moved up/down. Adjusting method is as follows: SW382 1) Turn ON the power of the finisher. 2) Turn ON the power switch of the host machine to be on standby. 3) Open the front door and put the door switch tool into the door switch [1]. -
Page 208: Changing Lower Delivery Mode
Chapter 5 5.3.2.31 Changing Lower Delivery Mode 0021-1764 Execute this adjustment to support lower tray delivery issue of unstapled pa- per. Adjusting method is as follows: SW382 1) Turn ON the power of the finisher. 2) Turn ON the power switch of the host machine to be on standby. 3) Open the front door and put the door switch tool into the door switch [1]. - Page 209 Chapter 5 SW382 SW381 SW383 SW384 SW385 ENTER F-5-221 5-47...
-
Page 210: Setting Of Stop-Less Stacking
Chapter 5 6) Press switch SW385 [1] so that this adjustment is ready now. 5.3.2.32 Setting of Stop-less Stacking 0021-1765 Execute this adjustment to eliminate paper wrinkle. SW382 Adjusting method is as follows: 1) Turn ON the power of the finisher. 2) Turn ON the power switch of the host machine to be on standby. -
Page 211: Adjusting Hole Positions In Feeding Direction
Chapter 5 5.3.2.33 Adjusting Hole Positions in Feeding Direction 0021-5209 Execute this adjustment to adjust the punch hole position at paper edge. Be sure to execute this adjustment for both the left and the right stopper units at the same time. 1) Remove the punch unit. -
Page 212: Outline Of Electrical Components
Chapter 5 5.4 Outline of Electrical Components 5.4.1 Sensors (Saddle Unit) 0022-8347 PS118 PS101 PS122 PS121 PS119 PS110 PS109 PS108 PS103 PS115 PS107 PS116 PS105 PS106 PS113 PS114 PS112 PS117 PS111 F-5-231 T-5-8 Notation Name Description Parts No. Error PS101 Saddle inlet sensor To detect the paper feed WG8-5736... - Page 213 Chapter 5 Notation Name Description Parts No. Error PS109 Saddle press front sensor To detect the paper feed WG8-5823 PS110 Saddle press HP sensor To detect the saddle press HP WG8-5823 E5FA PS111 Saddle delivery tray paper sensor 2 To detect the saddle delivery tray paper presence 2 WG8-5823 E5F0 PS112...
-
Page 214: Motors (Saddle Unit)
Chapter 5 5.4.2 Motors (Saddle Unit) 0022-8348 M109 M113 M101 M111 M114 M110 M103 M102 M104 M108 M112 M106 M105 M107 F-5-232 T-5-9 Notati Name Description Parts No. Error M101 Saddle feed motor To drive the roller FK2-1728 M102 Saddle alignment guide motor To move the saddle alignment guide FK2-1730 E5F2... -
Page 215: Solenoids (Saddle Unit)
Chapter 5 Notati Name Description Parts No. Error M111 Saddle trailing edge moving motor To move the saddle trailing edge FK2-1732 E5FD M112 Saddle alignment roller motor To drive the saddle alignment roller FK2-1714 M113 Saddle tapping motor To drive the saddle tapping plate FK2-1731 E5FC M114... -
Page 216: Pcbs (Saddle Unit)
Chapter 5 5.4.4 PCBs (Saddle Unit) 0022-8350 UN101 UN125 F-5-234 T-5-11 Notation Name Description Parts No. Error UN101 Saddle sticher controller PCB To control the saddle sticher unit UN125 Saddle sticher jam LED PCB To turn on the saddle sticher unit jam FG3-0535 5.5 Upgrading 5.5.1 Upgrading... - Page 217 Chapter 5 Name Description Composition Remarks Door switch tool Front door switch ON tool number:FY9-8006 5-55...
- Page 219 Appendix...
- Page 221 General Timing Chart / General Circuit Diagram Finisher, Sorter, DeliveryTray Saddle Finisher-AF2...
- Page 223 IMPORTANT This documentation is published by Canon Inc., Japan, to serve as a source of reference for work in the field. Specifications and other information contained herein may vary slightly from actual machine values or those found in advertising and other printed matter.
- Page 225 Contents 1 General Circuit Diagram......................... 1 Signal Names ............................1 General Circuit Diagram........................9...
- Page 227 1 General Circuit Diagram Signal Names List Of Signals(finisher) T-1-1 Notation Signal name assist motor home position detection sig- ASSIST-HP-SEN ASSIST-M-8FG* assist motor rotation detection signal ASSIST-M-CLK assist motor clock signal ASSIST-M-CW* assist motor drive signal ASSIST-M-IHA assist motor current switch signal 1 ASSIST-M-ILB assist motor current switch signal 2 ASSIST-R-SL1...
- Page 228 Notation Signal name BTRY-POSS-SEN2 tray B position sensor detection signal 2 BTRY-POSS-SEN3 tray B position sensor detection signal 3 BTRY-POSS-SEN4 tray B position sensor detection signal 4 BTRY-P-SEN tray B paper sensor detection signal tray B paper surface sensor detection BTRY-SHIMEN-SEN* signal BTRY-SL-ON*...
- Page 229 Notation Signal name FJOG-M-Clk front alignment motor clock signal FJOG-M-CW* front alignment motor drive signal front alignment motor current switch FJOG-M-IHA* signal paper edge stopper shift motor drive sig- FRONT-BIN-M-A nal A paper edge stopper shift motor drive sig- FRONT-BIN-M-B nal B paper edge stopper shift motor current FRONT-BIN-M-IHA*...
- Page 230 Notation Signal name pre-buffer transport motor current PASS-M-IA switch signal 1 pre-buffer transport motor current PASS-M-IB switch signal 2 PDL-M-Clk paddle rotation motor clock signal PDL-M-CW* paddle rotation motor drive signal paddle rotation motor current switch sig- PDL-M-IHA* paddle rotation home position detection PDL-ROTATE-HP-SEN signal paddle lift home position detection sig-...
- Page 231 Notation Signal name horizontal registration detection unit SIDEREJI-M-A shift motor drive signal A horizontal registration detection unit SIDEREJI-M-A* shift motor drive signal A* horizontal registration detection unit SIDEREJI-M-B shift motor drive signal B horizontal registration detection unit SIDEREJI-M-B* shift motor drive signal B* horizontal registration detection unit SIDEREJI-M-IHA shift motor current switch signal 1...
- Page 232 Notation Signal name YDG-CLS-SEN* swing guide closed detection signal YDG-HP-SEN swing guide open detection signal swing guide motor high-speed setting YDM-H-SPEED signal swing guide motor low-speed setting YDM-L-SPEED signal swing guide motor middle-speed setting YDM-M-SPEED mode YDM-ON* swing guide motor drive signal List Of Signals(saddle) T-1-2 Notation...
- Page 233 Notation Signal name JOG-M-B* saddle alignment motor drive signal B* JOG-M-IHA saddle alignment motor current switch signal LENGTH-PATH-SEN saddle vertical path sensor signal PRESS-CLK-SEN saddle pressing motor clock signal saddle pressing home position detection sig- PRESS-HP-SEN saddle pressing motor CCW rotation drive PRESS-M-CCW signal saddle pressing motor CW rotation drive sig-...
- Page 234 Notation Signal name THRUST-CLK-SEN saddle butting motor clock sensor signal THRUST-HP-SEN saddle butting home position detection signal saddle butting motor CCW rotation drive sig- THRUST-M-CCW saddle butting motor CW rotation drive sig- THRUST-M-CW THRUST-M-PWM saddle butting motor PWM signal TOP-PATH-SEN saddle lead edge path detection signal...
- Page 235 General Circuit Diagram General Circuit Diagram(Finisher1) 200V-EU FT1013 FT1012 UN12 FT1014 J1011 FT1008 Inlet J1012 SOLD1 AC noise filter PCB FT1007 FT1017 J471 SOLD2 J472 SOLD3 J474 J473 FT1018 FT1016 J1013 J1014F Circuit breaker MT1004 MT1005 GN/Y J1001M MT1003 FT1019 FT1021 FT1022 FT1024...
- Page 236 General Circuit Diagram(Finisher2) Finisher controller PCB J129 J127 J128 J522D J522DH 12 11 10 9 J522L J520D J526D J525D J539D J524D J638 J519D J518D J520LH J526LH J525DH J539LH J515 UN15 J519LH J518LH J524LH J520L J526L J525L J539L Tray A paper surface J524L PS26 sensor PCB (emission)
- Page 237 General Circuit Diagram(Finisher3) Inlet roller disengage motor PS43 Inlet roller HP sensor Inlet sensor Finisher controller PCB J542L PS24 J544 Paper trailing edge J542DH Lower J505 drop guide HP sensor Saddle path J125 J542D J126 delivery sensor J142 switch solenoid J510 J511 J517L...
- Page 238 General Circuit Diagram(Finisher4) Finisher controller PCB J139 J106 J623DH J620DH J623D J620D J620L J623L J622D J621D J621DH J622DH 14 13 12 11 10 9 16 15 14 13 12 11 10 9 J621L J622L J625D J653D J625DH J624D J653LH J625L J624LH J653L J624L...
- Page 239 General Circuit Diagram(Finisher5) Finisher controller PCB J141 J111 J122 J140 J121 J123 J680 J633DH PS42 Needle chip J652M J633D J634M full sensor 18 17 16 15 14 13 12 11 10 9 J652F J633L J634F 14 13 12 11 10 9 J314 J311 Staple driver PCB...
- Page 240 General Circuit Diagram(Finisher6) Finisher controller PCB J109A J109B J124 J108A J108B J110 J134 J109WH A15 B15 J108WH MT1012 13 12 11 10 9 13 12 11 10 9 MT1014 J292A J292B UN10 UN11 Upper tray motor driver PCB Lower tray motor driver PCB J706D J701 J291A...
- Page 241 General Circuit Diagram(Finisher7) DC power PCB (24V) Relay PCB J421 J104 J107 J105 J1003D J1001F J1003L J1002D J942D J942DH J1003LH J1002L 13 12 11 10 9 J1001M J1002LH J942L J201 J203 J202 UN101 Saddle sticher controller PCB J934 J931 J932 J933 J206 J210...
- Page 242 General Circuit Diagram(Saddle1) M104 M113 M101 M114 PS122 PS107 PS101 PS108 PS118 PS103 Saddle roller Saddle tapping Saddle feed motor Saddle lead-in roller Saddle lead-in Saddle roller Saddle Saddle paper Saddle paper Saddle M109 guide motor motor disengage motor PS110 PS116 PS115 roller...