LG ON7 - Mini Hi-Fi Audio Manual
- Owner's manual (49 pages) ,
- Simple manual (12 pages) ,
- Simple manual (2 pages)
Advertisement
Package Contents

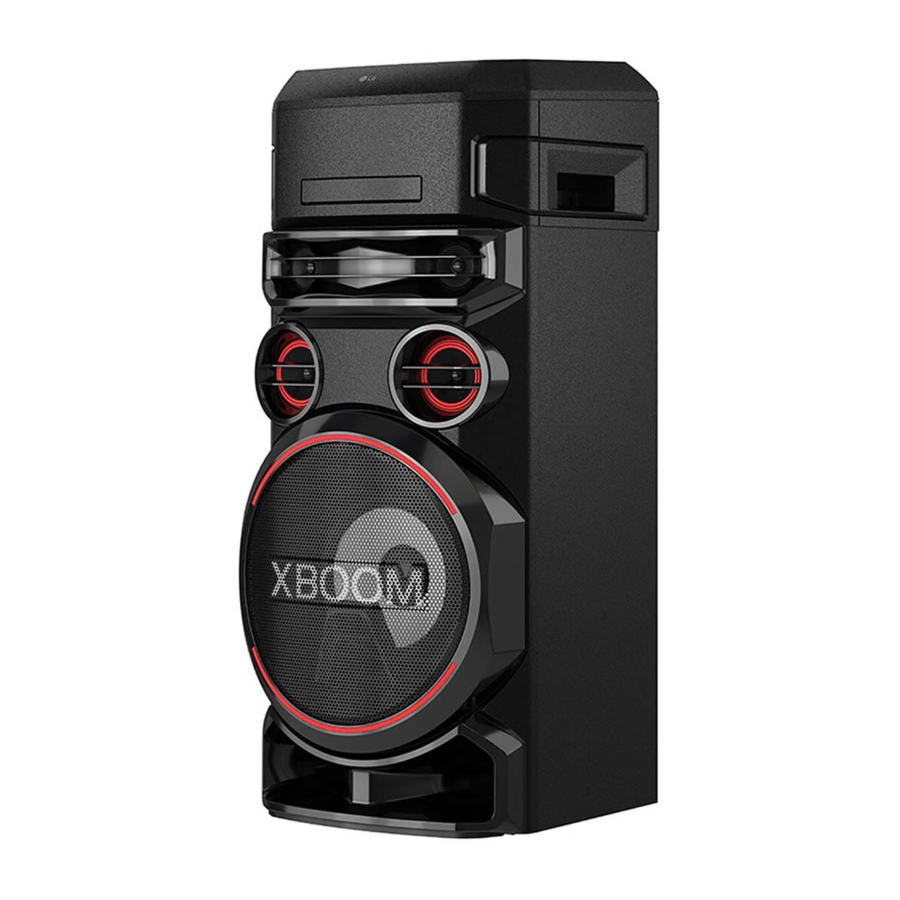
Top panel

![]() (Standby)
(Standby)
Turns the power on or off.- USB REC / DEMO
- Records to USB.
- Stops recording.
- In power off status, if you press USB REC / DEMO, show demo mode.
- USB 1 Port
You can play sound files by connecting the USB device. - Display window
- USB 2 Port
You can play sound files by connecting the USB device. - F (Function)
Selects the function and input source. - LIGHTING
Selects the lighting mode. ![]() TWIN
TWIN
Connects two units for TWIN mode in WIRELESS PARTY LINK.![]() (Skip/Search)
(Skip/Search) - Skips backward or forward.
- Searches for a section within a track/file.
- Selects the radio stations.
- Scans DAB+ stations by pressing and holding.


 (Play/Pause)
- Starts or pauses playback.
- Selects stereo/mono.
- Bluetooth connection lock (BT LOCK): Select the Bluetooth function by pressing F repeatedly. And long press
![]() to limit Bluetooth connection to only BT and LG TV.
to limit Bluetooth connection to only BT and LG TV.
 to limit Bluetooth connection to only BT and LG TV.
 (Stop) / RDS
- Stops playback or cancels DELETE function.
- Radio Data System
VOL (Volume) -/+
Adjusts speaker volume.
MIC (Microphone) / GUITAR -/+
Adjusts Microphone volume or Guitar volume.
![]() (Auto Music Play)
(Auto Music Play)
Plays the audio currently playing by tagging the mobile (with "LG XBOOM" App) to this unit. (Android Only) k- VOICE CANCELLER
You can reduce the vocal tones during music playback from various input sources.
![]() (Open/Close)
(Open/Close)
Opens and closes the disc tray. - CLUB, DRUM, USER (DJ PAD)
Selects CLUB, DRUM or USER sound effect to mix.
(If you want to use USER, you have to register a source with "LG XBOOM" app. (Android Only))
1, 2, 3 (DJ PAD)
Press a desired sound pad. - MIC (Microphone) ECHO
Selects ECHO mode.
VOCAL EFFECTS
Selects various vocal effects mode.
KEY CHANGER (![]() )
)
Changes the key to suit your vocal range. - Remote sensor
- SPECIAL EQ / BASS BLAST (or BASS BLAST+)
- Chooses special equalizer.
- Press and hold to select BASS (or BASS+) effect directly.


 )
)SEARCH
Moves to folder or file in selection mode.
OK
Selects a folder when searching a file.
USER EQ
Selects the equalizer created by your own.
Multi jog
- Searches a folder or a file.
- Turns clockwise or counterclockwise to control the USER EQ level.
- Chooses special equalizer.
Front panel/ Rear panel

- Disc tray
- Lighting
- Remote sensor
- OPTICAL IN: Connect an optical device.
- GUITAR IN: Connect a guitar.
- MIC (Microphone) IN: Connect a microphone.
- DAB+/FM ANTENNA
- AC IN socket
 Make sure to properly align and connect the optical cable; improper alignment may cause damage to the jack.
Controller App
Download the LG XBOOM App to your device.


Android


iOS
Additional Information
Specifications
| Power Requirements | Refer to the main label on the unit. |
| Power Consumption | Refer to the main label on the unit. |
| Networked standby: 0.5 W (If all network ports are activated.) | |
| Dimensions (W x H x D) | Approx. 330.0 mm x 785.0 mm x 344.0 mm |
| Bus Power Supply (USB) | 5 V  500 mA 500 mA |

- Connect the power cord to wall outlet directly if possible. Or when you use an extension cable, it is highly recommended to use an extension cable of 110 V / 15 A or 230 V / 15 A, otherwise the unit may not operate properly because of the lack of power supply.
- Do not overload the extension cord with excessive electrical load.
Note
- Do not look directly at the light emitting part when the LIGHTING is turned on.
- If the illumination brightness is glaring, switch on the room lights or turn off the LIGHTING of the unit.
How to disconnect the wireless network connection or the wireless device
Turn off the unit by pressing the power button for more than 5 seconds.
Replacement of battery

Safety

RISK OF ELECTRIC SHOCK
DO NOT OPEN
TO REDUCE THE RISK OF ELECTRIC SHOCK DO NOT REMOVE COVER (OR BACK) NO USER-SERVICEABLE PARTS INSIDE REFER SERVICING TO QUALIFIED SERVICE PERSONNEL.
 This lightning flash with arrowhead symbol within an equilateral triangle is intended to alert the user to the presence of uninsulated dangerous voltage within the product' s enclosure that may be of sufficient magnitude to constitute a risk of electric shock to persons.
 The exclamation point within an equilateral triangle is intended to alert the user to the presence of important operating and maintenance (servicing) instructions in the literature accompanying the product.


TO PREVENT FIRE OR ELECTRIC SHOCK HAZARD, DO NOT EXPOSE THIS PRODUCT TO RAIN OR MOISTURE.

Do not install this equipment in a confined space such as a book case or similar unit.
Do not use high voltage products around this product. (ex. Electrical swatter) This product may malfunction due to electrical shock.
No naked flame sources, such as lighted candles, should be placed on the apparatus.
CLASS 1 LASER PRODUCT
This product employs a Laser System. To ensure proper use of this product, please read this owner' s manual carefully and retain it for future reference. Shall the unit require maintenance, contact an authorised service centre.
Use of controls, adjustments or the performance of procedures other than those specified herein may result in hazardous radiation exposure.
To prevent direct exposure to laser beam, do not try to open the enclosure.
Do not block any ventilation openings. Install in accordance with the manufacturer' s instructions.
Slots and openings in the cabinet are provided for ventilation and to ensure reliable operation of the product and to protect it from over heating. The openings should never be blocked by placing the product on a bed, sofa, rug or other similar surface. This product shall not be placed in a builtin installation such as a bookcase or rack unless proper ventilation is provided or the manufacturer' s instruction has been adhered to.
CAUTION concerning the Power Cord
The Power Plug is the disconnecting device. In case of an emergency, the Power Plug must remain readily accessible.
The apparatus should not be exposed to water (dripping or splashing) and no objects filled with liquids, such as vases, should be placed on the apparatus.
NOTICE: For safety marking information including product identification and supply ratings, please refer to the main label on the bottom or the other surface of the product.
For models using a battery
This device is equipped with a portable battery or accumulator.

Risk of fire or explosion if the battery is replaced by an incorrect type.
How to Safely remove the batteries or the battery pack from the equipment: To Remove the old batteries or battery pack, follow the assembly steps in reverse order. To prevent contamination of the environment and bring on possible threat to human and/or animal health, the old batteries or the battery pack must be put in an appropriate container at designated collection points. Do not dispose of batteries or battery pack together with other waste. It is recommended that you use local, free reimbursement systems batteries or battery packs, (may not be available in your area). The batteries or the battery pack should not be exposed to excessive heat such as sunshine, fire or the like.
POWER: This unit operates on a mains supply of 200 - 240 V ~ 50 / 60 Hz.
Wiring: This unit is supplied with a BS 1363 approved main plug. When replacing the fuse, always use a fuse of the same rating and approved to BS 1362. Never use this plug with the fuse cover omitted. To obtain a replacement fuse cover contact your dealer. If the type of plug supplied is not suitable for the mains sockets in your home, then the plug should be removed and a suitable type fitted. Please refer to the wiring instructions below:
A mains plug removed from the mains lead of this unit must be destroyed. A mains plug with bared wires is hazardous if inserted in a mains socket. Do not connect either wire to the earth pin, marked with the letter E or with the earth symbol  or coloured green or green and yellow. If any other plug is fitted, use same rating of fuse in the plug.

The wires in this mains lead are coloured in accordance with the following codes:
- BLUE: NEUTRAL, BROWN: LIVE - As the colours of the wires in the mains lead of this unit may not correspond with the coloured marking identifying the terminals in your plug, proceed as follows: The wire which is coloured blue must be connected to the terminal which is marked with the letter N or coloured black. The wire which is coloured brown must be connected to the terminal which is marked with the letter L or coloured red.
Symbols
| ~ | Refers to alternating current (AC). |
 | Refers to direct current (DC). |
 | Refers to class II equipment. |
 | Refers to stand-by. |
 | Refers to "ON" (power). |
| Refers to dangerous voltage. |
Be careful to make sure children do not put their hands or any objects into the *speaker duct.
* speaker duct: A hole for plentiful bass sound on speaker cabinet. (enclosure)
Copyright © 2020-2021 LG Electronics Inc. All Rights Reserved.

VideosLG Xboom ON7 unboxing and sound check the Party Speaker Video
Documents / Resources
References
Download manual
Here you can download full pdf version of manual, it may contain additional safety instructions, warranty information, FCC rules, etc.
Advertisement
Thank you! Your question has been received!


Need Assistance?
Do you have a question about the ON7 that isn't answered in the manual? Leave your question here.