Table of Contents
Advertisement
Quick Links
USER'S GUIDE
Wi-Fi ® Home Video Camera
MODELS:
FOCUS89, FOCUS89-2, FOCUS89-3, FOCUS89-4
FOCUS89-W, FOCUS89-W2, FOCUS89-W3, FOCUS89-W4
FOCUSSATURN, FOCUSSATURN-2, FOCUSSATURN-3,
FOCUSSATURN-4,FOCUSSATURN-W, FOCUSSATURN-W2,
FOCUSSATURN-W3, FOCUSSATURN-W4,FOCUSESPY,
FOCUSESPY-W2, FOCUSESPY-W3, FOCUSESPY-W4
FOCUSESPY-2, FOCUSESPY-3, FOCUSESPY-4,FOCUSESPY-W,
FOCUSRADIUS, FOCUSRADIUS-2, FOCUSRADIUS-3,
FOCUSRADIUS-4,FOCUSRADIUS-W, FOCUSRADIUS-W2,
FOCUSRADIUS-W3, FOCUSRADIUS-W4
The features described in this user's guide are subject to modifications without prior notice.
Advertisement
Table of Contents

Related Manuals for Motorola FOCUSSATURN


Summary of Contents for Motorola FOCUSSATURN
- Page 1 USER’S GUIDE Wi-Fi ® Home Video Camera MODELS: FOCUS89, FOCUS89-2, FOCUS89-3, FOCUS89-4 FOCUS89-W, FOCUS89-W2, FOCUS89-W3, FOCUS89-W4 FOCUSSATURN, FOCUSSATURN-2, FOCUSSATURN-3, FOCUSSATURN-4,FOCUSSATURN-W, FOCUSSATURN-W2, FOCUSSATURN-W3, FOCUSSATURN-W4,FOCUSESPY, FOCUSESPY-W2, FOCUSESPY-W3, FOCUSESPY-W4 FOCUSESPY-2, FOCUSESPY-3, FOCUSESPY-4,FOCUSESPY-W, FOCUSRADIUS, FOCUSRADIUS-2, FOCUSRADIUS-3, FOCUSRADIUS-4,FOCUSRADIUS-W, FOCUSRADIUS-W2, FOCUSRADIUS-W3, FOCUSRADIUS-W4 The features described in this user’s guide are subject to modifications without prior notice.
- Page 2 ® /iPad ® or Android™ devices. Please keep your original dated sales receipt for your records. For warranty service of your Motorola product, you will need to provide a copy of your dated sales receipt to confirm warranty status. Registration is not required for warranty coverage.
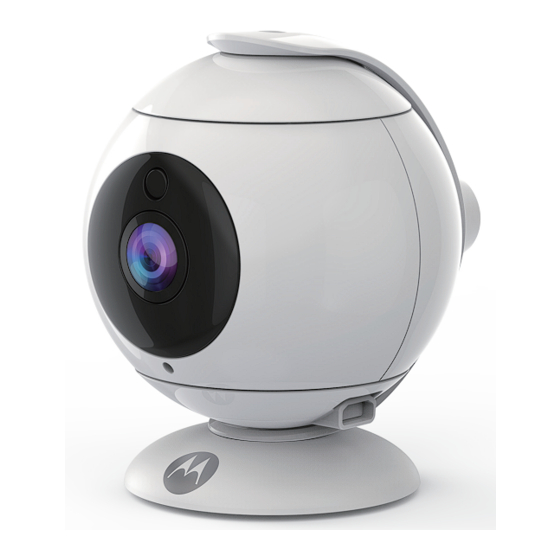
- Page 3 Overview of your Camera 1. Light Sensor (for night mode 5. Infrared LEDs (for night vision) detection) 6. Speaker 2. Power / Status indicator 7. Micro USB socket 3. Microphone 8. PAIR Button 4. Camera Lens 9. SD Card slot ®...
-
Page 4: Table Of Contents
Power ON and Connect the Camera ..........9 3.2.2 Download Hubble for Motorola Monitors App ......... 9 3.2.3 Run Hubble for Motorola Monitors App on Android™ device ..9 3.2.4 Add the Camera to your account ............ 10 ® ® ......14 3.3 User Account and Camera Setup on iPhone... -
Page 5: Safety Instructions
1. Safety Instructions WARNING: STRANGULATION HAZARD - In case this unit is being used to monitor infants or children, keep the unit and adapter cord more than 1 metre away from the cot and out of their reach. Never place the Camera or cords within a cot or near a bed. - Page 6 WARNING This Wi-Fi ® Camera Unit is compliant with all relevant electromagnetic field standards and is, when handled as described in the User’s Guide, safe to use. Therefore, always read the instructions in this User’s Guide carefully before using the device. •...
-
Page 7: Minimum System Requirements
2. Minimum System Requirements Web Portal Windows ® 7 • Mac OS ® 10.7 • • Chrome™ 24 Internet Explorer ® 9 • Safari ® 6 • • Java™ 7 Firefox ® 18.0 • Adobe ® Flash ® Player 15.0 •... -
Page 8: Getting Started - Connecting Devices
3. Getting started - Connecting Devices How does it work? FOCUS89 Wi-Fi Router Access your View your Camera from any Camera Camera locally compatible device remotely Hubble Service When a user tries to access the Camera, our Hubble server authenticates the user’s identity and permits access to the Camera. -
Page 9: User Account And Camera Setup On Android™ Devices
The Camera’s Red LED Flashes after the Camera has finished booting. 3.2.2 Download Hubble for Motorola Monitors App • Go to Google Play™ Store to search for “Hubble for Motorola Monitors”. • Download “Hubble for Motorola Monitors” App from Google Play™ Store and install it on your Android™ device 3.2.3... -
Page 10: Add The Camera To Your Account
Note: If you already have a Hubble App account, please select Already have an Account? to go to the next step. 3.2.4 Add the Camera to your account on the lower right corner of the screen to add camera. (Picture A2) •... - Page 11 • The following setup instructions will appear on the screen. (Pictures A3) • Plug in and switch on the camera, and wait for a couple of minutes for it to warm up. • The following setup instructions will appear on the screen. (Picture A4, A4a) Getting started - Connecting Devices...
- Page 12 • To pair the camera - Press and hold the PAIR button on the back of the Camera Unit for 8 seconds. You will then hear a beep tone, followed by a voice prompt indicating that the Camera is ready for pairing. The LED will flash Red / Blue.
- Page 13 Select your Wi-Fi ® Network, enter your password and then tap Connect. • (Pictures A8, A9, A10) It will take a few minutes for the Camera to connect to the Wi-Fi ® network • before showing the connection status. (Pictures A11) •...
-
Page 14: User Account And Camera Setup On Iphone /Ipad
The Camera’s Red LED Flashes after the Camera has finished booting. 3.3.2 Download Hubble for Motorola Monitors App • Go to App Store to search for “Hubble for Motorola Monitors”. • Download “Hubble for Motorola Monitors” App and install it on your iPhone ® /iPad ® . -
Page 15: Add The Camera To Your Account
Note: If you already have a Hubble App account, please select Already have an Account? to go to the next step (Picture i1). 3.3.4 Add the Camera to your account • on the lower right corner of the screen to add camera. (Picture i2). Getting started - Connecting Devices... - Page 16 • The following setup instructions will appear on the screen. (Pictures i3, i3a) • Plug in and switch on the camera, and wait for a couple of minutes for it to warm up. • The following setup instructions will appear on the screen. (Picture i4, i5) Getting started - Connecting Devices...
- Page 17 • To pair the camera - Press and hold the PAIR button on the back of the Camera for 8 seconds. You will then hear a beep tone, followed by a voice prompt indicating that the Camera is ready for pairing. The LED will flash Red / Blue.
- Page 18 • Select your Wi-Fi® network. (Picture i9) • Enter your Wi-Fi® password and tap OK. (Picture i10) • It will take a few minutes for the Camera Unit to connect to the Wi-Fi® network before showing the connection status. • Select what your camera will be used for.
-
Page 19: Camera Functions
4. Camera Functions Connecting the Camera Unit to power • Connect the power adapter to an electrical outlet and insert the plug into the micro USB socket on the back of the Camera Unit. • The Blue LED will illuminate after approximately 30 seconds if the camera is set up. - Page 20 Lullabies Tap to access the Melody menu and select one of the 5 pre-set melodies you wish to play on your Camera Unit. Two-way Tap to activate the function. Press the round communication button once to speak through the Camera Unit.
-
Page 21: Working With Pc/Notebook
5. Working with PC/Notebook • Go to http://www.hubbleconnected.com/motorola/login/ • Enter your User Name and Password and then click Login if you have already created an account. • Click on the Camera list paired in your account via Android™ device or iPhone ®... -
Page 22: Procedure For Resetting The Camera
6. Procedure for Resetting the Camera Note: If your Camera is moved from one router (e.g. home) to another (e.g. office) or you have Camera setup issues, then the Camera must be reset. Please reset the Camera with the following procedures: 1. -
Page 23: Help
7. Help Noise interference To avoid background noise or echoes, ensure that there is enough distance between your device and the Wi-Fi ® Camera Unit. Use of other 2.4 GHz products, such as Bluetooth™ systems or microwave ovens, may cause interference with this product. Keep the Wi-Fi ® Camera Unit at least 5ft away from these types of products, or turn them off if they appear to be causing interference. - Page 24 Account What do I do if I forgot Click on the “Forgot Password” link my password? on https://app.hubbleconnected. com/ #lostpassword OR on your Android™ or iOS application. An email will be sent to your registered email address. Account I am unable to receive 1.
- Page 25 Features The sound alert setting You can Adjust Sound Sensitivity to threshold is not right. trigger notifications under Camera Setting menu. Setting Up While I am adding a If you are trying to add a Camera new Camera to my which has previously been added into account, I am not able your account or another account, you...
- Page 26 Connectivity I am not able to access Please check if the Camera is within Wi-Fi ® range. Please try to move the issues my Camera. Camera closer to the router for better Wi-Fi ® connectivity and try again. Setting Up During setup on Please reset the Camera to setup devices for Android™...
- Page 27 General Which platforms Minimum requirement: Windows ® 7* are supported for accessing my *Java browser plug-in needed Mac OS ® version 10.7 Camera? Chrome™ version 24 Internet Explorer ® version 9 Safari ® version 6 Java™ version 7 Firefox ® version 18.0 Adobe ®...
- Page 28 App for Android™ – Open the Google Play Store on and iOS devices? your Android™ device. – Select Search – Type in “Hubble for Motorola Monitors” – The results will show the Hubble – Select to install it iOS Device: –...
-
Page 29: General Information
US and Canada 1-888-331-3383 Email: support@motorolastore.com Consumer Products and Accessories Limited Warranty (“Warranty”) Thank you for purchasing this Motorola branded product manufactured under license by Binatone Electronics International LTD (“BINATONE”). What Does this Warranty Cover? Subject to the exclusions contained below, BINATONE warrants that this Motorola branded product (“Product”) or certified accessory (“Accessory”) - Page 30 PROVIDED UNDER THIS EXPRESS LIMITED WARRANTY IS THE EXCLUSIVE REMEDY OF THE CONSUMER, AND IS PROVIDED IN LIEU OF ALL OTHER WARRANTIES, EXPRESS OR IMPLIED. IN NO EVENT SHALL MOTOROLA OR BINATONE BE LIABLE, WHETHER IN CONTRACT OR TORT (INCLUDING...
- Page 31 (c) use of the Products or Accessories for commercial purposes or subjecting the Product or Accessory to abnormal usage or conditions; or (d) other acts which are not the fault of MOTOROLA or BINATONE, are excluded from coverage.
- Page 32 How to Obtain Warranty Service or Other Information? To obtain service or information, please call: US and Canada 1-888-331-3383 Email: support@motorolastore.com You will receive instructions on how to ship the Products or Accessories at your expense and risk, to a BINATONE Authorized Repair Center. To obtain service, you must include: (a) the Product or Accessory;...
- Page 33 FCC and IC regulations FCC Part l5 NOTE: This equipment has been tested and found to comply with the limits for a Class B digital device, pursuant to Part 15 of the Federal Communications Commission (FCC) rules. These limits are designed to provide reasonable protection against harmful interference in a residential installation.
- Page 34 WARNING Changes or modifications, to this equipment not expressively approved by the party responsible for compliance could void the user’s authority to operate the equipment. The socket-outlet shall be installed near the equipment and shall be easily accessible Industry Canada This device complies with Industry Canada licence-exempt RSS standard(s): Operation is subject to the following Two conditions:(1) this device may not cause interference, and (2) this device must accept any interference, including...
-
Page 35: Technical Specifications
9. Technical Specifications Camera Unit Wi-Fi ® 2400 - 2483.5MHz (802.11 b/g/n) Image sensor Colour CMOS 1M Pixels Lens f=2.80mm, F=2.5 IR LED 8 pcs Power Adapter: Zhong Shan Xiao Lan Hui Yang Electric Appliance Factory HS06-050100US, Input: 100-240V 50/60Hz 0.15A; Output: 5V 1000mA. - Page 36 Manufactured, distributed or sold by Binatone Electronics International LTD., official licensee for this product. MOTOROLA and the Stylised M logo are trademarks or registered trademarks of Motorola Trademark Holdings, LLC. and are used under license. Apple logo and Safari are trademarks of Apple Inc., registered in the U.S.