
Related Manuals for Sony IT-M 704


Summary of Contents for Sony IT-M 704
- Page 1 3-047-337-12 (1) 4-Line Telephone Operat ing Inst ruct ions M anual de inst rucciones IT-M 704 ©2000 Sony Corporation Downloaded from: https://www.usersmanualguide.com/...
- Page 2 The openings below. Refer to these numbers should never be blocked by placing whenever you call upon your Sony the product on the bed, sofa, rug, or dealer regarding this product. other similar surface. This product should never be placed near or over a Model No.
- Page 3 A. When the power cord or plug is 5. Do not attempt to recharge the batteries provided with or identified for use with this damaged or frayed. product. The batteries may leak corrosive B. If liquid has been spilled into the electrolyte or explode.
- Page 4 (IT-M704), for repair or warranty information, interference by one or more of the following please contact Sony Direct Response Center: measures: Tel 1-800-222-7669. If the equipment is – Reorient or relocate the receiving antenna.
-
Page 5: Table Of Contents
Table of cont ent s Get t ing St art ed Int ercom Operat ion 6 Read this first 37 Talking between the phones (Intercom) 7 Step 1: Checking the package contents 39 Voice paging (PAGE) 8 Step 2: Setting up the phone 40 Paging all phones (ALL PAGE) 17 Step 3: Setting the day and time 41 Having an intercom conference... -
Page 6: Get T Ing St Art Ed
Get t ing St art ed Read t his f irst Before you use your phone, you must first set it up. Here’s a quick way to set up your phone: Steps 1 and 2. St ep 1 (page 7) First, unpack the phone and the supplied accessories. - Page 7 St ep 1 St ep 1 Checking t he package cont ent s Make sure you have received the following items in the package. If anything is missing, contact your local Sony dealer. AC pow er adaptor (AC-T71) Phone Handset...
- Page 8 To use the intercom features, you must connect all phones (IT-M 704 or IT-M 804) to the LINE 1 jack correctly. If you set the dialing mode and date and time on this phone after connecting other phones, these settings will be set automatically to every phone.
- Page 9 The connection method differs according to the conditions of indoor wiring. [Wiring 1] Conduct connections follow the procedure in “To connect the phone to two outlets having two lines” on page 10. Line1 To a telephone To a telephone To a telephone Line2 Telephone Office...
- Page 10 St ep 2: Set t ing up t he phone (cont inued) To connect the phone to tw o outlets having tw o lines To the telephone outlets Hook the cord. Line 1, 2 Line 3, 4 To “LINE 1/ LINE 1+2”...
- Page 11 To connect the phone to four separate outlets If you have single line outlet, you need two Two-Line adaptors (not supplied) to connect the phone to the four separate outlets. To the telephone outlets Tw o-Line adaptors (not supplied) Line 1 Hook the cord.
- Page 12 St ep 2: Set t ing up t he phone (cont inued) Notes • Conduct connections instructed on page 10 or 11 first, when inserting battery for backup (not supplied) in case for a power failure. If “POWER FAILURE” remains displayed when you connect the AC power adaptor to an AC outlet for the first time, remove the battery from the phone and unplug the AC power adaptor, then plug it into an AC outlet.
- Page 13 To attach the quick sheet Attach the supplied quick sheet on the bottom of the phone. To attach assignment of using line sticker Attach the supplied assignment of using line sticker under the speaker of the phone. To tilt the phone If you want to tilt the phone, attach the supplied wall bracket on the bottom of the phone.
- Page 14 St ep 2: Set t ing up t he phone (cont inued) Assigning st at ion num ber Ensure to connect all phones (IT-M704 or IT-M804) to LINE 1 jack correctly, and then assign the station number to all phones. To confirm the assigned station number is set correctly, make an intercom call one another.
- Page 15 Choose t he dialing m ode For the telephone to work properly, select an appropriate dialing mode (tone or pulse). When other phones (IT-M704 or IT-M804) are connected to the LINE 1 jack, the same dialing mode is automatically set to all the phones. Be sure to connect the phones beforehand, and set the dialing mode.
- Page 16 St ep 2: Set t ing up t he phone (cont inued) Enabling/disabling t he line When you may not use all four lines, you need to disable the unused line for the telephone to work properly. This setting can be set up at each phone separately. Press (PROGRAM).
- Page 17 St ep 3 St ep 3 Set t ing t he day and t im e When other phones (IT-M704 or IT-M804) are connected to the LINE 1 jack, the day and time is automatically set to all the phones. Be sure to connect the phones beforehand, and set the day and time.
- Page 18 St ep 3: Set t ing t he day and t im e (cont inued) Press (PROGRAM). HOUR=01 Enter the two digits for the hour (01 to 12) by pressing the dialing keys. The hour is on a 12-hour cycle. Press (PROGRAM).
- Page 19 St ep 4 Changing t he display language You can choose English or Spanish as the display language by following the procedure below. Press (PROGRAM). Press b(*) or (#)B until “LANGUAGE” appears on the display. Display “IDIOMA” when you want to change the display language from Spanish to English.
-
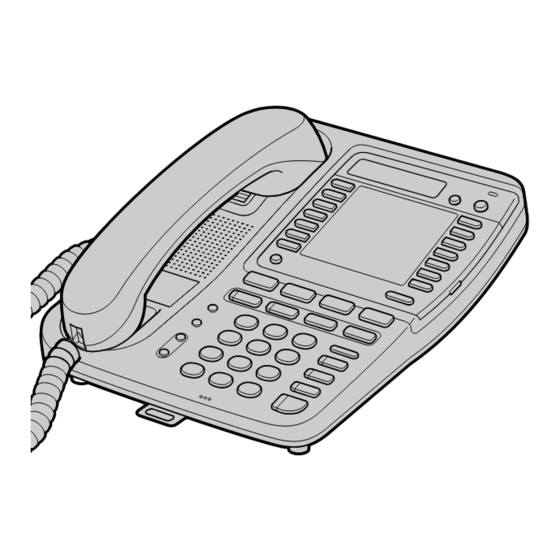
Page 20: Identifying The Parts
Ident if ying t he part s Refer to the pages indicated in parentheses for details. 1 Display w indow q; PAGE button (p. 39) Used to page the other phone. 2 One-touch dial buttons (p. 31) qa VOLUM E +/ - button (p. 24, 29) Used to store numbers on the one- touch dial. - Page 21 L2 L3 L4 DATA DATA LINE SELECT e; ea es ql HOLD button (p. 24, 29) wh DATA jack (p. 12) Puts a call on hold. wj DATA LINE SELECT sw itch (p. 12) w; TRANSFER button (p. 42) Used to select the line for data Used to transfer a call.
-
Page 22: Lamp Indications
Ident if ying t he part s (cont inued) Lam p indicat ions Lamp/ button Lighting pattern Status Lights up eh INTERCOM Lights up Calling extension from your phone or conversation available. Flashes Receiving an intercom call. Flashes Other phone using extension. ej CONF Lights up This function is activated. -
Page 23: Basics
Basics M aking calls Pick up the handset (or press (SPEAKERPHONE)). “=== TALK ===” appears on (LINE 1) the display, and then the (LINE 2) operation duration in hours, (LINE 3) minutes and seconds is (LINE 4) displayed. The connected line button lights When you want to select the line beforehand, press (LINE 1), (LINE 2), (LINE 3) or (LINE 4). - Page 24 M aking calls (cont inued) M aking calls w hen the headset is connected When the TL-HD1 headset (not supplied) is connected to the I (HEADSET) jack, you can talk through the headset. Press (SPEAKERPHONE) (HEADSET). The SPEAKERPHONE lamp lights up. Dial the phone number.
- Page 25 Notes • When another extension connected to line is in use, the line button flashes . • When another call comes in on the other line, the corresponding line button flashes and two beeps are heard from the speaker, but the phone won’t ring. (see page 30).
-
Page 26: Redialing
M aking calls (cont inued) Redialing Pick up the handset (or press (SPEAKERPHONE)). “=== TALK ===” appears on the display. Press (LINE 1), (LINE 2), (LINE 3) or (LINE 4) to select the line, if necessary. The corresponding line button lights up. Press (REDIAL/PAUSE) to redial the last number dialed. -
Page 27: Making Another Call While Talking
Busy redialing If the other line you called is busy, the phone will automatically redial the last number dialed up to 10 times every 30 seconds until the call is connected. When not making a call, press (BUSY REDIAL). The BUSY REDIAL lamp, MUTING lamp, SPEAKERPHONE lamp and selected line button light up and the last number dialed appears on the display. -
Page 28: Receiving Calls
Receiving calls When you hear the phone ring; • Pick up the handset from the phone (or press (LINE 1) (SPEAKERPHONE)). (LINE 2) (PROGRAM) (LINE 3) • Press (LINE 1), (LINE 2), (LINE 4) (LINE 3) or (LINE 4) whichever button is flashing. The SPEAKERPHONE lamp lights up and you can talk through the speakerphone. - Page 29 Receiving calls w hen the headset is connected When the TL-HD1 headset (not supplied) is connected to the I (HEADSET) jack, you can talk through the headset. When you hear the phone ring, press (SPEAKERPHONE) (HEADSET). The SPEAKERPHONE lamp lights up. When you’re done talking, press (SPEAKERPHONE) (HEADSET).
-
Page 30: Receiving A Call While Talking
Receiving calls (cont inued) Notes • When another phone connected to line is in use, the line button flashes slowly. • If a call is put on hold for more than about three minutes, you will hear an alarm. Using Do Not Disturb You can turn off the outside call and intercom call ringing of all the lines and voice from the speaker during a Page and an All Page using this function. -
Page 31: Telephone Features
Telephone Feat ures One-t ouch dialing You can dial with a one-touch dial button by storing a phone number to that button. Since two phone numbers can be stored in a one-touch dial button, up to 28 phone numbers can be stored. St oring phone num bers Press (PROGRAM). - Page 32 One-t ouch dialing (cont inued) Enter the phone number by pressing the 1234567 dialing keys. You can enter up to 20 digits, including a tone and a pause, each of which is counted as one digit. Press (PROGRAM). You will hear a long confirmation beep, and the number is stored.
-
Page 33: Erasing A Stored Phone Number
Erasing a st ored phone num ber Display the phone number you want to erase by pressing the one-touch dial button. Press (ERASE/CLEAR). ERASE ? YES NO Press b(*) or (#)B to choose “YES”, and then press (PROGRAM). You will hear a long confirmation beep and the phone number is erased. -
Page 34: Having A Three-Way Conference Call
Having a t hree-w ay conf erence call You can talk on two lines at the same time. M aking anot her call w hile t alking You can talk with two parties at the same time using two lines. (Three- way conference) Press (HOLD) while talking on one line. -
Page 35: Receiving A Call While Talking
Receiving a call w hile t alking If another call comes in while talking, the line button on which another call is coming will flash. Press (HOLD). The line in use is put on hold. Press (LINE 1), (LINE 2), (LINE 3) or (LINE 4), in which another call is coming. -
Page 36: Using Visual Message Waiting Service
Using visual m essage w ait ing service If you subscribe to your telephone company’s message service which includes this feature, the display will show that you have messages waiting to be retrieved. This phone has a special stutter dial tone and does not respond to FSK service. -
Page 37: Int Ercom Operat Ion
Int ercom Operat ion Talking bet w een t he phones (Int ercom ) You can converse with the other phone connected to the LINE 1 jack. Example : Making an intercom call from station number 02 to 03. Pick up the handset. Press (INTERCOM). - Page 38 Talking bet w een t he phones (Int ercom ) (cont inued) Notes • An intercom call is available between two phones only. If the other phone are busy with intercom, page, or all page, you will hear a busy tone and “BUSY” will be displayed.
-
Page 39: Voice Paging (Page)
Voice paging (PAGE) You can page the other phone connected to the LINE 1 jack without any operation on the other phone. The phone being called rings once and the speakerphone automatically turns on. Example : Page from station number 02 to 03. Pick up the handset. -
Page 40: Paging All Phones (All Page)
Paging all phones (ALL PAGE) You can page all phones connected to the LINE 1 jack through the speakerphone. Example : Page all phones from station number 02. Pick up the handset. Press (ALL PAGE). “ALL PAGE” appears on the display of the phone making the page. -
Page 41: Having An Intercom Conference Call
Having an int ercom conf erence call While on an outside call, connecting an intercom call allows you to talk with two parties at the same time (Intercom conference call). While conversing with an outside caller, press (INTERCOM). The line in use is put on hold and “INTERCOM ??”... -
Page 42: Transferring A Call
Transf erring a call You can transfer a call to the other phone connected to the LINE 1 jack. Example : When transferring the call on line 1 to station number 03. While conversing with an outside caller, press (TRANSFER). The line in use is put on hold and “TRANSFER ??”... -
Page 43: To Transfer During An Intercom Call
Notes • If there is another call from outside while transferring a call, you cannot speak to the outside caller in step 3. Press the line button you want to answer and talk. • After step 2, if the phone receiving the transferred call does not perform step 3 within about one minute after the handset has been replaced or (SPEAKERPHONE) pressed on the phone transferring the call, an alarm will be heard from the phone transferring the call. -
Page 44: Addit Ional Inf Orm At Ion
Addit ional Inf orm at ion M ount ing t he phone on a w all Remove the hang-up tab and replace it upside down. Hang-up Attach the wall bracket to the phone. Insert the upper tabs first, then press the phone into the wall bracket so that the lower tabs on the wall bracket go into the phone. -
Page 45: Using The Phone During A Power Failure
Using t he phone during a pow er f ailure During a power failure, you cannot make or receive calls. When power returns, reset the date and time. Other settings and memory will return as they were before the power failure. We recommend that you install the 6F22/6LR61 9V battery (not supplied) into the phone. -
Page 46: Maintenance
• If you have any questions or problems concerning your phone, please consult your nearest Sony dealer. Additional Information Downloaded from: https://www.usersmanualguide.com/... -
Page 47: Troubleshooting
Troubleshoot ing If you’ve experienced any of the following difficulties while using your phone, use this troubleshooting guide to help you remedy the problem. Should any problem persist, consult your nearest Sony dealer. Remedy Symptom You hear no dial tone. - Page 48 Troubleshoot ing (cont inued) Symptom Remedy You cannot use visual massage • Make sure you have subscribed to visual message waiting service. waiting service (see page 36). When pressing (INTERCOM), • The other phone is on an intercom call. you hear a busy tone and cannot make an intercom call.
-
Page 49: Specifications
Specif icat ions Power source DC 12V from AC power adaptor AC-T71 Dial signal Tone, 10 PPS (pulse) selectable Dimensions Approx. 7 ⁄ ⁄ ⁄ inches (w/h/d) (approx. 199 x 68.2 x 235.5 mm) Mass Approx. 1 lb 14 oz (approx. -
Page 50: Index
Index I, J, K Assigning station Identifying the parts 20 Setting up number 14 Intercom 37 dialing mode 15 Adjusting the volume Intercom conference 41 phone 8 handset 24, 29 Speakerphone headset 24, 29 performance 25 ringer 29 Specifications 49 Lamp indications 22 speaker 24, 29 T, U... - Page 51 Downloaded from: https://www.usersmanualguide.com/...
- Page 52 Refiérase a estos números cama, sofá, sillón o superficie similar. cada vez que se comunique con su Este producto nunca debe colocarse distribuidor Sony con respecto al cerca de un radiador o calefacción, o producto. encima de éste. Este producto no debe colocarse en una instalación...
- Page 53 12. Desconecte este producto de la línea 3. No abra ni mutile las pilas. El electrólito liberado es corrosivo y puede ocasionar daños telefónica y refiera el servicio a a los ojos o la piel. Puede ser tóxico si se personal de servicio calificado bajo las ingiere.
- Page 54 – Conectar el equipo en un enchufe de un o a la información sobre la garantía, póngase circuito distinto al circuito al cual está en contacto con Sony Direct Response Center: conectado el receptor. Tel 1-800-222-7669 (EE. UU. solamente). Si el –...
- Page 55 Índice Preparat ivos Operación de int ercom unicación 6 Lea esto en primer lugar 37 Conversación entre teléfonos 7 Paso 1: Comprobación del (Intercomunicación) contenido del paquete 39 Buscapersonas vocal (BUSCAR) 8 Paso 2: Instalación del teléfono 40 Buscapersonas en todos los 17 Paso 3: Introducción del día y de teléfonos (BUSCAR TODOS) la hora...
- Page 56 Preparat ivos Lea est o en prim er lugar Antes de utilizar su teléfono, tendrá que instalarlo. A continuación se indica la forma rápida de hacerlo: Pasos 1 y 2. Paso 1 (página 7) En primer lugar, desembale el teléfono y los accesorios suministrados.
- Page 57 Paso 1 Com probación del cont enido del paquet e Compruebe si con el paquete ha recibido los componentes siguientes. Si falta alguno, póngase en contacto con su proveedor Sony. Adaptador de alimentación Teléfono M icroteléfono de CA (AC-T71) Cable del Cables de línea telefónica (3)
- Page 58 Para utilizar las funciones de intercomunicación, conecte los otros teléfonos (IT-M 704 o IT-M 804) a la toma LINE 1 de este teléfono. Si ajusta el modo de marcación, y la hora en este teléfono después de haber conectado otros teléfonos, estos ajustes se introducirán automáticamente en cada teléfono.
- Page 59 El método de conexión diferirá de acuerdo con las condiciones del cableado interior. [Cableado 1] Realice las conexiones siguiendo el procedimiento de “Para conectar el teléfono a dos tomas telefónicas que posean dos líneas” de la página 10. Línea1 A un teléfono A un teléfono A un teléfono Línea2...
- Page 60 Paso 2: Inst alación del t eléf ono (cont inuación) Para conectar el teléfono a dos tomas telefónicas que posean dos líneas A las tomas telefónicas Enganche el cable. Línea 1, 2 Cables de línea telefónica (suministrados) A “LINE 1/ Línea 3, 4 LINE 1+2”...
- Page 61 Para conectar el teléfono a cuatro tomas telefónicas separadas Si usted solamente posee una toma telefónica, necesitará dos adaptadores para dos líneas (no suministrados) para conectar el teléfono a cuatro tomas telefónicas separadas. A las tomas telefónicas Adaptadores para dos líneas (no suministrados) Línea 1 Enganche el cable.
- Page 62 Paso 2: Inst alación del t eléf ono (cont inuación) Notas • Antes de insertar la pila (no suministrados) para protección en caso de corte del suministro eléctrico, realice en primer lugar las conexiones indicadas en las páginas 10 y 11. Si en el visualizador aparece “CORTE SUM ELÉC”...
- Page 63 Para fijar la hoja de guía rápida Fije la hoja de guía rápida suministrada en la base del teléfono. Para fijar la pegatina de asignación de líneas utilizadas Fije la pegatina de asignación de líneas utilizadas suministrada debajo del altavoz del teléfono. Para inclinar el teléfono Si desea inclinar el teléfono, fíjele el soporte para instalación mural suministrado en la parte superior de su base.
- Page 64 Paso 2: Inst alación del t eléf ono (cont inuación) Asignación del núm ero de est ación Cerciórese de conectar correctamente todos los teléfonos (IT-M704 o IT-M804) a la toma LINE 1, y después asigne un número de estación a todos los teléfonos.
- Page 65 Elección del m odo de m arcación Para que el teléfono funcione correctamente, seleccione el modo de marcación apropiado (por tonos o por pulsos). Cuando conecte otros teléfonos (IT-M704 o IT-M804) a la toma LINE 1, se ajustará automáticamente el mismo modo de marcación para todos los teléfonos.
- Page 66 Paso 2: Inst alación del t eléf ono (cont inuación) Habilit ación/inhabilit ación de la línea Cuando no vaya a utilizar las cuatro líneas, tendrá que inhabilitar las que no use para que el teléfono trabaje adecuadamente. Este ajuste podrá realizarse por separado para cada teléfono. Presione (PROGRAM).
- Page 67 Paso 3 Int roducción del día y de la hora Cuando haya otros teléfonos (IT-M704 o IT-M804) conectados a la toma LINE 1, el día y la hora se ajustarán automáticamente para todos los teléfonos. Cerciórese de conectar los teléfonos con antelación, y después introduzca el día y la hora.
- Page 68 Paso 3: Int roducción del día y de la hora (cont inuación) Presione (PROGRAM). HORA=01 Introduzca dos dígitos para la hora (01 a 12) presionando las teclas de marcación. La hora se indicará con el ciclo de 12 horas. Presione (PROGRAM). MINUTOS=01 Introduzca dos dígitos para los minutos (00 a 59) presionando las teclas de marcación.
- Page 69 Paso 4 Cam bio del idiom a de las indicaciones Usted podrá elegir entre inglés o español como idioma para las indicaciones realizando el procedimiento siguiente. Presione (PROGRAM). Presione b(*) o (#)B hasta que en el visualizador aparezca “IDIOMA”. Cuando desee cambiar el idioma de inglés a español, haga que se visualice “LANGUAGE”.
- Page 70 Ident if icación de las part es Con respecto a los detalles, consulte las páginas indicadas entree paréntesis. 1 Visualizador q; Tecla de buscapersonas (PAGE) (p. 39) 2 Teclas de marcación abreviada Utilícela para llamar a otro teléfono. (p. 31) qa Tecla de volumen Utilícelas para almacenar números (VOLUM E +/ -) (p.
- Page 71 L2 L3 L4 DATA DATA LINE SELECT e; ea es ql Tecla de retención (HOLD) wg Tecla de interfono (casco) (p. 24, 29) [SPEAKERPHONE (HEADSET)] (p. 23, 24) Utilícela para poner una llamada en retención. Utilícela para realizar o recibir llamadas a través del interfono o el w;...
- Page 72 Ident if icación de las part es (cont inuación) Indicaciones de las lám paras Lámpara/ tecla Patrón de encendido Estado Encendida Apagada eh INTERCOM Encendida Posibilidad de llamada a una extensión desde su teléfono o de conversación. Parpadeando Recepción de una llamada de intercomunicación.
- Page 73 Operaciones básicas Realización de llam adas Descuelgue el microteléfono (o presione (SPEAKERPHONE)). En el visualizador aparecerá (LINE 1) “== CONVERSAR ==”, y (LINE 2) después se visualizará la (LINE 3) duración de la operación en (LINE 4) horas, minutos, y segundos. La tecla de la línea conectada se encenderá.
- Page 74 Realización de llam adas (cont inuación) Realización de llamadas con un casco conectado Cuando haya conectado un casco TL-HD1 (no suministrado) a la toma I (HEADSET), usted podrá conversar a través de él. Presione (SPEAKERPHONE) (HEADSET). La lámpara SPEAKERPHONE se encenderá.
- Page 75 Notas • Cuando esté utilizándose otra extensión conectada a la línea, la tecla correspondiente a dicha línea parpadeará. • Cuando entre otra llamada por otra línea, la tecla correspondiente a la misma parpadeará y el altavoz emitirá dos pitidos, pero el teléfono no sonará (consulte la página 30).
- Page 76 Realización de llam adas (cont inuación) Repet ición de la m arcación Descuelgue el microteléfono (o presione (SPEAKERPHONE)). En el visualizador aparecerá “== CONVERSAR ==”. Presione (LINE 1), (LINE 2), (LINE 3), o (LINE 4) para seleccionar la línea, si es necesario. La tecla correspondiente a la línea se encenderá.
- Page 77 Repetición de la marcación por línea ocupada Si la línea a la que llamó está ocupada, el teléfono repetirá automáticamente la marcación del último número marcado hasta 10 veces cada 30 segundos hasta que se conecte la llamada. Cuando no esté realizando una llamada, presione (BUSY REDIAL). Se encenderán las lámparas BUSY REDIAL, MUTING, y SPEAKERPHONE, se encenderá...
- Page 78 Recepción de llam adas Cuando suene el teléfono: • Descuelgue el microteléfono (o presione (LINE 1) (SPEAKERPHONE)). (LINE 2) (PROGRAM) (LINE 3) • Presione la tecla, (LINE 1), (LINE 4) (LINE 2), (LINE 3), o (LINE 4), que esté parpadeando. La lámpara SPEAKERPHONE se encenderá...
- Page 79 Recepción de llamadas con el casco conectado Cuando haya conectado un casco TL-HD1 (no suministrado) a la toma I (HEADSET), podrá conversar a través del mismo. Cuando suene el teléfono, presione (SPEAKERPHONE) (HEADSET). La lámpara SPEAKERPHONE se encenderá. Cuando termine de hablar, vuelva a presionar (SPEAKERPHONE) (HEADSET).
- Page 80 Recepción de llam adas (cont inuación) Notas • Cuando esté utilizando otra teléfono conectada a la línea, la tecla de la línea parpadeará lentamente. • Si pone una llamada en retención durante más de unos tres minutos, oirá una alarma. Utilización de la función de no molestar Utilizando esta podrá...
- Page 81 Funciones del t eléf ono M arcación abreviada Usted podrá marcar presionando una tecla de marcación abreviada después de haber almacenado un número en la misma. Como en cada tecla podrán almacenarse dos números de teléfono, en total podrán almacenarse hasta 28 números. Alm acenam ient o de núm eros de t eléf ono Presione (PROGRAM).
- Page 82 M arcación abreviada (cont inuación) Introduzca el número de teléfono presionando 1234567 las teclas de marcación. Usted podrá introducir hasta 20 dígitos, incluyendo un tono y una pausa, que se contarán cada uno como un dígito. Presione (PROGRAM). Usted oirá un pitido largo de confirmación, y el nombre y el número se almacenarán.
- Page 83 Borrado de un núm ero de t eléf ono alm acenados Haga que se visualice el número de teléfono que desee borrar presionando la tecla de marcación abreviada correspondiente. Presione (ERASE/CLEAR). BORRAR? S NO Presione b(*) o (#)B para elegir “SÍ”, y después presione el botón Jog.
- Page 84 Realización de una llam ada de conf erencia t ripart it a Usted podrá conversar a través de dos líneas al mismo tiempo. Realización de ot ra llam ada durant e la conversación Usted podrá conversar con dos interlocutores al mismo tiempo utilizando dos líneas.
- Page 85 Recepción de una llam ada durant e la conversación Si llega otra llamada mientras esté conversando a través de una línea, parpadeará la tecla correspondiente a la línea a través de la que llegó tal llamada. Presione (HOLD). La línea que esté utilizando pasará a retención. Presione (LINE 1), (LINE 2), (LINE 3) o (LINE 4) de acuerdo con la línea por la que llegó...
- Page 86 Ut ilización del servicio de espera con m ensaje visual Si usted se ha abonado al servicio de mensajes de su compañía telefónica que incluya esta función, el visualizador le indicará que tiene mensajes a la espera de ser escuchados. Este teléfono posee un tono de marcación de tartamudeo especial y no responde al servicio FSK.
- Page 87 Operación de int ercom unicación Conversación ent re t eléf onos (Int ercom unicación) Usted podrá conversar con otro teléfono conectado a la toma LINE 1. Ejemplo: Realización de una llamada del número de estación 02 al 03. Descuelgue el microteléfono. Presione (INTERCOM).
- Page 88 Conversación ent re t eléf onos (Int ercom unicación) (cont inuación) Notas • La intercomunicación solamente podrá realizarse entre dos teléfonos. Si el otro teléfono está ocupado con una llamada de intercomunicación, buscapersonas, o buscapersonas a todos los teléfonos, oirá un tono de ocupado y se visualizará...
- Page 89 Buscapersonas vocal (BUSCAR) Usted podrá buscar una persona de otro teléfono conectado a la toma LINE 1 sin que haya que realizar ninguna operación en dicho teléfono. El teléfono llamado sonará una vez, y la función de interfono se activará automáticamente. Ejemplo: Búsqueda del número de estación 02 al 03.
- Page 90 Buscapersonas en t odos los t eléf onos (BUSCAR TODOS) Usted podrá llamar a todos los teléfonos conectados a la toma LINE 1 a través del interfono. Ejemplo: Para llamar a todos los teléfonos desde el número de estación 02. Descuelgue el microteléfono.
- Page 91 Realización de una llam ada de conf erencia con int ercom unicación Durante una llamada con el exterior, realizando una llamada de intercomunicación podrá conversar con dos interlocutores al mismo tiempo (Llamada de conferencia con intercomunicación). Cuando está conversando con alguien del exterior, presione (INTERCOM).
- Page 92 Transf erencia de una llam ada Usted podrá transferir una llamada a otro teléfono conectado a la toma LINE 1. Ejemplo: Para transferir la llamada de la línea 1 a la estación número 03. Durante la conversación con un interlocutor del exterior, presione (TRANSFER).
- Page 93 Notas • Si hay otra llamada desde el exterior durante la transferencia de una llamada, usted no podrá hablar con el interlocutor del exterior en el paso 3. Para contestar y hablar, presione la tecla correspondiente a la línea. • Después del paso 2, si el teléfono que esté recibiendo una llamada transferida no realiza el paso 3 antes de unos minuto de haber colgado el microteléfono o de haber presionado (SPEAKERPHONE) en el teléfono que está...
- Page 94 Inf orm ación adicional M ont aje del t eléf ono en una pared Lengüeta para Extraiga la lengüeta para colgar enganchar el microteléfono el microteléfono y dele la vuelta. Fije el soporte para instalación mural al teléfono. Inserte en primer lugar las lengüetas superiores, y después presione el teléfono contra el soporte...
- Page 95 Ut ilización del t eléf ono durant e un cort e del sum inist ro eléct rico Durante un corte del suministro eléctrico, no podrá realizar ni recibir llamadas. Cuando vuelva a reanudarse el suministro eléctrico, reajuste la fecha y la hora. Los demás ajustes y los datos de la memoria seguirán como antes de dicho corte del suministro eléctrico.
- Page 96 No utilice limpiadores abrasivos, desengrasantes ni disolventes, como el alcohol o la bencina, ya que podrían dañar el acabado. • En caso de duda o problemas con el teléfono, consulte a su proveedor Sony más próximo. Información adicional Downloaded from: https://www.usersmanualguide.com/...
- Page 97 Solución de problem as Si experimenta cualquiera de los problemas siguientes cuando utilice su teléfono, use esta guía como ayuda para solucionarlos. Si el problema persiste, póngase en contacto con su proveedor Sony. Síntoma Solución No se oye tono de invitación a •...
- Page 98 Solución de problem as (cont inuación) Síntoma Solución No es posible utilizar el servicio • Compruebe si está subscrito al servicio de espera de de espera de mensajes visuales. mensajes visuales (consulte la página 36). Al presionar (INTERCOM) se • El otro teléfono está ocupado en una llamada de intercomunicación.
- Page 99 Especif icaciones Alimentación 12 V CC desde el adaptador de alimentación de CA AC-T71 Señal de marcación Tonos, 10 pps (pulsos por segundo), seleccionable Dimensiones Aprox. 199 x 68,2 x 235,5 mm Masa Aprox. 990 g Accesorios suministrados Consulte la página 7. El diseño y las especificaciones están sujetos a cambio sin previo aviso.
- Page 100 Índice alf abét ico I, J, K, L Ajuste Identificación de partes 20 Servicio de llamada en espera 29 del modo de marcación Idioma de las indicaciones Servicio de llamada en espera con mensaje del teléfono 8 Indicaciones de las visual 36 lámparas 22 Ajuste del volumen...
- Page 101 Información adicional Downloaded from: https://www.usersmanualguide.com/...
- Page 102 Información adicional Downloaded from: https://www.usersmanualguide.com/...
- Page 103 Para clientes en EE. UU. Guarde el recibo y únalo a su tarjeta de GARANTÍA para el caso de tener que llevar su equipo a reparar a un centro de reparaciones autorizado por Sony. Información adicional Downloaded from: https://www.usersmanualguide.com/...
- Page 104 For the customers in the USA Be sure to save the receipt and attach it to your WARRANTY card when having your equipment repaired at an authorized Sony service station. Sony Corporation Printed in China Downloaded from: https://www.usersmanualguide.com/...
- Page 105 This file has been downloaded from: www.UsersManualGuide.com User Manual and User Guide for many equipments like mobile phones, photo cameras, monther board, monitors, software, tv, dvd, and othes.. Manual users, user manuals, user guide manual, owners manual, instruction manual, manual owner, manual owner's, manual guide, manual operation, operating manual, user's manual, operating instructions, manual operators, manual operator, manual product, documentation manual, user maintenance, brochure, user reference, pdf manual Downloaded from:...