Table of Contents
Advertisement
This device complies with Part 15 of the FCC Rules.
Operation is subject to the following two conditions: (1) This device
may not cause harmful interference, and (2) this device must accept
any interference received, including interference that may cause
undesired operation.
WARNING - FCC Regulations state that any unauthorized changes
or modifications to this equipment not expressly approved by the
manufacturer could void the user's authority to operate this
equipment.
Note: This equipment has been tested and found to comply with
the limits for a Class B digital device, pursuant to Part 15 of the
FCC Rules.
These limits are designed to provide reasonable protection against
harmful interference in a residential installation. This equipment
generates, uses, and can radiate radio frequency energy and, if
not installed and used in accordance with the instructions, may
cause harmful interference to radio communications.
However, there is no guarantee that interference will not occur in a
particular installation. If this equipment does cause harmful
interference to radio or television reception, which can be
determined by turning the equipment off and on, the user is
encouraged to try to correct the interference by one or more of the
following measures:
- Reorient or relocate the receiving antenna.
- Increase the separation between the equipment and receiver.
- Connect the equipment into an outlet on a circuit different from
that to which the receiver is connected.
- Consult the dealer or an experienced radio/TV technician for help.
Note: A shielded interface cable is required to ensure compliance
with FCC regulations for Class B certification.
FOR YOUR RECORDS....
For your assistance in reporting this Electronic Organizer in case
of loss or theft, please record the model number and serial number
(located on the bottom of the case) below.
Please retain this information
Model Number
Serial Number
Date of Purchase
Place of Purchase
3
a
Advertisement
Table of Contents

Related Manuals for Sharp Wizard OZ-570


Summary of Contents for Sharp Wizard OZ-570
- Page 1 This device complies with Part 15 of the FCC Rules. Operation is subject to the following two conditions: (1) This device may not cause harmful interference, and (2) this device must accept any interference received, including interference that may cause undesired operation.
-
Page 2: Introduction
Some of the accessories described in this manual may not be available at the time you purchase this product. Check with your local SHARP dealer concerning availability. All company and/or product names are trademarks and/or registered trademarks of their respective manufacturers. -
Page 3: Table Of Contents
Contents Introduction ... 1 Contents ... 2-3 Caring for the Organizer ... 4 Chapter 1 Getting Started ... 5-18 Part Names and Functions Getting the Organizer Up and Running Setting up the Organizer after Initialization Getting to Know Your Organizer Chapter 2 General Operation ... - Page 4 Chapter 10 Personalizing Your Organizer ... 83-88 Setting the Owner Information Locking the Organizer Changing the Calendar Display Format Selecting the Large Font View Appendices ... 89-93 A. Resetting the Organizer All reset operation B. Battery Replacement General guidelines Replacing the operating batteries C.
-
Page 5: Caring For The Organizer
Bending the Organizer unduly can damage it. Do not use extreme force when pressing the keys. Do not use any sharp, pointed object or even your fingernails to press them. Sharp or hard object can scratch and damage the Organizer. Make sure it is adequately protected when carried with other objects. -
Page 6: Chapter 1 Getting Started
CHAPTER 1 Getting Started This chapter explains everything you need to know to set up and begin working with your Organizer, from installing the batteries to initialization. The chapter also includes a labeled illustration of the parts of the Organizer, and basic explanation of its key features, from the keyboard to the display and its symbols. -
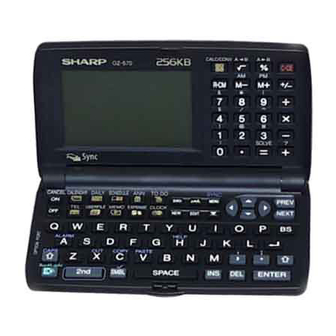
Page 7: Part Names And Functions
Part Names and Functions CANCEL CALENDAR DAILY SCHEDULE USERFILE MEMO EXPENSE CLOCK ALARM CAPS COPY PASTE CALC/CONV • • SOLVE TO DO SYNC PREV SEARCH MENU NEXT EDIT HELP Display Shows information, and is used for navigating the various functions. Numeric keypad Used for operating the calculator and entering numbers in other applications. -
Page 8: Getting The Organizer Up And Running
Reset button Initializes and resets the Organizer. Connects the docking station for PC communication. Battery replacement switch Locks the battery compartment to prevent access to the batteries Operating battery compartment Holds operating battery Getting the Organizer Up and Running Installing the batteries Lock button Set the battery replacement switch on the bottom of the Opens the Organzier. - Page 9 Replace the cover. Set the battery replacement switch back to NORMAL OPERATION (the red dot disappears). The Organizer will not function unless the battery replacement switch is in the NORMAL OPERATION p o s i t i o n . I n i t i a l i z i n g The Organizer must be initialized when it is used for the first t i m e .
-
Page 10: Setting Up The Organizer After Initialization
Setting up the Organizer after Initialization The Organizer takes you through the various steps needed to set up the Organizer before use. These steps are described below. We strongly recommend that you complete the entire SET UP procedure before starting to actually use your Organizer. - Page 11 You can also use [PREV] and [NEXT] to move cursor to previous or next page. Press [ENTER] to proceed with setting the Owner Information (or [CANCEL] to exit the SETUP procedure). Setting the Owner Information The Owner Information comprises your name, address and telephone number.
- Page 12 If the desired city does not appear, press [PREV] or [NEXT] to display more cities. You can jump to a particular country by pressing the first letter of that country’s name. Select the desired city by moving the cursor to it and then press [ENTER] to confirm.
- Page 13 [ENTER] to exit set up. The Calendar application display then appears, and you can begin to use your Organizer. To set one of the Advanced Setup, select the appropriate option. Setting the World City As well as setting the Local City previously, you can also select the world city, used to display the time in another city of your choice alongside the Local time.
- Page 14 Auto power off To conserve battery power, the Organizer will turn itself off if it has not been used for about 7 consecutive minutes. However, in order to avoid accidentally interrupting data transfers, the auto power-off function is disabled while communicating with other devices.
-
Page 15: Getting To Know Your Organizer
Press [MENU] twice to open the PREFERENCES menu. Select BACKLIGHT SETUP. A submenu appears, Select an option by pressing [ Press [ENTER] when you have finished. The Backlight may remain on for less than a set time duration if the battery level is very low. Note: Do not use the Backlight unnecessarily. - Page 16 Press [MENU] once displays the application menu, which contains the operations and commands specific to the particular application. Pressing [MENU] successively displays the PREFERENCES, TOOLS and PERIPHERALS menus. Pop-up menus The Organizer’s pop-up menus offer a convenient and efficient method of selecting options from pre-defined lists, similar to many of the latest personal computer application software packages.
- Page 17 Display symbols The following symbols appear at the bottom of the screen to indicate various operating conditions. This symbol appears at the bottom of the display to indicate that the current entry (in View or Edit mode) has been marked as Secret. These symbols indicate that all information in an entry cannot be shown simultaneously on the display.
- Page 18 To get Help, press the number corresponding to the menu option describing the kind of Help you want. Pressing [CANCEL] takes you back to the display you were in previously. After selecting a number, the first page of help for corresponding topic is displayed.
-
Page 20: Chapter 2 General Operation
Chapter 2 General Operation This chapter introduces most of the Organizer’s basic operations. The Tel application will be used for the examples. However, most of the techniques described here can be applied to all of the Organizer’s applications. Opening an Application To start an application, simply press the corresponding key, located on the top of the keyboard. -
Page 21: Selecting The Display Modes
Selecting the Display Modes Once an application is open, you can switch between three basic display modes: Index, View and Edit. Each display mode has its own unique appearance and particular purpose. Index mode is normally the default view when an application is opened, and provides a summary of the individual entries that have been created. - Page 22 View mode View mode allows you to see the full details of an entry, without being able to edit or change it. Other operations: [NEW] Creates a new entry for the current application (in Edit mode). [EDIT] Edits the currently displayed entry. [DEL] Deletes the currently selected entry.
-
Page 23: Creating A New Entry
] to move to the FIRST NAME field. Type in Pat . Press [ ] to move to the COMPANY field. Type in SHARP CORPORATION . Press [ ] to move to the TITLE field. 1 0 . Type in SUPERVISOR . -
Page 24: Editing An Existing Entry
Editing an Existing Entry To edit an entry already stored in memory, you must first access the entry in Edit mode (in which it was originally created). Press [TEL] to open the application. Select the desired entry in Index mode. Press [EDIT] to open the entry in Edit mode. - Page 25 When the pop-up symbol appears by a field while editing an entry, this indicates that a pop-up menu is available for the field. The pop-up menu contains a list of values available for the field, and is used by pressing [ value from the pop-up list.
- Page 26 symbols are available by pressing [SMBL] (see p.75) Moving around the display You can move the cursor around the display with the arrow keys [ ] , [ ] , [ ] , [ ] , [PREV] and [NEXT]. In addition, you can hold any arrow key down for continuous rapid movement.
-
Page 27: Finding Specific Entries In Your Organizer
[BS] or [DEL] Deletes the selected text. [2nd] [COPY] Copies the selected text to the clipboard so that it can later be pasted to another location. [2nd] [CUT] Deletes the selected text from its current location and moves it to the clipboard. [2nd] [PASTE] Replaces the selected text with whatever is currently in the clipboard. - Page 28 When the desired entry is displayed, select it and press [ENTER] to see the entry in full. You can also press any letters/symbols/numbers, then the most relevant entry will be highlighted. Press [ENTER] to see the details of the entry. (Only Tel, User File and MEMO applications provide this function.) Using keywords If you know a particular entry is in your Organizer, but you...
- Page 29 By date You can use the various Calendar views to quickly and easily find information related to a time and/or date. Press [CALENDAR]. The calendar appears in the preset view. Select a day using the arrow keys, then press [ENTER] to see the Weekly Calendar.
-
Page 30: Deleting Entries
Deleting Entries Entries in the Organizer can be deleted using either the [DEL] key or the application menu. Deleting single entries Open the desired application. Select the entry in Index mode. Press [DEL] on the keyboard. A confirmation message appears asking if you are sure you want to delete the selected entry. -
Page 31: Checking The Time And Date
Checking the Time and Date To check the current date and time, press [CLOCK]. Press any other application key to close the Clock application. For a full explanation of the Clock application, see p.61. Checking the Memory The Organizer has a certain memory capacity in which operations are carried out and data that has been entered, such as phone numbers and memos, are stored. -
Page 32: The Tools Menu - The Organizer's Basic Utilities
Even if the display shows a small amount of free memory available, that amount may be insufficient for certain operations to work properly. You are strongly recommended to carry out regular “housekeeping” by deleting unwanted or out-of-date information to prevent the memory becoming full. -
Page 34: Chapter 3 Time Management
Chapter 3 Time Management The Organizer’s Calendar, Schedule, To Do, Daily Calendar and Ann (Anniversary) applications let you structure and manage your time easily, whether scheduling appointments or giving reminders about important people and events. The explanations and examples in this chapter will give you the information you need to make all of the time management features of these applications work for you on a daily basis. - Page 35 Press [MENU] to open the Calendar menu. Select VIEWS. Select the desired view in the VIEWS menu. You can also jump to Daily Calendar by pressing [DAILY] directly. In the Daily Calendar, highlight an entry and press [ENTER] to display the details of the entry. Setting the Calendar view You can switch between 1-Month Calendar view and 2-Month Calendar view.
-
Page 36: The Schedule Application
In 1-Month Calendar, 2-Month Calendar, Weekly Calendar, Weekly Graph and Daily Calendar, you can press [NEW] to open a new Schedule Edit mode. Date Calculating You can find and display any date a given number of days before or after a particular date. The date calculating function is only available in 1-Month Calendar view. - Page 37 The first entry on that day is selected in Index mode, or displayed in View mode. If you would like to make a new entry, press [NEW], or if you would like to view other entries on that date, press [NEXT] or [PREV].
- Page 38 Enter the number of additional days on which the event will be repeated. An entry can be repeated up to 999 times. In this case, type 4 (together with the original entry, the event will occur on five days). Press [ENTER]. Your five-day vacation is now stored.
- Page 39 Note that the alarm symbol is different from the bell which appears at the bottom of the display to indicate that any alarm already marked as set throughout the Organizer will sound at the designated time. Move to the DESCRIPTION field and type Lunch with Sally . Press [ENTER].
-
Page 40: The To Do Application
The To Do application The To Do application is a valuable organizational tool to help you meet deadlines and to add structure and efficiency to your work that you set for yourself. This application allows you to organize and track task and objectives, assign them priorities. To help you in this task, entries are identified as TO BE DONE or DONE. - Page 41 Assigning due dates to entries A To Do entry must be given a due date (or month) so the Organizer knows how to classify it and the Calendar knows when it becomes due. The due date can be entered either by typing in the actual date, or by selecting the date from the pop-up calendar and using the arrow keys to select the desired month and day.
- Page 42 Checking off completed entries Once you have reached a target you set for yourself, it is a good idea to check off the entry as completed so that you can concentrate on things still to be done. This operation can be done either using the Daily Calendar, which makes it easy to check completed entries when you check your schedule for the day, or in the To Do application, which lets you check off a task that you have completed before...
- Page 43 Once a project or task is completed, and you no longer need the To Do reminder, you can delete the entry, or groups of entries, which will free up memory in the Organizer. Updating the Category list You may wish to edit the names of existing categories. From the To Do application’s Index view, press [MENU].
-
Page 44: The Ann (Anniversary) Application
The ANN (Anniversary) Application The Ann (Anniversary) application makes it easy for you to keep track of annual events, such as wedding anniversaries and birthdays of friends, relatives and business associates. Once entered, the dates of annual events are displayed on the Calendar, giving you plenty of warning to prepare for them well in advance every year. -
Page 46: Chapter 4 Creating Your Own Database
Chapter 4 Creating Your Own Database This chapter describes using the Tel (Telephone) and User File applications. These two applications are actually identical in the way that they function, except that they have different default file and field names designed to handle different types of information. The flexibility of these applications allows you to manage a wide range of information, from simple address book to an extensive restaurant guide or even a listing... - Page 47 Press [TEL] to open the application. Press [MENU], select INDEX ITEMS. The INDEX ITEMS window opens. The current setting is indicated by a tick. Select the desired index item. Then Name and Office# or Name and Home# will be displayed on the Index mode of the Tel application.
-
Page 48: The User File Application
The User File Application The User File application allows you to manage different information. Each entry comprising 16 text fields. Note that you can rename the file name and the field names according to your preferences. See p.48 for more information on customizing this application. - Page 49 When you edit a category name, any USER FILE entries that refer to that category are automatically updated to reflect the change. Changing file name Press [USER FILE] to start the application. Press [MENU], select FILE NAME. The FILE NAME window appears. Change the file name according to your preferences.
- Page 50 Press [USER FILE] to open the application. Press [MENU], select INDEX ITEMS. The INDEX ITEMS window appears. In INDEX 1 field, press [ ] to select the field name that you want it to be displayed in the first field of the Index mode and the sorting key.
-
Page 52: Chapter 5 Memo
Chapter 5 Memo This chapter explains the features of the Memo application, the Organizer’s basic word processing utility. This application provides powerful word processing capability in a hand-held device. The Memo Application The Organizer’s Memo application provides you with a simple yet powerful means of recording information, from meeting notes to memorandums and letters. - Page 53 July 10, 1999 Mr. Frank Smith Chairman ABC Co. Ltd. Dear Mr. Smith: Thank you for your fax of July 5th, 1999 regarding the Alpha Project. We agree that it is too difficult to answer your questions about our new project properly based on the available information. We will receive the proper documentation within the next week.
- Page 54 The Memo application menu Turns WORD WRAP on and off (see above) Selects specific entries for deletion (see p.29)
-
Page 56: Chapter 6 Desk Accessories
Chapter 6 Desk Accessories The Organizer’s desk accessories are a set of valuable utilities for everyday use. The Calc (Calculator) can perform calculations on figures entered by using the number keys. The Clock can simultaneously display the day, date, and time in any two cities of your choice. - Page 57 To quit the Calc application, simply change to any other application by pressing the corresponding key. To clear an entered value, press [C·CE] once. To clear an entire calculator operation, press [C·CE] twice. Calculations are performed in the order of entry, not according to algebraic operator precedence, ie., the calculation 8 + 2 x 3 is performed as: (8 + 2) x 3 not 8 + (2 x 3).
-
Page 58: Contents
Press [CALC/CONV] several times until the COST/ S.PRICE/MARKUP display or the COST/S.PRICE/MARGIN display appears, as required. Use [ ] or [PREV] [NEXT] to move to the fields whose values you already know, and enter the values. Press [SOLVE] to calculate the missing value. The missing value is displayed in the appropriate field. - Page 59 Calculation examples Conversion function The Organizer can be used to perform conversions between different currencies and units of length, area, volume, mass, temperature and energy. There are 3 conversion index groups. The first index group comprises eight currency conversion screens in which you can set and edit the exchange rates yourself.
- Page 60 Press [C·CE] to clear the original rate first. Then enter the rate 0.45. Make sure that a maximum of 10 digits can be entered. Press [ ] to move to the currency name field and then change what you want. Example: STR£...
-
Page 61: The Calc Application Menu
The answer is displayed under the unit rate. If you want to know how many gallons are equal to 10 liters, press [A B] key to change from gal The method of converting currencies, units of length/area/ mass/temperature/energy is the same as above. The following table shows the conversion factors that are preset in your Organizer. -
Page 62: The Clock Application
The Clock Application The unit’s built-in clock makes it possible not only to know the correct time and date in your area, but also to know the time in other cities or any region around the world. The Clock is used as the reference time by the Calendar, Schedule, and To Do applications. - Page 63 Certain countries will be abbreviated as follows: Federal Republic of Germany Papua New Guniea Czech Republic Republic of Trinidad and Tobago Dominican Republic French Polynesia United Arab Emirates United States of America Country and city names in the list and their relative time differences are current as of July 1997.
- Page 64 Checking the time in a city You can find out the time anywhere in the world using the Clock application by selecting another city, called the World city. Selecting a city as the World city will display the time in that city as well as the Local city when you press [CLOCK].
- Page 65 Daylight Saving Time (DST) Assigning DST to a city Designating Daylight Saving Time (DST) for a city automatically sets the time for that city one hour ahead of its regular time. Press [MENU] to open the Clock menu. Select either CHANGE LOCAL CITY or CHANGE WORLD CITY (it doesn’t matter which you choose).
- Page 66 Enter the time for the desired alarm, followed by [AM] or [PM] for AM or PM. Press [ ] to set the alarm. Move to the next field and set any other alarms you want using the same procedure. Press [ENTER] (or [CANCEL] to cancel the setting). Turning alarms on and off To turn off an alarm that is sounding, press [CANCEL].
-
Page 68: Chapter 7 Expense Function
Chapter 7 Expense Function The Expense function is an easy way to track expense information for the traveling business person. Each record can contain the category, date, amount, payment type (AMEX, Visa, MasterCard, Diners Club, check, cash or two other types of your choice), status and a description of the expenses. - Page 69 The expense amount can be up to 10 digits including up to two decimal places. Move to the Payment Type field. Press [ desired payment type. Press [1] - [8] to select the desired i t e m . Select AMEX. Move to the Memo field and use the keyboard to input the description of the expense.
-
Page 70: Expense Report
Expense Report A summary is a collection of records in the EXPENSE REPORT mode. Daily or Period expense summaries for entire records or for each payment type can be obtained. Records marked as secret are not included in summaries if the SECRET function is on. Press [2nd] [EXPENSE] to jump to Expense Report function directly. - Page 71 Summarizing expense records for a certain period For example, you want to find out the total amount of all expenses from Aug 10 to Aug 17, 1999: Press [EXPENSE] to open the application. Press [MENU] to open the Expense menu. Select EXPENSE REPORT.
- Page 72 Expense application menu Opens the CATEGORIES window so you can edit the category (see above). Opens the PAYMENT TYPE window so you can edit the payment type. (see above) Selects the Expense Report function. Selects the specific entries for deletion. (see p.29)
-
Page 74: Chapter 8 Features And Utilities For Added Power
Chapter 8 Features and Utilities for Added Power In addition to its basic functions, the Organizer also provides a wide range of utilities and features to give you even greater control over your information. This chapter introduces and describes these features, which include text cutting, copying, pasting and many more. -
Page 75: Copying Or Moving Entries
Press [ENTER] if you want to store the original entry with any changes you have made (including moving or copying the selected text), or press [CANCEL] to discard all the changes you have made to the original entry. Note that even if you press [CANCEL], the text you selected will remain in the clipboard for you to use. -
Page 76: Special Characters
Special Characters The Organizer has a list of 153 symbols and accented characters, such as “&”, “?”, and “/”. These symbols and accented characters can be easily accessed and inserted into an entry. Selecting any of these special characters inserts it at the cursor’s current location. -
Page 78: Chapter 9 Using The Optional Peripherals
Chapter 9 Using the Optional Peripherals Your Organizer is a powerful pocketsize computer with built-in functions that make it possible to accomplish a broad range of tasks. It has the flexibility to connect to other Organizers and transfer data to desktop computers using data transfer facilities, which are accessed through the PERIPHERALS menu. -
Page 79: Transferring Data
- between the Organizer and other information processing devices, including personal computers and other SHARP Organizers. In this way, you can back up your information to guard against losing it, or copy information so that you or someone else can work with it on another device. - Page 80 Turn on both Organizers and select the entries that you want to transfer To conserve battery power, disconnect the cable as soon as a transfer is completed. Transferring single entry Single entry can be transferred in all applications. Turn on both Organizers. Open the same application on each Organizer.
- Page 81 Select SEND ALL THIS MODE. All entries in the application are transferred. Exchanging data with other Organizers You can receive information from other SHARP Organizers. However, OZ-570 Organizer cannot handle graphic data from other Organizer models. This type of transfer requires the optional cable.
-
Page 82: Exchanging Information With A Personal Computer
Priority field of the receiving unit respectively if the data in the Priority field of an To Do record in other SHARP Organizer is 0, 1, 2, 3, 4. Other characters such as 5-9, A-Z, , etc will not be shown on the Priority field of the receiving unit. -
Page 83: Points To Remember When Using Peripherals
Your Organizer is now ready to transfer data. Consult the Organizer Link manual regarding subsequent transfer procedures. Press [ON] at any time to exit the PC Link mode. If you leave the Organizer in PC Link mode, more power is consumed from the batteries than usual, and the auto power off function does not work. -
Page 84: Chapter 10 Personalizing Your Organizer
Chapter 10 Personalizing Your Organizer Now that you have an understanding of all of the Organizer’s functions and its operation, let’s take a look at the various ways you can customize the Organizer to suit your personal preferences: entries can be made secure through password protection and by marking them as secret;... -
Page 85: Locking The Organizer
This text box is case- sensitive, which means that upper- and lower-case letters are treated differently. The password “SHARP”, for example, is different from the passwords “Sharp” or “sharp”. Choose your password carefully. If you forget your... - Page 86 Marking/unmarking entries as Secret You can mark or unmark any entry as secret in Edit mode. Open the application containing the entry you want to mark as secret. Display the entry in Edit mode. Press [MENU] twice to display the PREFERENCES menu, select SET SECRET STATUS.
- Page 87 You can also lock the Organizer yourself at any time: Press [MENU] twice to open the PREFERENCES menu. Select SECRET. The SECRET submenu appears. Select LOCK ORGANIZER. appears, indicating that the Organizer is now locked. Changing or deleting the password To register a new password, the current one must first be deleted.
-
Page 88: Changing The Calendar Display Format
Changing the Calendar Display Format The Organizer lets you change the default Calendar display to one you find more convenient. There are three aspects to change the display: setting the Calendar view, setting the weekly format, and setting the date format. You can use these options to set up a way of working that you prefer. -
Page 89: Selecting The Large Font View
Press [MENU] twice to display the PREFERENCES menu. Select DATE FORMAT. A submenu appears. The current selection is marked with a t i c k . Select the desired format. Selecting the Large Font View Since the Organizer’s display is fairly small, you may find the displayed information easier to read if it is changed into a large font view. -
Page 90: Appendices
A condition that makes the unit inoperative may erase some or all of the data stored in memory. Do not use anything breakable, anything with a sharp tip or anything that might break to press the RESET switch. All reset operation... -
Page 91: Battery Replacement
B. Battery Replacement General guidelines The Organizer uses the following type of battery: Type General operation Alkaline batteries There are some extremely important points to remember when installing new batteries: Replace the two operating batteries at the same time with new batteries of the same type. - Page 92 Insert the two new batteries on top of the ribbon tab, taking care to position them correctly according to the plus (+) and minus (-) terminals, as shown below. Replace the cover. Set the battery replacement switch to NORMAL OPERATION. If nothing happens when you press [ON]: Setting the battery replacement switch to REPLACE BATTERIES shuts off power to the unit.
-
Page 93: Specifications
C. Specifications Model OZ-570 Display 119 x 80 dot matrix liquid crystal display plus LCD flag Electronic unit section Applications Calendar, Schedule, To Do, Anniversary, Telephone, User File, Memo, Expense, Expense Report, Clock, Calculation, Conversion. Memory capacity 256KB (User area: Approx. 210Kbytes) Schedule application capacity: Approx. - Page 94 Peripherals and data transfer interface Cable jack 4-pin connector 8-pin Docking Station connector Common Power Battery: DC, alkaline batteries (LR03 x 2) Power consumption 0.25W Battery life Battery life may vary depending on usage. Operating batteries: * Approx. 70 hours (2.3 months of 1 hour continuous use per day).
-
Page 95: Index
Index Accessing Secret entries Alarms Daily Schedule Disable all alarms All reset Ann(iversary) application Application Opening Keys Assigning Due date Priority Auto power off Backlight Battery Installing Life Operating Replacement Blocks Copying/moving Working with blocks of text Calc(ulator) application Date calculations Calculations Examples Performing... - Page 96 Index Items Checking Current time/date Memory Time in a city Checking off To Do entries Clock application Copying Blocks of text 25, 73 Entries Cursor Customizing Index display User File application 26, 73, 74 Daily alarms setting Turning on/off Daily view Date calculation Date format Setting...
- Page 97 Go to today Help Index Index Items Index mode Initialize Installing Batteries Key beep Keyboard Local city 10, 61 Locking the Organizer Marking entries as secret Memo application Memory check Menu Application 35, 38, 42, 43, 46, 49, 53, 60, 65, 71 Peripherals Tools Modifying the Field Order...
- Page 98 Pop-up list/menu Power Auto power off Turning on and off Replacing Operating batteries Schedule alarms Clearing Setting Schedule application Scrolling the display Search (see also Finding) By keyword By date Search function Secret function Selecting Calendar views Date Display modes Setting Calendar view Clock...
- Page 99 Unlocking the Organizer User File application Weekly format Weekly view Word wrap World city...
-
Page 100: Product Support
Product Support Sharp Electronics Corporation is dedicated to serving Customer needs. Please fill out and send the enclosed registration card so that we can keep you up-to-date as new products and services become available. If you have read the ORGANIZER operation manual, but you... -
Page 101: Limited Warranty
Product and shall constitute full satisfaction of all claims, whether based on contract, negligence, strict liability or otherwise. In no event shall Sharp be liable, or in any way responsible, for any damages or defects in the Product which were caused by repairs or attempted repairs performed by anyone other than an authorized servicer. - Page 102 Product. At a Sharp Authorized Servicer located in the United States. To find out the location of the nearest Sharp Authorized Servicer, call Sharp toll free at 800-BE-SHARP. Ship (prepaid) or carry in your Product to a Sharp Authorized Servicer. Be sure to have proof of purchase available.