Table of Contents
Advertisement
Available languages
Available languages
Quick Links
OWNER'S MANUAL
ROBOT CLEANER
Before using, please carefully read the Safety Precautions pages to allow for safe operation of
the product. After reading the operation manual, please keep it in an easily accessible location.
Be sure to charge the battery fully before using the product for the first time after purchase.
VR626*****
VR637*****
VR627*****
VR647*****
MFL67680042
VR646*****
www.lg.com
Advertisement
Table of Contents

Related Manuals for LG VR637 Series


Summary of Contents for LG VR637 Series
- Page 1 Before using, please carefully read the Safety Precautions pages to allow for safe operation of the product. After reading the operation manual, please keep it in an easily accessible location. Be sure to charge the battery fully before using the product for the first time after purchase. VR626***** VR637***** VR646***** VR627***** VR647***** www.lg.com MFL67680042...
- Page 2 FEATURES Corner Master By having adopted a brand new concept design that is appropriate for walls, the Robot Cleaner's cleaning performance is incredibly efficient. Learning Mode The Robot Cleaner is capable of memorizing the cleaning environment via its Smart Operation feature for smarter cleaning. Turbo Mode In the Turbo mode, the Robot Cleaner operates the suction motor and the brushes at a greater speed giving cleaner results.
-
Page 3: Table Of Contents
CONTENTS BEFORE USING ADDITIONAL INFORMATION Safety precautions 36~38 Troubleshooting Included with product Before you call for service Parts description 10~11 Button functions Display status information REFERENCE Before you start Product specifications Overview Reference items METHOD OF USE How to install the home station How to turn the Robot Cleaner power supply on &... -
Page 4: 2~6 Safety Precautions
3. If the supply cord is damaged, it must be replaced by LG Electronics Service Agent in order to avoid a hazard. 4. This appliance can be used by children aged from 8 years and above and persons with reduced physical,... - Page 5 If the power cord is broken, do not plug it in. Take the product to an LG Electronics Authorised service repairer. Do not place the home station Always use a dedicated...
- Page 6 SAFETY PRECAUTIONS WARNING Turn the power supply off Do not spray or use immediately if any abnormal inflammable materials, sound, odor, or smoke is surfactants, or drinking water in the vicinity of the Robot generated from the Robot Cleaner. Cleaner by removing it from the home station and turning Doing so can cause fire or off the main switch on the...
- Page 7 Doing so can cause product failure. failure. Do not put any water or detergent on the Robot Cleaner. If liquids get inside of the Robot Cleaner, turn off the power supply and contact an LG Electronics sales agent or customer care center.
- Page 8 SAFETY PRECAUTIONS CAUTION When the robot cleaner is If the floor is wet or has wet operating, it may hit the spots, wipe them up before chair leg, desk leg, table leg using the Robot Cleaner. Do not use the Robot Cleaner on or other narrow pieces of a wet surface.
-
Page 9: Included With Product
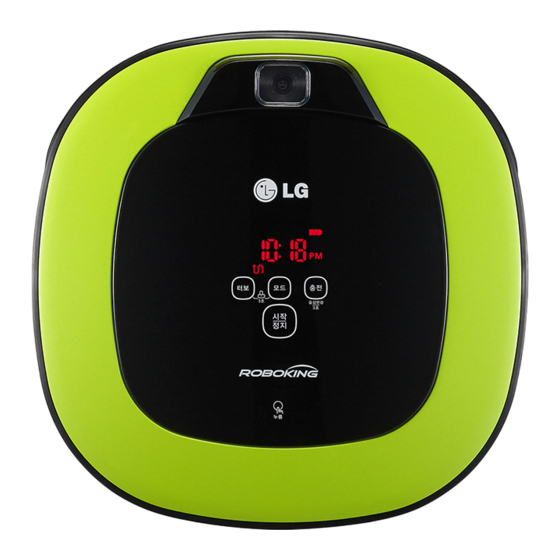
INCLUDED WITH PRODUCT Robot Cleaner Remote controller Home station ► Figures can be different from actual objects. Quick guide Operation manual Cleaning Tool Dust bin filter (spare) Quick guide Operation manual (option) for cleaning sensors for cleaning the filter Cleaning brush Mop plate (option) Ultra microfiber mop (It’s on the dust bin cover) - Page 10 PARTS DESCRIPTION - ROBOT CLEANER Plan view Upper camera sensor Dust bin cover Display & function buttons Dust bin compartment release button Front view Ultrasonic sensors Obstacle detecting sensor window Detecting sensors of home station & Receiving sensors of remote controller Rear view Main Power switch Ventilation port...
- Page 11 PARTS DESCRIPTION – HOME STATION / DUST BIN Home station Remote controller holder Charging terminal Power switch Power cord fixing hook Dust bin Dust bin handle Cleaning brush Dust bin lid Suction port flap Sponge filter Dust bin lid opening button EPA filter Filter cover ►...
-
Page 12: Button Functions
BUTTON FUNCTIONS – ROBOT CLEANER • If the button is pressed, ‘Turbo Mode’ will be set with a voice confirmation. TURBO • If the button is pressed whilst in ‘Turbo Mode’, it will be canceled. • Used to turn the power on from Standby, start or stop cleaning. •... - Page 13 BUTTON FUNCTIONS – REMOTE CONTROLLER Home Used to recharge the Robot Start Cleaner by making it return to the Pressing this button will start Home Station. (p18) the cleaning. (p17) Mode Turbo Changes the cleaning mode. Used to activate or deactivate (p20) 'Turbo' mode.
-
Page 14: Display Status Information
DISPLAY STATUS INFORMATION Mute icon This icon indicates whether the Mute is ON or OFF. Battery icon This icon indicates the residual battery Lock icon level, it flashes if Indicates whether 'Lock' the battery needs is activated or not. recharging. Schedule icon AM/PM icon Indicates... -
Page 15: Before You Start
BEFORE YOU START Check these items before cleaning • Do not use this device in a room where a child is left alone. The child could be injured. • Remove fragile or unnecessary objects from the room to be cleaned. Especially, remove expensive ceramics and valuables from the floor. -
Page 16: Overview
OVERVIEW Install the home station. (p15) Insert the power cord plug into an outlet and locate the station against a wall. If power is not supplied to the home station, the Robot Cleaner will not charge. Turn on the power supply of the Robot Cleaner. -
Page 17: How To Install The Home Station
Do not operate the Robot Cleaner if the Home Station has a damaged cord or plug, if it is not working properly, or if it has been damaged or dropped. To avoid electrical hazards, the cord must be replaced by LG Electronics, Inc. or a qualified service person. -
Page 18: How To Turn The Robot Cleaner Power Supply On & Off
HOW TO TURN THE ROBOT CLEANER POWER SUPPLY ON & OFF Turning on the main power supply Make sure the Power Switch is on at the rear-left of the Robot Cleaner. If the power is OFF, turn the switch ON. ※... -
Page 19: How To Start And Stop Cleaning
HOW TO START AND STOP CLEANING Using the buttons on the Robot Cleaner After the Robot Cleaner main power switch is turned on, press the START/STOP button to begin cleaning. A melody will sound and cleaning will begin. Press the START/STOP button during the cleaning cycle to stop cleaning. -
Page 20: How To Charge The Battery
HOW TO CHARGE THE BATTERY Automatic charging The Robot Cleaner returns to the home station at the end of a cleaning cycle or when its battery is running low. ※ If 10 minutes elapse without the Robot Cleaner moving or the battery is too low, the power will be automatically turned OFF. - Page 21 HOW TO CHARGE THE BATTERY Remaining Battery Charge Indicator The Battery level is indicated on the Status Display, as follows. • If recharging is in progress, the Battery Level indicator flashes showing the battery charge status level. • If recharging is complete, only the 'Battery' and 'Clean Mode' icons are displayed to save the energy. •...
-
Page 22: Cleaning Modes
CLEANING MODES Zigzag Cleaning In 'Zigzag' mode, Robot Cleaner repeats a zigzag operation to clean each and every spot in the cleaning area. If you need to quickly clean an area choose 'Zigzag' mode. Press ‘Mode’ button on Remote Controller or main unit to select 'Zigzag' mode and press 'Start' button. - Page 23 CLEANING MODES My Space Cleaning Pressing 'My Space' on the Remote Controller will set the My Space cleaning mode with a voice message. For cleaning of particular spaces, select this mode. The 1st stage: Use the Remote Controller to manually set the parrameters of each cleaning block.
-
Page 24: Auxiliary Cleaning Modes
AUXILIARY CLEANING MODES Manual Cleaning By pressing a direction key on the Remote Controller, you can move the Robot Cleaner manually. Robot Cleaner will clean the area, by pressing the forward/backward/left/right buttons accordingly on the keypad of the remote control. While in 'Manual' mode, the robot cleaner will run into obstacles placed behind it if the backward key on the remote is pressed or held down. - Page 25 AUXILIARY CLEANING MODES Turbo Mode Pressing the 'Turbo' button on the Remote Controller or main unit will activate 'Turbo' mode, with a voice message. While in 'Turbo' mode, pressing the same button will cancel 'Turbo' mode, with a voice message. In 'Turbo' mode, Robot Cleaner runs more intensely for a powerful clean.
-
Page 26: Time Setting
TIME SETTING You can set or change the current time on the Robot Cleaner. Pressing ‘Clock' button on the Remote Controller, when the Robot Cleaner is in standby mode, will start the clock setting mode. Flickering Set the hour by using ‘▲▼’ buttons on Remote Controller. -
Page 27: Scheduled Cleaning
SCHEDULED CLEANING You can schedule cleaning so that the Robot Cleaner starts cleaning at a scheduled time. Pressing 'Schedule' button on Remote Controller, only when the Robot Cleaner is recharging, will start the scheduled cleaning setting. Setting/Cancelling the schedule cleaning is only possible when the unit is recharging on the home station Select ‘Once reservation’... -
Page 28: Mop Cleaning (Option)
MOP CLEANING (OPTION) By attaching the ultra microfiber mop, you can effectively use the Robot Cleaner to remove dust on hard floor surfaces. When the mop plate is attached, the Robot Cleaner will not climb on to carpets or over thresholds, in order to prevent transferring dirt Caution from the mop. -
Page 29: Location Search Function
LOCATION SEARCH FUNCTION The Robot Cleaner remembers its location while cleaning. If the user moves the Robot Cleaner while it is operating, it will search for the location it was moved from by using its navigational location search function before continuing to clean. -
Page 30: Smart Diagnosis
SMART DIAGNOSIS Robot Cleaner uses this Smart Diagnosis feature to run a self-diagnosis. If any irregularity is found from the diagnosis, please contact the local LG Electronics service center. ※ During Smart Diagnosis, the Robot Cleaner will move about within a 50 cm radius. So, make sure no objects are in the way within a 1 m radius around the Home Station, before starting Smart Diagnosis. - Page 31 Smart diagnosis mode will be turned off. Please try smart diagnosis again after turning the main power switch off and on from the back of Robot Cleaner. If the problem continues, please contact LG Electronics customer care. Smart Diagnosis mode cannot be operated with mop Run Smart Diagnosis again after removing the Mop Plate.
-
Page 32: Cleaning The Dust Bin
CLEANING THE DUST BIN If the dust bin is full, suction power can be reduced. Clean the dust bin before or after each cleaning session. Clean the dust bin using the following sequence: 1. Open the dust bin compartment cover by pressing the PUSH button on the Robot Cleaner. -
Page 33: Cleaning The Dust Bin Filter
CLEANING THE DUST BIN FILTER The Dust Bin Filter consists of a EPA Filter and Sponge Filter. Clean both the EPA and Sponge filters as per the following sequence. 1. Pull the hook on the left of the EPA Filter module on the rear side of Dust Bin to separate the EPA Filter and the sponge. -
Page 34: Cleaning The Brush
CLEANING THE BRUSH The rotating Brush, located on the bottom of Robot Cleaner, helps collect the dust. Clean the Brush as per the following sequence. ※ Before turning over the main unit, lay a soft cloth on the floor and remove the Dust Bin. Otherwise, the main unit can get scratched and dust will fall from the Dust Bin. -
Page 35: Cleaning The Sensors/Charging Terminals
CLEANING THE SENSORS/CHARGING TERMINALS There are sensors on the Robot Cleaner that detect obstacles, stairways and the home station for charging the battery. In order to maintain the performance of the Robot Cleaner, regularly clean the sensors and charging terminals as follows: 1. -
Page 36: Cleaning The Side Brush
CLEANING THE SIDE BRUSH Foreign objects/materials such as hair can easily adhere to the side brush. Remove such materials at least once a week. If excessive amounts of foreign materials are stuck to the brush, there is the risk of damage to the brushes. If the floor is rough or frequently cleaned, the side brushes may bend or become deformed. -
Page 37: Cleaning The Ultra Microfiber Mop (Option)
※ If the Mop is used in a damp or wet state, it will cause the Robot Cleaner to malfunction. • To avoid product malfunction, only use the ultra microfiber mop provided with the Robot Cleaner. • Additional microfiber mops can be purchased by visiting a nearby LG Electronics service center. -
Page 38: Troubleshooting
TROUBLESHOOTING Upon a voice message, "The wheels are not touching the floor. Please move Robot Cleaner onto flat floor." A warning message will be given if a wheel does not contact the floor surface for any reason. • Is a wheel trapped in the front door, balcony, stairway, etc? ►... - Page 39 TROUBLESHOOTING Upon a voice message, "Please check if the dust bin is installed with the filter." A warning message will be given if there is no Dust Bin or Filter housing fitted. • Is the Dust Bin fitted to the Robot Cleaner? ►...
- Page 40 TROUBLESHOOTING Upon a voice message, "Please remove foreign material from the brushes on the bottom." A warning message will be given if foreign materials restrict the Brush's rotation. Turn off the main power switch on the rear of the Robot Cleaner. Lay a soft cloth on the floor and put the Robot Cleaner upside down on it.
-
Page 41: Before You Call For Service
BEFORE YOU CALL FOR SERVICE Confirm before reporting the failure of Robot Cleaner. Problem Solutions (Reference page) The power supply cannot be Check that the power switch is turned on. (Page 16) turned on. The power supply This is not a failure. Robot Cleaner has its own power saving automatically turns off. -
Page 42: Product Specifications
PRODUCT SPECIFICATIONS Item/Model LG Robot Cleaner VR626***** / VR627***** / VR637***** / VR647***** / VR646***** 340 mm × 340 mm × 89 mm External Dimensions 3 kg Weight 18 W Power Consumption DC 16.8 V Battery (Fully Charging) 350 mm/s (Maximum) -
Page 43: Reference Items
REFERENCE ITEMS Open source software notice To obtain the source code under GPL, LGPL, MPL and other open source licenses, that is contained in this product, please visit http://opensource.lge.com. In addition to the source code, all referred license terms, warranty disclaimers and copyright notices are available for download. - Page 44 MEMO...
- Page 45 .לפני השימוש, קרא בתשומת לב את העמודים העוסקים באמצעי בטיחות, להפעלה בטוחה של המוצר .לאחר קריאת מדריך ההפעלה, שמור אותו במיקום נגיש .הקפד לבצע טעינה מלאה של הסוללה לפני שימוש במוצר בפעם הראשונה לאחר הרכישה VR646***** VR637***** VR626***** VR647***** VR627***** www.lg.com MFL67680042...
- Page 46 תכונות Corner Master הודות לתכנון קונספט חדש לחלוטין המתאים לקירות, ביצועי הניקוי של . הינם יעילים באופן יוצא מן הכללRobot Cleaner מצב למידה מסוגל לזכור את סביבת הניקוי באמצעות התכונהRobot Cleaner ., לניקוי חכם יותרSmart Operation מצב טורבו , פועל בעצמה גבוהה יותרRobot Cleaner ,”במצב “טורבו .ומשיג...
- Page 47 תוכן העניינים מידע נוסף לפני השימוש פתרון בעיות אמצעי בטיחות 36~38 לפני פנייה לקבלת שירות כלול במוצר תיאור חלקים פונקציות לחצנים 10~11 מידע מצב תצוגה עיון לפני שתתחיל מפרטי מוצר מבט כולל פריטי עיון אופן השימוש כיצד להתקין את תחנת הבית כיצד...
- Page 48 אמצעי בטיחות אמצעי הבטיחות המתוארים להלן נועדו לאפשר למשתמש להשתמש במוצר באופן בטוח ונכון, כדי למנוע סיכונים .בלתי-צפויים לפציעה או נזק אמצעי בטיחות בסיסיים .לאחר קריאת מדריך זה, שמור אותו במיקום נגיש זהו סמל התראת הבטיחות. סמל זה מתריע בפני סכנות אפשריות העלולות להוביל לנזק לרכוש .ו/או...
- Page 49 ברצונך להחליף את הסוללה או את , קח את המכשירRobot Cleaner פעולה זו עלולה לגרום לשריפה או אל מוקד השירות או הספק המורשה .לתקלה במוצר לקבלתLG Electronics הקרוב של .סיוע אי ציות לאזהרה זו עלול לגרום .לשריפה או לתקלה במוצר Robot Cleaner-אל תשתמש ב...
- Page 50 אמצעי בטיחות אזהרה Robot Cleaner אל תפעיל את אין להכניס שום איבר, כגון יד או .בחדר שבו נמצא ילד ישן רגל, אל מתחת למברשת או Robot Cleaner לגלגלים של פעולה זו עלולה לגרום לפציעה או .במהלך השימוש .לנזק למוצר פעולה זו עלולה לגרום לפציעה או .לנזק...
- Page 51 .פעולה זו עלולה לגרום לתקלה במוצר .פעולה זו עלולה לגרום לתקלה במוצר מיםRobot Cleaner אין לשפוך על או חומרי ניקוי כלשהם. במקרה של ,Robot Cleaner-חדירת נוזלים ל כבה את אספקת המתח ופנה לנציג מכירות או למוקד שירות לקוחות של .LG Electronics...
- Page 52 אמצעי בטיחות שים לב פועל, הואRobot Cleaner כאשר אם הרצפה רטובה או שחלקים עלול להתנגש ברגלי כיסאות, רגלי ממנה רטובים, נגב וייבש אותה לפני שולחנות או בחלקי ריהוט צרים . איןRobot Cleaner-השימוש ב .אחרים Robot Cleaner-להשתמש ב .על-גבי משטח רטוב לניקוי...
- Page 53 כלול במוצר Robot Cleaner תחנת בית שלט רחוק .◀ האיורים עשויים להיות שונים מהפריטים בפועל מדריך מהיר מדריך הפעלה כלי ניקוי (מסנן מכל אבק )חלופי מדריך מהיר מדריך הפעלה ()אופציונלי לניקוי חיישנים לניקוי המסנן מברשת ניקוי (לוחית מטלית )אופציונלי מטלית אולטרא מיקרופייבר ()נמצאת...
- Page 54 - תיאור חלקים ROBOT CLEANER מבט מישורי חיישן מצלמה עליון כיסוי מכסה אבק לחצן תצוגה ואפשרויות לחצן כיסוי מכסה אבק מבט קדמי חיישני אולטראסאונד חלון חיישן לזיהוי מכשולים, חיישני זיהוי של תחנת הבית וחיישני קליטה של השלט הרחוק מבט אחורי מתג...
- Page 55 תיאור חלקים - תחנת בית/מכל אבק תחנת בית מחזיק שלט רחוק מסוף טעינה מתג הפעלה קרס החזקת כבל מתח מכל אבק ידית מכל אבק מברשת ניקוי כיסוי מכסה אבק מסך פתח שאיבה מסנן ספוג לחצן פתיחה של כיסוי מכסה אבק EPA מסנן...
- Page 56 - פונקציות לחצנים ROBOT CLEANER .• לחיצה על הלחצן תגדיר את מצב טורבו, עם אישור קולי TURBO .• לחיצה על הלחצן במצב טורבו תבטל את המצב .• משמש להפעלת המכשיר, להתחלת הניקוי ולהפסקתו .• לחיצה על הלחצן כאשר היחידה מופעלת תתחיל בניקוי .•...
- Page 57 פונקציות לחצנים - שלט רחוק Start Home .לחיצה על לחצן זה תתחיל בניקוי Robot Cleaner משמש לטעינת (17 ’)עמ (18 ’על-ידי החזרתו לתחנת הבית. )עמ Mode Turbo (20 ’שינוי מצב הניקוי.)עמ משמש להפעלה וביטול של מצב (23 ’‘טורבו’. )עמ לחצן כיוונים לחצן...
- Page 58 מידע מצב תצוגה סמל השתקה סמל זה מציין אם מצב השתקה .פועל או מבוטל סמל סוללה סמל זה מציין את רמת סמל מנעול הסוללה הנוכחית, ומהבהב ’מציין אם ‘נעילה .כאשר יש לטעון את הסוללה .מופעלת או לא AM/PM סמל סמל תזמון מציין...
- Page 59 לפני שתתחיל בדוק פריטים אלה לפני הניקוי .• אל תשתמש במכשיר זה בחדר שבו ילד נמצא לבדו. הילד עלול להיפצע .• סלק כל עצם שביר או מיותר מהחדר המיועד לניקוי .בייחוד, סלק פריטי קרמיקה יקרים וחפצי ערך מהרצפה .• סגור את כיסוי מכל האבק לפני הניקוי .•...
- Page 60 מבט כולל ( 15 ’התקן את תחנת הבית. )עמ הכנס את תקע כבל המתח לשקע, והצב את התחנה .בסמוך לקיר . לא ייטעןRobot Cleaner ,אם לא יסופק מתח לתחנת הבית . Robot Cleaner -הפעל את אספקת המתח ל ( 16 ’)עמ הפעל...
- Page 61 כיצד להתקין את תחנת הבית כיצד להתקין את תחנת הבית ,1. הצב את תחנת הבית כנגד קיר, על-גבי רצפה ישרה וקשיחה .כדי למנוע החלקה במהלך העגינה .סלק עצמים בטווח 5.1 מטר מימין ומשמאל ובטווח 2 מטר מלפנים .2. חבר את כבל המתח לשקע לפף...
- Page 62 -כיצד להפעיל ולכבות את אספקת המתח ל Robot Cleaner הפעלת אספקת המתח הראשית Robot Cleaner ודא כי מתג ההפעלה בצדו האחורי-שמאלי של .נמצא במצב מופעל. אם המכשיר במצב כבוי, הפעל את המתג ※ בעת הפעלת מתג ההפעלה, אל תלחץ על הלחצן שבחלקו ..
- Page 63 כיצד להתחיל בניקוי ולהפסיק אותו Robot Cleaner שימוש בלחצנים של START/STOP , לחץ על הלחצןRobot Cleaner לאחר הפעלת .כדי להתחיל בניקוי. תישמע מנגינה, והניקוי יתחיל במהלך מחזור הניקוי כדי להפסיקSTART/STOP לחץ על הלחצן .את הניקוי כאשר אספקת המתחSTART/STOP ※ לחיצה על הלחצן ....
- Page 64 כיצד לטעון את הסוללה טעינה אוטומטית חוזר לתחנת הבית בסיום מחזור הניקוי או כאשרRobot Cleaner .הסוללה חלשה או אםRobot Cleaner ※ אם חלפו 01 דקות ללא תנועה של .הסוללה חלשה, המכשיר ייכבה באופן אוטומטי .※ אל תכבה את מתג ההפעלה הראשי, משום שהסוללה לא תיטען ,אם...
- Page 65 כיצד לטעון את הסוללה מחוון טעינת הסוללה הנותרת .רמת הסוללה מצוינת בתצוגת המצב, באופן הבא .• אם מתבצעת טעינה, נורת רמת הסוללה מהבהבת .• בסיום הטעינה, רק הסמלים ‘סוללה’ ו’מצב ניקוי’ מוצגים, כדי לחסוך באנרגיה .• כשיש צורך בטעינה, רק הרמה הראשונה של נורת רמת הסוללה תופיע ותהבהב מהבהב...
- Page 66 מצבי ניקוי ניקוי זיגזג חוזר על פעולתRobot Cleaner ,’במצב ‘ניקוי זיגזג .זיגזג לניקוי כל הנקודות באזור הניקוי אם ברצונך לנקות אזור מסוים במהירות, בחר במצב .’‘ניקוי זיגזג בשלט הרחוק או ביחידה הראשיתMode לחץ על הלחצן .Start כדי לבחור במצב ‘ניקוי זיגזג’, ולחץ על הלחצן .’※...
- Page 67 מצבי ניקוי My Space ניקוי בשלט הרחוק תגדיר את מצבMy Space לחיצה על ., ותישמע הודעה קוליתMy Space הניקוי .לניקוי אזורים מסוימים, בחר במצב זה :שלב ראשון השתמש בשלט הרחוק לניהול ידני של הניקוי בשוליים .של בלוקי הניקוי השונים .※...
- Page 68 מצבי עזר לניקוי ניקוי ידני . במצב ‘ידני’ על-ידי לחיצה על מקש כיוון בשלט הרחוקRobot Cleaner תוכל להזיז את . ינקה את האזור, תוך תנועה קדימה/אחורה/שמאלה/ימינה, בהתאם לקלט ממקש הכיווןRobot Cleaner . להתנגש במכשולים הנמצאים מאחוריוRobot Cleaner-במצב ‘ידני’, החזקת מקש התנועה אחורה תגרום ל ניקוי...
- Page 69 מצבי עזר לניקוי מצב טורבו בשלט הרחוק או ביחידהTurbo לחיצה על הלחצן .הראשית תפעיל את מצב ‘טורבו’, ותישמע הודעה קולית במצב טורבו, לחיצה על אותו הלחצן תבטל את מצב .טורבו, ותישמע הודעה קולית פועל באופן אינטנסיביRobot Cleaner ,במצב טורבו .יותר, לניקוי...
- Page 70 הגדרת זמן .Robot Cleaner-תוכל להגדיר את השעה הנוכחית ב , ממתיןCleaner Robot בשלט הרחוק, כאשרClock לחיצה על הלחצן .תתחיל בהגדרת השעה הנוכחית הגדר את יחידות השעות באמצעות מהבהב . בשלט הרחוקvu הלחצנים הגדר את יחידות הדקות באמצעות מהבהב . בשלט הרחוקvu הלחצנים ◀▶...
- Page 71 ניקוי מתוזמן . יתחיל בו בשעה שנקבעהRobot Cleaner-תוכל לתזמן ניקוי כך ש בשלט הרחוק, כאשר הסוללה בטעינה, תתחיל בהגדרתSchedule לחיצה על הלחצן .ניקוי מתוזמן .קביעה/ביטול של ההגדרה אפשרית רק כאשר היחידה נמצאת בטעינה ’בחר באפשרות ‘הזמנה חד פעמית מהבהב או...
- Page 72 (ניקוי במטלית )אופציונלי ,על-ידי חיבור המטלית האולטרא מיקרופייבר . לניקוי יעיל של אבקRobot Cleaner-תוכל להשתמש ב לאRobot Cleaner ,כאשר לוחית המטלית מחוברת יטפס על שטיחים או מעל ספים, כדי למנוע העברת לכלוך .מהמטלית שים לב אל תכסה את חיישן המצלמה התחתון .באמצעות...
- Page 73 פונקציית חיפוש מיקום . זוכר את המיקום בעת הניקויRobot Cleaner במהלך הפעולה, המכשיר יחפש את המיקוםRobot Cleaner אם המשתמש יזיז את .שממנו הוזז באמצעות פונקציית הניווט לחיפוש מיקום, לפני שימשיך בניקוי Robot Cleaner-※ פונקציית הניווט תופעל לאחר ש .יזהה כראוי את סביבת הניקוי כאשר...
- Page 74 אבחון חכם . משתמש בתכונה זו של ‘אבחון חכם’ לביצוע אבחון עצמיRobot Cleaner .LG Electronics אם האבחון יזהה חריגה, פנה למוקד השירות של ינוע בתוך רדיוס של כ05- ס”מ. לפיכך, ודא כי שום עצמיםRobot Cleaner ,※ במהלך האבחון החכם...
- Page 75 אבחון חכם .אם תישמע הודעה קולית לאחר האבחון החכם, עיין בטבלה הבאה כדי לברר את הפעולות המתאימות (צעדים )לעיון הודעה קולית פנה את כל העצמים ברדיוס של מטר אחד מסביב לתחנת מתחיל אבחנה חכמה של ההומבוט. יש לזוז הצידה ולהזיז .הבית, והתרחק...
- Page 76 ניקוי מכל האבק .אם מכל האבק מלא, תיתכן פגיעה בעצמת השאיבה. נקה את מכל האבק לפני ואחרי כל הפעלת ניקוי :נקה את מכל האבק בסדר הבא 1. פתח את כיסוי מכל האבק על-ידי לחיצה על הלחצן .Robot Cleaner- בPUSH .2. אחוז בידית מכל האבק, ומשוך כלפי מעלה 3.
- Page 77 ניקוי מסנן מכל האבק . ומסנן ספוגEPA מסנן מכל האבק כולל מסנן . והספוג בסדר הבאEPA-נקה את מסנני ה 1. משוך את הקרס שמשמאל למודול מסנן , בצדו האחורי של מכל האבקEPA-ה . והספוגEPA-כדי להפריד את מסנן ה מחלקיקי האבק הקטניםEPA-2. נקה היטב את מסנן ה .באמצעות...
- Page 78 ניקוי המברשת ., עוזרת באיסוף האבקCleaner Robot המברשת המסתובבת, הנמצאת בצדו התחתון של .נקה את המברשת בסדר הבא .※ לפני הפיכת היחידה הראשית, הנח מטלית לחה על-גבי הרצפה, והוצא את מכל האבק .אם לא, היחידה הראשית עלולה להישרט, ואבק יישפך ממכל האבק באמצעות...
- Page 79 ניקוי חיישן/מסוף הטעינה כולל חיישנים המאתרים מכשולים, מדרגות ואת תחנתRobot Cleaner ,Robot Cleaner הבית לטעינת הסוללה. כדי לשמור על ביצועי :נקה באופן שוטף את החיישנים ואת מסוף הטעינה באופן הבא .Robot Cleaner 1. הפעל את מתג ההפעלה בחלקו התחתון של ...
- Page 80 ניקוי המברשת הצדית .עצמים/חומרים זרים כגון שערות עלולים להיצמד בקלות למברשת הצדית .יש לסלק חומרים כאלה פעם בשבוע לפחות ,במקרה של כמויות חריגות של חומרים זרים הנתקעים במברשת .קיים סיכון לנזק למברשות .אם הרצפה מחוספסת או שהקירות מנוקים בתדירות גבוהה, המברשת הצדית עשויה להתכופף או להינזק .במקרה...
- Page 81 (ניקוי מטלית אולטרא מיקרופייבר )אופציונלי .כדי למנוע ריחות לא נעימים, יש לשטוף לכלוך ואבק מהמטלית לאחר השימוש בו לצורך ניקוי :בצע הנחיות אלה לשטיפת מטלית האולטרא מיקרופייבר .1. הפרד את מטלית האולטרא מייקרופייבר מלוחית הסמרטוט 012 מ”מ .2. נקה בזהירות באמצעות מים חמימים .3.
- Page 82 פתרון בעיות :בהישמע ההודעה הקולית "."הגלגלים אינם נוגעים ברצפה. יש להזיז את ההומבוט לרצפה שטוחה .הודעת אזהרה תינתן במקרה שבו גלגל מסוים אינו נוגע במשטח הרצפה מסיבה כלשהי ?• האם הגלגל לכוד בדלת הקדמית, במרפסת, במדרגות וכדומה . אל הרצפה השטוחהRobot Cleaner ◀ הזז את :בהישמע...
- Page 83 פתרון בעיות :בהישמע ההודעה הקולית "."יש לבדוק כי מיכל האבק והמסנן מותקנים כיאות .תינתן הודעת אזהרה אם מכל האבק או כיסוי המסנן אינן מורכבים ?Robot Cleaner-• האם מכל האבק מחובר ל .◀ פתח את כיסוי מכל האבק וודא כי מכל האבק מורכב במקומו .◀...
- Page 84 פתרון בעיות :בהישמע ההודעה הקולית "."יש להזיז חומרים זרים מהמברשת שבתחתית ההומבוט .הודעת אזהרה תינתן במקרה שבו חומרים זרים מגבילים את סיבוב המברשת . עליה במצב הפוךRobot Cleaner הנח מטלית רכה על-גבי הרצפה, והנח את .※ לפני הפיכת היחידה הראשית, הסר את מכל האבק .אחרת, מכל...
- Page 85 לפני פנייה לקבלת שירות .Robot Cleaner-ודא לפני הדיווח על תקלה ב (פתרונות )עמוד להפניה בעיה (16 ודא כי מתג החשמל נמצא במצב פועל. )עמוד לא ניתן להפעיל את אספקת .המתח . פונקציה משלו לחיסכון בחשמלRobot Cleaner-לא מדובר בתקלה. ל אספקת המתח נכבית אם...
- Page 86 מפרטי מוצר פריט/דגם LG Robot Cleaner VR626***** / VR627***** / VR637***** / VR647***** / VR646***** 98 × 043 × 043 מ”מ ממדים חיצוניים 3 ק”ג משקל 81 ואט צריכת חשמל DC 16.8 V (סוללה )טעינה מלאה (053 מ”מ/ש’ )מרבית מהירות נסיעה...
- Page 87 פריטי עיון הודעה של תוכנת מקור פתוח , ורישיונות מקור פתוח אחריםMPL ,LGPL ,GPL כדי לקבל את קוד המקור הכלול במוצר זה במסגרת .http://opensource.lge.com בקר באתר בנוסף לקוד המקור, כל תנאי הרישוי, סייגים באחריות והודעות זכויות היוצרים המאוזכרים הינם זמינים .להורדה...
- Page 88 .יש לבדוק מדי פעם את תקינותו של כבל החשמל .אין להשתמש במכשיר במקרה שכבל החשמך ניזוק .תיקון או החלפה של כבל החשמל יבוצעו אך ורק במעבדת שירות מוסמכת .ראו רשימת מעבדות שירות בתעודת האחריות...