Logitech Harmony Ultimate - All in One Remote Manual
- User manual (54 pages) ,
- Setup manual (2 pages) ,
- Setup manual (2 pages)
Advertisement
- 1 About this Manual
- 2 At a Glance
-
3
Harmony Ultimate First Time Setup
- 3.1 Hardware setup
- 3.2 Your MyHarmony account
- 3.3 Installing the setup plugins
- 3.4 Connecting the remote to the computer
- 3.5 Getting help with online setup
- 3.6 Connecting to Wi-Fi
- 3.7 Setting up Devices to control
- 3.8 Adding Devices
- 3.9 Setting up and testing Activities
- 3.10 Setting up Favorites
- 3.11 Syncing your Harmony Ultimate
- 3.12 Using your phone as a remote
- 3.13 Upgrading your Harmony Ultimate firmware
- 3.14 Testing your setup
-
4
Using your Harmony Ultimate
- 4.1 Activities
- 4.2 Favorites
- 4.3 Devices
- 4.4 Advanced customization
-
4.5
How to get the most out of your Harmony Ultimate
- 4.5.1 Important: use your Harmony Ultimate every time!
- 4.5.2 Use your smartphone as a remote control
- 4.5.3 Adjust the power on delay
- 4.5.4 Position the hub and set up hub assignments correctly for your setup
- 4.5.5 Use the Help function to put the remote back in sync with devices
- 4.5.6 Use the Fix It Myself function to put the remote back in step with devices
- 5 Changing your Setup
- 6 Personalizing your Remote
- 7 Remote Control Menus
- 8 Troubleshooting
- 9 Support
- 10 Copyright
- 11 Documents / Resources
About this Manual
This manual contains both internal links to other parts of the manual and external links to other sources of information. Internal links appear like this and external links appear like this.
Illustrations in this manual were accurate at the time of publication.
Terms used in this manual
- Harmony Ultimate system: includes the Harmony Hub, the Harmony Ultimate remote, MyHarmony, and the Harmony App.
- Harmony Ultimate remote: the physical remote control that comes with Harmony Ultimate.
- MyHarmony: the account that saves all your setup information in the cloud. You can access your MyHarmony account either on your computer through myharmony.com, or through the Harmony App.
- Harmony App: the remote control app that runs on your smartphone or mobile device.
At a Glance
Features
The Harmony Ultimate remote provides maximum flexibility for controlling your home entertainment system.
Choose whether you prefer to use the Ultimate remote or your smartphone to control your entertainment devices (TV, cable or satellite box, DVR, game console, etc.) and home automation devices (IR controllable light bulbs, vacuum cleaners, motorized blinds, etc.).
Switch between watching cable TV, watching your Roku, or playing a game with one touch. You can program your Activities to be as simple and general as you want or as complicated and precise as you want. Whatever you like to do, one touch can take you from one Activity to the next, powering off and on the right devices and adapting the remote control to send the right commands to the devices you're currently using.
MyHarmony will guide you through the setup process. Once your setup is saved in the MyHarmony cloud, you have the ability to turn any supported smartphone into a remote that functions as a Harmony Ultimate remote.
For suggestions on how to optimize your Harmony and for unique setup solutions, please visit our Harmony user community forums for ideas (English only).
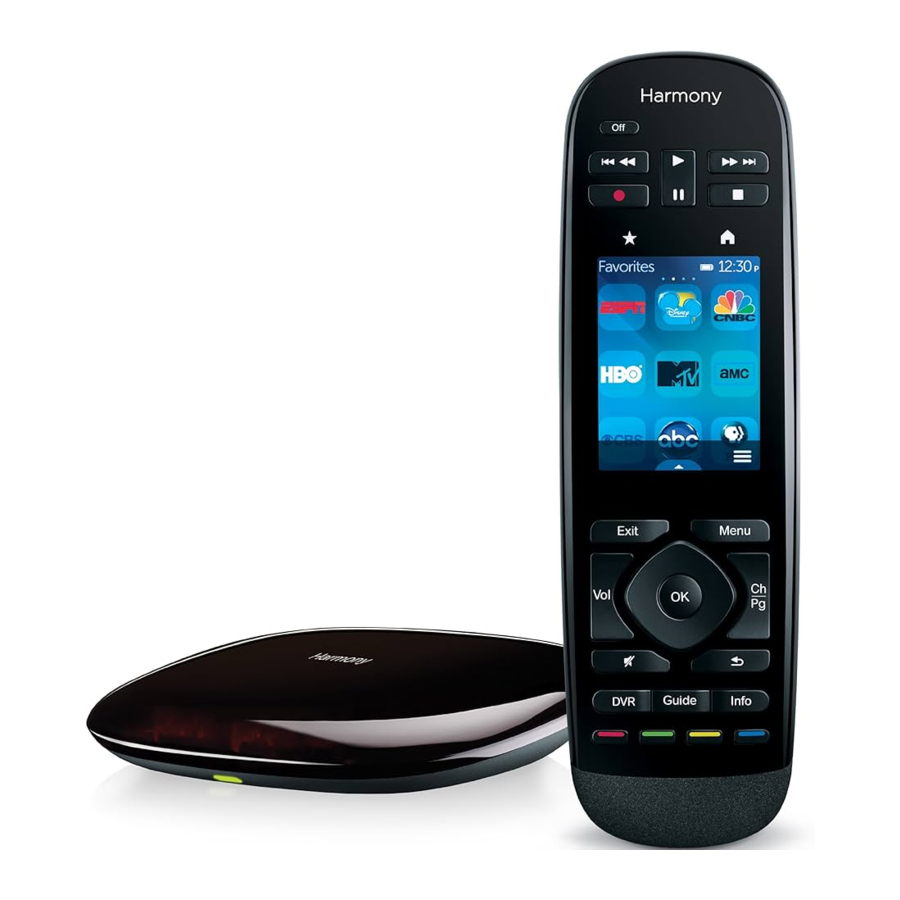
Know your Harmony Ultimate
Open your Harmony Ultimate box and familiarize yourself with the components.

- Harmony Ultimate remote
- Charging cradle
- Remote power adapter
- Harmony Hub
- Micro USB power connector
- Hub power adapter
- IR Mini blaster connector
- IR mini blasters (x2)
- Pair / Reset button
Features of the remote control

- Off button: Power off your current Activity.
- Audio/video controls: Perform standard AV functions.
- Favorites: Display a list of your Favorite Channels.
- LCD touch screen: View, launch and edit Activities and Favorites, use the onscreen number pad, change settings, and get Help.
- Directional controls: Navigate up, down, left and right in menus on your TV, DVR, game console or other media source.
- Exit: Leave a listing or menu on your TV screen.
- OK: Press to select an option on your TV screen.
- Volume control
- Mute
- Satellite/cable controls:
- DVR: Opens the record/ play menu.
- Guide: Opens satellite or cable program listings.
- Info: Provides program information.
- Color coded navigation buttons: Perform cable, satellite or Blu-ray functions
- Home: Display your Activities on the remote screen.
- Menu: Display the menu on your TV, DVR, game console or other media source.
- Channel and page navigation.
- Previous: Tune to the previous channel or navigate to a previous screen in your media player.
- IR Window: "Learn" IR (infrared) commands from another remote.
- Micro-USB port: Connect Harmony Ultimate to your computer to program it.
Charging your remote

To charge your remote, use the charging cradle.
Harmony Hub and IR mini blasters
Whether you use a mobile device or your Harmony Ultimate remote control, the hub stores your setup information and communicates between your remote control and your entertainment center devices. The hub communicates with other devices by Wi-Fi, IR (infrared), and Bluetooth signals, depending on the device.
IR mini blasters extend the range of the Harmony Hub allowing you to control devices that are on other shelves or outside of your cabinet, such as a television.
How your Harmony Ultimate works
Devices
Devices are the components of your entertainment system. Examples of devices are:
- TV set
- Cable or Satellite set top box
- Audio Visual (AV) receiver
- DVD player
- Game console
Gather the manufacturer and model number information for each of your devices and record it on the next page of this user guide. Also write down how devices are connected to one another and the input they must be on. For example, to watch a movie you might have your television set to input (or source) "HDMI 1" and your AV Receiver set to input "DVD". Having this information collected ahead of time will make setup much easier.

Activities
Activities define the way you use your remote controlled devices. Examples of Activities are:
- Watch TV
- Listen to Music
- Watch a Movie
- Play a Game
To create an Activity, you need to know some basic information about how your devices interact with each other in that Activity. For example, to create a basic Watch TV Activity, you need to know:
- Which devices you will use. In most cases, you need the following devices:
- A TV set
- A video source, such as a cable or satellite set top box
- Which device is used to control the volume
- Which device is used to change channels
- Which input is used on the TV set to view the video source
Inputs determine how your devices are connected. For example, if your DVD player is connected to the Video 2 input on your TV, then the TV must be set to Video 2 to display the DVD's picture. More information is provided about inputs in the instructions for Adding a Watch TV Activity.
Favorites
The Favorites screen allows you to view your predefined favorite TV channels and station icons (where available). Using the MyHarmony website you can select up to 50 Favorite Channels to display on the remote. Selecting a Favorite Channel will start your "Watch TV" Activity, if it's not already started, and tune directly to that channel. Using the touch screen, you can add, remove and reorder your Favorite Channels right on the remote. The Harmony App on your smartphone allows you to customize Favorite Channels unique to each smartphone. Changes made on your smartphone or on your Harmony remote only affect the device on which they are made and will not be reflected on the other devices.
myharmony.com
http://myharmony.com is the website where you configure your Harmony Ultimate. By connecting your Harmony Ultimate to your Mac or Windows computer and following the instructions at MyHarmony, you can enter your device information, create Activities, and choose your Favorites. With this information, MyHarmony will configure your Harmony Ultimate to control your entertainment system. You can return to MyHarmony any time to update your configuration, although many settings can also be maintained directly on Harmony Ultimate as well. There are minimum system requirements for using MyHarmony on your computer. The following operating system/browser combinations are supported:
| Desktop Browser | Mac | PC* |
| Internet Explorer 8+ | × | |
| Chrome 16+ | × | |
| Firefox 11+ | × | × |
| Safari 5.1+ | × |
* Windows Vista and XP support 32 bit browsers
* Windows 7 and 8 support both 32 and 64 bit browsers
Using a smartphone for a remote control
In addition to the remote control that comes with your Harmony Ultimate, you can use a smartphone with the Harmony Control App as a remote control. Your smartphone will communicate with the Harmony Hub over Wi-Fi allowing the hub to control your devices. Find out if your mobile device is supported.
Powering your system off
The Off button on the Harmony Ultimate remote powers off all of the devices for an Activity with one touch. For example, in a Watch TV Activity that uses a TV, Cable Box, and AV Receiver, pressing the Off button will power off all three devices at the same time.
The Harmony Ultimate knows the current state of the devices it controls by remembering the last Activity you selected. For example, if you switch from watching cable TV to watching a DVD, the Harmony Ultimate knows that it doesn't need to power the TV off and back on; it just leaves the TV turned on. It also it knows that it needs to power off the cable box and power on the DVD player.
Interference with Harmony Ultimate
Avoid operating your devices using the original, manufactures remote control or by powering it on and off using the buttons on the device itself as doing so will cause Harmony to become out of sync with your devices. For example, if you select the Watch TV Activity and then use your TV remote to turn off the TV, the next time you want to select an Activity, the Harmony Ultimate will think that your TV is already powered on and will not turn it on. Other things that can confuse the Harmony Ultimate include inter-device communication that turns devices on or off, such as HDMI-CEC or SCART (in Europe). For more information about HDMI-CEC, see the FAQ.
If the Harmony Ultimate becomes out of sync with your devices, you can use the Help function on your remote to bring the TV back in sync. For more information about the Help function, see the sections Help menu and Troubleshooting.
Harmony Ultimate First Time Setup
The first time you set up your Harmony Ultimate remote, MyHarmony walks you through the setup process and stores your settings in your personal account in the cloud. From there your settings can be transmitted to your Harmony Hub, your Harmony Ultimate remote control, or any supported mobile device that can be used as a remote. If anything ever happens to your Harmony Hub or remote control, you can use these saved settings to set up a new system with ease.
Hardware setup
There are a few steps to setting up your Harmony Ultimate hardware:
- Connect your Harmony Hub to a power outlet.
![]()
- Place the hub inside your entertainment system.

- Connect the IR mini blasters to the ports on the rear of the Harmony Hub.
![]()
- Place one mini blaster on top of your entertainment system to control your TV; place the other mini blaster inside your cabinet on a different shelf from your hub.


Now you're ready to program your system.
Your MyHarmony account
To use your Harmony Ultimate, you will need an account where you can enter and save the details for your devices, Activities and Favorites.
Using your web browser, go to http://www.myharmony.com and click the Sign In button in the upper right corner.

If this is your first time using MyHarmony, click Create Account and follow the instructions to create your account.
If you already have a MyHarmony account, you can add your Harmony Ultimate to that account. Enter your account information in the "Existing Users—Sign In" section on the right. When you sign in to your account, you will see the "Remote Gallery" page where you can access your existing Harmony remotes, or choose to add your new Harmony Ultimate. If you have already set up devices and Activities for another Harmony remote, you will be able to re-use that information when setting up your Harmony Ultimate.

Installing the setup plugins
If you are creating a new account or accessing an existing account on a new computer for the first time, you will need to install two plugins: Microsoft Silverlight and the Harmony Browser plug-in.

To install the required plugins, follow these steps:
- Click the Silverlight plugin button and follow the instructions to complete the Microsoft Silverlight installation. (This step will be skipped if MyHarmony detects that you already have a compatible version of Silverlight installed.)
- Click the MyHarmony plugin button and follow the instructions to complete the MyHarmony plugin installation.
- When both plugins are installed, your browser will automatically refresh and continue the set up process.
Tip: if the browser does not refresh, close and re-start the browser; then return to MyHarmony.
Connecting the remote to the computer
Whether you are creating a new account or adding Harmony Ultimate to an existing account, you will be asked to connect Harmony Ultimate to your computer using the USB cable provided.

Once connected, it may take several seconds for Harmony Ultimate to be detected by MyHarmony before you can proceed.
When the welcome page appears, familiarize yourself with the information it contains and then click Next to see the Software License Agreement.

Read the Software License Agreement, then click Accept and Continue to begin setup.

Getting help with online setup
There is online help available for some of the steps of the setup process. If there is help available for the screen you are viewing, you will see Help in the upper right corner.

If Harmony has additional information about a device you have added to your account, you will see an information icon  next to it.

In addition, Harmony Ultimate Support FAQs are accessible at: http://www.logitech.com/en-us/support/harmonyultimate?
In some sections of this manual, links are provided to take you directly to relevant sections of the FAQ.
For more support options, refer to the Support section of this manual.
Connecting to Wi-Fi
Connecting your Harmony Hub to your Wi-Fi network has multiple advantages, such as enabling use of the Harmony app, providing Philips hue lighting control, and wirelessly syncing settings between your remote and your MyHarmony account.
Select your home Wi-Fi network. If a password is required, you are prompted to enter it. Click Next when you are finished.
NOTE: Harmony Ultimate supports 2.4GHz 802.11 b/g/n wireless networks with WPA, WPA2-AES, and 64/128 bit WEP encryption.

If you have problems connecting to the Wi-Fi, please refer to Wi-Fi problems.
Setting up Devices to control
The first step to setting up Harmony Ultimate is to tell MyHarmony what devices you have in your entertainment system.
When you have your device information collected (as described in the Devices section) and are ready to begin, click Next.
Copying setup information from another Harmony remote
If you have a previous Harmony remote such as Harmony One, Harmony 1100 or Harmony 880, you can reuse the device and Activity settings from that remote to program your Harmony Ultimate. If you do not have a previous Harmony remote, skip to the Adding Devices section below.
To copy a previous Harmony remote's settings, click the Copy button shown below. You will be asked to enter the ID and password for your previous account. When you do, the settings will be copied and applied to your Harmony Ultimate account.

Once your settings are copied, you will be able to add more devices or Activities and modify your settings.
Adding Devices
To add devices during setup, enter the manufacturer and model number when prompted:

Carefully enter the manufacturer or brand of your first device followed by the model number. Harmony will automatically correct for common errors such as zeros or ones being confused for the letters '0' or 'I' and will provide suggestions if the entered device cannot be found.
Serial numbers found on your devices should not be entered as they are unique and cannot be used to identify the device you have. It is important to enter manufacturer and model information correctly because not doing so may cause devices to change to the wrong input, miss commands, or not function at all during Activities.
Repeat this step by clicking "Add Device" until all of your devices have been entered.
Most devices are recognized by MyHarmony, and when you add the device you are automatically prompted to enter the information required to correctly set up that device.
Adding an unknown device

This process should only be used if you cannot find a match for your device.
The database of devices on MyHarmony contains over 225,000 of the most common devices.
- If MyHarmony is unable to find your device you will be prompted to double check the information entered. In some rare cases you may need to add a device that is not contained in the database. If your device is not found, select Yes, I'm sure that's it and click OK to proceed to teach myharmony.com about this new device.

- Click Select your device type to display a list of device types.

- Select the device type that best describes your device and click Next. Based on your selection, another page displays to get more information about your device.

- Check the box for each item that applies to your device. This will help setup determine which commands are appropriate for your device. Click Next.
- If you have the original remote for the device, click yes then click Next. Having the original remote will help you set up the device Using the teach commands function to add a device feature.
- Follow the instructions to set up your device.


Using the teach commands function to add a device
In some cases, your device may not be recognized, or it may have been manufactured in different versions that require additional information to be set up properly. MyHarmony will recognize when this is necessary and guide you through the Teach Commands process to identify and set up your device.
To add a device using Teach Commands:
- Enter the manufacturer and model number for your device.
- Confirm the device information and click Yes.
- If you have the original remote for the device, click Yes. If you do not have the original remote, click No and follow the instructions.
- Click Next.
- Prepare to use your original device remote to teach your Harmony Ultimate a few commands. Point the end of the original remote at the sensor on the back of your Harmony Ultimate, as shown:
![]()
- Follow the instructions to push buttons on the original remote to teach commands to the Harmony Ultimate.

Tip: If your Harmony remote is having problems learning IR commands from your original remote, one or more of the following ideas may help:
- Minimize the amount of light that could interfere with the learning process by blocking out sunlight or turning off the lights.
- Install new batteries in the original remote. If the batteries are low, the signal coming from your original remote may be too weak for the Harmony Ultimate remote to detect.
- Press or tap the button on your original remote as you would during normal use. If you still have problems learning IR commands, gradually increase the time for which the button is pressed until you reach 1-2 seconds.
- If you still have trouble teaching the commands, start with the remotes 2 inches apart. Then try again, slightly increasing the distance each time (2.5 inches, 3 inches, etc.).
- Try varying the angle at which the commands are sent from the original remote to the Harmony Ultimate.
- Ensure the device's original remote is sending infrared (IR) commands. If the device's original remote is able to control the device when in a different room or when covered by a blanket then it is likely not an IR remote and cannot be learned or controlled by Harmony.
Setting up and testing Activities
After you have added devices, you can create Activities that manage how you use your devices together. For example, if you have a TV, AV receiver, and cable or satellite box, you will want to control all of these devices when you watch TV. To control all of these devices together, create a Watch TV Activity.
Adding a Watch TV Activity
When you are initially setting up your Harmony remote, you'll be guided through setting up the Watch TV Activity. Pressing Watch TV on your new Harmony Ultimate will turn on your television, your cable box, and any other devices that you've specified for the Watch TV Activity.
To add a Watch TV Activity:
- The Watch TV Activity configuration step will begin automatically the first time you finish adding devices to your account. You will be able to configure other Activities later, such as Watch a Movie, Listen to Music and Play a Game.

- Choose the devices you want to use in your Activity. MyHarmony will recommend the devices you have added based on their typical use. You can include or exclude devices from the Activity at this stage. Select or deselect devices if appropriate and click Next.
- Choose the device you use to change channels. The recommended device is pre-selected.
- Choose the device you use to control volume. The recommended device is pre-selected.
- Select the input your television must be set to when you are viewing TV.
- If you have additional devices configured for this Activity, you are prompted to choose their input settings.
- Answer any additional questions that MyHarmony asks. The questions you are asked depends on the specific devices you added.
- Confirm that the devices and inputs are correct for your Watch TV Activity and click Done.

The following is an example of the completed Watch TV Activity setup.


Adding more Activities
When you have completed adding your Watch TV Activity, you can add the other Activities that you want your Harmony Ultimate to control. The types of Activities that MyHarmony offers you depends on the types of devices you have added. You can add multiple Activities based on each type of Activity offered, such as Watch TV, Watch Movie, or Play Game. For example, it is recommended that you use the Watch Movie Activity for watching a movie on your DVD player, and you can create a second Watch a Movie Activity to stream Netflix from your SmartTV or PlayStation 3. You will be prompted to provide a unique name for each activity. The setup process for these other Activities is similar to Watch TV. Depending on the devices you're using, additional questions may be asked during the setup process.
Although the Custom Activity type is always offered as an option, it is an advanced feature and should only be used if you are setting up unusual devices and Activities such as light controllers, fans, home appliances, climate control devices, etc. Refer to Custom Activities for more information.
Adding a Watch Movie Activity
- Click Add Activity.
- Select Watch a Movie.
- Click Next.
- Choose the devices you want to use in your Activity. MyHarmony will recommend the devices you have added based on their typical use. You can include or exclude devices from the Activity at this stage. Select or deselect devices if appropriate and click Next.
- Choose the device you use to control volume. The recommended device is pre-selected.
- Select the input your television must be set to when you are watching a movie.
- If you have additional devices configured for this Activity, you are prompted to choose their input settings.
- Answer any additional questions that MyHarmony asks. The questions you are asked depends on the specific devices you added.
- Confirm that the devices and inputs are correct for your Watch a Movie Activity and click Done.


Custom Activities
Most Activities should fit into one of the Activity types offered. The Custom Activity type is recommended only for home appliances such as light controllers, fans, climate control devices, etc. The Custom Activity does not provide optimized defaults such as button customizations, Activity icons, and Favorite Channels as the other predefined Activity types do. These may be configured manually from MyHarmony once setup is complete. Refer to How to map buttons to your remote for additional information.
Special Devices
Some types of devices require that you change or manipulate some aspect of them in order for them to be controlled by Harmony Ultimate. If you have an RF-only device, a device that understands multiple IR languages, or a device that does not accept IR input at all, you will be notified of this during setup. Look for that flags it. Examples of these devices are:
- RF devices: some devices, such as DirecTV or Dish Network cable boxes, are controlled using RF (Radio Frequency) signals. If your device's original remote can operate from a different room, then it is likely using a RF signal. Some of these devices allow them to switch into an IR (infrared) mode that allows Harmony to control them.
- Multi-Code devices: some devices may be controlled using multiple different IR (infrared) signal versions. MyHarmony will use the most common version. However, if it does not work you may return to MyHarmony and teach a command from your original remote so Harmony knows which version to use.
- Bluetooth Devices: Harmony Ultimate works with the PS3, Wii, and Wii U game consoles over Bluetooth. The Harmony remote will help you connect to these devices the first time they are used. Other Bluetooth capable devices such as television keyboards are not supported. For more information, see these articles:
- Control Sony PlayStation 3 with the Harmony Ultimate
- Control Nintendo Wii with the Harmony Ultimate
Setting up Favorites
With your devices added and Activities set up, you can now add Favorites. Favorites are up to 50 television channels you watch most often.
NOTE: Favorite Channels are associated to your primary Watch TV Activity. If you have multiple Watch TV Activities, you will be prompted to select which one the Favorite Channels should be associated with. Favorite Channels cannot be used across more than one Watch TV Activity.
Follow these steps to add Favorites to the Watch TV Activity. On the Select Your Favorite TV channels page:

- Select your country and enter your zip/postal code.
NOTE: Favorite Channel information may not be available for all country and zip or postal code locations. Refer to Setting up Favorites manually for more information. - Click Search. The list of service providers for your zip code displays.
- Select your service provider.
- Click Next.
The channels list for the selected provider displays:

TIP: 25 of the most popular channels for your provider are pre-selected. You can filter which channels are displayed by entering a network name, or by viewing the Popular Channels or All Channels tab.
Select your Favorite Channels. Selected Favorites are shown with a gold star in the first column. You can select up to 50 Favorites by clicking on the stars. - When you have selected all of your Favorite Channels, click Next. The Manage Favorite Channels page displays:

Use this page to arrange your Favorites in the order you want to see them on your Harmony Ultimate screen. You can drag and drop each channel icon to move or remove it from the screen as desired. You can also add a new Favorite Channel manually if it is missing, or upload your own Favorite Channel icon by clicking Modify a Favorite Channel. - Click Finish when you are done.


Setting up Favorites manually
If no channel provider or channel list is available for your area, you can set up Favorites manually by entering the channel names and numbers rather than using a channel list.
- Select your country.
- If channel information is not available for your country, the page will remain as is, and Next will be enabled.

- If channel information is available for your country but you service provider is not listed, select Manual channel setup.

- Click Next.

- Enter the Channel Name and Channel Number for each Favorite Channel. The Browse button allows you to select an image to represent each channel.
- Click Add More to add more Favorite Channels.
- Click Save when you are finished.


Syncing your Harmony Ultimate
To complete your first time setup, MyHarmony will perform a sync operation to save all of your setup details and update your remote. When prompted, click Sync to continue.

Tip: It is important to sync your remote whenever you make changes directly on the remote, so that your MyHarmony account is current with all of your desired changes. If you set up your Harmony Ultimate to communicate using Wi-Fi, all settings changes and syncs will happen wirelessly.
Using your phone as a remote
You can also use the Harmony app on your smartphone to access your MyHarmony account and use your phone as a remote. To get started with the Harmony app, go to the app store for your device, and download the Harmony app. (In the iTunes store, search for "Harmony Control")
Upgrading your Harmony Ultimate firmware
When new firmware is available for your Harmony Ultimate, it will automatically be applied the next time you sync your remote. The remote may reboot multiple times during this process. Once the firmware update is complete, your Harmony Ultimate will sync with MyHarmony as usual.
If you have set up your Harmony Ultimate to communicate using Wi-Fi, your remote will automatically notify you when a firmware update is available. If you do not use Wi-Fi, you will have to plug your remote into your computer and open MyHarmony to find out when a firmware update is available.
Testing your setup
Once you have completed the setup process you may begin using your remote in your living room. Please ensure all of your devices are powered off, then start an Activity by tapping on it from the Harmony Ultimate remote screen. To test your setup:
- Make sure that all of your devices are turned off.
- Tap an Activity such as Watch TV from the Harmony Ultimate remote LCD screen.
- Confirm that the Activity has started correctly and that you can hear sound and see video. If it has, select Yes, everything started correctly. If something is not working properly, the tutorial may help to correct it or you may have to visit MyHarmony.
If you discover any setup problems during these tests, see Setup problems under Troubleshooting for more information.
Using your Harmony Ultimate
After completing the first time setup to add your devices, create Activities, and choose your Favorite Channels, you are ready to use your remote. The following sections describe how to access the features you will use most often.
Activities
Tap the ![]() icon above the touch screen on your Harmony Ultimate to see your Activities.
icon above the touch screen on your Harmony Ultimate to see your Activities.

Tap an Activity to start it.
Your Harmony Ultimate will send all the commands to the necessary devices in your entertainment system. For example, to Watch TV, Harmony Ultimate will turn on your TV, turn on your cable set top box, turn on your AV receiver, set the input on your TV to HDMI 2, set the input on your AV receiver to HDMI 1.

The first time you start an Activity after setup, the Harmony Ultimate asks you to confirm that everything worked properly. If you answer "no" the remote will walk you through troubleshooting steps.

Switching between Activities
While an Activity is active, selecting another Activity will leave on or turn on necessary devices, turn off unnecessary devices, and select the correct inputs for each of the devices. For example, when switching from watching TV to watching a Blu-ray, Harmony Ultimate will leave your TV and AV receiver turned on, but will turn off your cable set top box and turn on your Blu-ray player. Depending on how your AV receiver is set up, Harmony Ultimate may also change the AV input from the TV to the Blu-ray player.
TIP: You don't need to turn your system off in between switching Activities. Harmony Ultimate remembers what is on and off and switches between Activities automatically.
NOTE: if you would like to keep a particular device on when switching to an Activity that does not use it, this may be customized by signing into MyHarmony. For example: you may want to keep your Xbox powered on while you switch to Watch TV so you may return back to Play a Game without losing your game status. For more information, refer to the support article for setting devices to stay on.
Activity commands
When your Activity starts, all the buttons on Harmony Ultimate are configured to control that Activity. For example, in a Watch TV Activity, the volume button will control your AV receiver while the Play and Pause buttons and the directional navigation will control your cable or satellite set top box. In addition, the screen on the remote is able to display all the available commands for each device that is participating in the current Activity.
Gesture control
Each Activity allows you to control your devices using simple swipes and taps on the Harmony Ultimate screen. Eleven different gestures are supported:
- Swipe up
- Swipe up and hold
- Swipe down
- Swipe down and hold
- Swipe left
- Swipe left and hold
- Swipe right
- Swipe right and hold
- Tap
- Double tap
- Long press

Each gesture performs a default command that depends on the current Activity. When you use a gesture, the action associated with that gesture appears on the screen and activates.
Viewing current gesture commands
To see a list of commands associated with each gesture, swipe the up-arrow at the bottom center of the screen and then tap the  in the upper right corner.
NOTE: Gestures are only available when an Activity is active.
Customizing Activity gestures
To change which commands are associated with each gesture:
- Swipe the up-arrow at the bottom to bring up the gestures screen.
- Tap the
![]() in the upper right corner of the screen.
in the upper right corner of the screen. - Tap the gesture you want to change.
- Tap the device that you want the gesture to control.
- Tap the command that you want the gesture to send.
Leaving gesture control mode
To leave gesture control mode, swipe the down arrow at the top center of the screen to return to the previous screen.
Favorites
Tap the ![]() icon above the Harmony Ultimate screen to see your Favorite Channels.
icon above the Harmony Ultimate screen to see your Favorite Channels.

Swipe up and down on the screen to scroll your Favorites. Tap any Favorite to tune to that channel.
TIP: If your entertainment system is off or if you are in another Activity when you select a Favorite, Harmony Ultimate will automatically start the Watch TV Activity and tune to the selected channel.
Managing your Favorites
To remove Favorites or rearrange their positions on the Favorites screen, follow these steps:
- Tap the
![]() icon above the Harmony Ultimate screen.
icon above the Harmony Ultimate screen.
![]()
- Tap the
![]() icon at the bottom right of the Favorites screen.
icon at the bottom right of the Favorites screen. - Tap Edit.
![]()
- Tap the "X" icon on each Favorite to remove it from your Harmony Ultimate.
- Tap-and-hold on a Favorite to move it within the screen. When the icon changes color, you can drag it to a new spot.


Devices
Your Harmony Ultimate is designed to control your devices as part of the Activities that you set up on MyHarmony. Occasionally, you may need to access the full list of commands available for a particular device.
Tap the ![]() icon at the bottom right, then tap Devices to enter Device Mode and see a list of all your devices. You can choose a device to see the complete list of commands for that device. At this time, the physical buttons on the Harmony Ultimate will also control the selected device.
icon at the bottom right, then tap Devices to enter Device Mode and see a list of all your devices. You can choose a device to see the complete list of commands for that device. At this time, the physical buttons on the Harmony Ultimate will also control the selected device.

Do not power off or change any of your device's inputs while in Device Mode. The remote does not track state changes in Device Mode. You can adjust sound or picture settings, etc.; just don't turn devices off or on, or switch inputs.
Advanced customization
Customizing Activities
You can add extra steps to an Activity if you want to customize it further. For example, your Watch a Movie Activity can be set up to automatically send the Play command to start your movie.
To add steps to an Activity in your MyHarmony account:
- Click Activities and select an Activity to customize.

- Click Customize this Activity. The Customize: Activity Sequence page displays. In this example, the Watch TV Activity is shown.

- Add steps or delays to your Activity as desired.


Customizing buttons to perform a sequence of commands
A button sequence is a set of commands that can be grouped together and assigned to one button on your remote, helping to automate certain tasks. Button sequences are sometimes referred to as macros.
To create a button sequence in your MyHarmony account:
- Click Buttons.
- Select an Activity or device from the pull-down menu for the area of the remote you would like to create a sequence for—screen or buttons, and click Go.
- Click the Sequences tab on the right side of the screen
- Click onAdd Sequence. The Add Sequence page opens.
- Enter a name for your sequence. Try using a name for your sequence that will represent what you are programming it to do.
- Add steps or delays to your sequence as desired.
- Click Save when finished. Your Sequence will appear in the list.
- Assign your button sequence to a single button as described in the next section, Customizing buttons and on-screen commands.
Customizing buttons and on-screen commands
Harmony allows you to customize the commands that each button sends, or what commands appear in your Activity list. These button mappings may be unique for each of your Activities. This allows each button or screen to have different functions based on context. For example, in your Watch a DVD Activity, the yellow button may perform the eject command, while in your Listen to Music Activity this same yellow button may be used to pull up your Favorite preset.
When customizing your Harmony remote you may find that commands have slightly different names than those of your original remote. For example, Select, OK, and Enter often perform the same action, but may be named differently based on the original manufacturer.
Activities mode
When you select an Activity to map buttons for, the buttons only perform the assigned functions while the activity is in progress for which they were mapped. If you want to assign a button function for all Activities, you will need to do it for each individual Activity.
How to map buttons to your remote
- Select the Buttons tab on the left hand side of the screen.
- Select an Activity for the area of the remote you would like to create a sequence for (screen options or remote buttons) and click Go.
- Select a button on the illustration of the remote. You can scroll the illustration to see buttons at the bottom of the remote.
- Hover over a command to assign to that button and click on Long Press, Short Press, or Both to make the selection.
- Click OK.
NOTE: Each button on your remote can be assigned more than one command. For example, the Fast Forward button on the top of your remote can be set up so that quickly pressing it (short press) activates the Fast Forward function and holding it (long press) activates the Skip Forward function.
Device Mode
It is recommended that you do not map buttons while in Device Mode because the mapping will not carry over into any of your Activities. Instead, select an Activity to map buttons for.
Controlling Phillips hue wireless lighting systems
Harmony Ultimate is able to communicate with Philips hue wireless lighting systems when your Harmony is configured to use your home's Wi-Fi network.
Once paired with hue, a light bulb will appear in the lower left corner of your remote allowing you to control your Philips hue light bulbs.
Light, color, and brightness settings can be configured for each Activity. For example, you could turn on lights and turn them blue when you watch TV, and dim the lights and turn them yellow for a movie. These settings can be programmed as part of an Activity so that optimal lighting will always be set for each Activity. Refer to the Control Phillips hue with Harmony Ultimate FAQ for detailed setup information.
How to get the most out of your Harmony Ultimate
You can prevent some common problems if you follow the tips in this section.
Important: use your Harmony Ultimate every time!
Always exclusively use your Harmony Ultimate or the Harmony App on your smartphone to control your devices. Do not use other remotes to control your devices, or manually turn them on or off or change inputs. Harmony is unable to track changes that it does not make and will continue to assume your devices are in the state that it has left them in.
Use your smartphone as a remote control
If you have a supported mobile device, you can use an app on your smartphone to control your devices. The app is very similar to the touch screen on your Harmony Ultimate remote. Your smartphone will communicate with the Harmony Hub over Wi-Fi allowing the hub to control your devices. For more information about the Harmony App, see the Harmony Smart Control Manual.
Find out if your mobile device is supported.
Adjust the power on delay
If your TV does not go to the right input when starting an Activity from an everything-off state, or does not go to any input, try increasing the power on delay for your television. This feature is accessible in your remote's Settings menu and in your MyHarmony account. See the Delay settings section for more information.
Position the hub and set up hub assignments correctly for your setup
Traditional 'line of sight' required when operating most infrared remote controls is not required with Harmony Ultimate. The Harmony Hub and IR mini blasters send a strong infrared signal that can reflect off walls and other surfaces before reaching your devices.
Both the hub and IR mini blasters send strong IR signals and may control multiple devices within their range. Larger obstacles such as walls, bookshelves or doors may prevent the IR signals from reaching your devices. If this is the case, try repositioning your hub or IR mini blasters.
When used inside a cabinet, the hub or IR mini blasters can control all the devices within that cabinet. If your cabinet contains devices on multiple shelves that are isolated from one another, a hub or IR mini blaster may need to be positioned on each shelf. If it's not possible to reach a particular device with the hub or IR mini blasters then you can choose to control it using the IR emitters within the Harmony Ultimate remote itself. Devices that are configured to be controlled by the remote instead of the hub or IR mini blasters cannot be operated when using the accompanying Harmony App on your smartphone. You must also point your remote at these devices when starting an Activity or when you wish to control them. To set a device to be controlled by the remote:
- Tap the
![]() icon on the Harmony Ultimate remote.
icon on the Harmony Ultimate remote. - Tap Settings.
- Tap Devices.
- Tap Hub assignments.
- Select a device that you want to control using your Harmony Ultimate remote and not the hub or IR mini blasters.
- A menu of options for how to control the device is displayed.
- Select Remote only.
Once you have set up your remote like this, it will prompt you to keep your remote pointed at your devices until it is finished sending commands to your devices. Depending on your Activity, the Harmony Ultimate may send power commands to your devices very rapidly after the Activity is launched. Keeping the remote carefully pointed at your devices immediately after starting an Activity will help ensure the power and other commands reach your devices successfully.
The Harmony Hub and connected IR mini blasters will by default all send infrared commands to your devices.
The Hub assignments menu mentioned above can be used to specify which of the Harmony Hub or IR mini blasters should control specific devices, helping to optimize your system.
For example, if IR mini blaster 1 is placed inside your entertainment cabinet, assign all the devices in that cabinet (or on that specific shelf) to be controlled by IR mini blaster 1. Only that IR mini blaster will send infrared to those devices.
TIP: Devices controlled using the Harmony Ultimate remote and not the hub or IR mini blasters require that you keep the remote pointed at them when starting an Activity, sending commands, or using the Help feature.
Use the Help function to put the remote back in sync with devices
Sometimes Harmony becomes out of sync with your devices and confuses when they are on or off, or which input they are on. This occurs when there is an obstacle between the device and the IR transmitters in the hub, IR mini blaster, or remote; or if the devices are operated manually or by using their original remote control.
- Harmony Ultimate can run through a series of questions to help identify the issue and correct it. Tap the
![]() icon.
icon. - Select Help.
- Answer Yes or No to the questions on the screen.
Based on your answers, your remote re-sends the necessary commands to synchronize it with your devices.
![]() NOTE: If you use the Help feature frequently when powering on your devices or switching between Activities, then there may be changes that can be applied to correct this. The Help feature should not be necessary with a properly configured setup.
NOTE: If you use the Help feature frequently when powering on your devices or switching between Activities, then there may be changes that can be applied to correct this. The Help feature should not be necessary with a properly configured setup.
TIP: Before you use Help, make sure you take steps to address the problem: remove any obstacles from the line of sight between your remote and your system, and only use the remote when it is within range of your entertainment system.
For more information about using the on-remote Help feature, refer to the Harmony Ultimate On-Remote Help FAQ.
Use the Fix It Myself function to put the remote back in step with devices
Sometimes Harmony becomes out of sync with your devices and confuses when they are on or off, or which input they are on. This occurs when there is an obstacle between the IR transmitters in the hub, IR mini blaster or remote; or if the devices are operated manually or by using their original remote control. If you know what the problem is you may bypass the Help feature and directly fix it yourself.
- Tap the
![]() icon.
icon. - Select Fix it Myself.
- Select the device to fix.
- Tap the command you want the remote to send to the device.
Changing your Setup
Once you have completed the initial setup process on MyHarmony, you can make additional changes on MyHarmony, such as:
- adding or removing devices
- creating, updating, or deleting Activities
- managing Favorite Channels
- reordering screen commands
- changing the behavior of buttons
MyHarmony also allows advanced configuration changes such as:
- adjusting a device's power settings
- adjusting a device's input settings
- adjusting device delays
- fine tuning how Activities control your devices when they start and stop
Changing your setup with MyHarmony
Follow these steps to manage your remote setup on MyHarmony
- Login to your MyHarmony account. The Remote Gallery displays.
- Click the Harmony Ultimate image. If your remote is not connected to Wi-Fi, you will be prompted to connect your remote to your computer to ensure that any changes made on-remote are saved back to your MyHarmony account.
- Make the desired changes, then sync your remote.
Syncing your remote
After changing settings on MyHarmony, be sure to sync your remote. This will update the remote with any setup changes you have made. There are two ways to sync your remote:
- If your Harmony Ultimate is configured to your home's Wi-Fi network, you can wireless sync any changes made on MyHarmony with your remote without connecting it to your computer. To initiate a sync, tap the
![]() icon, tap Settings, and select Sync remote. The remote, hub, and Harmony App on your smartphone will automatically stay in sync with each other.
icon, tap Settings, and select Sync remote. The remote, hub, and Harmony App on your smartphone will automatically stay in sync with each other. - If your Harmony Ultimate is not configured to your home's Wi-Fi network you may still make changes on either the remote or on MyHarmony; however you must connect the remote to your computer to sync these changes. Connect your Harmony Ultimate remote using the supplied USB cable and click the Sync button in the upper right corner of the website.


Syncing your hub to MyHarmony
When connected to your home Wi-Fi network, the Harmony hub automatically synchronizes to any changes made on MyHarmony. No special sync procedure is required.
Adding or deleting Devices

Adding a Device
- Select the Devices tab on the left hand side of the screen.
- Click Add Device. The Add Device page displays.
- Carefully enter the manufacturer or brand of your device.
- Carefully enter the model number.
NOTE: Harmony will automatically correct for common errors such as zeros or ones being confused for the letters '0' or 'I' and will provide suggestions if the entered device cannot be found.
NOTE: Serial numbers found on your devices should not be entered as they are unique and cannot be used to identify the device you have. It is important to enter manufacturer and model information correctly because not doing so may cause devices to change to the wrong input, miss commands, or not function at all during Activities. - Add.
NOTE: After adding a new device to your account, be sure to associate it with an Activity.
Deleting a Device
- Select the device to delete.
- Click Delete This Device. The Delete Device confirmation displays.
- Click Delete to remove the device from your list.
Deleting a device will affect any Activity that was currently using this device. This Activity's settings will have to be reviewed and updated on MyHarmony before it can be used from your remote.
Modifying Device settings
You can also modify the way your Harmony Ultimate will control each of your devices. These topics are covered in the Settings menu section of this guide.
The remote does not track state changes in Device Mode. Do not power off any devices or change inputs while in Device Mode. Also, changes made to commands in Device Mode are not reflected in your Activities' command list. It is recommended to make command modifications directly within Activities instead of in Device Mode.
Adding or deleting Activities

Adding an Activity
- Select the Activities tab on the left hand side of the screen.
- Click Add Activity.
- Select the type of Activity to add. The choices available depend on the devices you have added. You can add more than one of each Activity type.
NOTE: Most Activities fit into one of the specific Activity types offered. The Custom Activity type is recommended only for home appliances. The Custom Activity does not provide Favorite Channels or require roles for the device being added. Button assignments may not correctly reflect what is expected for this Activity, but can be changed as described in How to map buttons to your remote. - Click Next.
- Enter a name for the Activity.
- Upload Icon to choose an icon from your system or accept the displayed icon. This icon will also be used to represent your Activity on your Harmony Ultimate.
- Click Next. The list of devices available for this Activity is displayed, with suggested devices checked.
- Review the device list and clear any check boxes for unneeded devices.
- Click the check the box for devices to add to this Activity.
- Click Next.
- Answer any questions about your Activity that MyHarmony asks.
- Choose the input(s) for your Activity.
- Review the settings for your Activity. The devices used are listed, along with the inputs and controls used.
- The devices that are not used are also shown at the bottom of the screen.
- Click Done.
Viewing Activity settings
- Click Activities. Your list of Activities displays.

- Select the Activity to view.
- Click View your settings. The Activity settings page displays.
- Click Change to go to the Change Activity Settings page or click Close.

Changing Activity settings
- Click Activities. Your list of Activities displays.

- Select the Activity to change settings.
- Change your settings. The Rename Activity page displays. This is the first page in the process for changing the Activity settings.
- Follow the instructions to change the remaining settings for the selected Activity.

Deleting an Activity
- Click Activities. Your list of Activities displays.

- Select the Activity to delete.
- Click Delete your Activity. The Delete Activity confirmation displays.
- Click Delete to remove the Activity from your list. Any changes made will be lost, such as Activity customizations and button assignments.

Managing your Favorites
This section describes how to manage your favorites from MyHarmony. For information about managing your favorites from the remote control, please refer to Managing your Favorites in the Using your Harmony Ultimate section.

Changing your location or channel provider
Selecting a new provider will reset all previously configured Favorite Channels.
If you move or change your TV channel provider, you will need to change those settings in your MyHarmony account. Harmony allows you to configure one service provider and associate that to one primary Watch TV Activity. To change your channel provider, follow these steps:
- Select the Favorites tab from the left hand side of the screen.
- Click Edit Your Service Provider:

- Follow the same steps performed during your first time setup to choose your location, TV provider and new Favorites.

Adding, modifying and reordering Favorites
To add, modify or reorder your Favorites:
- Select the Favorites tab from the left hand side of the screen.
- Click Edit Your Favorite Channels. The Set up Favorites page displays. Current Favorites are shown with a gold star in the first column.

- To add or remove a channel from your Favorites, click the gold star beside that channel so it is highlighted or grayed out. If the channel you want to add is not in the list, or is missing the icon or channel number, you can add it on the next screen by clicking Next.

- On the Select Your Favorite TV Channels screen, you can drag and drop your current Favorites into the exact order you want them to appear on your Harmony Ultimate. Here you can also drag a Favorite to the trash can icon to remove it from your remote.
- To add a Favorite Channel that does not appear in the list on the previous screen, select Add a Favorite Channel to manually enter the name and number for that channel. Optionally, you can upload an icon for that channel from your computer's file system:

- To modify the name, number or icon for a Favorite Channel, select it and click the Modify a Favorite Channel link. Enter the channel name and channel number. You can also choose a channel icon from your computer file system. Click Browse to select an image file.


TIP: you can also add, remove or reorder your Favorites directly on your Harmony Ultimate screen.
Personalizing your Remote
Customizing your background picture
The Harmony Ultimate remote comes with several choices of background images, or you can upload your own image using MyHarmony.
Choosing an alternate background image
- On your Harmony Ultimate remote, tap the Menu icon.
- Tap Settings, then tap Remote, then tap Background.

- Tap a picture to use as the background for the remote. After tapping, you're shown a preview and given the option to accept it or go back.

Uploading your own background image
- In MyHarmony, select the Settings tab on the left had side of the screen.
- Click Change Remote Background Image.

- Click the + over an available blank space under Custom Images.

- Click Browse.

- Choose an image to upload, then click Next. Your image appears in the Custom Images area and is highlighted for selection.

TIP: Select a darker colored photo so your Activity and Favorite Channel names are more easily seen. PNG, JPEG and JPG file formats under 5 MB in size are supported. The minimum required resolution is 240 x 320 pixels. - Click Done to choose the image you just uploaded.
- Sync your remote. Now your image is used as the background for the remote, and appears as a background option in the menus on the remote.


Customizing Activity icons
You can upload images to use as custom Activity icons. To upload and choose an image as an Activity icon, follow these steps:
- In MyHarmony, select the Activities tab on the left hand side of the screen.
- Select the Activity whose icon you want to change.
- Click Change your settings.
- Click Upload Icon.
- Choose an image to upload, then click Next.
- Continue to click Next to complete the Change an Activity action sequence.
- On the last screen, click Done. The icon for the Activity is replaced with your image.
Customizing Favorite Channel icons
When you choose a Favorite Channel from the list of channels offered by your provider, a default icon for that channel is provided. To choose a different icon for a channel, follow these steps:
- In MyHarmony, select the Favorites tab on the left had side of the screen.
- Click Edit Your Favorite Channels.
- Click Next.

- Click a channel icon. Use the scroll arrow to see more Favorites if the one you are looking for is not visible.
- Click Modify a Favorite Channel.

- Click Choose Image.
- Select an image and click Save. The icon for that channel is replaced with your image.
- Click Finish.
Remote Control Menus
The ![]() icon on your Harmony Ultimate remote screen opens the menu for the remote. The following sections describe the actions you can take using the menus on the remote.
icon on your Harmony Ultimate remote screen opens the menu for the remote. The following sections describe the actions you can take using the menus on the remote.
Help menu
If your remote becomes out of sync with your devices, tapping Help from the remote control menu causes the remote to attempt to fix this. First the remote control asks you questions to determine the current state of your system, and then it sends a signal to the devices to bring the remote back in sync with the devices. When the signals are complete, the remote asks you to confirm whether the problem was fixed. You can tap on Yes, No, or the down arrow to choose neither. If the remote control is not able to solve your problem, refer to the Troubleshooting section of this manual for additional assistance.
![]() NOTE: If you are using the Help feature frequently when powering on your devices or switching between Activities, then there may be changes that can be applied to correct this. The Help feature should not be necessary with a properly configured setup.
NOTE: If you are using the Help feature frequently when powering on your devices or switching between Activities, then there may be changes that can be applied to correct this. The Help feature should not be necessary with a properly configured setup.
Fix It Myself menu
If your remote becomes out of step with your devices and you know what the problem is and how to fix it, you can bypass some of the steps of the Help feature by choosing Fix it Myself.
Tapping Fix it Myself on the remote control menu opens a menu of devices that you can send commands to. Tap a device on the list to see what options are available for that device. You can tap any of those options, or tap < to exit that menu.
Devices menu
The Devices menu lists all devices you have added to your Harmony remote, regardless of whether or not they are in an Activity. Tap a device on the list to see what options are available for that device. You can tap any of those options, or tap < to exit that menu.
The remote does not track state changes in Device Mode. Do not power off any devices or change inputs while in Device Mode. Also, changes made to commands in Device Mode are not reflected in your Activities' command list. It is recommended to make command modifications directly within Activities instead of in Device Mode.
Settings menu
After completing the first time setup process, many settings can be changed on the remote that let you personalize your Harmony Ultimate or affect how it controls your entertainment system.

To access the Settings menu, tap the ![]() menu icon, then tap Settings.
menu icon, then tap Settings.
The following sections describe how you can adjust settings related to your remote, your Activities and your devices.
Remote
There are several features of your remote that you can customize to suit your preferences:
Remote lock
You can temporarily disable the remote so that you can clean it without accidentally turning on or off any devices. To lock the remote, tap Settings > Remote > Remote lock. Press and hold the physical Exit button on the remote control to unlock the remote control for use.
Background
Tap ![]() Settings > Remote > Background and use one of the standard background images that come with the Harmony Ultimate remote, or upload one of your own as described in Customizing your background picture.
Settings > Remote > Background and use one of the standard background images that come with the Harmony Ultimate remote, or upload one of your own as described in Customizing your background picture.
Brightness
Tap ![]() Settings > Remote > Timeout and use the sliding controls to brighten or dim the remote control screen and the button backlighting.
Settings > Remote > Timeout and use the sliding controls to brighten or dim the remote control screen and the button backlighting.
TIP: To extend remote battery time between charges, set the screen and backlight brightness to a lower value.
Timeout
Tap ![]() Settings > Remote > Timeout and use the sliding control to lengthen or shorten the time after which your remote screen goes dark.
Settings > Remote > Timeout and use the sliding control to lengthen or shorten the time after which your remote screen goes dark.
TIP: To extend remote battery time between charges, set the timeout to a lower value.
Set time
The remote control should automatically be set to the correct time. If for any reason you want to change the time on the remote, follow these steps:
- Tap
![]() Settings > Remote > Set time.
Settings > Remote > Set time. - Tap on the number you want to change.
- Use the slider to change the highlighted number.
![]()
- Tap Done.

To change from an AM/PM clock to a 24-hour clock, follow these steps:
- Tap
![]() Settings > Remote > Set time.
Settings > Remote > Set time. - Slide your finger across the switch to change the 24-hour clock from off to on.
![]()
- Tap Done.

Vibration
The remote vibrates to give you tactile feedback about when a tap, swipe, or other gesture (and in certain cases, a button press) has been recognized by the remote. You can choose a different type of vibration or turn off vibration altogether. To change the vibration setting, follow these steps:
- Tap
![]() Settings > Remote > Vibration.
Settings > Remote > Vibration. - Tap the vibration option you prefer.
- Tap < when your preferred vibration option is selected.
- Tap Done.
TIP: To extend remote battery time between charges, disable vibration.
Tilt sensor
The remote display lights up when the remote control is moved. To turn off this feature, follow these steps:
- Tap
![]() Settings > Remote > Tilt sensor.
Settings > Remote > Tilt sensor. - Slide your finger across the switch to change the tilt sensor from on to off.
![]()
- Tap Done.

You can turn the tilt sensor on again by following these steps and changing the switch to the off position.
Activities
Activity tutorial
The Activity tutorials run automatically the first time you start an Activity. Tutorials give you the opportunity to test your Activities and make changes to them if they are not working correctly. The specifics of the tutorial vary depending on which devices you have, but the following steps show how an example Watch TV tutorial might work. You can re-run the tutorial at any time:
- Make sure that all devices are turned off. Tutorials assume that all devices are off when they begin.
- Tap
![]() Settings > Activities > Activity tutorial.
Settings > Activities > Activity tutorial. - Tap Watch TV.
- Wait for the devices to turn on and for the TV to switch to the correct input.
- Tap Yes or No depending on whether everything worked correctly.
- If you tapped No, select the problem with the Activity and then follow the instructions to complete the tutorial.
If you are unable to fix the problem using the tutorial, you can exit the tutorial by tapping Yes, and then use MyHarmony to fix the problem. Refer to the Troubleshooting and Changing your Setup sections for more information.
Inputs
If the inputs change for one or more devices, you can change the Activity settings to match them.
- Tap Settings > Activities > Inputs.
- Tap an Activity.
- Tap a Device to change the input for.
- Tap the new input, then tap < to return to the device.
- Tap Done.
Startup screen
When you set up your Activities, a default startup screen was chosen based on what is usually best for that kind of Activity. If you would prefer a different startup screen to be shown when you start an Activity, you can change it by tapping Settings > Activities > Startup screen. The available startup screens vary depending on the Activity chosen. For example, you can choose between Favorites, gestures, commands, and numbers for the Watch TV Activity.
Set icons
When you set up your Activities, a default icon to represent the Activity on the remote control was chosen based on the type of Activity. If you would prefer a different icon for an Activity, you can change it by tapping Settings > Activities > Set icons.
TIP: You can also upload your own custom Activity icons by visiting MyHarmony. Refer to Customizing Activity icons for more information.
Devices
There are many customizable characteristics to each device, such as:
- how long they take to power on
- how quickly they respond to key presses
- how they switch between inputs
The most common device settings can be configured directly on your Harmony Ultimate remote or by using the accompanying Harmony App on your smartphone. More advanced settings require you to visit MyHarmony.
Delay settings
From the Delay Settings menu, you can change delays, reset the delays to their factory settings, or read these descriptions of the types of delays:
- Power on: The time your device needs to power on, warm up, and be ready to receive additional commands.
- Inter-key: The time your device needs before being ready to accept another command.
- Inter-device: The time your remote waits between sending commands to different devices within the same Activity.
- Input: The time your device needs to be ready to accept another command after switching inputs.
Change delays
The following types of delays can all be changed through the Change Delays menu:
- Power on: The time your device needs to power on, warm up, and be ready to receive additional commands. Tap
![]() > Settings > Devices > Delay Settings > Change Delays > (Device Name) > Power On and then use slider to set.
> Settings > Devices > Delay Settings > Change Delays > (Device Name) > Power On and then use slider to set.
![]()
- Inter-key: The time your device needs before being ready to accept another command. Tap
![]() > Settings > Devices > Delay Settings > Change Delays > (Device Name) > Inter-key and then use slider to set.
> Settings > Devices > Delay Settings > Change Delays > (Device Name) > Inter-key and then use slider to set. - Input: The time your device needs to be ready to accept another command after switching inputs. Tap
![]() > Settings > Devices > Delay Settings > Change Delays > (Device Name) > Input and then use slider to set.
> Settings > Devices > Delay Settings > Change Delays > (Device Name) > Input and then use slider to set. - Inter-device: The time your remote waits between sending commands to different devices within the same Activity. Tap
![]() > Settings > Devices > Delay Settings > Change Delays > (Device Name) > Inter-device and then use slider to set.
> Settings > Devices > Delay Settings > Change Delays > (Device Name) > Inter-device and then use slider to set.

Reset delays
Resets all delay times to their factory specifications.
Hub assignments
By default, IR signals are sent at the same time from the Harmony Hub and both IR mini blasters in order to control your equipment. This default works for the vast majority of configurations. If you have an advanced set up such as multiple televisions or multiple set top boxes that are of the same manufacturer, then you may need to isolate signals to only one IR mini blaster. To change this behavior:
- Tap
![]() > Settings > Devices > Hub assignments > (Device Name).
> Settings > Devices > Hub assignments > (Device Name). - Tap one of the options for controlling the device.
Refer to Position the hub and set up hub assignments correctly for your setup for more information about this feature.
General
The General menu:
- provides information about your remote and hub status
- displays your MyHarmony email ID
- allows you to factory reset your remote
- allows you to review our open source code license notices
About
- Model: Displays "Harmony Ultimate" which is this remote's model number.
- Firmware: The firmware numbers of the Harmony Ultimate remote and Harmony Hub should be the same. If your Harmony is configured on your home's Wi-Fi network you will be notified when a new firmware version is available. To view the most recent firmware versions visit: forums.logitech.com and search for "Release Notes".
- Wi-Fi Network: Notifies you if your Harmony is configured to your home's Wi-Fi network or if there are any connection problems.
- Hardware: Displays the hardware version number.
Account
Displays your MyHarmony email ID and the most recent time when your Harmony Ultimate was synced with your MyHarmony account.
Reset
Resets your remote to the original factory settings and removes any device or Activity information. Your account information on MyHarmony will remain intact.
If your remote is not behaving as expected, refer to the Troubleshooting section. If buttons are not behaving as expected, refer to Add missing commands to your Harmony Ultimate.
Legal notices
Tap ![]() > Settings > General > Legal Notices to read legal information relevant to the Harmony Ultimate remote control.
> Settings > General > Legal Notices to read legal information relevant to the Harmony Ultimate remote control.
Find hue bridge
Scans your network for a hue bridge and if it finds one, offers to pair your Harmony Ultimate with it. Refer to Controlling Phillips hue wireless lighting systems for more information.
Sync remote
Settings made directly on your Harmony Ultimate remote automatically sync with your MyHarmony account if your Harmony is configured to use your home's Wi-Fi network. Any configuration changes made on either your Harmony Ultimate remote or accompanying Harmony App for your smartphone also automatically stay in sync.
Changes made from MyHarmony must be manually synced with your Harmony Ultimate remote. If you are configured using Wi-Fi this can be done from either your remote or Harmony App by tapping ![]() > Settings > Sync remote. If your Harmony Ultimate is not configured on Wi-Fi, please connect the remote to your computer using the supplied USB cable and click Sync in the upper right corner after any changes are made on the website.
> Settings > Sync remote. If your Harmony Ultimate is not configured on Wi-Fi, please connect the remote to your computer using the supplied USB cable and click Sync in the upper right corner after any changes are made on the website.
Troubleshooting
Setup problems
Once you complete the setup process through MyHarmony, your Harmony Ultimate remote control should work properly to control your devices. Here are common troubleshooting tips. If you do not find the solution to your problem here, the Harmony Ultimate user community and online support articles can also help troubleshoot unique issues. Refer to the Support section for more information.
| Symptom | Possible Cause | Solution | See Also |
| I tap an Activity and one or more devices does not turn on | The remote is out of sync with your devices | Use Help or Activity tutorials to restore synchronization. | Harmony Ultimate On-Remote Help |
| By default all devices are assigned to the hub and blaster. If one or more of your devices needs to be controlled by the remote you will need to assign it to remote | Remove any physical obstructions or reposition the mini blasters and try again. If that doesn't solve the problem, use Help or Activity tutorials to restore synchronization. | Harmony Ultimate On-Remote Help Position the hub and set up hub assignments correctly for your setup | |
| The inter-device delay time is too short | Set the inter-device delay time to a longer interval. Refer to Change delays. | Harmony Ultimate doesn't switch between activities without using the Help feature | |
| My devices turn on but the wrong input is selected | The power on delay for your device is too short | Change the delay time using your remote or with MyHarmony | Change delays Harmony Ultimate activities do not work when first powering on devices |
| The wrong device information is being applied | Make sure you entered the correct brand and model numbers for your devices. | ||
| The wrong input was selected for that Activity during configuration | Correct the input settings using your remote by following the steps in the Activities section, or in MyHarmony by following the steps in Changing Activity | Changing the inputs of an activity on the Harmony Ultimate | |
| Device is not changing channels properly | The inter-key delay time is too short | Change the delay time using your remote or with MyHarmony as described in Harmony Ultimate sends commands slowly in activities | Change delays |
| Depending on the device, a different sequence of buttons may be required to change channels | Fix the channel tuning settings in MyHarmony:
| ||
| An Activity works when I select it as the first Activity when I power on my system, but not when I select it while I'm using another Activity | The inter-device delay time is too short or too long | Change the delay time using your remote or with MyHarmony as described in Harmony Ultimate doesn't switch between activities without using the Help feature | Change delays |
| I want to add a new Activity or change how an Activity is defined | Go to MyHarmony and follow the steps for Adding more Activities or Changing Activity. | ||
| The right devices turn on but the play/stop/other buttons don't operate the device. | Accurate device operation information was not available for your device | Follow the steps for Customizing buttons and on-screen commands | |
| One or more devices does not respond to the Harmony system | There is a physical obstruction between your remote and your hub | Remove any physical obstructions or change how your Hub assignments control your devices. | |
| One or more of your devices needs to be controlled by the Harmony remote, not the hub | Configure the remote to send IR (infrared) signals directly to devices:
Once you have set up your remote like this, the remote will prompt you to keep it pointed at your devices until it finishes sending commands. | ||
| There is electrical interference from Wi-Fi, Bluetooth, a microwave oven, a cordless telephone, or some other device. | Turn off power to possible sources of interference and try again. | ||
| The incorrect manufacturer or model number was entered for the device | Verify the manufacturer and model number to make sure it is correct in your Harmony setup. |
 icon on the remote.
Wi-Fi problems
If you are having trouble getting your Harmony Ultimate to communicate with your Wi-Fi network, please read the Harmony Ultimate Not Able to Connect to Wi-Fi FAQ.
Add missing commands to your Harmony Ultimate
If your remote control buttons are not working properly, you can teach functions to the buttons individually using MyHarmony. For more information, see Customizing buttons and on-screen commands.
Harmony Ultimate is not detected by my computer
If you've connected your Harmony Ultimate but it does not appear to be connected, try the following steps. After each step, try plugging in the device again.
- Ensure that the USB cable is plugged into your computer and into your Harmony Ultimate. While it will successfully be able to charge, the Harmony Ultimate will not be detected when connected to your computer through the charging cradle.
- Ensure that you are not connecting through a USB hub. If you are, connect the cable directly to a computer USB port.
- Unplug the USB cable from your computer, and plug it in again. Unplug the USB cable from your Harmony device, and plug it in again.
- Restart your remote by holding the Off button pressed for 15 seconds
- Completely close your browser, start your browser again, and return to MyHarmony.
- Plug the USB cable into a different USB port of your computer.
- Disable any anti-virus, firewall, or pop-up blocker programs.
- Restart your computer.
- Try using a different computer to connect the Harmony device.
Devices do not respond to Harmony Ultimate
There are a number of reasons why Harmony Ultimate may not be able to control your devices after setup. The latest information about solving this problem is available online in the support article Harmony Ultimate Activity not working.
Harmony Ultimate does not charge
The Harmony Ultimate displays a charging notification on its screen when placed in its charging cradle or connected to a computer. If you are unable to charge your Harmony Ultimate:
- Verify the cable is firmly connected to the charging cradle, and that the other side is securely connected to your wall outlet.
- Verify that neither side of the connectors or the body of the cable is damaged.
- Make sure the contacts on the remote and on the charging cradle are clean and free of any external substance such as dust.
- Restart your remote by holding the Off button pressed for 15 seconds.
Support
Chances are that if you're having an issue, other people are too. To see what the current support issues are, go to: http://forums.logitech.com/ and search for "harmony team". You will see articles posted by Harmony support team members in chronological order.
Find answers to questions online
Answers to many of your questions can be found either in Logitech's online knowledge base or in discussions in Logitech's user forums.
Logitech Harmony remote knowledge base
The knowledge base is a collection of articles written by our technical support group.
Visit our knowledgebase at http://www.logitech.com/support/universal-remotes.
Logitech Harmony remote user forum
If your question isn't answered in the knowledge base, Logitech's user forums are a valuable source of information. There our customers and our technical support staff discuss questions posed by users like you.
Visit the Harmony Remote User Forums at http://forums.logitech.com/t5/Harmony-Universal-Remotes/ctp/harmony_remote_controls.
Contact customer support:
Click the Support link in MyHarmony for a list of links to all available support options for your Harmony Ultimate remote control.
Copyright
© 2013 Logitech. All rights reserved. Logitech, the Logitech logo, and other Logitech marks are owned by Logitech and may be registered. All other trademarks are the property of their respective owners. Logitech assumes no responsibility for any errors that may appear in this manual. Information contained herein is subject to change without notice.

Documents / Resources
References
Download manual
Here you can download full pdf version of manual, it may contain additional safety instructions, warranty information, FCC rules, etc.
Download Logitech Harmony Ultimate - All in One Remote Manual
Advertisement
Thank you! Your question has been received!


Need Assistance?
Do you have a question about the Harmony Ultimate that isn't answered in the manual? Leave your question here.