Table of Contents
Advertisement
Owner's Manual
42" HIGH PERFORMANCE
LAWNSWEEPER
Model No. 486.242112
CAUTION:
Before using this product, read this
manual and follow all Safety Rules
and Operating Instructions.
IMPORTANT - READ THIS FIRST!!!
For Missing Parts or Assembly Questions
Please Call 866-576-8388
Mon.-Fri. 7 am - 5 pm CST.
FAX 217-728-2032 or e-mail info@agri-fab.com
Missing parts will be sent UPS in 24 hours directly to your home.
Sears, Roebuck and Co., Hoffman Estates, IL 60179 U.S.A.
www.sears.com/craftsman
PRINTED IN U.S.A.
®
info@agri-fab.com
• Safety
• Assembly
• Operation
• Maintenance
• Parts
FORM NO. 49535 (REV. 1/05)
Advertisement
Table of Contents

Related Manuals for Craftsman 486.242112


Summary of Contents for Craftsman 486.242112
-
Page 1: Safety Rules
42" HIGH PERFORMANCE LAWNSWEEPER Model No. 486.242112 CAUTION: Before using this product, read this manual and follow all Safety Rules and Operating Instructions. IMPORTANT - READ THIS FIRST!!! For Missing Parts or Assembly Questions Please Call 866-576-8388 Mon.-Fri. 7 am - 5 pm CST. -
Page 2: Table Of Contents
Hopper Assembly Instructions ... 7 Operation ... 11 LIMITED TWO YEAR WARRANTY ON CRAFTSMAN LAWNSWEEPER For two years from the date of purchase, when this Lawnsweeper is maintained and lubricated according to the operating and maintenance instructions in the owner's manual, Sears will repair free of charge any defect in material or workmanship. -
Page 3: Full Size Hardware Chart
HARDWARE PACKAGE CONTENTS REF. REF. REF. QTY. QTY. QTY. DESCRIPTION DESCRIPTION DESCRIPTION Hex Bolt, 5/16-18 x 3" Lg. Hex Bolt, 5/16-18 x 3" Lg. Hex Bolt, 5/16-18 x 3" Lg. Hex Bolt, 5/16-18 x 2-1/2" Lg. Hex Bolt, 5/16-18 x 2-1/2" Lg. Hex Bolt, 5/16-18 x 2-1/2"... -
Page 4: Carton Contents
CARTON CONTENTS (Loose Parts in Carton) 1. Sweeper Housing Assembly 2. Bag Arm Tube (2) 3. Hitch Tube, L.H. (Left Hand) 4. Hitch Bracket Assembly 5. Hitch Bracket, Bent 6. Height Adjustment Strap 7. Height Adjustment Handle 8. Hitch Tube, R.H. (Right Hand) CARTON CONTENTS TOOLS REQUIRED FOR ASSEMBLY (1) Pliers... -
Page 5: Sweeper Assembly Instructions
STEP 2 - ASSEMBLE HITCH TUBES • The hitch tubes are stamped with a "77L" for the left tube and a "76R" for the right tube. The sweeper housing is marked with and "L" on the left with side and an "R" on the right side. See fi gure 1. •... - Page 6 At this time tighten the four bolts in fi gure 1 that • fasten the hitch tubes to the sweeper housing. Next, tighten the two bolts in fi gure 2 that fasten the ends of the hitch tubes together. Finally, tighten the two bolts in fi...
-
Page 7: Hopper Assembly Instructions
Unfold the hopper bag, reverse the fold of the mesh wind screen and then lay the bag out fl at with the wind screen on top and the Craftsman logo facing down. • Insert the ends of the assembled upper hopper tubes... - Page 8 • Insert the bag frame strap into the stitched sleeve at the front edge of the bag bottom. See fi gure 11. BAG FRAME STRAP STITCHED SLEEVE FIGURE 11 • Assemble the bag frame strap to the holes in the lower hopper tubes using two clevis pins (N) and hair cotter pins (L).
- Page 9 • Slide the hopper bag pivot rod through the upper hole in the upper hopper tubes and through the stitched sleeve at the front edge of the mesh wind screen, assembling a bag arm tube on each side as shown in fi...
- Page 10 • Place the tractor and sweeper on a fl at level surface. • Set the sweeper height adjustment handle to about the middle of its adjustment range. • Attach the sweeper hitch to the tractor hitch, arranging the 3/4" spacers in one of six possible combinations as shown in GROUP A and GROUP B diagrams below.
-
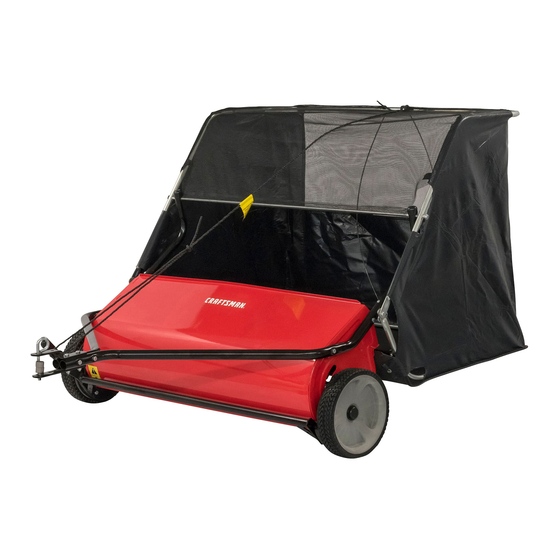
Page 11: Operation
KNOW YOUR SWEEPER HOPPER BAG Hopper Bag Collects grass clippings, leaves and debris. Hopper Rope Permits dumping of hopper bag from driver's seat. Windscreen Helps prevent collected material from being blown out of hopper bag. Bag Arm Tubes Connects the hopper bag to the sweeper housing. Pivot Rod Allows hopper bag to tilt forward to dump material. -
Page 12: Maintenance Schedule
CUSTOMER RESPONSIBILITIES • Read and follow the maintenance schedule and the procedures listed in the maintenance section. MAINTENANCE SCHEDULE MAINTENANCE SCHEDULE Fill in dates as you complete regular service. complete regular service. Check for loose fasteners Check for loose fasteners Check for loose fasteners Check for worn or damaged parts Check for worn or damaged parts... -
Page 13: Service And Adjustments
BRUSH REPLACEMENT NOTE: Brush replacement should be done one brush at a time. • Remove the hopper bag from the sweeper. • Loosen the hex bolts and lock nuts on two single brush retainers which clamp one brush to the double brush retainers. -
Page 14: Repair Parts Illustration
REPAIR PARTS FOR MODEL 486.242112 - 42" HIGH PERFORMANCE LAWNSWEEPER PARTS... -
Page 15: Repair Parts List
REPAIR PARTS LIST FOR MODEL 486.242112 - 42" HIGH PERFORMANCE LAWNSWEEPER REF. REF. REF. REF. PART PART PART PART QTY. QTY. QTY. QTY. DESCRIPTION DESCRIPTION DESCRIPTION DESCRIPTION 46776 46776 46776 46776 46776 Hitch Tube, R.H. Hitch Tube, R.H. Hitch Tube, R.H. - Page 16 Get it fixed, at your home or ours! For repair of major brand appliances in your own home… no matter who made it, no matter who sold it! 1-800-4-MY-HOME Anytime, day or night (1-800-469-4663) www.sears.com To bring in products such as vacuums, lawn equipment and electronics for repair, call for the location of your nearest Sears Parts &...