Table of Contents
Advertisement
Owner's Manual
I CRAFTSHAN I
46"- 2 STAGE SNOW THROWER
TRACTO R ATTAC HM E NT
Model No. 486.248462
CAUTION:
Before using this product, read
this manual and follow all
Safety Rules and
Operating
Instructions.
• Safety
• Assembly
• Operation
• Maintenance
• Parts
IMPORTANT
- READ
THIS
FIRST!!!
For Missing Parts or Assembly
Questions
Please Call 217-726-6366
Mon.-Fri.
7 am - 5 pm CST.
FAX 217-726-2032
or e-mail info@agri-fab.com
Missing parts will be sent UPS in 24 hours directly to your home.
Sears,
Roebuck
and Co.,
Hoffman
Estates,
IL 60179
U.S.A.
www.sears.com/craftsman
PRINTED IN U.S.A.
FORM NO. 48568 (REV. 10/02)
Advertisement
Table of Contents

Related Manuals for Craftsman 486.248462


Summary of Contents for Craftsman 486.248462
- Page 1 Owner's Manual I CRAFTSHAN I 46"- 2 STAGE SNOW THROWER TRACTO R ATTAC HM E NT Model No. 486.248462 CAUTION: Before using this product, read this manual and follow all Safety Rules and Operating Instructions. IMPORTANT - READ THIS For Missing Parts or Assembly Please Call 217-726-6366 Mon.-Fri.
- Page 2 SLOPE GUIDE ... PARTS ORDERING/SERVICE ON 46" 2-STAGE SNOW THROWER They are also available at most Sears retail outlets TIRE CHAINS MODEL NUMBER: SERIAL NUMBER: DATE OF PURCHASE: ... 18,20 19,21 ... Back Page DRIFT CUTTER BARS KIT NO. 71-52050 486.248462...
- Page 3 Any power equipment can cause injury if operated the equipment. Exercise caution • Read this owner's manual carefully to operate your snow thrower and how to stop the unit and disengage the controls quickly. • Never allow children to operate the equipment. •...
- Page 4 Two shear bolts (R) and hex lock nuts (S) are provided as replacement parts for the spiral augers. Store in a safe place until needed. (See page 16.) REF. QTY. DESCRIPTION Hex Bolt, 3/8" x 1-1/2" Hex Bolt, 3/8" x 1" Hex Bolt, 5/16"...
- Page 5 CARTON CONTENTS Frame Bracket, R.H. Frame Bracket, L.H. Hanger Bracket, L.H. Hanger Bracket, R.H. Side Plate, L.H. Side Plate, R.H. Cross Brace Plastic Weight Keg Weight Tray Side Brace Arms (2) Chute Crank Assembly Lift Handle with Cable Clutch/Idler Drive "V" Belt Auger "V"...
- Page 6 TOOLS REQUIRED FOR ASSEMBLY 7/16" Wrenches 1/2" Wrenches 9/16" Wrenches 5/8" Wrench or Adjustable Wrench 11/16" Wrench or Adjustable Wrench 3/4" Wrench or Adjustable Wrench Knife General Purpose Grease REMOVAL OF PARTS FROM CARTON • Remove all parts and hardware packages from the carton.
- Page 7 • Remove the mower stop bracket and its two bolts and nuts from the R.H. side of the tractor frame as shown in figure 3. • If the tractor has a muffler guard at the front of the R.H. foot rest, remove the bottom bolt and nut, and the washer which is located between the guard and the tractor frame.
- Page 8 ATTACHING CLUTCH/IDLER IF YOUR MOWER DECK SIZE IS OTHER THAN 48" • Before attaching the clutch idler assembly to the tractor, measure the outer diameter of the tractor's engine pulley. If the diameter of the pulley is less than 6", move the 3/32" hairpin clip in the L.H. adjusting chain from link #8 to link #5.
- Page 9 Remove the nylon tie which fastens the chute crank rod to the crank support tube. Assemble the crank support tube (flat side) to the two brackets on the left side of the thrower housing using two 3/8" x 1-1/2" hex bolts, 3/8" lock washers and 3/8"...
- Page 10 MOUNTING SNOW THROWER NOTE: The help of another person may be required to mount the snow thrower to the front of the tractor. • Place the tractor and snow thrower on a flat, level surface. • Remove the plastic tie from the auger belt and extend the belt out behind the snow thrower, making sure the belt remains assembled the top of the large auger drive pulley and passing...
- Page 11 AUGER BELT • Make sure the auger belt is correctly assembled the snow thrower. The belt must pass over the top of the auger pulley and then twist 1/4 turn to pass underneath the two side idler pulleys on the snow thrower.
- Page 12 ATTACHING WEIGHT TRAY TO TRACTOR • Loosen the two hex bolts and nuts which fasten the top of the tractor drawbar to the rear of the tractor frame. See figure 19. • Assemble the notched end of the side brace arms down onto both loosened bolts.
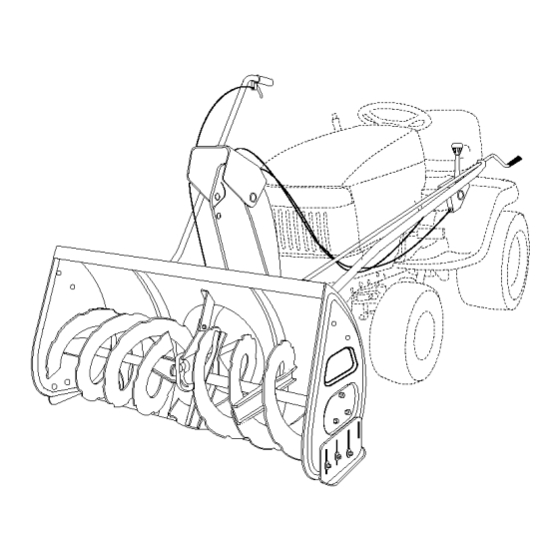
- Page 13 KNOW YOUR SNOW THROWER Read this owner's manual and safety rules before operating your snow thrower. Compare the illustration below with your snow thrower to familiarize yourself with the various controls and their locations. LIFT HANDLE UPPER CHUTE LOWER CHUTE SCRAPER PLATE SPIRAL AUGERS,...
- Page 14 HOW TO USE YOUR SNOW THROWER & CAUTION: Never direct discharge towards bystanders allow anyone in front of unit. CONTROLLING SNOW DISCHARGE • To control the direction snow is thrown, the dis- charge chute has 180 degrees of rotation. Turn the crank rod clockwise to rotate the chute to the right.
- Page 15 CUSTOMER RESPONSIBILITIES • Read and follow the maintenance MAINTENANCE SCHEDULE Fill in dates as you complete regular service. Check for loose fasteners Check belts for wear Check scraper and shoes for wear Cleaninq Lubrication Section CHECK LOOSE FASTENERS • Before each use make a thorough visual check of the snow thrower for any bolts and nuts which may have loosened.
- Page 16 CAUTION: Before servicing or adjusting & the snow thrower, shut off the engine, remove the spark plug wire(s), set the parking brake and remove the key from the tractor ignition. REPLACING AUGER BELT • Raise the snow thrower to the transport •...
- Page 17 STORAGE RECOMMENDATIONS • Lower the snow thrower to the ground and remove it from the tractor. • Clean the snow thrower thoroughly. salt deposits which may have dried on the thrower and housing. • Any bare metal that has become exposed should be painted or coated with a light oil to prevent rust.
-
Page 18: Repair Parts
REPAIR PARTS FOR MODEL 47 _ 14 20 39 38 486.248462 .110 8_7__._ _. 109 46" SNOW THROWER "7 .. 38... - Page 19 Chute Control Cable 746-0929 Chute Control Cable w/Clip 43085 Hex Bolt, 5/16-18 x 1-1/2" 710-0896 Hex Screw, 1/4-14 x 5/8" 741-0475 Plastic Bushing, 3/8" 486.248462 46" SNOW REF. PART QTY. 684-0061 Chute Crank Assembly U-Joint 784-5149 Roll Pin, 1/8" x 5/8"...
- Page 20 REPAIR PARTS FOR MODEL 486.248462 52 51 46" SNOW THROWER ,...,20...
- Page 21 Cotter Pin, 1/8" x 1" 47066 Attachment Pin 43343 Hair Cotter Pin, 1/8" #4 603-0302 Chute Tilt Bracket Assembly 784-5604 Chute Tilt Handle 720-0232 Knob 486.248462 46" SNOW REF. PART QTY. 46957 Chute Crank Rod 720-0201A Knob, Crank 44917 Palnut, 3/8"...
- Page 22 NOTES...
- Page 23 & CAUTION: DO NOT OPERATE YOUR TRACTOR AND SNOW THROWER ON A SLOPE IN EXCESS OF 10 DEGREES. BE SURE OF YOUR TRACTOR'S TOWING AND BRAKING CAPABILITIES OPERATING ON A SLOPE, AVOID ANY SUDDEN TURNS OR MA- NEUVERS WHILE ON A SLOPE. =-_.
- Page 24 1"800"4"MY'HOMESM(1-800-469-4663)www.sears.comAny To bring in products such as vacuums, lawn equipment and electronics for repair, call for the location of your nearest Sears Parts & Repair Center. 1-800-488-1222 For the replacement that you need to do-it-yourself, 1-800-366-PART To purchase or inquire about a Sears Service Agreement: ©...