LG LP0820WSR, LP1020WSR, LP1220GSR, LP1420BSR, LP1420BHR - PORTABLE AIR CONDITIONER Manual
- Owner's manual (26 pages) ,
- Owner's manual (32 pages)
Advertisement
- 1 PRODUCT OVERVIEW
-
2
INSTALLATION
- 2.1 Electrical Information
- 2.2 Before Installing the Air Conditioner
- 2.3 Wireless Remote Control
- 2.4 Contents of Installation Kit
- 2.5 Selection of Installation Location
- 2.6 Assembling the Flexible Vent Hose Set
- 2.7 Attaching the Flexible Vent Hose Set
- 2.8 Window Vent Panel and Extensions
- 2.9 Installing Vent Panels
- 2.10 Drain Hose Installation for Heating (On Some Models)
- 2.11 Garden Hose Installation for Dehumidifying (Dry Mode Only)
- 3 OPERATION
- 4 MAINTENANCE
- 5 TROUBLESHOOTING
- 6 SAFETY INSTRUCTIONS
- 7 Documents / Resources
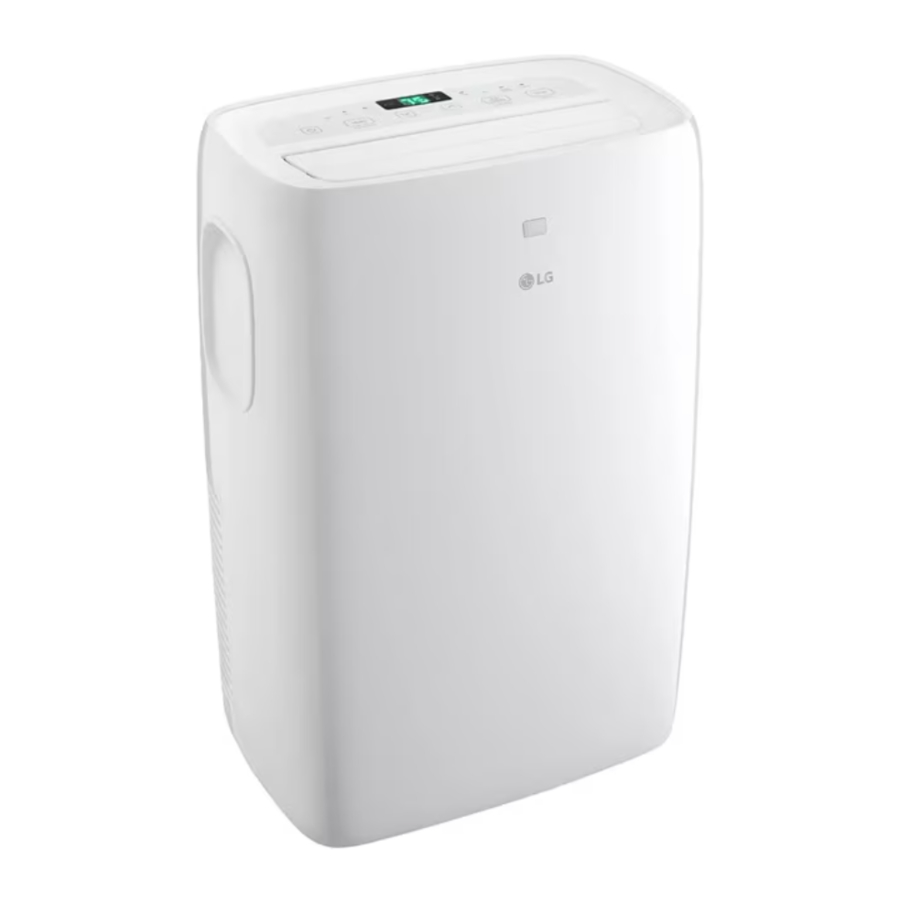
PRODUCT OVERVIEW
Key Parts and Components

- AIR DISCHARGE
The adjustable louvered air discharge opens automatically when the air conditioner is turned on, and closes when it is turned off. It can also be set to oscillate to distribute air more evenly through the room. - CONTROL PANEL AND DISPLAY
Easy-to-read digital display shows the set temperature, and indicator lights show the operating mode. Simple push buttons make changing settings quick and easy. - SWIVELING CASTERS
Swiveling casters allow you to move the air conditioner easily on most floor surfaces. - INTEGRATED HANDLES
Integrated handles provide a convenient grip when iting the air conditioner. - WIRELESS REMOTE CONTROL
The remote control allows you to adjust the temperature and operate most functions of the air conditioner from across the room. - BOTTOM DRAIN PORT
Before moving the air conditioner, drain the internal water in the collection tank completely using the bottom drain port. - CONTINUOUS DRAIN PORT
Connect a garden hose for continuous drainage when running the air conditioner in Dry mode. - PUMP DRAIN PORT (On Some Models)
Connect the provided pump drain hose for drainage when running the air conditioner in Heat mode. - AIR FILTER
- HOSE AND DIFFUSER
Use the diffuser and hose to connect the air conditioner to the window installation kit to vent exhaust air outside. - PUMP DRAIN HOSE (On Some Models)
Connect to the pump drain port for pump drainage when running the air conditioner in Heat mode. See Drain Hose Installation for Heating.
 NOTE: Features may change depending on model.
INSTALLATION
Electrical Information

- This appliance should be installed in accordance with the National Electrical Code.
- Use of extension cords could cause serious injury or death.
- Do not use an extension cord with this portable air conditioner.
- Do not use surge protectors or multi-outlet adapters with this portable air conditioner.
- Never push the TEST button during operation. Doing so can damage the plug.
- Do not remove, modify, or immerse this plug. If this device trips, the cause should be corrected before further use.
Power cord may include a current interrupter device. TEST and RESET buttons are provided on the plug case. The device should be tested on a periodic basis by first pressing the TEST button and then the RESET button. If the TEST button does not trip or if the RESET button will not stay engaged, discontinue use of the air conditioner and contact a qualified service technician.
for 120 V

| Use Wall Receptacle | Power Supply |
| Standard 120V, 3-wire grounding receptacle rated 15A / 120 VAC / 60 Hz | Use 15 A, time-delay fuse or 15 A circuit breaker. |

- The conductors inside this cord are surrounded by shields, which monitor leakage current. These shields are not grounded. Periodically examine the cordfor any damage. Do not use this product in the event the shields become exposed.
Avoid shock hazard. This unit cannot be user-serviced. Do not open the tamper-resistant sealed portion. All warranties and performance will be voided. This unit is not intended to be used as an ON/OFF switch.
Before Installing the Air Conditioner
PREPARING FOR OPERATION
Refer to the Installation Instructions included in this manual before using the air conditioner. Once the air conditioner has been property assembled and installed:
- Pius the power cord into its own dedicated property grounded outlet. Do not plug ather appliances into the same out.
Doing 3 could overload the outlet and create a fre hazard. - Make sure tho air conditioner and cord are positioned where they do not create a tripping hazard and will receive adequate ventilation. Do not place the appliance near furniture or objects that could block the vent openings.
- Make sure that any items that could be blown over or damaged by the afow from the fan are out ofthe airflow path.

- Do not remain in the direct airflow from the air conditioner for extended periods of time.
- When used at the same time as stoves, fireplaces, and other combustion devices, make sure there is a sufficient flow of fresh air into the room. Do not use in tightly enclosed spaces with these types of devices.
- This air conditioner is intended for household use as a consumer comfort appliance. Do not use it as a precision climate control system, or for purposes such as cooling precision equipment, food, pets, plants, artwork, etc.
Such items could be damaged. - Do not bend the hose downward when window installation kit is not applied. It may cause failure of air conditioner or performance deterioration.
UNPACKING THE AIR CONDITIONER
Remove and store packing materials for reuse.
Remove any shipping tape before using the air conditioner. If the tape leaves behind any adhesive, rub a small amount of liquid dish soap onto it and wipe with a damp cloth. Do NOT use sharp instruments, alcohol, thinners, or abrasive cleaners to remove adhesive. They could damage the finish.
Wireless Remote Control
Inserting Batteries
If the display screen of the remote control begins to fade, replace the batteries. Insert AAA (1.5 V) batteries before using the remote control.
- Remove the cover on the back of the remote control.
![]()
- Insert the new batteries and make sure that the + and - terminals of the batteries are installed correctly.
![]()


NOTE
- New batteries are supplied with the air conditioner for use in the remote control.
- Do not use a rechargeable battery. Make sure that the battery is new.
- In order to prevent discharge, remove the battery from the remote control if the air conditioner is not going to be used for an extended period of time.
- Keep the remote control away from extremely hot or humid places.
- To maintain optimal operation of the remote control, the remote sensor should not be exposed to direct sunlight.
- The remote control will not work properly if the unit is exposed to direct light or there is any obstacle between the unit and the remote controller.
Contents of Installation Kit

Selection of Installation Location

- Place the unit on a level floor.
- For best performance, allow at least 20" of air space on all sides of the unit for good air circulation.
- Place the unit near a window. The hose and diffuser will be used to connect the air conditioner to the window installation kit to vent exhaust air outside.
NOTE
The length of the flexible vent hose is specially designed according to the specification of this product. Do not replace or extend it with a hose that is not specifically designed for use with this product as this could cause malfunction.
Assembling the Flexible Vent Hose Set

- Pull evenly on the folds to extend one end of the flexible vent hose.
- Insert the mounting bracket on to the end of the vent hose, aligning the mounting bracket threads with the notch on the flexible vent hose.
- Turn the mounting bracket counterclockwise though 5 rotations or until the flexible vent hose is firmly attached.
- Repeat the process to attach the diffuser to the other end of the flexible vent hose.
Attaching the Flexible Vent Hose Set
Insert the mounting bracket and rotate it to lock it in place.

Window Vent Panel and Extensions
The window installation kit allows you to install the air conditioner in most vertical-sliding windows 18' to 50' wide, or horizontal-sliding windows from 18' to 50' high.
| Panel / Window opening | A 18' | B 9' | C 17' | D 17' | Fig. |
| 18' | √ | a | |||
| 19' - 26' | √ | √ | b | ||
| 27' - 34' | √ | √ | c | ||
| 35' - 50' | √ | √ | √ | d |
Window Installation Kit
(Includes 1 window vent panel and 3 extension panels)

1 Window Vent Panel
3 Extension Panels
- Select the panels required based on the window opening, as shown above.
- For longer window openings, assemble and adjust the panels to fit the window opening. Use type A screws (included) to fix the panels together at the proper length.

Fig. a
For an 18' window opening, use the window vent panel (Panel A) by itself.

Fig. b
For window openings from 19' to 25', use the window vent panel (Panel A) and extension Panel B.

Fig. c
For window openings from 27' to 34', use the window vent panel (Panel A) and extension Panel D.

Fig. d
For window openings from 35' to 50', use the window vent panel (Panel A) and extension Panel C and Panel D.
Installing Vent Panels
- Attach the long adhesive foam weather seals to the top and bottom sides of the window vent panel assembly. Attach the short foam weather seals to the right and left sides of the panel assembly.
(Attaching the foam weather seals to the panel assembly rather than the window sash and frame makes for easier cleanup when removing the panel assembly.)

- Insert the panel assembly in the bottom sash channel. Use care when installing the assembly, which will now fit very tightly in the opening. Close the sash tightly against the top of the panel assembly.
![]()
- If needed, install the included security bracket with type B screws.

- Measure and cut the included non-adhesive foam to fit the window opening. Stuff it between the window sashes to prevent air and insects from getting into the room.
![]()
- Align the tabs on the diffuser with the slots in the vent panel. Insert the diffuser into the opening in the vent panel and slide the diffuser all the way over to lock the tabs in place. Position the diffuser with the round opening above the bottom of the vent panel to avoid interference from the window sill.

- Insert the type C screw in the hole in the diffuser to prevent the diffuser from sliding out of the vent opening. If the diffuser is positioned correctly, the screw should just clear the edge of the opening in the vent panel. You should not have to drill through the vent panel.
![]()


NOTE
- For a tighter seal, use "no residue" duct tape (not provided) to seal any gaps around the installed panel assembly, around the diffuser, and between the sashes.
- For best results, keep the vent hose as short and straight as possible.

Best positioning
However, shape the diffuser end of the vent hose into an inverted U shape just inside the window to allow any rain or condensation to drain out the window.

Inverted U shape


Drain Hose Installation for Heating (On Some Models)
- If you use the Heat mode, you must install the drain hose. If only the Cool mode is used, the drain hose is not needed.
- If the outside temperature is at or near freezing 32°F (0°C) follow the indoor drainage instructions.
- When the weather is above freezing, the unit can be set up to drain to the outside. Make sure the outlet of the hose is aimed away from nearby surfaces that could be stained or damaged by the draining water.
Indoor Drainage

- To attach the drain hose, insert the connector into the pump drain port at the back of the unit until it snaps into place.
- Place the other end of the drain hose in a bucket that holds at least 28 ounces. Remember to check and empty the bucket frequently to avoid overflows.
- To detach the drain hose from the product, push the outer ring of the pump drain port in and pull the connector out.
NOTE
- Inserting the drain hose into the unit will automatically activate the drain function.
Outdoor Drainage

- To attach the drain hose, insert the connector into the pump drain port at the back of the unit until it snaps into place.
- Unscrew the nut at the bottom of the locking nut. Insert the locking nut into the hole in the front of the window vent panel and reassemble the nut. Unscrew the top part of the locking nut until you can easily insert the drain hose through the opening.
- Make sure to insert the drain hose at least 8 inches (20 cm).
- Turn the top of the locking nut to tighten it and secure the drain hose in place.
- To detach the drain hose from the product, push the outer ring of the pump drain port in and pull the connector out.
NOTE
- Inserting the drain hose in the unit will automatically activate the drain function.
Garden Hose Installation for Dehumidifying (Dry Mode Only)
- Remove the drain plug when using the Dry (dehumidifying) mode.
- Install a 1/2" (12.7 mm) inside diameter garden hose (not provided) into the continuous drain port and place the open end of the hose over a floor drain or bucket.


NOTE
- Install the garden hose when you need dehumidification in high humidity.
- This product has a self-evaporative system. The condensing water will be recycled to cool the condenser. This not only improves cooling efficiency, but also saves energy for you.
OPERATION
Control Panel and Remote Control


- Power (
![]() )
)
Turns the air conditioner on and off.
A chime sounds to confirm you have turned it on or off. - Mode
Press this button repeatedly to toggle through and select the operating mode. Modes include Cool, Dry (dehumidify), Fan, and Heat. An LED illuminates to indicate the selected mode. The default mode is Cool.
Cool (![]() )
)
Compressor runs and cools the room. Use the![]() /
/![]() and Fan Speed buttons to set the desired temperature and fan speed
and Fan Speed buttons to set the desired temperature and fan speed
Dry (![]() )
)
Use the Dry mode to remove humidity from the room without additional cooling. The fan speed is preset and cannot be adjusted
Fan (![]() )
)
Fan circulates air but compressor does not run. Use the Fan Speed button to set the desired fan speed to either High or Low
Heat (![]() )
)
Compressor runs and heats the room. Use the![]() /
/![]() and Fan Speed buttons to set the desired temperature and fan speed.
and Fan Speed buttons to set the desired temperature and fan speed.
 )
) )
) /
/ and Fan Speed buttons to set the desired temperature and fan speed
 )
) )
) )
) NOTE:
To protect the compressor, the fan and compressor may stop for a short time if you switch modes from Cool to Heat or vice versa.
NOTE:
- Available functions may vary by model.
- The number and location of LEDs on the control panel may vary by model.
- Temperature Control
![]() /
/![]()
In Cool, Dry and Heat mode, the![]() /
/![]() buttons adjust the set temperature up to 86°F (30°C) or down to 60°F (16°C), in one-degree increments.
buttons adjust the set temperature up to 86°F (30°C) or down to 60°F (16°C), in one-degree increments.
![warning]() NOTE: To switch the temperature units on the display between Fahrenheit (°F) and Celsius (°C), press and hold the
NOTE: To switch the temperature units on the display between Fahrenheit (°F) and Celsius (°C), press and hold the ![]() and
and ![]() buttons on the control panel at the same time for 5 seconds.
buttons on the control panel at the same time for 5 seconds.
- Fan Speed
Press repeatedly to toggle the fan speed between High and Low settings. An LED illuminates to indicate the selected fan speed. The fan speed can be changed in the Cool, Fan, and Heat modes. The fan speed is preset in the Dry mode. After pressing the button, there is a brief delay before the fan motor changes speed.
![warning]() NOTE: Press and hold the Fan Speed button on the control panel for 3 seconds to set Auto Swing.
NOTE: Press and hold the Fan Speed button on the control panel for 3 seconds to set Auto Swing.
- Timer
Delay ON - When the air conditioner is off, set it to automatically turn on from 1 to 24 hours later, at its previous mode and fan settings.
Delay OFF - When the air conditioner is on, set it to automatically turn off from 1 to 24 hours later.
![warning]() NOTE:
NOTE: - Each press of the Timer button advances the timer by 1 hour. Once you have finished setting the Delay OFF Timer, the display returns to the temperature setting after a short delay.
- To cancel the Timer function, press the Timer button on control panel.
- Auto Swing
This function automatically moves the louvers to adjust the direction of the air flow. Press the Auto Swing button repeatedly to select the desired direction.
![warning]() NOTE: To switch the temperature units on the display between Fahrenheit (°F) and Celsius (°C), press and hold the Swing button on the remote control for 5 seconds.
NOTE: To switch the temperature units on the display between Fahrenheit (°F) and Celsius (°C), press and hold the Swing button on the remote control for 5 seconds.
- Light
Sets the display screen brightness:
![]()
![warning]() NOTE: Press and hold the Timer button on the control panel for 3 seconds to adjust the brightness.
NOTE: Press and hold the Timer button on the control panel for 3 seconds to adjust the brightness.
- Clean Filter
The Clean Filter LED lights up to notify you that the filter needs to be cleaned. After cleaning the filter, press and hold the Mode button on the control panel for 3 seconds to turn off the Clean Filter light.
![warning]() NOTE:
NOTE: - The filter reset must be done using the control panel, not the remote control.
- This feature is a reminder to clean the air filter for more efficient operation. The LED light turns on after 250 hours of operation.

MAINTENANCE
Before cleaning or performing maintenance, unplug the product and wait until the fan stops.
Emptying the Water Collection Tank
When the internal water collection tank is full, the LED display will show FL and the air conditioner will turn off until the tank is emptied.
- Unplug the air conditioner, disconnect the exhaust hose from the back, and move the air conditioner to a suitable drain location or outdoors. You may also place a pan under the drain that will hold up to 2 pints of water.
- Remove the drain cap from the bottom drain outlet.
- Once the water collection tank is drained, reinstall the drain cap, making sure it is on securely.
- Place the air conditioner in the desired location, reconnect the exhaust hose, and plug in the air conditioner.
![]()

Cleaning the Case
Wipe the case with a slightly damp cloth, then wipe dry with a dry cloth or towel.
- To prevent damage to the finish, do not use gasoline, benzene, thinners or any abrasive cleansers to clean the air conditioner.
- Never pour water onto or into the air conditioner. It could damage internal components and create a shock and fire hazard.
Cleaning the Air Filter

The air filters should be cleaned every two weeks. Depending on indoor air quality, more frequent cleaning may be needed. A dirty air filter will decrease airflow and reduce efficiency.
- Pull out each air filter by the handle.
- Use a vacuum cleaner to clean the filters. If the filters are heavily soiled, they can be washed in warm water using a mild detergent.
- Do not use harsh cleaners or very hot water.
- Do not wash in a dishwasher.
- Dry the filters in the shade.
- Reinsert the filters.
TROUBLESHOOTING
Before Calling for Service
The appliance is equipped with an automatic error-monitoring system to detect and diagnose problems at an early stage. If the appliance does not function properly or does not function at all, check the following before you call for service.
| Problem | Possible Cause | Solutions |
| Air conditioner does not start. | The air conditioner is unplugged. | Make sure the air conditioner plug is pushed completely into the outlet. |
| The fuse is blown/circuit breaker is tripped. | Check the house fuse/circuit breaker box and replace the fuse or reset the breaker. | |
| Power failure. | If power failure occurs, turn the mode control to off. When power is restored, wait 3 minutes to restart the air conditioner to prevent tripping of the compressor overload. | |
| The current interrupter device is tripped. | Press the RESET button located on the power cord plug. If the RESET button will not stay engaged, discontinue use of the air conditioner and contact a qualified service technician. | |
| FL appears in the display. | The water collection tank is full. Drain the tank and reset your settings. | |
| Mode switched from Cool to Heat or vice versa. | To protect the compressor, the fan and compressor will momentarily stop if you switch modes from Cool to Heat or vice versa. After a few minutes, the product will resume operating in the new mode. | |
| Air conditioner does not cool as it should. | Airflow is restricted. | Make sure there are no curtains, blinds, or furniture blocking the front of the air conditioner. |
| The temp control may not be set correctly. | Set the desired temperature to a level lower than the current temperature. | |
| The air filter is dirty. | Clean the filter at least every 2 weeks. See the 'MAINTENANCE' section. | |
| The room may have been hot. | When the air conditioner is first turned on, you need to allow time for the room to cool down. | |
| Cold air is escaping. | Check for open furnace floor registers and cold air returns. | |
| Cooling coils have iced up. | See 'Air conditioner freezing up' below. | |
| Air conditioner freezing up. | The cooling coils are iced over. | Ice may block the air flow and obstruct the air conditioner from properly cooling the room. Set the mode control at High Fan or High Cool. |
| Water collects in base pan. | Moisture removed from air and drains into base pan. | This is normal for a short period in areas with little humidity; normal for a longer period in very humid areas. |
| Air conditioner turns on and off rapidly. | Dirty air filter - air restricted. | Clean air filter. |
| Outside temperature extremely hot. | Refer to installation instructions or check with installer. | |
| Noise when unit is cooling. | Air movement sound. | This is normal. If too loud, adjust the fan speed to low. |
| Remote sensing deactivating prematurely. | Remote control not located within range. | Place remote control within 20 feet & 120° radius of the front of the unit. |
| Remote control signal obstructed. | Remove obstruction. | |
| Room too cold. | Set temperature too low. | Increase set temperature. |
NOTE: If you see "CH" in the display, please call 1-800-243-0000.
SAFETY INSTRUCTIONS
READ ALL INSTRUCTIONS BEFORE USE
Your safety and the safety of others are very important.
We have provided many important safety messages in this manual and on your appliance. Always read and follow all safety messages.
This is the safety alert symbol.
This symbol alerts you to potential hazards that can kill or injure you and others.
All safety messages will follow the safety alert symbol and either the word WARNING or CAUTION.
These words mean:
You may be killed or seriously injured if you do not follow instructions.
You may be injured or cause damage to the product if you do not follow instructions. All safety messages will tell you what the potential hazard is, tell you how to reduce the chance of injury, and tell you what may happen if the instructions are not followed.
IMPORTANT SAFETY INSTRUCTIONS
To reduce the risk of explosion, fire, death, electric shock, scalding or injury to persons when using this product, follow basic precautions, including the following:
INSTALLATION
- Before use, the appliance must be properly installed as described in this manual.
- Contact the authorized service technician for repair or maintenance of this unit.
- When the power cord is to be replaced, replacement work shall be performed by authorized personnel only using only genuine replacement parts.
- Installation work must be performed in accordance with the National Electric Code.
- Connect to a properly rated, protected, and sized power circuit to avoid electrical overload.
- Always plug into a grounded outlet.
- Do not under any circumstances, cut or remove the third (ground) prong from the power cord.
- When installing or moving the appliance, be careful not to pinch, crush, or damage the power cord.
- Plug in the power plug properly.
- Do not modify or extend the power cord.
- Do not start/stop operation by plugging/unplugging the power cord.
- Use a dedicated circuit.
- Do not disassemble or modify the product.
- Adhere to all industry recommended safety procedures including the use of long-sleeved gloves and safety glasses.
- Use care when unpacking and installing. The edges of the product may be sharp.
- Disconnect the power cord or circuit breaker before installing or servicing the appliance.
- Keep packaging materials out of the reach of children. These materials can pose a suffocation risk to children.
- Store and install the product where it will not be exposed to temperatures below freezing or exposed to outdoor weather conditions.
- Do not store or use gasoline or other flammable vapors and liquids in the vicinity of this or any other appliance.
OPERATION
- Use this appliance only for its intended purpose.
- Never attempt to operate this appliance if it is damaged, malfunctioning, partially disassembled, or has missing or broken parts, including a damaged cord or plug.
- Repair or immediately replace all power cords that have become frayed or otherwise damaged. Do not use a cord that shows cracks or abrasion damage along its length or at either end.
- Do not run cord under carpets or mats where it could be stepped on and damaged. Keep the cord out from under heavy objects like tables or chairs.
- Do not place the power cord near a heat source.
- Do not use an adaptor or plug the product into a shared outlet. Do not tamper with controls.
- If you detect a strange sound, a chemical or burning smell, or smoke coming from the appliance, unplug it immediately, and contact an LG Electronics Customer Information Center.
- Never unplug the appliance by pulling on the power cord. Always grip the plug firmly and pull straight out from the outlet.
- Do not grasp the power cord or touch the appliance controls with wet hands.
- The air conditioner is not intended for use by young children or invalids without supervision.
- Young children should be supervised to ensure that they do not play with the air conditioner.
- If water enters the product, turn off the power at the main circuit, then unplug the product and call for service.
- If the product has been submerged, contact the LG Electronics Customer Information Center for instructions before resuming use.
- Unplug the product if it will not be used for long periods.
- Unplug the product before cleaning.
- In the event of a gas leak (propane gas, etc.) do not operate this or any other appliance. Open a window or door to ventilate the area immediately.
- This appliance is not intended for use by persons (including children) with reduced physical, sensory or mental capabilities, or lack of experience and knowledge, unless they have been given supervision or instruction concerning the use of the appliance by a person responsible for their safety.
- To clean the interior, contact the LG Electronics Customer Information Center or a dealer. Using harsh detergents may cause corrosion or damage to the unit.
- Do not use solvent-based detergent on the product. Doing so can cause corrosion or damage, product failure, electrical shock, or fire.
GROUNDING INSTRUCTIONS
- The power cord of this appliance is equipped with a three-prong (grounding) plug. Use this with a standard three-slot (grounding) wall power outlet to minimize the hazard of electric shock. Have the wall receptacle and circuit checked by a qualified electrician to make sure the receptacle is properly grounded. DO NOT CUT OR REMOVE THE THIRD (GROUND) PRONG FROM THE POWER PLUG.
- Situations when the appliance will be disconnected occasionally; Because of potential safety hazards, we strongly discourage the use of an adapter plug. However, if you wish to use an adapter, a TEMPORARY CONNECTION may be made. Use UL-listed adapter, available from most local hardware stores.
The large slot in the adapter must be aligned with the large slot in the receptacle to assure a proper polarity connection.
- Situations when the appliance will be disconnected occasionally; Because of potential safety hazards, we strongly discourage the use of an adapter plug. However, if you wish to use an adapter, a TEMPORARY CONNECTION may be made. Use UL-listed adapter, available from most local hardware stores.
- Attaching the adapter ground terminal to the wall receptacle cover screw does not ground the appliance unless the cover screw is metal, and not insulated, and the wall receptacle is grounded to make sure the receptacle is properly grounded.
- Disconnect the power cord from the adapter, using one hand on each. Otherwise, the adapter ground terminal might break. Do not use the appliance with a broken adapter plug.
- Situations when the appliance will be disconnected often; Do not use an adapter plug in these situations. Unplugging the power cord frequently can lead to an eventual breakage of the ground terminal. The wall power outlet should be replaced by a three-slot (grounding) outlet instead.
To reduce the risk of minor or moderate injury to persons, malfunction, or damage to the product or property when using this product, follow basic precautions, including the following:
INSTALLATION
- Take care when installing the product that exhaust or condensation does not damage nearby property.
- Follow installation instructions exactly to avoid excessive vibration or water leakage.
OPERATION
- This appliance is not intended for use as a precision refrigeration system. Do not use it for special purposes such as maintaining pets, food, precision machinery, or art objects.
- When installing or moving the appliance, be careful not to pinch, crush, or damage the power cord.
- Make sure the air inlet and outlet are free from obstructions.
- Use a soft cloth to clean the appliance. Do not use waxes, thinners, or harsh detergents.
- Do not step on or place heavy objects on top of the appliance.
- Do not operate the appliance without the filter securely installed.
- Do not drink water drained from the appliance.
- Be sure to ventilate sufficiently when the air conditioner and a heating appliance such as a heater are used simultaneously.
- Being exposed to direct airflow for an extended period of time could be hazardous to your health.
- Remove the batteries if the remote control is not to be used for an extended period of time.
- Never mix different types of batteries, or old and new batteries for the remote control.
- Stop using the remote control if there is a fluid leak in the battery. If your clothes or skin are exposed to the leaking battery fluid, wash off with clean water.
- lf the leaking battery fluid has been swallowed, rinse the inside of the mouth thoroughly and consult a doctor.
- Do not recharge or disassemble the batteries.
MAINTENANCE
- Clean the filter every two weeks.
- Never touch the metal parts of the air conditioner when removing the air filter.
- Never spray the product with water or use strong cleaning agents or solvents when cleaning the air conditioner. Use a soft cloth to avoid scratching the exterior.
SAVE THESE INSTRUCTIONS
HOW TO OBTAIN WARRANTY SERVICE & ADDITIONAL INFORMATION:
Call 1-800-243-0000 or visit our website at www.lg.com.
Mail to: LG Customer Information Center (ATTN: CIC)
201 James Record Road, Huntsville, AL 35824

Documents / Resources
References
Download manual
Here you can download full pdf version of manual, it may contain additional safety instructions, warranty information, FCC rules, etc.
Download LG LP0820WSR, LP1020WSR, LP1220GSR, LP1420BSR, LP1420BHR - PORTABLE AIR CONDITIONER Manual
Advertisement
Thank you! Your question has been received!


Need Assistance?
Do you have a question about the LP0820WSR that isn't answered in the manual? Leave your question here.