Table of Contents
Advertisement
Quick Links
Important Information
Thank you for purchasing this Panasonic digital cellular phone. This phone is designed to operate on GSM networks – GSM900,
GSM1800 and GSM1900. It also supports GPRS for packet data connections. Please ensure the battery is fully charged before use.
Safety Considerations
The following information should be read and understood as it provides details which will enable you to operate your phone in a
manner which is both safe to you and your environment, and conforms to legal requirements regarding the use of cellular phones.
This equipment should only be charged with
approved charging equipment to ensure optimum
performance and avoid damage to your phone.
Other usage will invalidate any approval given to
this apparatus and may be dangerous. Ensure the
voltage rating of the Fast Travel Charger is
compatible with the area of use when travelling
abroad. A Fast Travel Charger (EB-CAX70xx*) is
supplied with the Main Kit. Other recommended
equipment for charging – Car Charger (EB-
CDX70xx).
Note* xx identifies the Charger region, e.g.
CN, EU, UK.
Use of another battery pack than that
recommended by the manufacturer may result in a
safety hazard.
If you use a feature which keeps the key backlight
on continuously for a long time, such as the
camera, a game or the browser, battery life will
become extremely short. To maintain longer battery
life, set the key backlight to off. See "Settings" on
page 96.
Switch off your cellular phone when in an aircraft.
The use of cellular phones in an aircraft may be
dangerous to the operation of the aircraft, disrupt
the cellular network and may be illegal. Failure to
observe this instruction may lead to the suspension
or denial of cellular phone services to the offender,
or legal action or both.
1
Advertisement
Table of Contents

Related Manuals for Panasonic GSM900


Summary of Contents for Panasonic GSM900
-
Page 1: Important Information
Important Information Thank you for purchasing this Panasonic digital cellular phone. This phone is designed to operate on GSM networks – GSM900, GSM1800 and GSM1900. It also supports GPRS for packet data connections. Please ensure the battery is fully charged before use. - Page 2 Never expose the battery to extreme temperatures (in excess of 60°C). This phone should only be used with Panasonic approved accessories to ensure optimum It is imperative that the driver exercises proper performance and avoid damage to your phone.
-
Page 3: Care And Maintenance
Care and Maintenance Pressing any of the keys may produce a loud tone. Do not leave the equipment in direct sunlight or a Avoid holding the phone close to the ear while humid, dusty or hot area. pressing the keys. Never throw a battery into a fire. -
Page 4: Getting Started
Getting Started Some services described in this manual are network dependent or may only be available on a subscription basis. Some functions are SIM dependent. For more information contact your service provider. Inserting and Removing the SIM Attaching and Removing the Battery The SIM is inserted into the back of the phone underneath the battery. -
Page 5: Charging The Battery
Charging the Battery Operation of Battery Level Indicator Connecting and disconnecting the Fast Travel Charger While charging Charging complete The battery must be attached in the phone before the charger is connected. Insert the connector into the base of the phone, ensuring the arrows on the connector face to the front of the phone. -
Page 6: Charging
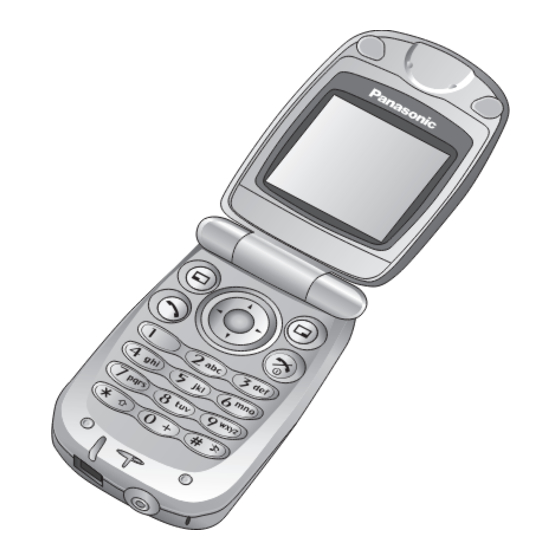
Keys & Displays Earpiece Camera Lens Main Display Self-Portrait Infrared Port Mirror Watch yourself Left Soft Key Navigation Key when taking a Selection/scroll/move key self-portrait Send Key Right Soft Key To answer a call or to Illumination make an Outgoing Call Light Multi Function Key Camera/Shutter/Alert Mute... -
Page 7: Keys
Right Soft Key: Perform function displayed in lower right corner of the display. Mainly used to cancel and return to previous menu level or to delete text/number entries. Press and hold to delete all characters in text entry mode. From Idle press to open Panasonic box. Send Key: Make a call or recall recently dialled phone numbers. - Page 8 Function 1 Key/Voicemail Key: Press and hold $ to retrieve voicemail messages. 1-9 Number Keys: Enter numbers. Press and hold a single key (2~9) for Speed dial. In text entry mode, enter text, numbers and characters. International Dialling Prefix Key: Press and hold # to enter + (the international dialling prefix) while entering a phone number.
-
Page 9: Shortcuts
When you are familiar with the menu system, you can use the keypad to access features instead of navigating through the display menus. Main Display Short press (from Idle) Function Function Messages Call dial field "! Panasonic box Dialled numbers < Menu Camera Shortcuts Contacts With some operations, the display Long press (from Idle) automatically clears after three seconds or after pressing any key. - Page 10 Different icons are shown, depending on the features you are using and the options you have selected. Icons appear on the main display as shown in the following table. Icon Indicates Icon Indicates Signal strength Unread Wap push message The more bars visible, the stronger the signal. Battery charge level Call divert is on Battery is charging...
-
Page 11: Illumination Light
Illumination Light Function Luminous colour Light goes out Incoming Call Purple Switchover to voice call, or if call is missed Call in progress Blue Call ended Mobile phone status: Closed LED goes out when phone is opened. Missed call notification Yellow Mobile phone status: Open LED goes out by pressing any key or if phone is closed. -
Page 12: How To Use This Phone
How to Use this Phone Symbols Used in the Manual The table below shows the symbols used throughout these instructions and the corresponding meaning in the column on the right. Symbol Meaning < Press centre of the Navigation key to select option or to save. 1537 Direction in which you can move on the display screen with the Navigation key. -
Page 13: Selecting A Menu Option
Selecting a Menu Option From Idle, press the centre of the Navigation key < to open the main menu display. The main menu display has 9 options. Main menu screen Main menu Press to perform Press to CANCEL/ function displayed in EXIT or to perform the lower left corner of function displayed... -
Page 14: Phone Basics And Managing Calls
Phone Basics and Managing Calls Switching Phone ON/OFF ................. 1 Press and hold for three seconds 2 When the phone is switched on, a greeting may be displayed and the phone then enters the Idle mode. Press and hold again to switch phone off NOTE: When switching the phone off, use only to avoid damaging the phone. -
Page 15: Making Calls
Making Calls • To make a call, start in Idle mode. • Ensure network name and appear on the display. Standard Dialling ......................"! 1 Enter phone number ( Contacts Dialling ......................Contacts (see “Shortcuts” on page 9) required contact Recent Number Dialling (Calls Made or Received)............ -
Page 16: Antenna
International Dialling ......................The international code for the destination country/region should be entered, followed by the area code and phone number. 1 Press and hold NOTE: Many countries/regions include 2 Enter country/region code an initial “0” in the area code. This 3 Enter area code and phone number should, in most cases, be omitted when dialling international numbers. -
Page 17: Answering Calls
Answering Calls....................< Press any key except Ending / Rejecting Calls ................or fold the phone during an incoming call to reject the call or end a call in progress. -
Page 18: Managing Calls
Managing Calls ....................Voicemail You need to subscribe to the voicemail service through your service provider before you can retrieve voicemail messages. To check if voicemail access has been configured, press and hold See “Voicemail” on page 67 on how to programme. 1 When a new voicemail message is received, an alert sounds and appears in lower part of the display or you receive an SMS notification (depending on the local service) -
Page 19: In-Call Options
In-Call Options During a call, for options “ ” Option When Left Soft Key is pressed < Hold Call Put a call on hold. To resume, Resume From contacts Access the contact list Create SMS Access Create SMS Inbox (SMS) Access Inbox (SMS) Calendar Access Calendar... - Page 20 DTMF Tones ........................DTMF tones can be sent during conversation. These are often used to access voicemail, paging and computerised home banking. For example, you may need to input a number to remotely access voicemail messages. A phone number may be stored in Contacts with DTMF tones, allowing the number to be dialled upon recall and the DTMF number to be sent automatically.
- Page 21 Incoming Call While on a Call ..................During a call, you may receive another call. To enable this, call waiting must be on (see “Call Waiting” on page 39). Accept a second call: (The second call is active, the current call is put on hold) The following options are available when two calls are connected.
- Page 22 Multi-Party Calls ....................... 1 Establish a multi-party call by merging two calls Multi-Party Calls: 2 Continue to add people to the multi-party call A multi-party call has 3 or more people in (up to 5 connections in total) by calling others or conversation at the same time.
-
Page 23: Call Log
Call log Recently dialled phone numbers, answered calls and missed calls are stored in the Call log. It is possible to call and send messages from stored numbers. Viewing Call log ......................Dialled Numbers, Answered Calls or Missed Calls < required phone number Sending Messages ...................... - Page 24 Saving a Phone Number from Call log into the Contacts list........Dialled Numbers, Answered Calls or Missed Calls < required phone number < Add to contacts < Phone or SIM < required icon < 8 Enter as appropriate (If required, repeat steps 7 and 8) Options in Call log ......................
-
Page 25: Sound Recorder
(SIM dependent) Settings Sounds Alarm Shortcuts Text Templates Sound recorder Memory status Calculator Infrared Messages Create new Browser Inbox Panasonic box Archive Voicemail Chat (SIM dependent) Cell Broadcast Camera Settings Memory status Contacts Settings Calendar Contacts list Profiles Add contact... -
Page 26: Settings Menu Structure
Settings menu structure Normal Profiles Quiet Meeting Incoming Tone Outdoor Sound Message Tone Ring Volume Key Tone Vibration Alert Key Volume Warning Tone Wallpaper Display Colour Theme Settings Contrast Display language Backlight time Language Input language Data connections New Search GSM network Select Network Search Mode... -
Page 27: Settings
Settings Settings Profile Setting You can switch between five profiles in your phone each with a distinct combination of ring tone, ring volume, etc. Profiles are set up for use in different environments – for instance you might want to create a Quiet profile, a Meeting profile with a ring tone appropriate for formal occasions and an Outdoor profile for loud environments. -
Page 28: Editing Profile
Settings Editing Profile Incoming Tone ........................From Profiles menu required profile < Edit Profiles < Incoming Tone < Preinstalled, My Media or Download < required data Message Tone ........................From Profiles menu required profile < Edit < Message Tone < Preinstalled, My Media or Download <... - Page 29 Settings Key Tone ........................... From Profiles menu required profile < Edit < Key Tone < required key type Profiles Key Volume ........................From Profiles menu required profile < Edit < Key Volume < adjust the volume level (1- 4) Warning Tone........................From Profiles menu required profile <...
-
Page 30: Tone Setting
Settings Tone Setting Changing the Ring Tone The ring tone of the phone can be changed to one of the tones from Preinstalled, My Media or Download. Incoming tone and Message tone can have different ring tones assigned. Changing Incoming Tone ....................Sound From Sound menu <... - Page 31 Settings Setting Key Tone ......................From Sound menu < Key Tone < required tone Sound Setting Key Volume ......................From Sound menu < Key Volume < adjust the volume level (1- 4) Setting Warning Tone ...................... From Sound menu < Warning Tone <...
-
Page 32: Vibration Alert Setting
Settings Vibration Alert Setting Vibration Alert can be set to indicate an incoming call. From Vibration Alert menu < On or Off Vibration Alert... -
Page 33: Display Setting
Settings Display Setting Setting Wallpaper ......................From Display menu < Wallpaper < Preinstalled, My Media or Download required data < < Display 4 To view and save, press then to save To save without viewing, press Setting Display Colour Theme ..................From Display menu <... - Page 34 Changing the Language ................... It is possible to change the language that the phone uses for display Language messages and/or text entry. ( From Language menu < Display language or Input language < required language Settings Data connections Data connections ....................GPRS settings and CSD settings are stored in the Data connections menu.
-
Page 35: Network Setting
Settings Network Setting Changing to a New Network .................... The New Search function is used to manually select a network that is available in your current location. From GSM network menu < New Search network < required network Select Network ........................View available networks From GSM network menu <... - Page 36 Settings When the Search Mode is set to Automatic the phone will automatically reselect a new network in order to maintain optimum network availability. The Network List is used when the Search Mode is set to Automatic. The location numbers in the Preferred Network List show the search priority. You can amend the List as follows: Option Explanation...
-
Page 37: Call Settings
Settings Call Settings Call Diverts ........................Voice calls can be diverted to different numbers in different situations. For example, you may wish voice calls to be diverted to Voice mail in the event that the phone is switched off. To register a number to divert at first time, Calls From Calls menu <... - Page 38 Settings When the number to divert is already registered, From Calls menu < Call Diverts < the type of calls to divert < Calls Request of Call divert will be send to network. When a divert situation is enabled the divert icon ( ) is displayed.
- Page 39 Settings Call Waiting ........................If Call Waiting is switched on a second call can be received. From Calls menu < Call Waiting 2 After “Call waiting deactivated” or “Call waiting activated” is shown, < Calls NOTE: If you select Activate or Deactivate in the step 3, you can reset Call waiting.
- Page 40 Settings Service Charge ......................... This function allows you to check the charges for your calls. From Calls menu < Service Charge The following can be set. Calls Menu Item Explanation Cost Left Show how much cost is left Call Meter This is the total costs of calls made.
-
Page 41: Security Settings
Settings Security Settings The PIN protects your SIM against unauthorised use. If you enable the PIN, every time the phone is switched on you will be prompted to enter the PIN. The PIN2 controls security for the Fixed dial Store. PIN entry .......................... - Page 42 Settings Fixed Dial........................... Fixed Dial is a part of Contacts, but with added security. When Fixed Dial is enabled: ➢ Only numbers that are in the Fixed Dial Store may be dialled. ➢ Any manually dialled phone numbers must match a number already in the Fixed Dial Store. ➢...
- Page 43 Settings Call Barring ........................Call Barring restricts certain outgoing and/or incoming calls using a password supplied by your service provider. When updating/checking the status of Call Barring the phone must be registered with a network. Varying call restrictions can be used for voice calls. From Security menu Security <...
-
Page 44: Time And Date
Settings Time and date Setting Time and date ...................... From Time and date menu < Time 2 # ~ , to enter the time using 24 hour clock < Time and < Date 4 # ~ , to enter the date <... -
Page 45: Camera
Camera Camera Taking a Picture ........................ The range from the camera is 30 cm - From Camera menu < to capture the image To create MMS: Select Add picture, see page 53. To return to camera operation without storing the image: (After capturing the image) To store the image in My Media: The picture will be saved in My Media / Pictures / Stored pictures. - Page 46 Options in View Finder..................... For options list “ ” Option When Left Soft Key is pressed Twilight mode Improve picture taken in low light conditions Anti-flicker Reduce flicker in view finder × × Image size Change image size (352 288 pixels, 160 120 pixels) Use and Save Pictures ....................
- Page 47 Self-portrait ........................The shutter button located on the side of the phone can be used to capture an image, for example, a self-portrait. You can activate the camera mode and take a picture by using the shutter button with your phone shut.
-
Page 48: Text Entry (Edit)
Text Entry (Edit) You can use alphanumeric characters to enter details into Contacts, to create text, email messages, etc. Text Mode ® (T9 , T9 or T9) Multi tap Numeric (Input language: English) (Input mode indicator: Abc, ABC or abc) (Input mode indicator: 0-9) Alternatives . -
Page 49: Shift Mode
Shift mode Shift mode change ......................The Shift mode changes by pressing (within 1 sec) ". Multi tap Tegic Abc -> ABC -> abc -> T9 -> T9 If Input mode is changed, Shift mode is initialised. Auto capital change ......................Auto capital affects Abc and T9 If Input mode is changed to Abc or T9 , the first character is input as upper case and subsequent letters as lower case. -
Page 50: Text Input
Text Input ® ............................. Using this mode of text input dramatically reduces the number of key presses required: Press a key once for any letter you require on that key. The desired letter may not be displayed. Continue pressing other keys until the end of a word is reached; then check that the word has been typed correctly before continuing on to the next word. -
Page 51: Messages Menu Structure
Messages menu structure Create new Inbox Archive Messages Call Mailbox Voicemail Web mail (SIM dependent) Set Mailbox number Chat (SIM dependent) On/Off Cell Broadcast Read messages Options Settings Memory status... -
Page 52: Messages
Messages Messages MMS (Multimedia Messaging Service) Your phone is designed to be compatible with certain Multimedia Messaging Services (MMS). You can send pictures and music with text messages. The recipient can play it as a Slide show. MMS messages can be sent to another mobile phone with MMS capability or to an email address. When you receive an MMS message, a notice will inform you that you have received a message. - Page 53 Messages Creating a New MMS ......................From Create new menu < When creating a message, these selections are available. Selection Explanation Create new Select a picture stored in Stored pictures / Download / Take new picture and insert Add picture it into the MMS message Add text Create text and add to MMS message...
- Page 54 Messages Creating a Slide ........................ In order to send an MMS with more than one picture, text or sound, you need to add new slides to the MMS. From Create new menu < Create new < Add picture, Add text or Add sound , then select a picture or sound, or enter a text <...
- Page 55 Messages Sending a Message ......................When a message is completed, press < Send < Add subject < 3 Enter subject < Add recipient Create new < From Contacts, Enter number or Enter address < 6 appropriate entry < Send Before sending a message, the following options are available. “...
- Page 56 Messages Creating Options ......................Before sending a message, you can set send options. When a message is completed, press < Send for the options < Create options Create new Option When “ Left Soft Key ” is pressed Request read Ask if the other party read the message Request delivery Check if your message has been delivered to the other party...
- Page 57 Messages Receiving Messages ......................When you receive an MMS message, the message notification indicator ( ) is displayed along with a tone, illumination, and/or vibration. From Inbox menu < required message Inbox Press for the following options. Option When “ Left Soft Key ”...
- Page 58 Messages Reading a Received Message ..................From Inbox menu < required message When viewing the list, the following options are available. “ ” Option When Left Soft Key is pressed Inbox Reply Create Reply Message Reply to all Create Reply Message to the sender and all recipients of the message Forward Forward MMS message To contact...
- Page 59 Messages Viewing Message Lists ....................The following messages are stored in Archive. ➢ Outbox: When a message has been sent it is stored in the Outbox. ➢ Unsent: Undelivered messages are stored in Unsent. ➢ Drafts: Use to create a message draft. MMS Drafts: Messages that are saved in the MMS mode are saved in Drafts.
- Page 60 Messages Setting the MMS Message Server / Profile ..............MMS message server and profile setting must be done before you can send or receive an MMS message. Please check with your operator if additional settings are required. You can select one of five server URLs on the phone. From Settings menu (Message server) <...
- Page 61 Messages Setting Options ......................... The following settings are available. From Settings menu < Settings Option Explanation Set Request read (ask if the other party read the message) / Send read (inform the other party that you have read the message when Reports asked) /Request delivery (ask if the other party received the message) /Send delivery (inform the other party that you have...
-
Page 62: Sms (Short Message Service)
Messages SMS (Short Message Service) It is possible to receive, display, edit and/or send text messages to mobile phones on any network that has a roaming agreement. (Dependent on the recipient’s phone parameters.) The message centre number sould be preprogrammed on the Operator SIM, changing this number (See page 66) may cause failure of a text message. - Page 63 Sending a Message ......................When you have created your message (see page 62), press < Send < 2 Enter the destination phone number If you wish to select from Contacts < Send < From Contacts required contact <...
- Page 64 Messages Receiving Messages ......................When you receive an SMS message, the message icon is displayed along with an audible tone, illumination, and/or vibration. Reading a Received Message ..................From Inbox menu Inbox < < required message When viewing messages, the following options are available. “...
- Page 65 Messages Viewing Message Lists ....................These message lists are stored in Archive. ➢ Outbox: When a message has been sent, it is stored in the Outbox. ➢ Unsent: If the transmission of an SMS message fails, the message is stored in Unsent together with other saved messages.
- Page 66 Messages Setting the Message Centre number ................The message centre number sould be preprogrammed on the Operator SIM, changing this number may cause failure of a text message. From Settings menu < < Message Centre Settings 3 Enter Message Centre number in international dial format <...
-
Page 67: Voicemail
Messages Voicemail Voicemail is an innovative service that lets you stay up-to-date with all of your messages. You must subscribe to voicemail through your service provider before you can retrieve voicemail or email messages. Listening to Voicemail Messages ................... Voicemail From Voicemail menu <... -
Page 68: Chat
Messages Chat Chat lets you enjoy the fun of instant messaging wherever you are. It’s the fun way to chat on-line. ➢More information on this service may be obtained by contacting your service provider. Viewing Chat ........................Chat From Chat menu Follow the screen contents It allows you to read sent and received... -
Page 69: Cell Broadcast
Messages Cell Broadcast You can receive messages on specified topics, such as traffic and weather information, from your network service operator. Setting Cell Broadcast On/Off ..................From Cell Broadcast menu Cell < On/Off Broadcast < On or Off Reading a Received Message ..................From Cell Broadcast menu <... -
Page 70: Contacts Menu Structure
Contacts menu structure Contacts list Phone Add contact Dialled Numbers Contacts Call log Answered Calls Missed Calls Speed dial Speed Dial list View groups Search Group My Number Group Settings Advanced Memory status Copy from SIM NOTE: When your phone is installed SIM compatible with SDN, Service numbers will be added in the Contacts menu. -
Page 71: Contacts
Contacts Contacts Browsing Contacts You can search Contacts by name. When browsing by name, pressing a letter key will take you to the first entry starting with that letter. From Contacts list menu < required contact Contacts list... - Page 72 Contacts Options in Contacts ....................... From Contacts list menu required contact < required option Contacts Option When “Left Soft Key” or “Centre Soft Key” is pressed list Call Call Contact Send message Send MMS/SMS from Contact Edit Edit Contact Add contact Add Contact to Contacts list Copy to SIM/Phone Copy Contact to SIM or Phone Speed dial...
-
Page 73: Storing
Contacts Storing Storing a Number in SIM ....................In the SIM, you can store: Name, Phone number. The length of name and number and the total amount of data are dependent on your SIM. Phone numbers can From Add contact menu be stored in your <... - Page 74 Contacts Storing a Number in Your Phone ................In the phone, you can store: Name, Phone No. 1, Phone No. 2, email Address, Picture and Group. From Add contact menu < Phone < name icon ( Phone numbers can < 3 Enter the name be stored in your phone.
-
Page 75: Call Log
Contacts Call log Recently dialled phone numbers, answered calls and missed calls are stored in the Call log. It is possible to call, send message, add to Contacts, delete and delete all from stored numbers. Viewing Call log......................From Call log menu Call log Dialled Numbers, Answered Calls or Missed Calls <... - Page 76 Contacts Saving a Phone Number from Call log into the Contacts list ........From Call log menu Dialled Numbers, Answered Calls or Missed Calls < required phone number < Add to contacts < Call log Phone or SIM < required icon <...
-
Page 77: Speed Dial
Contacts Speed Dial Phone numbers from the Speed dial of Contacts can be dialled quickly. In Idle Mode, press and hold a number key (2 ~ 9). Setting Speed Dial......................Speed From Speed Dial list menu < required list Dial list <... -
Page 78: Grouping Contacts Entries
Contacts Grouping Contacts Entries The ability to group Contacts entries together is an extra function of Phone Contacts. Groups are used to collect together types of Contacts entries, e.g. business and personal. Each group can be suitably titled for quick access to the entries contained within. You can attach a particular sound to the groups to identify them. -
Page 79: My Number
Contacts My Number My Number is a contact where you can store your own numbers. Adding Numbers ......................From Advanced menu < My Number Advanced < Mobile Profile or SIM Profile < 3 When My number is empty, press then go to step 5 When My number is already stored in SIM profile, press <... - Page 80 Contacts Viewing Stored Numbers....................From Advanced menu < My Number < Mobile Profile or SIM Profile Options in My Number Advanced When viewing My Number the following options are available. Mobile Profile (View Display) SIM Profile (View Display and List Display) Option When “Left Soft Key”...
-
Page 81: Group Settings
Contacts Group Settings You can change the group name and attach a sound to a group. Changing Group Names ....................From Advanced menu < Group Settings Advanced < required group 3 Press and hold to remove the current name < 4 Enter new group name Attaching a Sound to a Group .................. -
Page 82: Memory Status
Contacts Memory status ..................... Memory status shows how many locations are available in the contacts. From Advanced menu < Memory status Advanced Copy from SIM .................... It is possible to copy SIM Contacts to Phone Contacts. From Advanced menu < Copy from SIM x 2 /... -
Page 83: Browser
Browser Browser Server Setting Before Internet services can be accessed, you need to subscribe to your network operator or Internet Service Provider (ISP) to enable the relevant configuration information. Please contact your network service provider to ensure that your network settings are correct. NOTE: Modifying previously entered settings can cause failure of the Browser. -
Page 84: Viewing The Contents
Browser Viewing the Contents From Browser menu < required list In each list, these options are available (see page 85). For options... -
Page 85: Browser Options
Browser Browser Options................... From Browser menu (Options) < select from below options Option When “Left Soft Key” is pressed Go to page Select Select item Add bookmark Bookmarks Go to bookmark list Edit Delete Enter address Go to URL entry Save image The image in contents is saved in “My Media”... -
Page 86: Browser Options (Bookmarks)
Browser Browser Options (Bookmarks)..............From Browser menu or Content From embedded From content (Options) < Bookmarks required bookmarks < to load the URL to select options Options: Go to page....Jump to the URL page Add bookmark ....Add to bookmarks Edit ...........Edit bookmark Delete ........ -
Page 87: Browser Options (Save Image)
Browser Browser Options (Save image) ..............Displayed images can be saved in My Media. From Content (Options) < Save image to see whole image < to save Browser Options (Set as bookmark) ............. Favourite URLs can be saved in bookmarks. From Content (Options) <... -
Page 88: Browser Options (Reload Page)
Browser Browser Options (Reload page)............... Current Page can be reloaded. From Content (Options) < Reload page The page is reloaded. -
Page 89: Browser Options (Advanced)
Browser Browser Options (Advanced) From Browser menu or Content (Options) < Advanced Browser Options (Advanced - Home) ..........Phone jumps to the set-up Homepage. From Advanced menu Home < to jump to home page Browser Options (Advanced - Clear cache) ........Cache is cleared. - Page 90 Browser Browser Options (Advanced) From Browser menu or Content (Options) < Advanced Browser Options (Advanced - Service Inbox) ........View WAP message and go to URL. From Advanced menu < Service Inbox < to load the URL to select option Options: Go to page....Jump to the URL page View message ......
- Page 91 Browser Browser Options (Advanced) From Browser menu or Content (Options) < Advanced Browser Options (Advanced - View address) ........View URL of the contents. From Advanced menu < View address Browser Options (Advanced - WAP information) ......View WAP information. From Advanced menu <...
-
Page 92: Browser Options (Settings)
Browser Browser Options (Settings) From Browser menu or Content (Options) < Settings Browser Options (Settings - WAP profiles) ........WAP browser is set up. From Settings menu < WAP profiles required profile < to activate to select options Browser Options (Settings - Push access) ........Push access is set up. -
Page 93: Games
Games Games Selecting Games Five games are pre-installed: Mobile Golf, Ninja Action, Slotz, Square and Truck. From Games menu < required game you wish to play Mobile Golf........................Games This game is a golf game. Compete against your score on all 18 holes. Key Operation <... - Page 94 Games Slotz..........................This game is a slot machine game. If the figures are aligned correctly, collect your bet. Key Operation < < to enter the bet, again to start the drum turning. or ', (, ) to stop the drum. <...
- Page 95 Games Truck ..........................This game is an action puzzle game. The purpose of this game is to guide the truck from the starting point to the goal within a specified time limit. The player moves the tiles on the screen to connect the rails to complete a track.
-
Page 96: Settings
Games Settings Game settings, such as volume and backlight etc, can be changed. From Settings menu < required setting Settings Explanation Settings Sound volume Volume setting for game applications Backlight ON/OFF setting of Backlight in game applications Reset Reset the game application settings Information Display of copyright information... -
Page 97: Applications Menu Structure
Applications menu structure SIM Tool Kit Applications Alarm Sound recorder Calculator Infrared NOTE: SIM Tool Kit is SIM dependent ( ). The menu name will be changed. -
Page 98: Alarm
Applications STK....................... Tool KIT Appli- This function is SIM dependent (E). This menu name will be changed. cations Alarm Alarm Setting the Alarm....................From Alarm menu < < alarm icon ( < clock icon ( , enter the required time (24 hour clock) <... - Page 99 Applications Muting the Alarm......................To end the alarm: 1 Press any key or < Disabling the alarm: From Alarm menu Alarm < alarm icon ( < Adjusting the Alarm Time....................From Alarm menu < clock icon ( < 2 Enter the required time If you wish to change other settings, see “Setting the Alarm”...
-
Page 100: Sound Recorder
Sound recorder................. Sound You can record sounds or your voice in My Media. The sounds you record can be attached to MMS. recorder When My Media is full, sounds can not be recorded until a previous recording is first deleted. Appli- To record new sound: cations... -
Page 101: Infrared
Applications Infrared By using the infrared connection with another X66 or with other devices with an infrared port, you can transfer data between the devices. Preparing for Infrared Connection ................➢ Place the X66 and another device with an infrared port within the effective infrared connection Infrared range of each other. - Page 102 Applications Setting Infrared ......................... You need to activate infrared before receiving data. From Infrared menu < to activate Infrared Sending Pictures and Sounds..................From Idle display < < My Media < Pictures or Sounds If you try to send data that cannot <...
- Page 103 Applications Sending Contacts......................From Idle display < < Contacts < Contacts list select contact to send Infrared < Send by Infrared Receiving Data via Infrared Port................... You need to activate infrared before receiving data. Data received message is displayed then sent data is displayed. <...
-
Page 104: Calendar
Calendar Calendar Viewing Calendar ......................From Calendar menu will display recent and future calendars For options list Option When “Left Soft Key” is pressed Go to date Jump to the required date With the calendar, it is possible to select which day the week Week starts on starts on... -
Page 105: My Media
My Media menu structure Stored pictures Pictures Download Take new picture Stored sounds Sounds Download Record new sound My Media Create MMS Shortcuts Inbox (MMS) Create SMS Inbox (SMS) Profiles Alarm Text Templates Memory status... -
Page 106: My Media
My Media My Media Pictures (My Media > Pictures) Pictures taken by the camera or images downloaded from the Internet can be managed. Viewing Picture / Image ....................From Pictures menu < Stored pictures The data saved in the X66 is located in My <... - Page 107 My Media Picture Options ......................When the picture is selected the following options are available. For options list Option When “Left Soft Key” is pressed Pictures Send MMS Attach pictures to MMS Messages (see “MMS Message”) Send by Infrared Send pictures to another device by Infrared As wallpaper Use pictures as Wallpaper Add to contacts...
-
Page 108: Sounds
My Media Sounds (My Media > Sounds) Downloaded sounds and Recorded sounds are stored in Stored sounds. Checking Sounds......................From Sounds menu < Stored sounds < required sound Sounds Downloading Sounds ....................From Sounds menu < Download 2 The sound file download site is displayed Recording New Sound.................... -
Page 109: Shortcuts
My Media Shortcuts You can create shortcuts you wish to use in My Media. Viewing Shortcuts......................From Shortcuts menu < required content Shortcuts In shortcuts menu the following options are available. Option When “Left Soft Key” is pressed Edit Overwrite the present Shortcut with a new one Move Move Shortcut to another place in the list Store new Shortcut... -
Page 110: Text Templates
My Media Text Templates When creating a text message it is possible to use templates stored in the phone. You can save frequently used text as templates. Editing the Text Templates ................... From Text Templates menu Text < required template (The display will turn back to Editing display) Templates For options list... -
Page 111: Memory Status
Memory status My Media You can see how much data is stored in the individual folders in My Media. The memory in “My Media” is separate from the MMS storage and Java storage. NOTE: Memory status... -
Page 112: Personal Wap / Mms Settings
Personal WAP / MMS Settings Use the table below to record your GSM/GPRS WAP/MMS settings. Item Provisioning Provisioning Provisioning Provisioning Provisioning Information Information Information Information Information Setting No. 1 Setting No. 2 Setting No. 3 Setting No. 4 Setting No. 5 Profile name Homepage Gateway... -
Page 113: Troubleshooting
Troubleshooting Should any problem persist contact your dealer. Problem Cause Remedy Check that the battery is fully charged and Phone will not switch on. correctly connected to the phone. Extremely short battery life for a The network you are using and the condition new battery. - Page 114 Problem Cause Remedy Check whether your SIM supports Fixed Dial Calls cannot be made from Fixed Check if the Fixed Dial is switched on Dial Store. Check whether the phone number is stored in the Fixed Dial. The phone is not switched on. Switch the phone on.
-
Page 115: Important Error Messages
Important Error Messages These are some of the most important error messages which may be displayed: Roaming in the selected area is not allowed. Failed Roaming with the selected network is not allowed. The network has detected an authentication failure because your SIM is not registered with that network –... - Page 116 This message may mot be The message area is full. Your messages cannot be stored until some of the currently stored stored messages are deleted. Verification failure On changing the phone lock code, verification of the new code is incorrect – retry changing the lock code with correct verification.
-
Page 117: Glossary Of Terms
Glossary of Terms Access Point Name. Directs the user to the gateway or the required service. Permanently removes selected text from a short text message. Copy Copies selected text from a short text message without removing it from the original message. CHAP Challenge Handshake Authentication Protocol. - Page 118 PIN2 Personal Identification Number used for the control of Fixed Dial Store and Call Charge metering. Supplied by your service provider. If the PIN2 is entered incorrectly 3 times, the PIN2 will be blocked. PUK/PUK2 PIN/PIN2 Unblocking Key. Used to unblock the PIN/PIN2. Supplied by your service provider. If the PUK/ PUK2 is entered incorrectly 10 times, the PUK/PUK2 will be blocked.
-
Page 119: Table Of Contents
Specifications Bands Supported ......GSM900 Class 4 SIM Type.......... 3 V only GSM1800 Class 1 Contacts Size ........300 entries + SIM GSM1900 Class 1 Sound Recorder ....... Each max. record size 15 seconds (Varies Talk Time ..........1.5 hrs. - 5 hrs. -
Page 120: Accessories
So, as you’d expect from this class leader, the bottom of the handset – and talk range of accessories are second to none. Most genuine Panasonic accessories will have a label showing an “EB-XXX00” model number. Car Charger (EB-CDX70) -
Page 121: Mms
® ® is a trademark of Tegic Communications Inc.T9 © Panasonic Mobile Communications Co., Ltd. 2003 Text Input is licenced under one or more of the following: U.S. Pat. Nos. 5,818,437, 5,953,541, 5,187,480, 5,945,928 Information in this document is subject to change without and 6,011,554;... -
Page 122: Notes
Notes... -
Page 123: Index
Index A Accessories ....................120 C Calculator ....................100 Activate Quiet Mode ................... 18 Calendar ....................104 Activating a Profile ..................27 Call Barring ....................43 Adding Numbers ..................79 Call Diverts....................37 Adjusting the Alarm Time ................99 Call Duration ....................39 Alarm ......................98 Call log ....................23, 75 Answering Calls .................. - Page 124 D Data connections ..................34 K Keep Input mode..................49 Desktop Handsfree ..................19 Key Tone....................29, 31 Dialling from Call log................... 75 Key Volume...................29, 31 Display......................9 Keys ......................7 Display Setting.................... 33 Keys & Displays ....................6 Displaying Menu ..................14 L Language ....................34 Downloading Picture / Image File .............
- Page 125 Options in Contacts ..................72 Sending a Message (MMS).................55 Options in Phone Contacts................. 74 Sending a Message (SMS) .................63 Options in SIM Contacts ................73 Sending Contacts (Infrared) ..............103 Options in Sound File (Stored Sounds) ............ 108 Sending Data (Infrared) ................101 Options in View Finder ................
- Page 126 Sound recorder..................100 W Wallpaper ....................33 Sounds (My Media) .................. 108 WAP information ..................91 Specifications ................... 119 WAP profiles ....................92 Speed Dial ....................77 Warning Tone ..................29, 31 Square ......................94 Standard Dialling ..................15 STK (SIM Tool Kit)..................98 Storing (Contacts)..................
- Page 127 The Serial Number can be found on the outside of the phone under the battery. For your convenience we recommend that you note the following details as a record of your purchase. Part Number Serial Number Dealer Name Purchase Date...
- Page 128 Contents Important Information............1 Explore the menus ............25 Safety Considerations ............1 Settings menu structure..........26 Care and Maintenance............3 Settings ................27 Getting Started ..............4 Profile Setting ..............27 Inserting and Removing the SIM........4 Editing Profile ..............28 Attaching and Removing the Battery ....... 4 Tone Setting ..............30 Charging the Battery ............
- Page 129 Contacts................71 Sound recorder.............100 Browsing Contacts ............71 Calculator ..............100 Storing................73 Infrared .................101 Call log ................75 Calendar.................104 Speed Dial ..............77 My Media menu structure..........105 Grouping Contacts Entries ..........78 My Media ................106 My Number ..............79 Pictures ................106 Group Settings ...............81 Sounds ................108 Memory status ...............82 Shortcuts ..............109 Copy from SIM ...............82 Text Templates.............110...