Table of Contents
Advertisement
Available languages
Available languages
Advertisement
Table of Contents

Related Manuals for Toshiba Camileo P100


Summary of Contents for Toshiba Camileo P100
-
Page 1: Quick Start Guide
® CAMILEO P100 Quick Start Guide English/Español... -
Page 2: Safety Instructions
12 Dispose of used batteries according to the instructions. About the battery ❖ Use only batteries recommended by TOSHIBA as replacements. The battery is a lithium ion battery, which can explode if not replaced, used, handled or disposed of properly. Dispose of the battery as required by local ordinances or regulations. -
Page 3: Regulatory Information
State of California to cause birth defects or other reproductive harm. Wash hands after handling. Regulatory Information TOSHIBA declares that this product conforms to the following Standards: FCC Conditions This equipment has been tested and found to comply with Part 15 of the FCC Rules. -
Page 4: Additional Information
Safety instructions Additional Information © Copyright 2011 TOSHIBA CORPORATION. All rights reserved. TOSHIBA reserves the right to make technical changes. TOSHIBA assumes no liability for damages incurred directly or indirectly from errors, omissions or discrepancies between this product and the documentation. - Page 5 Getting Started The battery comes pre-installed in the camcorder, however you must remove the protective film on the battery before use. To properly connect the battery: Slide the back battery cover down and remove. Remove the battery. Pull the film off. REMOVE Reinsert the battery, making sure it is lined-up with the correct polarity marks.
- Page 6 Getting Started Once inserted, close the SD™ Card cover. Charge your battery You must use the supplied USB cable or AC adaptor to charge your camcorder before use. Turn off the camcorder. A blinking light will indicate active charging and a solid light will indicate that charging is complete.
-
Page 7: Quick Tour
Quick Tour LCD touch screen 1 To power on Press and hold the Power ( button for one second. To conserve battery power, the camcorder will turn off automatically after 3 minutes of non-operation. 2 To start or stop recording Press the Video (...) button. -
Page 8: Power Button
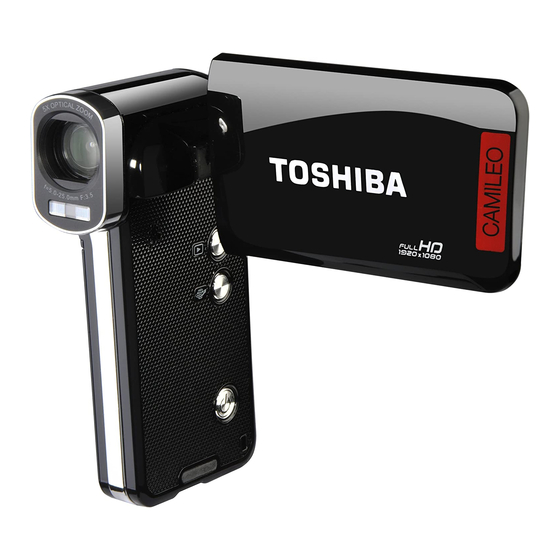
Quick Tour Lens NOTE: Remove the protective film from the lens before use. Light Speaker Power button Front/Sides Playback button Press to switch to Playback mode. Internet upload button (In Playback mode) Press to select the file to upload to a Web site. When the camcorder is connected to a computer, press to launch the... - Page 9 Multi-indicator light Tele (T) button Zoom in Wide (W) button Zoom out Pause button Press to pause recording. Press it again to continue recording. Mini USB 2.0 port Strap hook Rear/Underside Microphone Photo button Press to take a photo. Video button Press to begin recording.
- Page 10 Quick Tour On-screen touch options Touch the screen to display the options bar at the bottom of the screen. Video Record mode (the Video ( Photo Record mode (the Photo ( Video/Photo Playback mode (touch the Playback ( ) icon while in Preview mode) ) icon is highlighted) Touch to switch between Stabilization ON and OFF.
-
Page 11: Menu Options
Menu options Touch the on-screen Video Settings Light Digital Light Full HD 1080/30 1920 x 1080p (30fps) HD 720/60 Resolution HD 720/30 VGA 480/30 Stabilization Motion Detect Slow Motion NOTE: Pre-Record 1 Sec Time Lapse 3 Sec 5 Sec Continuos Play icon to display the options menu. - Page 12 Quick Tour Photos Settings Light Digital light High-16MP Resolution Standard-8MP Low-3MP Self-Timer Face Tracking Date Printing Auto 1600 2 sec 5 sec Slideshow 10 sec The light turns ON, providing illumination when recording. The light turns OFF. Extends the dynamic range for backlight and high contrast, so that objects are brighter and clearer.
- Page 13 Effects Macro Mode Auto Skin Scene Night Backlight Auto Black & White Filter Classic Negative Auto Daylight White Balance Fluorescent Tungsten Setup Menu Sound NTSC (60Hz) PAL (50Hz) Czech, Danish, Dutch, English, Finnish, French, German, Greek, Italian, Language Norwegian, Polish, Portuguese, Russian, Swedish, Spanish, Turkish. Time Setting Set up Date and Time.
-
Page 14: Webcam Mode
Plug and share Plug and share Install the bundled software application, ArcSoft MediaImpression optimal video playback on your computer. Connect the computer and camcorder with the supplied mini USB 2.0 cable as shown. Videos and photos recorded on your SD™ Card can be found on your computer at My Computer\SD\DCIM\100MEDIA (path will vary depending on name of SD™... - Page 15 Toshiba’s technical support Web site For technical support, or to stay current on the most recent software options for your CAMILEO be sure to regularly check the Toshiba Web site at www.support.toshiba.com. Toshiba voice contact For technical support, call the Toshiba Customer Support Center:...
- Page 16 Peru: 0-800-5-3817 Dominican Republic: 1-888-862-3225 Uruguay: 000-411-002-2297 Venezuela: 0-800-100-8819 *Phone charges apply This product comes with a One (1) Year Standard Limited Warranty. The One (1) Year Standard Limited Warranty for Toshiba Computer Accessories can be found online at http://pcsupport.toshiba.com/accessories1yr.
- Page 17 ® CAMILEO P100 Guía de inicio rápido...
-
Page 18: Instrucciones De Seguridad
12 Elimine las baterías usadas de acuerdo con las instrucciones. Información sobre la batería ❖ Use solamente las baterías recomendadas por TOSHIBA como repuestos. La batería es de iones de litio y puede explotar si no se reemplaza, utiliza, manipula o elimina en forma correcta. Deseche la... - Page 19 Lávese las manos después de tocar el cable. Información reglamentaria TOSHIBA declara que este producto cumple con las siguientes normas: Requisitos de la FCC Este equipo se probó y se comprobó que cumple con la Parte 15 de las normativas de la FCC.
-
Page 20: Marcas Comerciales
(949) 583-3000 Información adicional © Copyright 2011 TOSHIBA CORPORATION. Todos los derechos reservados. TOSHIBA se reserva el derecho de efectuar cambios técnicos. TOSHIBA no asume ninguna responsabilidad por daños directos o indirectos incurridos por errores, omisiones o discrepancias entre este producto y la documentación. - Page 21 Para comenzar La batería ya viene instalada en la videocámara, sin embargo, debe retirar la película protectora de la batería antes de usarla. Para conectar correctamente la batería: Deslice la cubierta de la batería hacia abajo y retírela. Saque la batería. Retire la película.
- Page 22 Para comenzar Para insertar una tarjeta SD™ (opcional): Abra la cubierta de la tarjeta SD™. Inserte la tarjeta SD™ en la ranura hasta que encaje en su lugar. Una vez insertada la tarjeta cierre la cubierta. Carga de la batería Antes de utilizar la videocámara debe cargar la batería usando el adaptador de CA o el cable USB que se suministran.
- Page 23 Referencia rápida Pantalla LCD táctil 1 Para encender la videocámara Presione y mantenga presionado el botón de encendido (...) durante un segundo. Para conservar energía de la batería la videocámara se apaga automáticamente después de 3 minutos de inactividad. 2 Para iniciar o detener una grabación Presione el botón Video (...).
- Page 24 Referencia rápida Lente NOTA: Retire la película protectora del lente antes de usarlo. Parlante Botón de encendido Lados frontal/lateral Botón Reproducir Presionar para cambiar al modo Reproducir. Botón Cargar a Internet (en el modo Reproducir) Presionar para marcar el archivo actual para cargarlo a un sitio web.
- Page 25 Indicador múltiple Botón Tele (T) Efectuar acercamientos Botón granangular (W) Efectuar alejamientos Botón Pausar Presionar para pausar la grabación. Presionar de nuevo para seguir grabando. Mini puerto USB 2.0 Gancho para la correa Lados posterior/inferior Cubierta de la tarjeta SD™ Ranura para el trípode Referencia rápida Micrófono...
- Page 26 Referencia rápida Opciones de sólo un toque Toque la pantalla para que aparezca la barra de opciones en la parte inferior de la pantalla. Modo Grabar video (se resalta el ícono ( Modo Grabar Fotografía (se resalta el ícono ( Modo Reproducir video/fotografía (tocar el ícono Reproducir ( ) en el modo Revisar) ) en la videocámara) Tocar para alternar entre Estabilización ACTIVADA y...
-
Page 27: Opciones Del Men
Opciones del menú Toque el ícono Configuración de video ENCENDIDA La luz se enciende, suministrando iluminación mientras APAGADA Luz digital Full HD 1080/30 HD 720/60 Resolución HD 720/30 VGA 480/30 ACTIVADA Estabilización DESACTIVADA Deshabilita la estabilización digital de la imagen. ACTIVADA Detección de movimiento... - Page 28 Referencia rápida Configuración de las fotografías ENCENDIDA La luz se enciende suministrando iluminación mientras APAGADA Luz digital Alta-16MP Resolución Estándar-8MP 3264 x 2448 (8MP) Baja-3MP ACTIVADO Autotemporizador DESACTIVADO Deshabilita el autotemporizador. ACTIVADO Seguimiento de caras DESACTIVADO Deshabilita el Seguimiento de caras. ACTIVADA Impresión de fecha...
- Page 29 Efectos ACTIVADO Modo Macro DESACTIVADO Deshabilita el modo Macro. Auto Piel Escena Noche Luz de fondo Utilizar cuando hay una luz brillante detrás del sujeto. Auto Blanco y negro La imagen se convierte a blanco y negro. Filtro Clásico Negativo Auto Luz de día Balance de...
- Page 30 Conectar y compartir Seleccionar y Seleccionar los archivos de video y fotografía que desea eliminar. Eliminar Eliminar todo Todos los archivos de video y fotografía. Conectar y compartir Para reproducir video en forma óptima en la computadora, instale el programa de software ArcSoft MediaImpression Con el mini cable USB 2.0 que se suministra conecte la computadora y la videocámara, como se muestra a continuación.
- Page 31 Para obtener información adicional consulte el Manual del usuario. Asistencia técnica de Toshiba Si necesita ayuda o tiene problemas con el funcionamiento de su producto, podría ser necesario ponerse en contacto con Toshiba para obtener asistencia técnica adicional. Antes de contactar a Toshiba Puesto que algunos problemas pueden estar relacionados con el software, es conveniente que recurra primero a otras fuentes de asistencia técnica.
- Page 32 Toshiba: Al (888) 592-0944 dentro de Estados Unidos Al (949) 583-3305 desde fuera de Estados Unidos Centro de Asistencia Telefónica de Toshiba para servicio técnico en español para América Latina. Horas: De lunes a viernes de 8:00 a.m. a 9:00 p.m. (hora estándar del este)