Table of Contents
Advertisement
Quick Links
Installation Instructions
separately attached
English
Before operating the unit, read these Operating Instructions thoroughly and keep them for future reference.
Panasonic Corporation
1006 Oaza Kadoma, Kadoma City, Osaka 571-8501, Japan
Model No.
z Safety precautions .............................................3
z Part names ..........................................................6
• Control panel / Top screen .......................................... 6
• Screen display ............................................................. 8
• Operation guide ........................................................... 8
z Basic operations ................................................9
z Menu list ............................................................12
z ECONAVI function ............................................13
z nanoe™ X function ..........................................16
z Filter sign ..........................................................18
z Outing function ................................................19
z Clock/Clock type/Controller name..................21
z Touch sound/Contrast .....................................22
z Backlight/Language .........................................23
z Contact address/Display mode.......................24
z Setting information list ....................................25
settings ..........................................28
®
z Wireless LAN settings .....................................60
z Troubleshooting ...............................................88
z Specifications ...................................................95
Wireless LAN functionality ..............................97
®
functionality) ................................97
(Wireless LAN functionality) ...........................99
Operating Instructions
Wired Remote Controller
CZ-RTC6BLW
CZ-RTC6WBLW
WEB-ACXF55-27554-EN
F0820-60223
Page
Advertisement
Table of Contents

Related Manuals for Panasonic CZ-RTC6WBLW


Summary of Contents for Panasonic CZ-RTC6WBLW
-
Page 1: Table Of Contents
Operating Instructions Wired Remote Controller CZ-RTC6BLW Model No. CZ-RTC6WBLW Page z Safety precautions ..........3 z Part names ............6 • Control panel / Top screen .......... 6 • Screen display ............. 8 • Operation guide ............8 z Basic operations ..........9 z Menu list ............12... - Page 2 Thank you for purchasing the Panasonic wired remote controller. z Read the Operating Instructions carefully for safe use. This manual describes the Operating Instructions of the wired remote controller. Read this manual as well as operating instructions supplied with indoor units and outdoor units.
-
Page 3: Safety Precautions
Safety precautions WARNING CAUTION This symbol refers to a hazard or unsafe This symbol refers to a hazard or unsafe practice which can result in severe personal practice which can result in personal injury or injury or death. product or property damage. Matters to be observed Prohibited matters WARNING... - Page 4 Safety precautions [General precautions for ECONAVI] WARNING • Do not use the ECONAVI function in a room with disabled persons or infants only. Due to their limited motions, the ECONAVI sensor may judge no person is present, causing the indoor unit to stop the operation.
- Page 5 • Third party wireless LAN interfaces cannot be connected to the “Panasonic Comfort Cloud” app. • Updates to the service may mean there are changes to the design of the “Panasonic Comfort Cloud” app screen and display. [Precautions for using mobile device application] •...
-
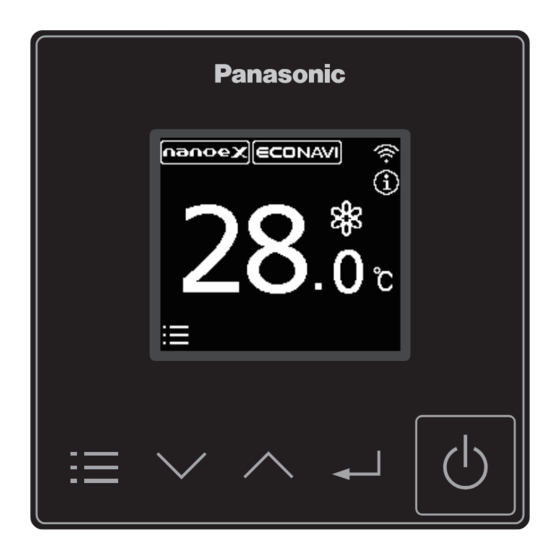
Page 6: Part Names
Part names Control panel / Top screen The control panel colour of CZ-RTC6WBLW is white. Appears when ECONAVI is being set to ON. Connected to a wireless LAN network (ECONAVI settings are possible only when fitted with via a router (P.63)* ECONAVI panel/ECONAVI sensor.) - Page 7 Part names Note Press centre No glove No pen • If no operation is performed for an extended period, the backlight turns off to save electricity. (Press any button for illumination.) (EN)
-
Page 8: Screen Display
Part names Screen display „ Internal cleaning in process „ Internal drying in process z To stop the z To stop the internal cleaning internal drying operation operation Press Press z To resume z To resume operation operation Press Press „... -
Page 9: Basic Operations
Basic operations Start operation. Press • Pressing after recovery from mains power failure will resume operation with the contents before mains power failure has occurred. • It is possible to set the screen in Step 2 as the top screen when starting operation. (P.24 “Display mode”) In that case, skip Step 2 below. - Page 10 Basic operations Set temperature Change the setting. (0.5 °C steps) Press → (Press to finish.) • Cool/Dry : 18.0 °C to 30.0 °C • Heat : 16.0 °C to 30.0 °C • Auto : 17.0 °C to 27.0 °C Operation mode (e.g. Cool, Heat, etc.) Press →...
- Page 11 Basic operations Flap Change the setting. Press → (Press to finish.) : Swing • Pressing during swing can stop the flap at your preferred position. • The swing and airflow direction on the remote controller is not synchronised with the flap movement. •...
-
Page 12: Menu List
Menu list Total number of items Turns the ECONAVI function ON/ 1 ECONAVI* P.13 Number for the selected item OFF. Turns the nanoe™ X function ON/ 2 nanoeX* P.16 OFF. 3 Filter sign Resets the time to filter cleaning. P.18 Prevents the room temperature from rising too high (or dropping 4 Outing function... -
Page 13: Econavi Function
ECONAVI function This function is available by attaching an optional ECONAVI sensor. The ECONAVI sensor detects human activity and conserves energy based on the activity level. Overview of the ECONAVI function • Cooling: Target temperature is the same as the set temperature. High activity •... - Page 14 ECONAVI function Note z ECONAVI can be set using the separately sold ECONAVI panel or by connecting the holder on the wall. z Even when target temperature is changed through the ECONAVI function, the set temperature shown in the remote controller does not change. z Even when Cooling/Heating is changed to Fan through the ECONAVI function, the operation mode shown in the remote controller will still be Cooling/Heating.
- Page 15 ECONAVI function ECONAVI Display the menu screen. „ When stopped Press „ When operating Press repeatedly until the menu screen is displayed. • To return to the top screen, press Select [ECONAVI]. Press → Select [ON] or [OFF]. Press → →...
-
Page 16: Z Nanoe™ X Function
nanoe™ X function Display during operation of nanoe™ X : Under operation of nanoe™ X nanoe™ X For a fresher and cleaner environment nanoe™ X generates negative ions using the air in the room to give a healthy air. It also reduces the smell in the room, and constrains propagations of mold and bacteria. - Page 17 nanoe™ X function nanoe™ X Display the menu screen. „ When stopped Press „ When operating Press repeatedly until the menu screen is displayed. • To return to the top screen, press Select [nanoeX]. Press → Select [ON] or [OFF]. Press →...
-
Page 18: Filter Sign
Filter sign When the cleaning time comes, the icon shown on the right appears on the top screen. Filter sign reset Display the menu screen. „ When stopped Press „ When operating Press repeatedly until the menu screen is displayed. •... -
Page 19: Outing Function
Outing function This function prevents the room temperature from rising too high (or dropping too low) when no one is in the room due to outing, etc. General Performance of the Outing Function Outing function upper limit COOL / DRY 1 °C The air conditioner starts operation when the room temperature increases up to –1 °C of the... - Page 20 Outing function Outing function Display the menu screen. „ When stopped Press „ When operating Press repeatedly until the menu screen is displayed. • To return to the top screen, press Select [Outing function]. Press → Select [Enable/disable]. Press → Select [Enable].
-
Page 21: Clock/Clock Type/Controller Name
Select the type to display. 24 h Press → → AM/PM (Press to finish.) Controller name The controller name can be set only with the “Panasonic H&C Control App”. Confirm the name. Confirm, then press (Press twice to finish.) (EN) -
Page 22: Touch Sound/Contrast
Touch sound/Contrast Steps 1 and 2 are common operations for each item. Display the menu screen. „ When stopped Press „ When operating Press repeatedly until the menu screen is displayed. • To return to the top screen, press Select the item to set. Press →... -
Page 23: Backlight/Language
Backlight/Language Steps 1 and 2 are common operations for each item. Display the menu screen. „ When stopped Press „ When operating Press repeatedly until the menu screen is displayed. • To return to the top screen, press Select the item to set. Press →... -
Page 24: Contact Address/Display Mode
Select the item to set. Press → Contact address The contact address can be set only with the “Panasonic H&C Control App”. Confirm the name and the contact number. Confirm, then press (Press twice to finish.) • If you need to contact for servicing, check the back cover of the operating instructions for indoor units or outdoor units. -
Page 25: Setting Information List
Setting information list This provides the meanings of setting information icons. Display the setting information screen. Press on the top screen. (Press and hold for 4 seconds or more.) Select the icon. Press → • Only icons currently being displayed on the screen are displayed here. - Page 26 Setting information list „ Setting information icon list Icon Description Page The indoor unit is stopped or slight blow operation is in process. – The indoor unit is turned on after a problem such as a power failure is – resolved.
- Page 27 Connected to a wireless LAN network via a router (Signal strength: No signal) Wireless LAN module is considered abnormal. P.91 (alternately) Clock not set (reset due to a power outage) P.90 (alternately) * Can only be set using the “Panasonic H&C Control App” (EN)
-
Page 28: Bluetooth ® Settings
(P.4). Panasonic H&C Control App You can use the “Panasonic H&C Control App” on your mobile device to operate the air conditioning unit, make detailed settings for functions such as the energy saving function, etc. „ Functions that can be set with the “Panasonic H&C Control App” (some... - Page 29 Bluetooth settings ® Bluetooth ® functionality Display the menu screen. „ When stopped Press „ When operating Press repeatedly until the menu screen is displayed. • To return to the top screen, press Select [Bluetooth]. Press → Select [Enable/disable]. Press →...
- Page 30 This setting is the same as Step 4 on page 61. • (enable) cannot be set for the Bluetooth ® functionality and Wireless LAN functionality simultaneously. „ datanavi This unit supports datanavi. For details on the usage, supporting regions, etc., visit the following URL. https://datanavi.ac.smartcloud.panasonic.com/global/ (EN)
- Page 31 Bluetooth® settings Bluetooth ® settings Connecting with the “Panasonic H&C Control App” Before connecting, set Bluetooth functionality to [Enable] on the remote controller. ® (Step 4 on page 29) When connecting, try getting the mobile device as close as possible to the remote controller.
- Page 32 Bluetooth® settings Bluetooth settings ® Confirm the numbers on the mobile device match the 6 digits on the remote controller. • If the numbers do not match, check the remote controller you want to connect again. (Step 2) Start connecting. „...
- Page 33 Bluetooth® settings Bluetooth ® settings „ To delete all mobile device information stored At first, set Bluetooth ® functionality to [Enable]. (P.29) 1. Display the menu screen. „ When stopped Press „ When operating Press repeatedly until the menu screen is displayed. •...
- Page 34 (+ or –) (P.35) Power consumption Energy saving operation monitor (P.39) On/Off (P.42) Weekly timer (P.39) ON/OFF timer (P.41) • Functions are not displayed in the “Panasonic H&C Control App” screen if the air conditioner does not support them. (EN)
- Page 35 Bluetooth® settings Bluetooth settings ® „ Operation mode Touch to select the operation mode. • Auto mode is automatically switched to Cool or Heat to achieve the set temperature. • Operation modes that cannot be set are not displayed. „ Set temperature Change set temperature (dial).
- Page 36 Bluetooth® settings Bluetooth settings ® „ Fan speed Change fan speed. Auto fan toggle • Cannot be selected in Fan mode. • Depending on the model, selectable fan speed may differ. • Depending on the model, either of the displays appears.
- Page 37 Bluetooth® settings Bluetooth ® settings „ Flap setting for each indoor unit When setting flaps for each indoor unit • Flaps of all air outlets of 1 indoor unit face the same direction. e.g. unit 1-1 e.g. unit 1-3 Select the indoor unit. •...
- Page 38 Bluetooth® settings Bluetooth settings ® „ Flap setting for each air outlet (Lock individual flap) When setting the flap for each air outlet individually according to the room condition • Even if the flap setting of all indoor units or each indoor unit (P.37) is changed, the flap directions set here are not changed.
- Page 39 Bluetooth® settings Bluetooth settings ® „ Power consumption monitor Select the period to display • You can view the power consumption (approx.). „ Weekly timer You can set a weekly operation schedule. • The operation ON/OFF schedule or temperature setting schedule can be set by setting the day and time (e.g.
- Page 40 Bluetooth® settings Bluetooth settings ® Add new timer Select temperature. Operation ON/OFF toggle Set time Set conditions Complete the settings. Change/delete timer Edit timer Change timer Delete timer Copy timer Select the day of the week (setting destination) to apply the settings •...
- Page 41 Bluetooth® settings Bluetooth ® settings „ ON/OFF timer This turns ON/OFF at the specified time. (e.g. Turning ON/OFF after 3 hours) 3 hours 3 hours Operation stop Operation start • Use OFF timer for example when: Reducing electric consumption while sleeping •...
- Page 42 Bluetooth® settings Bluetooth settings ® „ Energy saving Refer to page 49 for information about the function. Energy saving operation on/off toggle : Energy saving operation Off : Energy saving operation On (EN)
- Page 43 Bluetooth® settings Bluetooth ® settings „ Information You can view information about the connected units. Call a registered telephone number. This provides the meanings of setting information icons. Details are displayed when you press the icon. Air conditioner error messages Displays the time remaining in hours until the next filter cleaning is required.
- Page 44 Bluetooth® settings Bluetooth settings ® „ Menu list The menus displayed when a remote controller is connected differ to the menus displayed when a remote controller is not connected. When a remote controller is connected When a remote controller is not connected Depending on the model, there are some menus that are not available.
- Page 45 Bluetooth® settings Bluetooth settings ® „ Application settings (Menu Ú Application settings) Change the application’s settings. (Refer to page 46 to change the remote controller’s settings.) Change the display language of the application Change the type of clock display of the application (12h/24h) Change the type of Celsius/Fahrenheit display of the application (EN)
- Page 46 Bluetooth® settings Bluetooth settings ® „ Controller settings (Menu Ú Controller settings) Change the remote controller’s settings. Change the name of the remote controller Change the display language of the remote controller Set the present date and time of the remote controller Change the type of clock display of the remote controller The clock is synchronised with a mobile device.
- Page 47 Bluetooth® settings Bluetooth ® settings „ ECONAVI settings (Menu Ú H&C settings Ú ECONAVI settings) • Direct airflow: When the ECONAVI sensor detects a person, the unit swings wind up and down around where the person is Direct/Indirect airflow present. •...
- Page 48 Bluetooth® settings Bluetooth settings ® *1: Types of the Absence operation mode Select the Absence operation mode from among the following 4 options on the remote controller. • Not set If human activity is detected, the operation status is restored according to the level of human activity.
- Page 49 Bluetooth® settings Bluetooth settings ® „ Energy saving (Menu Ú H&C settings Ú Energy saving) z Temp. auto return Restoring the changed temperature to the originally set temperature automatically after a specified time elapses. (e.g. Only when a guest comes) z Temp.
- Page 50 Bluetooth® settings Bluetooth settings ® „ nanoeX settings (Menu Ú H&C settings Ú nanoeX settings) nanoe™ X function on/off toggle Internal cleaning function on/off toggle „ Outing function (Menu Ú H&C settings Ú Outing function) Outing function on/off toggle Set the upper temperature and lower temperature for the outing function.
- Page 51 Bluetooth® settings Bluetooth ® settings „ Ventilation (Menu Ú H&C settings Ú Ventilation) Ventilation operation on/off toggle „ Internal drying (Menu Ú H&C settings Ú Internal drying) Internal drying function on/off toggle (EN)
- Page 52 (There is a warning displayed 1 minute before.) The password needs to be entered again if you are logged out. • The password also needs to be entered again if the “Panasonic H&C Control App” ends or if the Bluetooth connection is interrupted.
- Page 53 Bluetooth® settings Bluetooth ® settings „ Initial settings (Menu Ú Administrator settings Ú Initial settings) Set whether to use the temperature sensor of the remote controller or the indoor units. Change the Celsius/Fahrenheit display on the unit displayed on the remote controller Change the ventilation output setting.
- Page 54 Bluetooth® settings Bluetooth settings ® „ Schedule peak cut (Menu Ú Administrator settings Ú Schedule peak cut) This reduces the operation capacity for the specified time period. Enable/disable toggle : Enable : Disable Add new setting Set the start time and end time and select the operation capacity. Complete the settings.
- Page 55 Bluetooth® settings Bluetooth settings ® „ Rotation settings (Menu Ú Administrator settings Ú Rotation settings) z Rotation operation Equalizes the operation time by stopping the operation in order. This prevents the operation time from being uneven depending on the refrigerant system. System1 Operation Stand by...
- Page 56 Bluetooth® settings Bluetooth settings ® z ROTATION (Menu Ú Administrator settings Ú Rotation settings Ú Rotation) Change the rotation cycle • 1 to 7 days (by the day) / 14 days / 21 days / 28 days / Not set (Rotation operation OFF) Set the switch-over time.
- Page 57 Bluetooth® settings Bluetooth ® settings „ Operation lock (Menu Ú Administrator settings Ú Operation lock) Locks operations Complete the settings. „ Password change (Menu Ú Administrator settings Ú Password change) Change the remote controller’s password. Input new password. Retype the password to confirm. Complete the settings.
- Page 58 Bluetooth® settings Bluetooth settings ® „ Group list (Menu Ú Group list) Edit the group name. Delete the group information. „ Template settings (Menu Ú Template settings) The settings for the weekly timer and the controller can be saved as templates even when there is no connection with the remote controller.
- Page 59 Bluetooth® settings Bluetooth settings ® <How to load> For the weekly timer Show the list of saved template settings. Select the settings to be loaded. • The template settings are applied to the weekly timer. • The original data is overwritten. •...
-
Page 60: Wireless Lan Settings
• Download and install. • Download and install. z You need to login with your Panasonic ID to use the “Panasonic Comfort Cloud” app. (P.63) z There is no charge for using the “Panasonic Comfort Cloud” app. However, other charges may be incurred for connection and operation. - Page 61 Wireless LAN settings Wireless LAN functionality Display the menu screen. „ When stopped Press „ When operating Press repeatedly until the menu screen is displayed. • To return to the top screen, press Select [WLAN]. Press → Select [Enable/disable]. Press →...
- Page 62 Wireless LAN settings Network status At first, set Wireless LAN functionality to [Enable]. (P.61) Display the menu screen. „ When stopped Press „ When operating Press repeatedly until the menu screen is displayed. • To return to the top screen, press Select [WLAN].
- Page 63 • Mobile device and air conditioner should be connected to the same wireless LAN. • Ensure Wireless LAN is broadcasting SSID. „ Setting flow You will need to operate both the remote controller and the “Panasonic Comfort Cloud” app to perform these settings. 1 Start the “Panasonic Comfort Cloud” app (Step 1)
- Page 64 Wireless LAN settings 1. At My Home screen, tap “+” to add new product. „ Mobile device Tap “+”. 2. Select the “Commercial air conditioner” and choose the “Wired Remote controller”. „ Mobile device Tap “Commercial air conditioner”. Tap “Wired Remote controller”. (EN)
- Page 65 Wireless LAN settings Make the settings for network connection. 1. After confirming that the Wireless LAN functionality on the remote controller is set to [Enable] (P.61), tap “Next”. „ Remote controller Follow the instructions on the app screen. „ Mobile device Tap “Next”.
- Page 66 Follow the instructions on the app screen. „ Mobile device Confirm that “Operating in Manual mode” is displayed, then tap “Next”. 2. Join to connect to the “Panasonic-CZ-C-wirelessAP” network. „ Mobile device (First time only) Tap “Allow While Using App”. Then, tap “Join”. (Subsequent connections) Tap “Join”.
- Page 67 Wireless LAN settings 3. Enter the password of the selected wireless router and continue. „ Mobile device Enter the password, then tap “OK”. 4. When the network connection to the router is successful, “Connected to router” is displayed on the remote controller screen.
- Page 68 Wireless LAN settings Connect to the network using Auto mode. 1. Press the WPS button on the router to establish connection. 2. Tap “Next” after the router is ready for connection. „ Mobile device Tap “Next”. 3. Make the remote controller operate in Auto mode.
- Page 69 Wireless LAN settings 4. When the network connection to the router is successful, “Connected to router” is displayed on the remote controller screen. • It may take some minutes for the connection to be established. „ Mobile device Tap “Next”. Note z If the remote controller screen does not change to “Connected to router”, check the wireless LAN router connections.
- Page 70 Wireless LAN settings < 3 Register the information for the air conditioner on the server > Select the air conditioner and set the password. 1. Select the air conditioner model to register the device. „ Mobile device Tap the indoor unit model number to register.
- Page 71 Note z Confirm the “Panasonic Comfort Cloud” app’s screen connectivity status before or during operation, if the status is not reflected, use in-house remote controller to operate.
- Page 72 Wireless LAN settings „ To create new Panasonic ID If you do not have a Panasonic ID, create one and then login. Use “Panasonic Comfort Cloud” app as an option to control the air conditioner. z For new user, select “Create new Panasonic ID” to register.
- Page 73 Wireless LAN settings Operating with the “Panasonic Comfort Cloud” app Before use, confirm that the remote controller is connected to the router (“ ” is displayed on the top screen of the remote controller). Login Panasonic ID Password Reset Panasonic ID / Password.
- Page 74 Wireless LAN settings Main device screen Air conditioner status (P.75) Back Main menu (P.81) Information (P.75) Indoor air temperature Operating mode* Outdoor ambient temperature Change set temperature (dial) Set temperature* Switch between connected devices Change set temperature (+ or –) Air conditioner ON/OFF Change swing position* Change fan speed*...
- Page 75 Wireless LAN settings „ Information This shows a list of users awaiting approval. User approval User’s control right Air conditioner error messages Notifications „ Air conditioner status Status of all air conditioners in the same group. Individual ON/OFF toggle Air conditioners status (ON/OFF, mode and set temperature) All ON/OFF (EN)
- Page 76 Wireless LAN settings „ Statistics Selection of type Chart Outdoor temperature Set temperature Indoor temperature Comparison of selected dates Date selection Information of selected date * Estimated energy consumption may not be supported by certain models. Comparison Date selection Week selection Information of date selected for comparison •...
- Page 77 Wireless LAN settings „ Weekly timer <Add/edit timer> 1. Tap “Edit timer”. Edit timer ON/OFF timer toggle (Enable/disable) 2. Add new timer or edit timer. Add new timer Select the day of the week. Edit timer Change timer Delete timer (EN)
- Page 78 Wireless LAN settings 3. Set time and conditions. Select mode Select temperature Operation ON/OFF toggle Complete the settings. 4. Tap “Apply” to complete settings. (EN)
- Page 79 Wireless LAN settings <Copy timer> 1. Tap “Edit timer”. Edit timer ON/OFF timer toggle (Enable/disable) 2. Select the copy source day. Then, tap “Copy”. Select the day of the week. (EN)
- Page 80 Wireless LAN settings 3. Select the day of the week (setting destination) to apply settings. Then, tap “OK”. 4. Tap “Apply” to complete settings. (EN)
- Page 81 Change device password. (P.82) Replace device. (P.83) Change router settings. (P.83) List of devices (P.84) List of groups (P.85) Change the language of the app. Operating Instructions Terms of use Privacy notice Copyright Delete Panasonic ID Logout from current Panasonic ID (EN)
- Page 82 Wireless LAN settings „ User list (Menu Ú Owner Ú User list) Edit the name of the user. Enable control of user. Edit / delete the user control. User’s control rights „ Changing device password (Menu Ú Owner Ú Changing device password) Enter old password.
- Page 83 Wireless LAN settings „ Replace device (Menu Ú Owner Ú Replace device) Select “Replace device” from the menu. Tap “Start”. Follow step-by-step instructions on the app. „ Change router settings (Menu Ú Owner Ú Change router settings) Select “Change router settings” from the menu.
- Page 84 Wireless LAN settings „ Device list (Menu Ú Device list) Edit device information and setting. Edit device name. Change device group. Time zone selection Features selection (Features vary depending on air conditioner model.) Delete the device. (EN)
- Page 85 Wireless LAN settings „ Group list (Menu Ú Group list) Edit group name. Delete group. Add new group Enter new group name. (EN)
- Page 86 Wireless LAN settings Restart At first, set Wireless LAN functionality to [Enable]. (P.61) When the wireless LAN communication is considered abnormal, reset the wireless LAN module hardware. Display the menu screen. „ When stopped Press „ When operating Press repeatedly until the menu screen is displayed.
- Page 87 Wireless LAN settings Initialization At first, set Wireless LAN functionality to [Enable]. (P.61) Reset the wireless LAN settings to manufacturing default condition. Display the menu screen. „ When stopped Press „ When operating Press repeatedly until the menu screen is displayed.
-
Page 88: Troubleshooting
Troubleshooting If operation does not start by pressing Check the following before asking for repair. When the [START/ z Being centrally controlled, operation is not STOP is prohibited.] possible. message is displayed z After recovery from blackout, press again. Blackout? →If operation does not start, turn off the circuit breaker and consult the dealer of purchase about the symptom and Model No. - Page 89 Troubleshooting Cannot stop the operation. z Check if the outing function is activated or not. Or the unit starts to run automatically z Check control by central control device. even if (Off) button is pressed. The remote controller z Faulty sensor or incorrect installation. screen displays →Turn OFF the ECONAVI function with the remote controller (P.15) and contact the retailer...
- Page 90 →Disable one of the timer settings. (P.39, according to the set P.77) z If the timer is set on the “Panasonic Comfort time. Cloud” app, check that the Time zone setting is correct. (P.84) z Check if OS of the mobile device is compatible.
- Page 91 Troubleshooting z Confirm that the remote controller is turned z Check the following if “ ” is not displayed on the top screen. Remote controller – Confirm that the Bluetooth ® setting on the remote controller is set to [Enable]. and mobile device (P.29) cannot be connected...
- Page 92 Troubleshooting Wireless LAN functionality z Check if OS of the mobile device is compatible. The “Panasonic The “Panasonic Comfort Cloud” app is not Comfort Cloud” app guaranteed to work with all versions of iOS cannot be installed and Android™ OS.
- Page 93 Troubleshooting z Download “Panasonic Comfort Cloud” app and create new Panasonic ID. Follow initial setting. Once the air conditioner is registered, input the preset Register additional device password (set by first user). user to control the Approval from administrator (first user) is air conditioner.
- Page 94 “Change router settings”. z Ensure the mobile device compatibility. Install “Panasonic Comfort Cloud” app and Change of mobile login using your Panasonic login ID and device’s model password. Complete by initial connection setup. z Change the remote controller and then, use “Panasonic Comfort Cloud”...
-
Page 95: Specifications
® word mark and logos are registered trademarks owned by Bluetooth SIG, Inc. and any use of such marks by Panasonic Corporation is under license. Other trademarks and trade names are those of their respective owners. • iOS is the name of the OS of Apple Inc. IOS is a trademark or registered trademark of Cisco in the US and other countries which has been licensed for use. - Page 96 The full text of the declaration of conformity is available at the following internet address: http://www.ptc.panasonic.eu/ Contact in the UK: Panasonic UK, a branch of Panasonic Marketing Europe GmbH, Maxis 2, Western Road, Bracknell, Berkshire, RG12 1RT (EN)
-
Page 97: Firmware Update Function For Wireless Lan Functionality
Firmware Update Function for Wireless LAN functionality This product has functionality for connecting to the Panasonic firmware update server over the Internet to automatically update the device firmware to the latest version. To update the firmware, the device will do check, once per day, whether its firmware is the latest version after power up. - Page 98 2. Grant of Copyright License. Subject to the terms and conditions 7. Disclaimer of Warranty. Unless required by applicable law of this License, each Contributor hereby grants to You a perpetual, or agreed to in writing, Licensor provides the Work (and each worldwide, non-exclusive, no-charge, royalty-free, irrevocable Contributor provides its Contributions) on an “AS IS”...
-
Page 99: Software License Information (Wireless Lan Functionality)
“Software License” menu on this product. Copyright (C) 2006-2016, ARM Limited, All Rights Reserved At least three (3) years from delivery of this product, Panasonic will Apache License give to any third party who contacts us at the contact information Version 2.0, January 2004... - Page 100 Copyright2 “Contribution” shall mean any work of authorship, including the 5. Submission of Contributions. Unless You explicitly state original version of the Work and any modifications or additions otherwise, any Contribution intentionally submitted for inclusion to that Work or Derivative Works thereof, that is intentionally in the Work by You to the Licensor shall be under the terms submitted to Licensor for inclusion in the Work by the copyright and conditions of this License, without any additional terms or...
- Page 101 =================================================== + Every copy of the combined work is accompanied by a Copyright (c) 2003-2016, Jouni Malinen written statement that details to the recipient the version <j@w1.fi > and contributors All Rights Reserved. of FreeRTOS used and an offer by yourself to provide the This program is licensed under the BSD license (the one with FreeRTOS source code (including any modifications you may advertisement clause removed).
- Page 102 Copyright3 The precise terms and conditions for copying, distribution and 3. You may copy and distribute the Program (or a work based modification follow. on it, under Section 2) in object code or executable form under the GNU GENERAL PUBLIC LICENSE terms of Sections 1 and 2 above provided that you also do one of TERMS AND CONDITIONS FOR COPYING, the following:...
- Page 103 If any portion of this section is held invalid or unenforceable How to Apply These Terms to Your New Programs under any particular circumstance, the balance of the section is If you develop a new program, and you want it to be of the intended to apply and the section as a whole is intended to apply greatest possible use to the public, the best way to achieve this in other circumstances.
- Page 104 Copyright4 (2) University of California, Berkeley (4) Advanced Micro Devices Copyright (c) 1981-2000 The Regents of the University of California. Copyright 1989, 1990 Advanced Micro Devices, Inc. All rights reserved. This software is the property of Advanced Micro Devices, Inc Redistribution and use in source and binary forms, with or without (AMD) which specifically grants the user the right to modify, use modification, are permitted provided that the following conditions...
- Page 105 IN NO EVENT SHALL THE AUTHOR BE LIABLE FOR ANY 2. Redistributions in binary form must reproduce the above DIRECT, INDIRECT, INCIDENTAL, SPECIAL, EXEMPLARY, copyright notice, this list of conditions and the following OR CONSEQUENTIAL DAMAGES (INCLUDING, BUT NOT disclaimer in the documentation and/or other materials provided LIMITED TO, PROCUREMENT OF SUBSTITUTE GOODS OR with the distribution.
- Page 106 Copyright5 (17) S. L. Moshier (20) DJ Delorie (i386) Author: S. L. Moshier. Copyright (C) 1991 DJ Delorie Copyright (c) 1984,2000 S.L. Moshier All rights reserved. Permission to use, copy, modify, and distribute this software for Redistribution, modification, and use in source and binary forms is any purpose without fee is hereby granted, provided that this entire permitted provided that the above copyright notice and following notice is included in all copies of any software which is or includes...
- Page 107 (27) Konstantin Chuguev (--enable-newlib-iconv) THIS SOFTWARE IS PROVIDED BY THE AUTHOR “AS IS” Copyright (c) 1999, 2000 AND ANY EXPRESS OR IMPLIED WARRANTIES, INCLUDING, Konstantin Chuguev. All rights reserved. BUT NOT LIMITED TO, THE IMPLIED WARRANTIES OF MERCHANTABILITY AND FITNESS FOR A PARTICULAR Redistribution and use in source and binary forms, with or without PURPOSE ARE DISCLAIMED.
- Page 108 Copyright6 (33) - Daniel Eischen (targets using libc/posix) THIS SOFTWARE IS PROVIDED BY THE AUTHOR AND Copyright (c) 2001 Daniel Eischen <deischen@FreeBSD.org>. CONTRIBUTORS “AS IS” AND ANY EXPRESS OR IMPLIED All rights reserved. WARRANTIES, INCLUDING, BUT NOT LIMITED TO, THE IMPLIED WARRANTIES OF MERCHANTABILITY AND FITNESS Redistribution and use in source and binary forms, with or without FOR A PARTICULAR PURPOSE ARE DISCLAIMED.
- Page 109 Setting Information Indoor unit model name Indoor unit serial number Outdoor unit model name Outdoor unit serial number System commissioning date Remote controller installation date Installer Contact Details Name Telephone number Maximum radio-frequency power transmitted in the frequency bands Type of wireless Frequency band Max EIRP (dBm) Bluetooth...
- Page 110 CZ-RTC6WBLW Model No. R-NZ Contact in the UK Panasonic UK, a branch of Panasonic Marketing Europe GmbH, Maxis 2, Western Road, Bracknell, Berkshire, RG12 1RT Authorized representative in EU Panasonic Testing Centre Panasonic Marketing Europe GmbH Winsbergring 15, 22525 Hamburg, Germany Panasonic Corporation http://www.panasonic.com...