Advertisement
- 1 Explanation of symbols
- 2 General information
- 3 Installation
- 4 Preparation
- 5 How to operate the device
- 6 Maintenance and care
- 7 Troubleshooting
- 8 Important instructions and warnings for safety
- 9 Documents / Resources
Explanation of symbols
Throughout this user manual the following symbols are used:
 | Important information or useful hints about usage. |
 | Warning of hazardous situations with regard to life and property. |
 | Warning of electric shock. |
 | Warning of risk of fire. |
| Warning of hot surfaces. |
General information
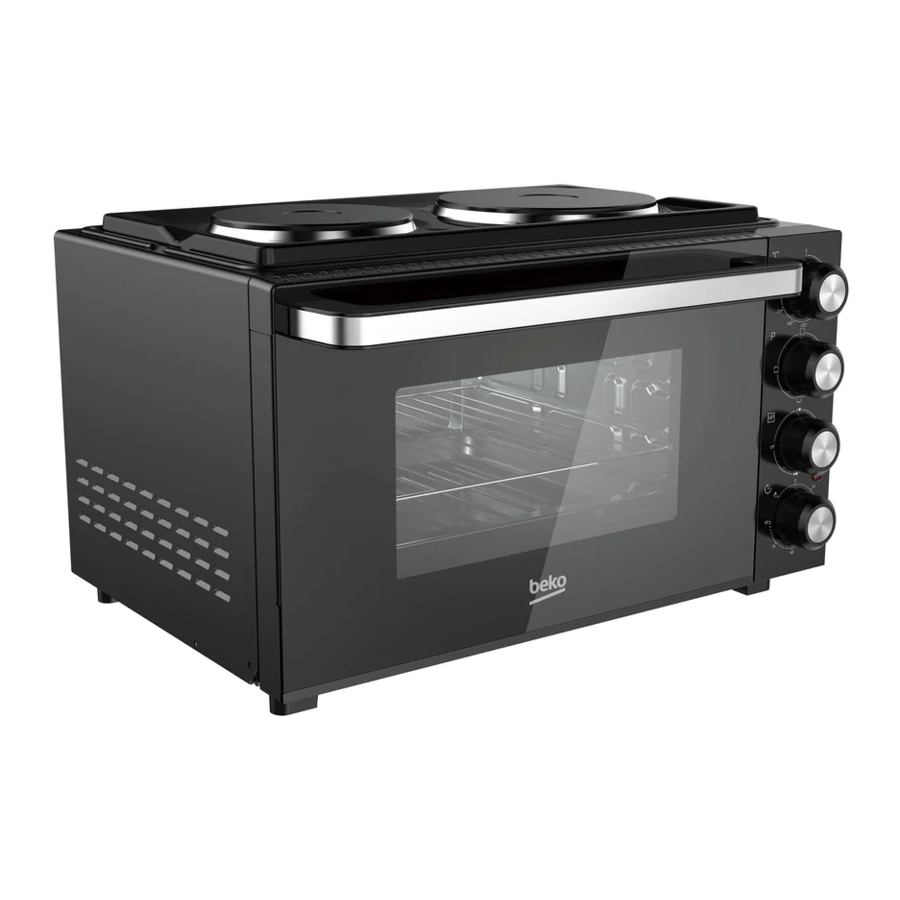
Overview

- Big hotplate
- Heating element
- Glass door
- Handle
- Small hotplate

- Thermostat
- Function
- Hotplate function
- Power indicator
- Timer
Operating modes
 | Off position |
 | Upper heating elements/Lower heating elements This functions are ideal for cooking cake, in general. |
 | Upper heating elements + lower heating elements This function is ideal for cooking bread, pizza, and fowl in general. |
 | Small hotplate |
 | Big hotplate |
 | Both hotplates |
Package contents
Accessories supplied can vary depending on the product model. Not every accessory described in the user manual may exist with your product.
- User manual
- Crumb tray
For collecting fallen oil or crumb.
![]()
- Food Tray
For use in broiling and roasting meat, poultry, fish, and various other foods.
![]()
- Food Tray Handle
For removing rack or tray.
![]()
- Wire Rack
For toasting, baking, and general cooking in casserole dishes and standard pans.
![]()


Technical specifications
| External dimensions (height / width / depth) | 510 mm /615 mm/395mm |
| Voltage / frequency | 220-240 V ~ 50/60 Hz |
| Total power consumption | 2500W (1500W for oven 1000W for big burner) |
| Cable type / section | min. H05RR-F 3 x 1 mm2 |
| Main oven | Conventional oven |
| Net volume# | 30 lt |
Technical specifications may be changed without prior notice to improve the quality of the product.
Figures in this manual are schematic and may not exactly match your product.
Values stated on the product labels or in the documentation accompanying it are obtained in laboratory conditions in accordance with relevant standards. Depending on operational and environmental conditions of the product, these values may vary.
Installation
Refer to the nearest Authorised Service Agent for installation of the product. Make sure that the electric and gas installations are in place before calling the Authorised Service Agent to have the product ready for operation. If not, call a qualified electrician and fitter to have the required arrangements made. The manufacturer shall not be held responsible for damages arising from procedures carried out by unauthorized persons which may also void the warranty.
Preparation of location and electrical installation for the product is under customer's responsibility.
The product must be installed in accordance with all local electrical regulations.
Prior to installation, visually check if the product has any defects on it. If so, do not have it installed. Damaged products cause risks for your safety.
Before installation
This product is intended for use only on a counter. Rear surface of appliances should be placed against a wall.
Do not use the product in a closed cabinet or on the floor level.
The kitchen floor must be able to carry the weight of the appliance plus the additional weight of cookware and bakeware and food.
- Any kitchen furniture next to the appliance must be heat-resistant (100°C min.).
Installation and connection
Product can only be installed and connected in accordance with the statutory installation rules.
Do not install the product next to refrigerators or freezers. The heat emitted by the product will increase the energy consumption of cooling appliances.
Do not use the door and/or handle to carry or move the product. The door, handle or hinges get damaged.
Electrical connection
Connect the product to a grounded outlet/line protected by a miniature circuit braker of suitable capacity as stated in the "Technical specifications" table. Have the grounding installation made by a qualified electrician while using the product with or without a transformer. Our company shall not be liable for any damages that will arise due to using the product without a grounding installation in accordance with the local regulations.
The product must be connected to the mains supply only by an authorised and qualified person. The product's warranty period starts only after correct installation.
Manufacturer shall not be held responsible for damages arising from procedures carried out by unauthorised persons.
The power cable must not be clamped, bent or trapped or come into contact with hot parts of the product.
A damaged power cable must be replaced by a qualified electrician. Otherwise, there is risk of electric shock, short circuit or fire!
The mains supply data must correspond to the data specified on the type label of the product. The rating plate is either seen when the door or the lower cover is opened or it is located at the rear wall of the unit depending on the unit type. Power cable of your product must comply with the values in "Technical specifications" table.
Power cable plug must be within easy reach after installation (do not route it above the hob).
While performing the wiring, you must apply with the national/local electrical regulations and must use the appropriate socket outlet/line and plug for oven. In case of the product's power limits are out of current carrying capability of plug and socket outlet/line, the product must be connected through fixed electrical installation directly without using plug and socket outlet/line.
Before starting any work on the electrical installation, disconnect the product from the mains supply. There is the risk of electric shock!
Connect the power cable into the socket.
- Push the product towards the kitchen wall.
Final check
- Check electrical functions.
Future Transportation
- Keep the product's original carton and transport the product in it. Follow the instructions on the carton. If you do not have the original carton, pack the product in bubble wrap or thick cardboard and tape it securely.
- To prevent the wire grill and tray inside the oven from damaging the oven door, place a strip of cardboard onto the inside of the oven door that lines up with the position of the trays. Tape the oven door to the side walls.
- Do not use the door or handle to lift or move the product.
Do not place any objects onto the product and move it in upright position.
Check the general appearance of your product for any damages that might have occurred during transportation.
Preparation
Tips for saving energy
The following information will help you to use your appliance in an ecological way, and to save energy:
- Use dark coloured or enamel coated cookware in the oven since the heat transmission will be better.
- While cooking your dishes, perform a preheating operation if it is advised in the user manual or cooking instructions.
- Do not open the door of the oven frequently during cooking.
- Try to cook more than one dish in the oven at the same time whenever possible. You can cook by placing two cooking vessels onto the wire shelf.
- Cook more than one dish one after another. The oven will already be hot.
- You can save energy by switching off your oven a few minutes before the end of the cooking time. Do not open the oven door.
- Defrost frozen dishes before cooking them.
Initial use
First cleaning of the appliance
The surface might get damaged by some detergents or cleaning materials.
Do not use aggressive detergents, cleaning powders/creams or any sharp objects during cleaning. Do not use harsh abrasive cleaners or sharp metal scrapers to clean the oven door glass since they can scratch the surface, which may result in shattering of the glass.
- Remove all packaging materials.
- Wipe the surfaces of the appliance with a damp cloth or sponge and dry with a cloth.
Initial heating
Heat up the product for about 30 minutes and then switch it off. Thus, any production residues or layers will be burnt off and removed.

Hot surfaces cause burns! Product may be hot when it is in use. Never touch the hot burners, inner sections of the oven, heaters and etc. Keep children away.
Always use heat resistant oven gloves when putting in or removing dishes into/from the hot oven.
Electric oven
- Take all baking trays and the wire grill out of the oven.
- Close the oven door.
- Select
![]() position.
position. - Select the highest temperature; See How to operate the device.
- Operate the oven for about 15 minutes.
- Turn off your oven; See How to operate the device
Smoke and smell may emit for a couple of hours during the initial operation. This is quite normal. Ensure that the room is well ventilated to remove the smoke and smell. Avoid directly inhaling the smoke and the smell that emits.
How to operate the device
General information on baking and roasting
Hot surfaces cause burns! Product may be hot when it is in use. Never touch the hot burners, inner sections of the oven, heaters and etc. Keep children away. Always use heat resistant oven gloves when putting in or removing dishes into/from the hot oven.
Be careful when opening the oven door as steam may escape. Exiting steam can scald your hands, face and/or eyes.
Tips for baking
- Use non-sticky coated appropriate metal plates or aluminum vessels or heat-resistant silicone moulds.
- Make best use of the space on the rack.
- Place the baking mould in the middle of the shelf.
- Select the correct rack position before turning the oven or grill on. Do not change the rack position when the oven is hot.
- Keep the oven door closed.
Tips for roasting
- Treating whole chicken, turkey and large piece of meat with dressings such as lemon juice and black pepper before cooking will increase the cooking performance.
- It takes about 15 to 30 minutes longer to roast meat with bones when compared to roasting the same size of meat without bones.
- Each centimeter of meat thickness requires approximately 4 to 5 minutes of cooking time.
- Let meat rest in the oven for about 10 minutes after the cooking time is over. The juice is better distributed all over the roast and does not run out when the meat is cut.
- Fish should be placed on the middle or lower rack in a heat-resistant plate.
How to operate the device

Select temperature and operating mode
- Thermostat
- Function
- Hotplate function
- Power indicator
- Timer
Turning on the unit
Use the Function knob to select the operating mode and set the temperature using the Thermostat. You should turn the timer knob to a specific cooking time or to "Stay On" to start the oven.
Turning off the unit
You can turn the oven off by turning the function selection, temperature and timer knobs to the off (up) position.
Manual cooking by selecting temperature and unit operating function
You can cook without setting the cooking time by selecting the temperature and operating function specific to your food.
Example:
- Select the operating function you want to cook using the function selection knob.
![]()
- Set the temperature you want to cook using the temperature knob.
![]()
- Turn the timer knob to "Stay On" symbol.
![]()
- Your oven will start operating immediately at the selected function and temperature, and the indicator lamp will light up. The oven does not switch off automatically after starting cooking. You have to control cooking yourself and turn it off. When your cooking is completed, turn off the oven by turning the function selection, temperature and timer knobs to the off (up) position.


Cooking by setting the cooking time
You can have the oven turn off automatically at the end of the time by selecting the temperature and operating function specific to your food and setting the cooking time on the timer.
Example:
- Select the operating function you want to cook using the function selection knob.
![]()
- Set the temperature you want to cook using the temperature knob.
![]()
- Turn the timer knob to time you want to cook.
![]()
- Your oven will start operating immediately at the selected function and temperature, and the indicator lamp will light up.
- When the cooking time is over, the timer knob automatically rotates counterclockwise. A warning tone sounds and the oven stops cooking.
- If your cooking is completed, turn the oven off by turning the function selection and temperature knobs to the off (up) position. If you want to continue, turn the timer knob back to a certain cooking time. The oven continues to operate at the set function and temperature.


To turn off cooking earlier than the time you set
- Turn the timer knob counter-clockwise until it reaches the off (up) position.
- Turn the oven off by turning the function selection and temperature knobs to the off (up) position.
Using hotplates
Using alternatives


This function could be used to cook various liquid foods, such as casserole dishes, milk, coffee.
Note:
- Utensils that can be placed on top of the heater to heat food includes all utensils made of ferrite element such as enamel, cast or stainless steel with a smooth base which diameter in 145- 180mm, have a flat bottom and are covered with lid.
- Utensils that should not be to heat food include those made of aluminum or copper; and containers with a base diameter no more than hotplate set value.
Operation:
- Place food to be cooked on cooking utensil and then place the utensil on the hotplate.
- Turn the function knob to select the heater you want to use.
- Set the Thermostat knob to the desired cooking temperature if cooked with the toast function.
- Set the Timer knob to the desired cooking time
- To check or remove food, use the handle to help side food in and out.
- When toasting is complete, a bell will sound and the Timer knob will back to off position automatically. Open door completely and remove the food with handle.
Cooked food, metal rack/tray, and door can be very hot, handle with care. Do not leave the oven unattended.
Cooking times table
The timings in this chart are meant as a guide. Timings may vary due to temperature of food, thickness, type and your own preference of cooking.
Baking and roasting
1st rack of the oven is the bottom rack.
| Dish | Cooking vessel | Rack position | Temperature (°C) | Cooking time (approx. in min.)  |
| cake in tray | oven tray | 2 | 160 | 20~24min |
| cakes in mould | cake mould | 1 | 150 | 35~45min |
| cookies | oven tray | 3 | 150 | 18~24min |
| donut | oven tray | 2 | 150 | 6~8min |
| Rich pastry | oven tray | 2 | 160 | 16~20min |
| Pizza | oven tray | 2 | 200 | 12~15min |
| Roasted chicken | oven tray | 1 | 220 | 40~60min |
| Steak | oven tray | 2 | 230 | 12~15min |
| Fish | oven tray | 2 | 230 | 18~22min |
| Leg of lamb | oven tray | 2 | 200 | 50~60min |
Maintenance and care
General information
Service life of the product will extend and the possibility of problems will decrease if the product is cleaned at regular intervals.
Disconnect the product from mains supply before starting maintenance and cleaning works. There is the risk of electric shock!
Allow the product to cool down before you clean it. Hot surfaces may cause burns!
- Clean the product thoroughly after each use. In this way it will be possible to remove cooking residues more easily, thus avoiding these from burning the next time the appliance is used.
- No special cleaning agents are required for cleaning the product. Use warm water with washing liquid, a soft cloth or sponge to clean the product and wipe it with a dry cloth.
- Always ensure any excess liquid is thoroughly wiped off after cleaning and any spillage is immediately wiped dry.
- Do not use cleaning agents that contain acid or chloride to clean the stainless or inox surfaces and the handle. Use a soft cloth with a liquid detergent (not abrasive) to wipe those parts clean, paying attention to sweep in one direction.
The surface might get damaged by some detergents or cleaning materials. Do not use aggressive detergents, cleaning powders/creams or any sharp objects during cleaning. Do not use harsh abrasive cleaners or sharp metal scrapers to clean the oven door glass since they can scratch the surface, which may result in shattering of the glass.
Do not use steam cleaners to clean the appliance as this may cause an electric shock.
Cleaning the hob
Electric hobs
- Turn off the hotplates and wait until they cool down.
- If necessary, clean the plates with a cleaning agent (you can obtain cleaners/softeners from specialty stores).
![]()
- Warm only for a few minutes after cleaning in order to have their top section dried.
![]()
- Apply a thin layer of machine oil onto the top surface of the hob regularly in order to protect it.


Cleaning the control panel
Clean the control panel and knobs with a damp cloth and wipe them dry.
If your product is equipped with buttons/knobs do not remove the control buttons/knobs to clean the control panel. Control panel may get damaged!
Cleaning the appliance
Clean oven door
To clean the oven door, use warm water with washing liquid, a soft cloth or sponge to clean the product and wipe it with a dry cloth.
Don't use any harsh abrasive cleaners or sharp metal scrapers for cleaning the oven door. They could scratch the surface and destroy the glass.
Replacing the oven lamp
Before replacing the oven lamp, make sure that the product is disconnected from mains and cooled down in order to avoid the risk of an electrical shock. Hot surfaces may cause burns!
The oven lamp is a special electric light bulb that can resist up to 300°C. See Technical specifications for details. Oven lamps can be obtained from Authorised Service Agents or technician with licence.
Position of lamp might vary from the figure.
The lamp used in this appliance is not suitable for household room illumination. The intended purpose of this lamp is to assist the user to see foodstuffs.
The lamps used in this appliance have to withstand extreme physical conditions such as temperatures above 50°C.
If your oven is equipped with a round lamp:
- Disconnect the product from mains.
- Turn the glass cover counter clockwise to remove it.

- If your oven lamp is of type (A) shown in the figure below, remove it by rotating as shown and replace it. If it is of type (B), pull and remove it as shown in the figure and replace it.

- Install the glass cover.


Troubleshooting
Product emits steam when it is in use
- It is normal that steam escapes during operation. >>> This is not a fault.
Product emits metal noises while heating and cooling
- When the metal parts are heated, they may expand and cause noise. >>> This is not a fault.
Product does not operate
- The mains fuse is defective or has tripped. >>> Check fuses in the fuse box. If necessary, replace or reset them.
- Product is not plugged into the (grounded) socket. >>> Check the plug connection.
The unit light does not work
- Oven lamp is defective. >>> Replace oven lamp.
- Power is cut. >>> Check if there is power. Check the fuses in the fuse box. If necessary, replace or reset the fuses.
The unit does not heat
- Might not be set to a certain cooking function and/or temperature. >>> Set the oven to a certain cooking function and/or temperature.
- In models equipped with a timer, the timer is not adjusted. >>> Adjust the time. (In products with microwave oven, timer controls only microwave oven.)
- Power is cut. >>> Check if there is power. Check the fuses in the fuse box. If necessary, replace or reset the fuses.
Consult the Authorised Service Agent or technician with licence or the dealer where you have purchased the product if you can not remedy the trouble although you have implemented the instructions in this section. Never attempt to repair a defective product yourself.
Important instructions and warnings for safety
This section contains safety instructions that will help protect from risk of personal injury or property damage. Failure to follow these instructions shall void any warranty.
General safety
- This appliance can be used by children aged from 8 years and above and persons with reduced physical, sensory or mental capabilities or lack of experience and knowledge if they have been given supervision or instruction concerning use of the appliance in a safe way and understand the hazards involved.
Children shall not play with the appliance. Cleaning and user maintenance shall not be made by children without supervision. - The appliance is not to be used by persons (including children) with reduced physical, sensory or mental capabilities, or lack of experience and knowledge, unless they have been given supervision or instruction. Children should be supervised and ensure they do not play with the appliance
- If the product is handed over to someone else for personal use or second-hand use purposes, the user manual, product labels and other relevant documents and parts should be also given.
- Installation and repair procedures must always be performed by Authorised Service Agents. The manufacturer shall not be held responsible for damages arising from procedures carried out by unauthorised persons which may also void the warranty. Before installation, read the instructions carefully.
- Do not operate the product if it is defective or has any visible damage.
- Ensure that the product function knobs are switched off after every use.
Electrical safety
![shock hazard]() If the product has a failure, it should not be operated unless it is repaired by an Authorised Service Agent. There is the risk of electric shock!
If the product has a failure, it should not be operated unless it is repaired by an Authorised Service Agent. There is the risk of electric shock!- Only connect the product to a grounded outlet/line with the voltage and protection as specified in the "Technical specifications". Have the grounding installation made by a qualified electrician while using the product with or without a transformer. Our company shall not be liable for any problems arising due to the product not being earthed in accordance with the local regulations.
![shock hazard]() Never wash the product by spreading or pouring water onto it! There is the risk of electric shock!
Never wash the product by spreading or pouring water onto it! There is the risk of electric shock!- Never touch the plug with wet hands! Never unplug by pulling on the cable, always pull out by holding the plug.
- The product must be disconnected during installation, maintenance, cleaning and repairing procedures.
- If the power connection cable for the product is damaged, it must be replaced by the manufacturer, its service agent or similarly qualified persons in order to avoid a hazard.
- The appliance must be installed so that it can be completely disconnected from the mains supply. The separation must be provided by a switch built into the fixed electrical installation, according to construction regulations.
- Rear surface of the oven gets hot when it is in use. Make sure that the electrical connection does not contact with the rear surface; otherwise, connections can get damaged.
![burn hazard]()
![shock hazard]()
Do not trap the mains cable between the oven door and frame and do not route it over hot surfaces. Otherwise, cable insulation may melt and cause fire as a result of short circuit.- Any work on electrical equipment and systems should only be carried out by authorised and qualified persons.
- In case of any damage, switch off the product and disconnect it from the mains. To do this, turn off the fuse at home.
- Make sure that fuse rating is compatible with the product.
- To disconnect, turn the control to OFF, then unplug the plug. Always hold the plug, but never pull the cord.
Product safety
![]()
The appliance and its accessible parts become hot during use. Care should be taken to avoid touching heating elements. Children less than 8 years of age shall be kept away unless continuously supervised.- Never use the product when your judgment or coordination is impaired by the use of alcohol and/or drugs.
![burn hazard]() Be careful when using alcoholic drinks in your dishes. Alcohol evaporates at high temperatures and may cause fire since it can ignite when it comes into contact with hot surfaces.
Be careful when using alcoholic drinks in your dishes. Alcohol evaporates at high temperatures and may cause fire since it can ignite when it comes into contact with hot surfaces.- Food Poisoning Hazard: Do not let food sit in oven for more than 1 hour before or after cooking. Doing so can result in food poisoning or sickness.
![burn hazard]()
![shock hazard]()
Oversized foods or metal utensils must not be inserted in an electric oven as they may create a fire or risk of electric shock.- The weight of the food which is put on the S3 Food Tray/Wire Rack cannot be over 3.0kg.
- Do not place any flammable materials close to the product as the sides may become hot during use.
- Do not place any of the following materials in the oven: cardboard, plastic, paper, or anything similar.
- During use the appliances becomes hot. Care should be taken to avoid touching heating elements inside the oven.
- Do not rest cooking utensils or baking dishes on glass door.
- Keep all ventilation slots clear of obstructions.
- Do not heat closed tins and glass jars in the oven. The pressure that would build-up in the tin/jar may cause it to burst.
- The use of accessory attachments not recommended by the appliance manufacturer may cause hazard or injury.
- Do not place baking trays, dishes or aluminium foil directly onto the bottom of the oven. The heat accumulation might damage the bottom of the oven.
- The accessible surfaces of the appliance get very hot. Never touch the hot surfaces.
- Pay attention to the information in the section Installation. The Appliance becomes very hot, it must not be installed in built-in unit.
- This appliances is intended to be used in household and similar applications such as:
- staff kitchen areas in shops, offices and others working environments;
- farm houses;
- by clients in hotels, motels and other residential type environments;
- bed and breakfast type environments.
![]()
Sufficient time should be allowed for product to cool in repeated usages.- The oven must not be covered when running.
- Do not use harsh abrasive cleaners or sharp metal scrapers to clean the oven door glass since they can scratch the surface, which may result in shattering of the glass.
![shock hazard]() Do not use steam cleaners to clean the appliance as this may cause an electric shock.
Do not use steam cleaners to clean the appliance as this may cause an electric shock.![]()
Unattended cooking on a hob with fat or oil can be dangerous and may result in fire. NEVER try to extinguish a fire with water, but switch off the appliance and then cover flame e.g. with a lid or a fire blanket.![]()
The cooking process has to be supervised. A short term cooking process has to be supervised continuously.![]()
Danger of fire: Do not store items on the cooking surfaces.- The appliance is not intended to be operated by means of an external timer or separate remote-control system.
![]()
Use only hob guards designed by the manufacturer of the cooking appliance or indicated by the manufacturer of the appliance in the instructions for use as suitable or hob guards incorporated in the appliance. The use of inappropriate guards can cause accidents.- Do not use the product if the front door glass is removed or cracked.
- Always use heat resistant oven gloves when putting in or removing dishes into/from the hot oven.
- Place the baking paper into the cooking pot or on to the oven accessory (tray, wire grill etc) together with the food and then insert all into the preheated oven. Remove the excess parts of the baking paper overflowing from the accessory or the pot in order to prevent the risk of touching the oven's heating elements. Never use the baking paper in an operating temperature higher than the indicated value for the baking paper. Do not place the baking paper directly on the base of the oven.
![]()
Ensure that power cord of the appliance is unplugged or circuit breaker is switched off before replacing the lamp to avoid the possibility of electric shock.- The appliance must not be installed behind a decorative door in order to avoid overheating.
- Product must be placed directly on the floor. It must not be placed onto a base or a pedestal.
![burn hazard]() The appliance is not intended to be operated by means of an external timer or separate remote-control system. Prevention against possible fire risk!
The appliance is not intended to be operated by means of an external timer or separate remote-control system. Prevention against possible fire risk!- Ensure all electrical connections are secure and tight to prevent risk of arcing.
- Do not use damaged cables or extension cables.
- Ensure liquid or moisture is not accessible to the electrical connection point.


Intended use
- This product is designed for domestic use. Commercial use will void the guarantee.
- Do not use the product in balcony, terrace, garden etc.
![]()
This appliance is for cooking purposes only. It must not be used for other purposes, for example room heating.- This product should not be used for warming the plates under the grill, drying towels, dish cloths etc. by hanging them on the oven door handles. This product should also not be used for room heating purposes.
- The manufacturer shall not be liable for any damage caused by improper use or handling errors.
- The oven can be used for defrosting, baking, roasting and grilling food.
Safety for children
![]()
Accessible parts may become hot during use. Young children should be kept away.- The packaging materials will be dangerous for children. Keep the packaging materials away from children. Please dispose of all parts of the packaging according to environmental standards.
- Electrical products are dangerous to children. Keep children away from the product when it is operating and do not allow them to play with the product.
- Do not place any items above the appliance that children may reach for.
- When the door is open, do not load any heavy object on it and do not allow children to sit on it. It may overturn or door hinges may get damaged.

Documents / ResourcesDownload manual
Here you can download full pdf version of manual, it may contain additional safety instructions, warranty information, FCC rules, etc.
Advertisement
Thank you! Your question has been received!


Need Assistance?
Do you have a question about the MSH30B that isn't answered in the manual? Leave your question here.