Advertisement
Quick Links
Advertisement

Related Manuals for Yamaha G1D


Summary of Contents for Yamaha G1D
- Page 1 Owner’s Manual Bedienungsanleitung Mode d’emploi...
-
Page 2: Table Of Contents
The G1D is a high-performance guitar synthesizer pickup/driver designed for use with the Yamaha G50 Guitar MIDI Converter. When properly installed and adjusted it can add high-performance MIDI guitar synthesizer capability to just about any electric or steel-string acoustic guitar. -
Page 3: Precautions
• Disconnect all cables before moving the instrument or any connected equipment. YAMAHA is not responsible for damage caused by improper installation, handling, or operation. Precautions !! PLEASE READ THIS BEFORE PROCEEDING !! Handling and Transport •... -
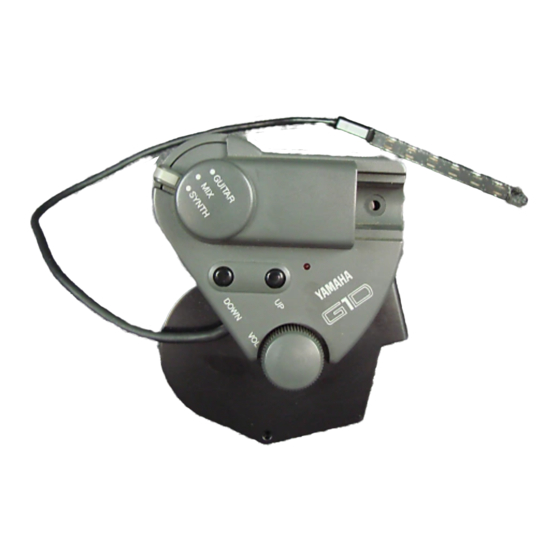
Page 4: Nomenclature
Handle the pickup carefully! 2 Multi-pin Cable Connector This is the main output from the G1D. One end of the multi-pin cable supplied with the G50 Guitar MIDI Converter is plugged in here, and the other end of the cable is plugged into the DIVIDED INPUT connector on the G50. -
Page 5: Installation
Installation Installing the G1D on a guitar is not a difficult process, but it does require care and at least a modicum of mechanical ability. If you don’t feel totally confident that you can handle the job, it might be a good idea to leave the installation to someone experienced in guitar modification or repair. - Page 6 Hardware The following parts are provided for installation of the controller unit. Please make sure you have all the parts. • Self-tapping round-head screw (3x16mm) ... 1 • Double-sided adhesive tape ... 3 • Re-usable double-sided adhesive pads (transparent)..3 •...
- Page 7 • The Velcro fastener is provided for players who will be frequently removing and reattaching the G1D. DO NOT use the adhesive pads if you use the Velcro fastener. Bottom side Installation 3.
- Page 8 The Re-usable Adhesive Pads The re-usable adhesive pads can be used in the same way as the standard double-sided adhesive tape for controller unit installation. They can be re- used many times, and if their adhesive qualities deteriorate due to accumulated dust and dirt, they can be restored to virtually like-new conditions by washing carefully with a neutral detergent.
- Page 9 Hardware The following parts, supplied with the G1D, are required or optional for installation of the pickup. Please make sure you have all the parts. •...
- Page 10 2. Set the pickup height. First make sure the truss rod and string height are adjusted properly, then tune the strings to their normal pitch. Adjust the height of the pickup — using the appropriate spacer or combination of spacers (see “NOTES” below) — so that the dis- tance between the top of the pickup and the bottom of each string is about 1 millimeter (0.04") when each string is fretted at the highest note on the neck.
- Page 11 If you need to readjust the pickup height … If the pickup height needs to be re-adjusted, remove the strings and carefully pry the pickup from the guitar by sliding a thin, flat object (e.g. a small knife blade) under the sixth-string end of the pickup —...
- Page 12 NOTES • The pickup should be located as far as possible but no more than 20 millimeters (3/4") from the bridge. • Make sure the pickup does not interfere with the operation of a tremolo arm or other guitar controls. Once the pickup has been positioned correctly, carefully mark the centers of the two screw holes at either end of the pickup on the guitar body using...
-
Page 13: Setup
Connect the 1/4" mono phone plug end of the direct guitar cable (supplied with the G1D) to the guitar’s output jack, and the mono mini-plug end of the cable to the G1D direct guitar input jack. Direct guitar cable NOTES •... - Page 14 1. Press release button. 2. Unplug cable by gripping the puing firmly. 3. Turn on the G50. When the G50 power is turned ON, the G1D power indicator should light indicating that it is receiving power from the G50. 4. Play.
-
Page 15: Specifications
Specifications Functions • Volume Control (VOL) • GUITAR/MIX/SYNTH Selector • UP/DOWN Buttons • Power Indicator • Pickup (individual-string synthesizer output) • Direct Guitar Input Jack • Multi-pin Cable Connector (individual-string synthesizer output + direct guitar sound) Package Contents • Pickup & Controller Unit •... - Page 16 M.D.G., EMI Division © Yamaha Corporation 1996 VU83880 706POCP5.2-03C0 Printed in Japan...