Whirlpool SC8720EDB - GAS DOWNDRAFT Installation Instructions Manual
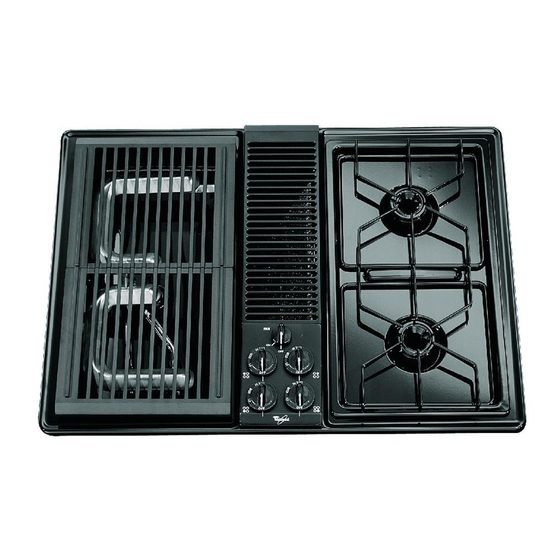
30" gas downdraft cooktop
Hide thumbs
Also See for SC8720EDB - GAS DOWNDRAFT:
- Dimensions and installation information (1 page) ,
- Use and care manual (34 pages)
Table of Contents
Advertisement
Quick Links
Installation Instructions
30"
GAS
Downdraft Cooktop
Modules selected at time of purchase.
IMPORTANT:
Read and save these instructions.
Part No. 8101P350-60/
8284676
Quick Reference
Table of Contents:
Pages
1
1
Clearance dimensions
1
2
2
2
2
3
3
4
5
6
7
Back cover
Need assistance?
Check your Use and Care Guide for a toll-free number to call, or
call the dealer from whom you purchased the cooktop when you:
Have questions about the cooktop installation or operation.
Need to obtain the name and number of an authorized service
company.
The dealer is listed in the Yellow Pages of your phone directory
under "Appliances - Household - Major - Service and Repair."
When you call, you will need:
The cooktop model number.
The cooktop serial number.
Both numbers are listed on the model/serial rating plate, located
on the bottom of the right side of the downdraft plenum.
Write both numbers down now before installing cooktop.
Model #
IMPORTANT:
Installer: Leave Installation Instructions with the homeowner.
Homeowner: Keep Installation Instructions for future reference.
Save Installation Instructions for local electrical inspector's use.
Serial #
Advertisement
Table of Contents

Related Manuals for Whirlpool SC8720EDB - GAS DOWNDRAFT


Summary of Contents for Whirlpool SC8720EDB - GAS DOWNDRAFT
-
Page 1: Table Of Contents
Installation Instructions Quick Reference Table of Contents: Pages Before you start Cutout dimensions Clearance dimensions Product dimensions Tools and materials needed Parts supplied Electrical requirements Gas supply requirements Venting requirements Installation steps Gas conversions Cooktop removal Back cover Need assistance? Check your Use and Care Guide for a toll-free number to call, or call the dealer from whom you purchased the cooktop when you: Have questions about the cooktop installation or operation. -
Page 2: Before You Start
Before you start... WARNING: To reduce the risk of fire, guideline and safety standards such as electric shock, or injury to persons, observe those published by the American Society the following: for Heating, Refrigeration and Air Conditioning Engineers (ASHRAE), and the Installation work and electrical wiring must Your safety and the safety of local code authorities. -
Page 3: Electrical Requirements
Clearance dimensions Installation location should 30" (76.2 cm) minimum when provide sufficient room for: higher than 18" (45.7 cm) • Removing grease containers. • Accessing gas regulator. Side clearance — 2" (5.1 cm) minimum clearance is required. 6" (15.2 cm) clearance 13"... -
Page 4: Gas Supply Requirements
Gas supply requirements certified by CSA International for Natural or shutoff valve WARNING “open” position L.P. gas usage with appropriate conversion. (See “Gas conversion” instructions, Page 7). to downdraft The model/serial rating plate (located on the cooktop right side of the downdraft plenum) lists the type of gas that can be used. -
Page 5: Venting Methods
Venting methods 20-15/16" 28-7/8" inside wall outside wall peninsula peninsula (53.2 cm) (73.3 cm) cabinet cabinet or island 7-9/16" (19.2 cm) 13" (33 cm) 3-1/4" x 10" transition transition 9-3/8" elbow opening elbow (23.8 cm) for venting through floor 3-1/4" x 10" inside wall to roof directly outside... -
Page 6: 6 Installation Steps
Installation steps Note: Cooktop shown with optional grill accessory. Check each burner for proper flame Align cooktop in cutout Gas supply connection Blower range setting Vent system connection Preparation Vent connection Installation WARNING Insert downdraft cooktop into Connect vent system. See cutout. -
Page 7: Check Operation
Check operation Push in and turn each surface burner control knob to “LITE” position and then to “LO” position. The low flame should To adjust be a minimum, steady blue flame. grill burner air shutter Do Not use a metal blade to pry off control opening knob;... -
Page 8: Gas Conversions
Gas conversions right rear Orifice hoods: burner Natural — Brass, drill size #53 (orifice dia. 0.0595") L.P. — Blue, drill size #63 (orifice dia. 0.037") right front burner left rear burner pressure regulator left front burner Orifice hoods: Natural — Green, drill size #55 (orifice dia. -
Page 9: Cooktop Removal
When you call, you will need the cooktop model number and serial number. Both numbers can be found on the model/serial rating plate located on the bottom of the burner box. Part No. 8101P350-60/8284676 Benton Harbor, Michigan 49022 © 2000 Whirlpool Corporation Printed in U.S.A.