Table of Contents
Advertisement
IMPORTANT
MANUAL
Do Not Throw
AwaY
g' _/ARS
operator's
manual
MODEL NO.
358.79710-22cc
(15" Cutting Path)
. A WAR_ING:
Read theOperators _hnual
and Follow All V_hrnings
and Safety Instructions.
FailureToDo SoCan Result
in Serious Injury.
Always Wear Eye Protection During Operation
C
22cc
2 Cycle Engine
• Assembly
®Operation
Fuel Mix 16:1
o Maintenance
e Repair Parts
Sold _y Sears,
koebuck
and Co.
Chicago,
ill., 60684
U_S..A,
"4
ff_
I
530-067315-1-0!289
/
© Sears, Roebuck and Co,
I989
Advertisement
Table of Contents
Troubleshooting

Related Manuals for Craftsman 358795790 - 22cc

Summary of Contents for Craftsman 358795790 - 22cc
- Page 1 IMPORTANT MANUAL Do Not Throw AwaY g' _/ARS operator's manual MODEL NO. 358.79710-22cc (15" Cutting Path) Always Wear Eye Protection During Operation 22cc . A WAR_ING: Fuel Mix 16:1 2 Cycle Engine Read theOperators _hnual and Follow All V_hrnings o Maintenance •...
- Page 2 ONE YE.__RLIMITED WA_qRANTY ON CRAFTSMAN WEEDWACKER ® and maintenance instructions in the operator's manuat. Sears will repair fl'ee of charge any defect in material or workmanship "'_<:_ This warranty excludes nylon line. spark plug. and air cleaner; which are expendable parts and become worn during normal...
- Page 3 WA INGS AND SAFETY This tool can cause serious injury or blindness to the operator and others, The warnings and safety instructions in this manual must be followed to provide reasonable safety and efficiency in using this tool, The operator is responsible for following the warnings and instructions in this manual and on the tool.
- Page 4 (this page intentionally left blank)
- Page 5 i ii1,1,,11111 ......, ..,,, ,,_,.., • ....=, ,L, ,,,.,,,1,,, 1 Always wear a safety face shield or goggles 1 Inspect the area to be cu! before each use Remove "Accessories "" objects frocks, broken glass, nails, wire, string, etc ) which can be thrown or become entangled in the Irim- 2 Always wear heavy, long pants, boots and gloves mer head...
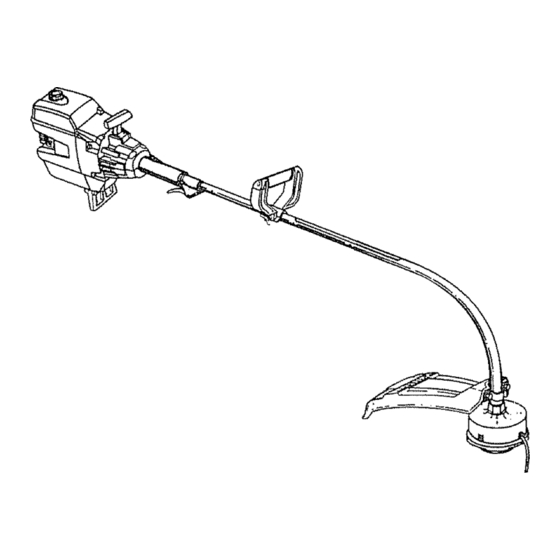
- Page 6 ............ i ,HIq,UM U,I ,ll,,,,,I,,lll* U I, H KNOW Y@UI IUbtK ER C. CAR_N C@N_NTS &, IlCI_@Duc'rloN "four Trimmer is a versatile product developed for large lawns and to make short work of a variety of lawn care tasks -- trimming, scalping, mowing, and sweeping, Engine Drive Shaft Assembly w/Safety Label Special Features Include:...
- Page 7 _,,m ....,i,, ,,,,, __L_ tr (If to!!! is received assembled, repeat all steps in this section to be sure assembly is correct and is adjusted for the operator.) PRF._A_A_ON 2,. _ yOU will ne_tlh This Operator's Manual has been developed to help you a, Flathead Screwdriver.
- Page 8 [_u'rloN:] Do not bend the throttle cable° a, Slide the Throttle Trigger Housing from the Foam Grip about 1" to 1-t/2" bo Insert the Throttle Cable through the tunnel in the Foam Grip until the end of the Cable extends at least ROUND HOLE 2 inches beyond the Grip, Figure 2 BARREL...
- Page 9 THRffFTLE e Assemble washer and wing nut onto screw, TRIGGER HOUSING Tighten securely, lCAUTION:I When adjusting the Assist Han- dle for comfort, be sure that the Assist Han- dle remains between the Throttle Trigger Hous- ing and the Safety Label on the Drive Shaft Housing.
- Page 10 ¢_. @I_I_A'_I_G _lfnOtq -- F_m'e a. Before s_ng the Engine, stand as shown in Figure [0 and check for the following: RIGHTARM 1) Left arm fully extended, hand holding Assist SLIGHTLY BENT, Handle. HAND HOLDING FACESHIELD FOAM GRIP. FINGERS ON 2).
- Page 11 .._7 ;_,,7 ..........2, ....A. _G YOUR EN_E 3. USE THE _'_LLOWINtG i. FUEL SAFETY (16 parts gasoline to I part oil) a Use only recommended fuel mixtures. b MLxand pour fue! outdoors and where there are no sparks or flames.
- Page 12 PRE_PE_TION CHECKS 5. Useonlytl_ _ trimmer _d. See "Spmtica- t.ions?' Make same the trimmer head is propei'ly installed and securely fastened. Refer to '_kssembly" Make carburetor adjustments with the drive shaft all Warnings and Safety Instructions in this housing supported to prevent the trimmer line from manual.
- Page 13 4. _r aW_E_e(_er R__t a. Refuel engine. Move 10 feet away from fueling site_ f Move Choke to "off" position. Figure t4. Move Ignition Switch to "on" Figure 13, g. Pull Starter Rope until engine runs, but no more than Move Choke to "full"...
- Page 14 a Always wear a safety face shield or goggles. See Make carburetor adjustments with the drive "Accessories:' shaft housing supported to prevent the trimmer b Always wear heavy, long pants, boots and gloves° line from contacting any object, Hold the tool with Donor wear loose clothing, jewelry, short pants, san- your hand Do not use the optional shoulder strap for dais or go barefoot...
- Page 15 The tip of the line does the cutting. Allow the line to trim at its own pace, You will achieve better results by Always wear eye pro_ction. Never lean over the trim- not crowding the line into the cutting area, The right and met head.
- Page 16 D. L_NE REPlaCEMENT e For proper line feed: -- Use only genuhae Sears pre-wound spools and .080" diameter Sears Laser Line.® Use of other spools or line can iesult in excessive breakage, line welding and improper line feed, --Pre-wound spools offer the most convenient method for replacing line as well as optimum per- formance...
- Page 17 _1 Kns_zUing Line on Spool. a To replace the Line on existing Spool: b If the Line breaks off or backs up in the Trimmer Head, follow "Installing Spool w/Line," steps "a-c?' L) Follow "Installing Spool w/Line," steps "a-cY and Pull slack in Line until the Line is tightly wound on remove any Line remaining on the Spool Spool, leaving 4-6 inches of extended Liner Continue...
- Page 18 !i ¸ ..,,_,_,,.._ ......C, STA_ _@IPN o Replace a starter rope that breaks. R_gOVE SCR_ WAIIg.M_IG Do not remove the retaining tab and screw to remove pulley. The spring beneath the pulley is under tension NOSE and can fly out causing serious injury.
- Page 19 11 Pull the melted ends through a thick, clean rag while the Rope is still hot to obtain smooth, pointed ends. 12 Insert one end of the Rope through the Handle and secure with a knot 134 Insert the other end of the Rope through the Rope Exit Hole into the inside of the Housing, into the Pulley and up through the Pulley Hole See Inset, Figure...
- Page 20 ]'his is a complicated task and it is iml_rtan! 2. _HC CA_E_ SE_GS follow instructions in sequence as indica!ed. NOTE: In most cases, your engine can be made to AwA aN run properly with minor caiburetor adjustments. Make carburetor adjustments with the drive shaft hous- Refer to "Trouble Shooting Suggestions"...
- Page 21 ¢. ACCE_/kTION CHECK e. !_IXTUKE _JUSTMENT [CAUTION:I Do not operate engine at full !.)Allow engine to idle. throttle for prolonged periods while making high speed adjustments as damage to the engine 2 )Squeeze Trigger fully can occur. a. If performance is satL,'factory, proceed to "d Deceleration Check"...
- Page 22 _'. STORAGE Empty the fuel tank before storing the too!, Use up fuel NOTE: It is important to prevent gum deposits flora left in the carburetorby starting the engine and letting the forming in essential fuel system parts such as the car- buretor;...
- Page 23 SEARS WEEDWACKER® REPAIR PARTS LIST - 358.797100-22.0cc -- 20 Operator's Manual Keyt Part Part Description Description 580-094672 Drive Shaft Housing 530-094523 Spool Post 530-010957 Handle 580-015542 Screw #i0-24x5/8 STD541025 Locknut 114-20 71-85810 Spool w/Line 530-027595 580-094522 Drive Shaft Grip Release Button 530-069252 "T"...
- Page 25 SEARS WEEDWACKER® REPAIR PARTS LIST - 358.797100-22.0cc Pa_t Part Description Description 530-015778 Screw 530-015239 Screw 530-027529 Air Filter Cover 530-039134 Ignition Module Kit 530-027530 Air Filter 530-015776 Screw 530-015766 Screw 530-039136 Flywheel Ass'y 530-027528 Spacer 530-014047 Fan Housing Ass'y, 530-015254 Wave Washer 530-069291 Stazter...
- Page 26 ..gNDglg I"%¸ ....', ..u,,, ... LUBRICATION ACCESSORIES Engine ..ADJUSTMENTS Flexible Drive Shaft Assist Handle ..MAINTENANCE Carburetor ..Air Filter Line Advance ..Carburetor Module Air' Gap Flexible Drive Shaft Spark Plug Gap Safety _ AIR FILTER Starter Rope ASSElVIBLY Trimmer Head...
- Page 27 QUICK REd.NeE PAGE Read and Follow All Warnings, Safety Instructions and Opera_g Instructions. Failure to do so can result in serious injury_ Page No. PREPANAT_ON ..........$ _ 5 1 Know all warnings and safety instructions in this manua[ 2 Wear safety face shield or goggles for eye protection 3 Dress safely - boots or safety shoes and heavy, long pants 4 Check tool for worn, loose, missing or damaged parts;...
- Page 28 The Model Number will be found on top of the engine with the Serial Number, Always mention the Model Number when requesting service or repair for your unit, All parts listed herein may be ordered from any Sears Service Center and most Sears Stores WHEN ORDERING...