Panasonic WV-SW155 Installation Manual
Installation guide
Hide thumbs
Also See for WV-SW155:
- Installation manual (40 pages) ,
- Specifications (2 pages) ,
- Operating instructions manual (168 pages)
Table of Contents
Advertisement
WV-SW155/WV-SW155M
Model No.
WV-SW152/WV-SW152M
WV-SW155E/WV-SW155ME
WV-SW152E/WV-SW152ME
Before attempting to connect or operate this product, please read these
The model number is abbreviated in some descriptions in this manual.
instructions carefully and save this manual for future use.
Installation Guide
Network Camera
WV-SW155
Advertisement
Table of Contents

Related Manuals for Panasonic WV-SW155


Summary of Contents for Panasonic WV-SW155
-
Page 1: Installation Guide
Installation Guide Network Camera WV-SW155/WV-SW155M Model No. WV-SW152/WV-SW152M WV-SW155E/WV-SW155ME WV-SW152E/WV-SW152ME WV-SW155 Before attempting to connect or operate this product, please read these instructions carefully and save this manual for future use. The model number is abbreviated in some descriptions in this manual. - Page 2 For U.S. and Canada: WV-SW155, WV-SW155M, WV-SW152, WV-SW152M For Europe and other countries: WV-SW155E, WV-SW155ME, WV-SW152E, WV-SW152ME UL listed model No. WV-SW155, WV-SW155M, WV-SW152, WV-SW152M For Europe We declare under our sole responsibility that the product For Canada to which this declaration relates is in conformity with the...
-
Page 3: Table Of Contents
Contents Important safety instructions ......................4 Limitation of liability ........................5 Disclaimer of warranty ........................5 Preface ............................6 Main functions ..........................6 About the user manuals ........................ 7 About notations ..........................7 System requirements for a PC ...................... 7 Trademarks and registered trademarks.................. -
Page 4: Important Safety Instructions
Important safety instructions 1) Read these instructions. 2) Keep these instructions. 3) Heed all warnings. 4) Follow all instructions. 5) Do not block any ventilation openings. Install in accordance with the manufacturer's instruc- tions. 6) Do not install near any heat sources such as radiators, heat registers, stoves, or other appara- tus (including amplifiers) that produce heat. -
Page 5: Limitation Of Liability
IMPROVEMENTS OF THIS PUBLICATION AND/OR THE CORRESPONDING PRODUCT (S). Disclaimer of warranty IN NO EVENT SHALL Panasonic System Networks Co., Ltd. BE LIABLE TO ANY PARTY OR ANY PERSON, EXCEPT FOR REPLACEMENT OR REASONABLE MAINTENANCE OF THE PRODUCT, FOR THE CASES, INCLUDING BUT NOT LIMITED TO BELOW:... -
Page 6: Preface
Preface The network cameras WV-SW155/WV-SW155M/WV-SW152/WV-SW152M are designed to oper- ate using a PC on a network (10BASE-T/100BASE-TX), and can be installed under eaves (shel- tered outdoor). By connecting to a network (LAN) or the Internet, images from the camera can be monitored on a PC via a network. -
Page 7: About The User Manuals
The following notations are used when describing the functions limited for specified models. The functions without the notations are supported by all models. : The functions with this notation are available when using the model WV-SW155. SW155 : The functions with this notation are available when using the model WV-SW155M. -
Page 8: Trademarks And Registered Trademarks
* A phenomenon in which portions of the screen are displayed out of alignment • For information on the operation verification of the supported operating systems and web browsers, refer to our website at http://panasonic.net/pss/security/support/index.html. Trademarks and registered trademarks • Adobe, the Adobe logo, and Reader are either registered trademarks or trademarks of Adobe Systems Incorporated in the United States and/or other countries. -
Page 9: Network Security
Network security As you will use this unit connected to a network, your attention is called to the following security risks. q Leakage or theft of information through this unit w Use of this unit for illegal operations by persons with malicious intent e Interference with or stoppage of this unit by persons with malicious intent It is your responsibility to take precautions such as those described below to protect yourself against the above network security risks. -
Page 10: Precautions
Precautions Refer installation work to the dealer. resulting in injury. Installation work requires technique and experi- ences. Failure to observe this may cause fire, Avoid installing this product in the loca- electric shock, injury, or damage to this prod- tions where salt damage occurs or corro- uct. - Page 11 Do not touch this product or the connect- Product disposal/transfer ed cables during thunder. (even in the pro- Data saved on this product or a storage device cess of work) used with this product may lead to personal Failure to observe this may cause electric information leakage.
- Page 12 Flickering • When some SDHC/SD memory cards are Due to the influence of lighting, flickering may used with this product, the product may sometimes happen. In this case, select "Indoor not work properly or performance deterio- scene" for "Light control mode". Select "Indoor ration may be caused.
-
Page 13: Precautions For Installation
Precautions for installation Panasonic assumes no responsibility for injuries or property damage resulting from fail- ures arising out of improper installation or operation inconsistent with this documenta- tion. This product is designed to be installed Be sure to remove this product if it is not in use. - Page 14 Do not remove or loosen the internal cam- era screws Do not loosen the internal camera screws. Otherwise, water exposure may cause damage or malfunction of camera, or camera dropping may result in injury. Radio disturbance When this product is used near TV/radio antenna, strong electric field or magnetic field (near a motor, a transformer or a power line), images may be distorted and noise sound may...
-
Page 15: Major Operating Controls
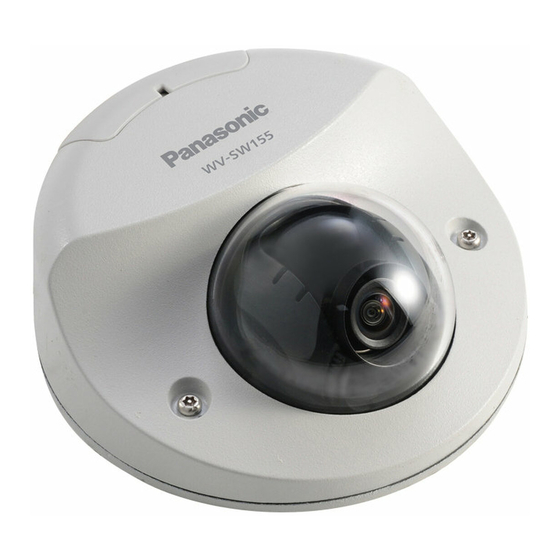
Major operating controls <Front view> <Rear view> Dome cover Dome SDHC/SD memory card slot Network cable Initial set button Link indicator (lit when linking) Lens SD memory card error indicator Access indicator (lit when data (lit when accessing) cannot be saved) About the initial set button After turning off the power of the camera, turn on the power of the camera while holding down this button, and wait for around 5 seconds or more without releasing the button. -
Page 16: Removing The Dome Cover Base
Removing the dome cover base Important: Cover film • Remove the cover film attached to the dome after the camera installation is completed. After removing the cover film, do not touch the dome with your hands. Screw Loosen the 3 dome cover fixing screws (M3) Screw cover using the tamperproof screw bit (accessory). -
Page 17: Preparations
Preparations When installing the camera on a ceiling or a wall, there are three methods as specified below. • Directly mounting to a ceiling or a wall • Use the supplied mount bracket • Use the one-gang junction box Important: •... -
Page 18: Method Of Camera Installation
Method of camera installation Installing the camera directly on the ceiling or wall Note: • Use the installation template label (accessory) with the side with the arrow facing you. • Ceiling installation: Place the installation template label so that the "h" is pointing to the front of the camera (the lens side). - Page 19 Ceiling Wall Using the mount bracket (accessory) Note: • When the camera is mounted on the ceiling or wall with a hole for cable running and the cables are passed through a conduit, the mount bracket is used. • The female thread for conduit is compliant with ANSI NPSM (parallel pipe threads) 3/4" or G3/4 of ISO 228-1.
- Page 20 Tamperproof screw hole Cable access hole <Connecting the cable through holes opened in the ceiling or wall> Place the installation template label (accessory) on the ceiling or wall, mark the hole for the cable to be passed through and for the fixing screws (3 places), then open the holes. Remove the installation template label, and mount the mount bracket with 3 fixing screws (locally procured).
- Page 21 Using a one-gang junction box • Secure the mount bracket (accessory) to the one-gang junction box built in a ceiling or a wall. [Mounting hole pattern] One-gang junction box 83.5 mm {3-9/32"} Mount bracket (accessory) Note: • Ceiling installation: The mount bracket shall be mounted with aligning the front side (the lens side) of the camera with the position of the arrow in "h".
-
Page 22: Insert/Remove An Sdhc/Sd Memory Card
Insert/remove an SDHC/SD memory card Important: • Before inserting the SDHC/SD memory card, turn off the power of the camera first. • When inserting an SDHC/SD memory card, make sure the direction. • Before removing the SDHC/SD memory card, select "Not use" for "SD memory card" on the [SD memory card] tab of the setup menu first. -
Page 23: Connection
Connect a LAN cable (category 5 or better, straight) between a PoE device (such as a hub) and the network connector of the camera. <WV-SW155, WV-SW152> Connect a LAN cable (category 5 or better, straight, STP) between a PoE device (such as a hub) and the network connector of the camera. -
Page 24: Waterproof Treatment For The Cable Joint Sections
Important: • Use all 4 pairs (8 pins) of the LAN cable. • The maximum cable length is 100 m {328 feet}. • Make sure that the PoE device in use is compliant with IEEE802.3af standard. • When the LAN cable is disconnected once, reconnect the cable after about 2 seconds. When the cable is quickly reconnected, the power may not be supplied from the PoE device. -
Page 25: Connection Example
Connection example PoE device (hub) LAN cable (category 5 or better, straight) LAN cable (category 5 or better, straight) LAN cable (category 5 or better, straight) <Required cable> LAN cable (category 5 or better, straight) Important: • Use a switching hub which is compliant with 10BASE-T/100BASE-TX. •... -
Page 26: Installation
Installation Camera mounting <Installing the camera directly on the ceiling or wall> Remove the dome cover. (3 screws) ( Page 16) ☞ Connect the cables to the camera. ( Pages 23 and 24) ☞ • Waterproof the connecting portion. ( Page 24) ☞... - Page 27 Conduit attachment Attachment for female thread Camera Fixing screws Mount bracket Network cable Conduit Wall Ceiling <Using a one-gang junction box> Connect each cable. • Apply waterproof treatment to all connections. ( Page 24) ☞ Secure the mount bracket to the one-gang junction box. (2 screws (M4) (locally procured)) Secure the camera to the mount bracket with 3 fixing screws (accessory).
- Page 28 Using the side cable access hole When installing the camera directly on the ceiling or wall with cables exposed, cut off a portion of the mount bracket to open a cable access hole. Cut off...
-
Page 29: Adjustment
Adjustment Adjust the camera angle. When determining the camera angle, repeat fine adjustments by gradually moving the panning table and tilting table. • Attach the lens adjuster (accessory) to the lens and adjust the direction of the lens. Attach the wider end of the lens adjuster to the lens. - Page 30 Note: • Depending on the vertical/horizontal angle used, the edges of the camera may be projected. • Use Extra Zoom when you want to adjust the angular field of view on the "Tele" side. When VGA or a lower resolution is selected, the angular field of view can be adjusted without deterio- ration in the image quality.
-
Page 31: Attaching The Dome Cover
Attaching the dome cover Attach the dome cover to the camera by using the tamperproof screw bit (accessory) to tighten the 3 dome cover fixing screws (M3). Ceiling Wall Screw cover Dome cover fixing screws Dome cover fixing screws Close the screw cover. Remove the cover film completely. -
Page 32: Using The Cd-Rom
The Panasonic IP setting software can be installed on the PC. → Refer to "Installing Panasonic IP setting software". ( Page 33) ☞ w Settings related to the camera's network can be set from the Panasonic IP setting software. → Refer to "Configure the network settings". ( Page 35) ☞... -
Page 33: Installing Panasonic Ip Setting Software
Select the Panasonic IP setting software to install. w Select where to create the Panasonic IP setting shortcut icon when the Panasonic IP setting software is installed. e Specify which folder on the PC to install the Panasonic IP setting software to. -
Page 34: Installing The Manuals
Installing the manuals On the CD launcher window, click the [Install] button next to [Manual] to display the Manual installa- tion window. Confirm the following settings before starting the installation. q Select which manuals to install. The camera models that the manuals support are displayed in w "Supported Camera Models". -
Page 35: Configure The Network Settings
CD-ROM. When using multiple cameras, it is necessary to configure the network settings of each camera independently. If the Panasonic IP setting software does not work, configure the network settings of the camera and the PC individually on the "Network" page of the setup menu. Refer to the Operating Instructions (included in the CD-ROM) for further information. - Page 36 Note: • When using a DHCP server, the IP address assigned to the camera can be displayed by click- ing the [Search] button of the IP setting software. • When a duplicate IP address is used, the corresponding camera number will be displayed shaded.
-
Page 37: Troubleshooting
Troubleshooting Before asking for repairs, check the symptoms with the following table. Contact your dealer if a problem cannot be solved even after checking and trying the solution in the table or a problem is not described below. Reference Symptom Cause/solution pages •... -
Page 38: Specifications
Specifications • Basic Power source: PoE (IEEE802.3af compliant) Power consumption: PoE 48 V: 56 mA (Class 1 device) Ambient operating temperature: -30 °C to +50 °C {14 °F to 122 °F} Ambient operating humidity: Less than 90 % (no condensation) Waterproof: Camera: IP66 (IEC60529) * Only when installation work specified in this book is properly... - Page 39 Max. 10/30s, Max. 16/30s Day & Night (electrical): Off/Auto White balance: ATW1/ ATW2/ AWC Digital noise reduction: High/Low Video analytics Face detection: On/Off (with the XML notification setting) Privacy zone: On/Off (up to 2 zones available) VIQS: On/Off Camera title on screen: Up to 20 characters (alphanumeric characters, marks) On/Off Video motion detection...
- Page 40 (Including the camera itself) Compatible SDHC/ SD memory card (option): Manufactured by Panasonic SDHC memory card: 4 GB, 8 GB, 16 GB, 32 GB SD memory card: 256 MB, 512 MB, 1 GB, 2 GB (except miniSD card and microSD card)
-
Page 41: Standard Accessories
Standard accessories Installation Guide (this document) ............1 pc. Important Safety Instructions .............1 pc. Warranty card (P model only) .............1 pc. CD-ROM* ..................1 pc. Code label* ..................1 pc. Lens adjuster ..................1 pc. The following parts are used during installation procedures. Fixing screws (M4 x 8 mm) ..............3 pcs. Installation template label ..............1 pc. - Page 44 Panasonic Marketing Europe GmbH Three Panasonic Way, Secaucus, Winsbergring 15, 22525 Hamburg F.R.Germany New Jersey 07094 U.S.A. Panasonic Canada Inc. 5770 Ambler Drive, Mississauga, Ontario, L4W 2T3 Canada (905)624-5010 www.panasonic.ca © Panasonic System Networks Co., Ltd. 2011 Cs0611-0/1 PGQX1022ZA Printed in China...