Table of Contents
Advertisement
Quick Links
Download this manual
See also:
User Manual
Advertisement
Table of Contents

Related Manuals for Asus TXP4


Summary of Contents for Asus TXP4
- Page 1 TXP4 Pentium Motherboard ® USER’S MANUAL...
- Page 2 CONSEQUENTIAL DAMAGES (INCLUDING DAMAGES FOR LOSS OF PROFITS, LOSS OF BUSINESS, LOSS OF USE OR DATA, INTERRUPTION OF BUSINESS AND THE LIKE), EVEN IF ASUS HAS BEEN ADVISED OF THE POSSIBILITY OF SUCH DAMAGES ARISING FROM ANY DEFECT OR ERROR IN THIS MANUAL OR PRODUCT.
-
Page 3: Contact Information
+1-408-474-0568 Email: info-usa@asus.com.tw Technical Support: BBS: +1-408-474-0555 Email: tsd-usa@asus.com.tw ASUS COMPUTER GmbH Marketing Info: Address: Harkort Str. 25, 40880 Ratingen, BRD, Germany Telephone: 49-2102-445011 Fax: 49-2102-442066 Email: info-ger@asus.com.tw Technical Support: BBS: 49-2102-448690 Email: tsd-ger@asus.com.tw Hotline: 49-2102-499712 ASUS TXP4 User’s Manual... -
Page 4: Table Of Contents
Item Checklist .................. 7 II. FEATURES ..................8 Features of the ASUS TXP4 Motherboard ........8 Introduction to ASUS TXP4 Series of Motherboards ....9 The ASUS TXP4 Motherboard ............11 III. INSTALLATION ................12 ASUS TXP4 Motherboard Layout ..........12 Installation Steps ................ - Page 5 ASUS PCI-SC200 & PCI-SC860 SCSI Cards ........ 55 Setting Up the ASUS PCI-SC200 & PCI-SC860 ....... 56 Setting the INT Assignment for the ASUS PCI-SC200 ..... 56 Terminator Requirements for SCSI Devices ......56 Terminator Settings for the ASUS PCI-SC860 ......57 Terminator Settings for the ASUS PCI-SC200 ......
-
Page 6: Federal Communications Commission Statement
Canadian Department of Communications Statement This digital apparatus does not exceed the Class B limits for radio noise emissions from digital apparatus set out in the Radio Interference Regulations of the Canadian Department of Communications. ASUS TXP4 User’s Manual... -
Page 7: Introduction
• Flash Memory Writer utility to update the FLASH BIOS • Desktop Management Interface (DMI) utility • Audio drivers and utilities (included with ASUS I-A16C audio bundle) • Readme files for descriptions and use of the files • Technical Support Form User’s Manual (Audio section included with ASUS I-A16C audio bundle) -
Page 8: Features
II. FEATURES Features of the ASUS TXP4 Motherboard The ASUS TXP4 motherboard is carefully designed for the demanding PC user who wants many features in a small package, namely: • Intel Chipset: Features Intel’s 430HX PCIset with I/O subsystems. ®... -
Page 9: Introduction To Asus Txp4 Series Of Motherboards
Windows 95, must be used. • PC ’97 Compliant: Both the BIOS and hardware levels of ASUS TXP4 series of motherboards meet PC ’97 compliancy. The new PC ’97 requirements for systems and components are based on the following high-level goals: support... - Page 10 (This page was intentionally left blank) ASUS TXP4 User’s Manual...
-
Page 11: The Asus Txp4 Motherboard
II. FEATURES The ASUS TXP4 Motherboard USB, PS/2 Mouse, Infrared Serial, Parallel, Floppy Keyboard Super Multi I/O 3 PCI Slots 2 ISA Slots 1 ISA/PCI Shared Slot AT Power Connector ATX Power Connector IDE Connectors 4 SIMM Sockets 2 DIMM Sockets... -
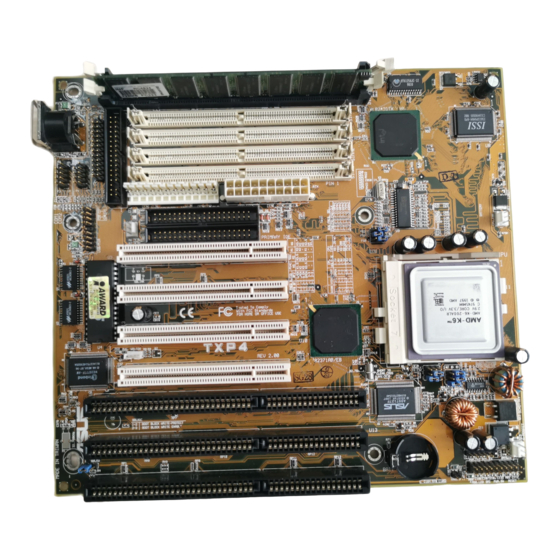
Page 12: Installation
III. INSTALLATION ASUS TXP4 Motherboard Layout COM 1 Key- Serial Ports board COM 2 Parallel Port USB, PS/2 Mouse, IrDA Floppy Drives Power Fan Intel PIIX4 PCIset 2 3 2 3 CR2032 3Volts 0 1 2 3 Lithium Cell Intel... - Page 13 28 Second Infrared Port Module Connector (5-pin block) 16) PS/2 PWR CON. p. 29 AT Power Supply Connector (12-pin block) 17) ATX PWR CON. p. 29 ATX Power Supply Connector (20-pin block) 18) IDELED p. 30 IDE Activity LED ASUS TXP4 User’s Manual...
-
Page 14: Installation Steps
3. Hold components by the edges and try not to touch the IC chips, leads, or circuitry. 4. Place components on a grounded antistatic pad or on the bag that came with the component whenever the components are separated from the system. ASUS TXP4 User’s Manual... -
Page 15: Jumper Settings
Setup Defaults” and re-enter any user information after removing and reapply- ing this jumper. RTC RAM RTCLR Keep CMOS [1-2] (Default) Clear CMOS [2-3] (momentarily) RTCLR RTCLR Battery Test Keep CMOS (Default) Clear CMOS RTC RAM ASUS TXP4 User’s Manual... -
Page 16: Compatible Cyrix Cpu Identification
These jumpers set the frequency ratio between the internal frequency of the CPU and the external frequency (called the BUS Clock) within the CPU. These must be set together with the jumpers for CPU External (BUS) Frequency Selection. ASUS TXP4 User’s Manual... - Page 17 66MHz [2-3] [1-2] [2-3] [2-3] [1-2] *NOTE: Only IBM or Cyrix Rev 2.7 or later is supported on this motherboard (see next page). Bootup screen will show 6x86-P166+ with the Cyrix PR166+ installed on this motherboard. ASUS TXP4 User’s Manual...
-
Page 18: System Memory (Simm & Dimm)
168-pin SDRAM or EDO DIMM (SIMM Sockets must be empty) DIMM Socket 2 8MB, 16MB, 32MB, 64MB, 128MB (Rows 2 & 3) 168-pin SDRAM or EDO DIMM (SIMM Sockets must be empty) Total System Memory (Max 256MB) ASUS TXP4 User’s Manual... -
Page 19: Simm Installation
72 Pin DRAM in SIMM Socket Support Clip Mounting Hole Safety Tab (This Side Only) To release the memory module, squeeze both metal clips outward and rock the module out of the metal clips ASUS TXP4 User’s Manual... -
Page 20: Dimm Installation
DIMM from being inserted into the DIMM socket (see illustration below). Four clock signals are supported on this motherboard. Ask your retailer for the specifications before purchasing memory modules. 168-Pin DIMM Notch Key Definitions (3.3V) Voltage Key Position DRAM Key Position Reserved Unbuffered 5.0V 3.3V Buffered ASUS TXP4 User’s Manual... -
Page 21: Central Processing Unit (Cpu)
IMPORTANT: You must set jumpers for CPU to BUS Frequency Ratio and jumpers for BUS Frequency Selection depending on the processor that you will install. White Dot Lever Lock Blank ZIF Socket 7 with Pentium Processor ASUS TXP4 User’s Manual... -
Page 22: Expansion Cards
Some expansion cards need to use an IRQ to operate. Generally an IRQ must be exclusively assigned to one use. In a standard design there are 16 IRQs available but most of them are already in use, leaving 6 IRQs free for expansion cards. ASUS TXP4 User’s Manual... -
Page 23: Assigning Dma Channels For Isa Cards
IMPORTANT: To avoid conflicts, reserve the necessary IRQs and DMAs for legacy ISA cards (under PNP AND PCI SETUP of the BIOS SOFTWARE, choose Yes in IRQ xx Used By ISA and DMA x Used By ISA for those IRQs and DMAs you want to reserve). ASUS TXP4 User’s Manual... -
Page 24: External Connectors
(Pin 5 is removed to prevent inserting in the wrong orien- tation when using ribbon cables with pin 5 plugged). Pin 1 Orient the red stripe to Pin 1 Floppy Disk Drive Connector ASUS TXP4 User’s Manual... - Page 25 & COM2 (using the 25-pin male) to a free expansion slot opening. COM 2 TIP: You may also remove the bracket connectors and mount them directly to Pin 1 the case to save expansion slot space. Serial Port Connectors ASUS TXP4 User’s Manual...
- Page 26 IDE connector and another ribbon cable on the secondary IDE connector. You may install one operating system on an IDE drive and an- other on a SCSI drive, and then select the boot disk through the BIOS Features Setup. ASUS TXP4 User’s Manual...
- Page 27 13. Speaker Connector (SPEAKER) This 4-pin connector connects to the case-mounted speaker. Message Power LED LOCK SMI Lead Keyboard Lock ATX Power Switch* Speaker Connector Reset SW SPKR * Required with an ATX power supply. System Panel Connectors ASUS TXP4 User’s Manual...
- Page 28 For the infrared feature to be available, you must connect an optional infrared module to the motherboard. Front View Back View FIRRX IRRX IRTX IRTX Infrared Module Connector IRRX ASUS TXP4 User’s Manual...
- Page 29 — 3.3V GND — — GND PS-ON — — 5.0V GND — — GND GND — — 5.0V GND — — GND 5.0V — — PW-OK 5.0V — — 5VSB 5.0V — — 12.0V ATX Power Connector ASUS TXP4 User’s Manual...
- Page 30 Primary or Secondary IDE connectors will cause the LED to light up. TIP: If the case-mounted LED does not light, try reversing the 2-pin plug. IDE LED IDE Activity LED Lead ASUS TXP4 User’s Manual...
-
Page 31: Power Connection Procedures
Start button and the system will give three quick beeps after about 30 seconds and power off after Windows shut down. NOTE: The message, It’s now safe to turn off your computer, will not be shown in Windows 95 when using shut down with ATX power supplies. ASUS TXP4 User’s Manual... -
Page 32: Bios Software
This gives you a backup copy of the original motherboard BIOS in case you need to reinstall it. Create a system disk by typing FORMAT A:/S on the DOS prompt (do not create “AUTOEXEC.BAT” and “CONFIG.SYS”), then save the PFLASH.EXE file and the BIOS to the system disk. ASUS TXP4 User’s Manual... -
Page 33: Advanced Feature Menu
Block and ESCD” require that the system is running in real mode. This utility will not operate if the system is under protected mode or virtual mode. You must boot from a system floppy disk without the “AUTOEXEC.BAT” and “CONFIG.SYS” files. ASUS TXP4 User’s Manual... -
Page 34: Managing And Updating Your Motherboard's Bios
“Flash type --,” then this ROM chip is not programmable or not supported by the PnP BIOS and therefore cannot be programmed by the Flash Memory Writer. 1. Download an updated ASUS BIOS file from the Internet (WWW or FTP) or a BBS (Bulletin Board Service) (see ASUS CONTACT INFORMATION on page 3 for details) and save to the disk you created earlier. -
Page 35: Bios Setup
You can also restart by turning the system off and then back on again. Do this only, however, if the first two methods fail. When you run Setup, the CMOS SETUP UTILITY main program screen will ap- pear with the following options: ASUS TXP4 User’s Manual... -
Page 36: Load Defaults
User-configurable fields appear in a different color. If you need information on the selected field, press <F1>. The help menu will then appear to provide you with the information you need. The memory display at the lower right-hand side of the screen is read-only and automatically adjusts accordingly. ASUS TXP4 User’s Manual... -
Page 37: Details Of Standard Cmos Setup
(landing zone), SECTOR (number of sectors) and MODE. The SIZE field auto- matically adjusts according to the configuration you specify. The documentation that came with your hard disk should provide you with the information regarding the drive specifications. ASUS TXP4 User’s Manual... - Page 38 VGA or any higher resolution card, choose EGA/VGA. Halt On (All Errors) This field determines which types of errors will cause the system to halt. Choose from either All Errors; No Errors; All, But Keyboard; All, But Diskette; or All, But Disk/Key. ASUS TXP4 User’s Manual...
-
Page 39: Bios Features Setup
SCSI. This allows multiple operating systems to be used on both IDE and SCSI drives or the primary operating system to boot using a SCSI hard disk drive. ASUS TXP4 User’s Manual... - Page 40 ROMs on them, you will need to know which addresses the ROMs use to shadow them specifically. Shadowing a ROM reduces the memory available between 640KB and 1024KB by the amount used for this purpose. ASUS TXP4 User’s Manual...
-
Page 41: Chipset Features Setup
The default setting of 60ns DRAM sets the optimal timings for items 2 through 9 for 60ns DRAM modules. If you are using 70ns DRAM modules, you must change this item to 70ns DRAM. See section III for DRAM installation information. ASUS TXP4 User’s Manual... - Page 42 IV. BIOS SOFTWARE SDRAM CAS# Latency (3T) If you use ASUS SDRAM DIMM modules, you can set this to 2T for better perfor- mance, otherwise leave on default or check with your vendor for DIMM specs. SDRAM Speculative Read (Disabled) If Enabled, the CPU will issue predict commands to access the DRAM, if a miss occurs, the CPU will cancel this command.
- Page 43 Because each IDE device may have a different Mode timing (0, 1, 2, 3, 4), it is necessary for these to be independent. PIO and DMA timings can be independently set. The default setting of Auto will allow autodetection to ensure optimal performance. ASUS TXP4 User’s Manual...
-
Page 44: Power Management Setup
Video Off Option (Susp,Stby -> Off ) This field determines when to activate the video off feature for monitor power management. The settings are All Modes -> Off; Always On; Suspend -> Off; and Susp,Stby -> Off . ASUS TXP4 User’s Manual... - Page 45 The Doze Mode, Standby Mode, and Suspend Mode fields set the period of time after which each of these modes activate. At Max Saving, these modes activate se- quentially (in the given order) after 30 seconds; at Min Saving after 40 minutes............................ASUS TXP4 User’s Manual...
-
Page 46: Pnp And Pci Setup
Auto, which uses auto-routing to determine IRQ use. The other options are the manual settings of NA, 5, 7, 9, 10, 11, 12, 14, or 15 for each slot. PCI Latency Timer (32 PCI Clock) “32 PCI Clock” enables maximum PCI performance for this motherboard. ASUS TXP4 User’s Manual... - Page 47 ISA MEM Block BASE to its default setting of No/ICU. SYMBIOS SCSI BIOS (Auto) The default uses Auto settings for the onboard SCSI BIOS. If you do not want to use the onboard SCSI BIOS, choose Disabled. ASUS TXP4 User’s Manual...
-
Page 48: Load Bios Defaults
<Enter>. The system displays a confirmation message on the screen. Press <Y> and then <Enter> to confirm. Press <N> and then<Enter> to abort. This feature does not affect the fields on the Standard CMOS Setup screen. ASUS TXP4 User’s Manual... -
Page 49: Supervisor Password And User Password
<Enter> instead of entering a new password when the “Enter Password” prompt appears. A message confirms the password has been disabled. NOTE: If you forget the password, see CMOS RAM in section III for procedures on clearing the CMOS. ASUS TXP4 User’s Manual... -
Page 50: Ide Hdd Auto Detection
The autodetection feature can only detect one set of parameters for a particular IDE hard disk. Some IDE drives can use more than one set. This is not a problem if the drive is new and there is nothing on it. ASUS TXP4 User’s Manual... -
Page 51: Save And Exit Setup
Select this option to exit the Setup utility without saving the modifications you specify during the current session. To exit without saving, highlight the “Exit Without Sav- ing” option on the main screen and then press the <Enter> key. ASUS TXP4 User’s Manual... -
Page 52: Support Software
V. SUPPORT SOFTWARE Desktop Management Interface (DMI) Introducing the ASUS DMI Configuration Utility This motherboard supports DMI within the BIOS level and provides a DMI Con- figuration Utility to maintain the Management Information Format Database (MIFD). DMI is able to auto-detect and record information pertinent to a computer’s system such as the CPU type, CPU speed, and internal/external frequencies, and memory size. -
Page 53: Using The Asus Dmi Configuration Utility
V. SUPPORT SOFTWARE Using the ASUS DMI Configuration Utility Edit DMI (or delete) Use the (left-right) cursors to move the top menu items and the (up-down) cursor to move between the left hand menu items. The bottom of the screen will show the available keys for each screen. - Page 54 You can load the BIOS defaults from a MIFD file and can clear all user modified and added data. You must reboot your computer in order for the defaults to be saved back into the Flash BIOS. ASUS TXP4 User’s Manual...
-
Page 55: Asus Pci Scsi Cards
SCO UNIX floppy disk. Windows 95 support is also available using the device drivers included within the Windows software. The ASUS PCI-SC200 and ASUS PCI-SC860 are Plug and Play adapters that are auto detected by BIOS and current operating systems that support Plug and Play features. -
Page 56: Setting Up The Asus Pci-Sc200 & Pci-Sc860
VI. ASUS PCI SCSI Cards Setting Up the ASUS PCI-SC200 & PCI-SC860 There are two jumper settings you may need to make on the ASUS PCI-SC200 to set it up. One setting assigns the PCI INT interrupt, the other sets the card’s termination. -
Page 57: Terminator Settings For The Asus Pci-Sc860
JP5. There are two settings, "terminated" and "not terminated," as shown below. Decide whether or not you need to terminate the ASUS PCI-SC200 based on its position in the SCSI chain. Only the devices at each end of the chain need to be terminated. -
Page 58: Scsi Id Numbers For Scsi Devices
SCSI identification number that is not in use by any other SCSI device. There are eight possible ID numbers, 0 through 7. The ASUS PCI-SC200 and ASUS PCI-SC860 cards have fixed SCSI IDs of 7. The SCSI ID serves two purposes: •... -
Page 59: Asus I-A16C Audio Card
Unpacking and Handling Precautions WARNING! Keep the ASUS I-A16C stored in its anti-static bag until you are ready to install it in your system. The ASUS I-A16C is easily damaged by static electricity. Observe the following precautions while unpacking and handling the board: •... -
Page 60: Layout And Connectors
VII. ASUS I-A16C Audio Card Layout and Connectors Panasonic Audio In Wave Table Upgrade Mitsumi Audio In PC Speaker In Volume Control PC Speaker Out Sony Audio In Speaker Out Line Out Line In Microphone MIDI/Game Connectors The audio input connectors are used when you wish to control software mixer set- tings (e.g., bass, treble, volume) for CDs that are played with your CD-ROM drive.