Epson PhotoPC 700 User Manual
Epson user guide digital camera photopc 700
Hide thumbs
Also See for PhotoPC 700:
- User manual (198 pages) ,
- Manual (11 pages) ,
- Product support bulletin (3 pages)
Table of Contents
Advertisement
Quick Links
Advertisement
Table of Contents

Related Manuals for Epson PhotoPC 700


Summary of Contents for Epson PhotoPC 700
- Page 2 Color Guide (may not be available in some countries) Explains the basics of color imaging and shows you how to get impressive results from your PhotoPC 700 and other EPSON products. See this User’s Guide for information on accessing the Color Guide.
- Page 3 ® COLOR DIGITAL CAMERA User’s Guide...
- Page 4 CompactFlash is a trademark of SanDisk Corporation. General Notice: Other product names used herein are for identification purposes only and may be trademarks of their respective owners. EPSON disclaims any and all rights in those marks. Copyright©1998 by SEIKO EPSON CORPORATION, Nagano, Japan.
-
Page 5: Table Of Contents
Introduction PhotoPC 700 Features ....0-1 Options ......0-2 For United Kingdom users - use of options . - Page 6 Chapter 3 Using the LCD Monitor Menus Working with LCD Monitor Menus ... . 3-1 Using the Panorama/Zoom Menu ... . . 3-4 Using the Conditions Menu .
- Page 7 World Wide Web ....B-1 Faxon EPSON ..... . B-2 Bulletin Board Service for latest drivers and utilities B-2 Customer and Warranty Support .
-
Page 9: Introduction
PhotoPC 700. PhotoPC 700 Features PhotoPC 700 is a complete system for capturing digital images, and includes the following features: 1.3 Mega pixel CCD 24-bit color image capture... -
Page 10: Options
EPSON Photo File Uploader software that allows you to convert images stored in your computer to EPSON Photo file format and upload them to your camera EPSON Program Uploader software that lets you upload optional programs to the camera from your... -
Page 11: Safety Instructions
Safety Instructions Read all these instructions and save them for later reference. Follow all warnings and instructions marked on the camera and options. To reduce the risk of electric shock, do not remove the cover of the camera or options and do not open any compartments except as instructed in this User’s Guide. -
Page 12: Warnings, Cautions, And Notes
Remove the batteries and/or unplug the camera and refer servicing to qualified service personnel in the following circumstances: The power cord or plug is damaged; liquid has entered the camera or options; the camera or options have been dropped or the case damaged;... -
Page 13: Chapter 1 Getting Started
Chapter 1 Getting Started This chapter prepares you to use your PhotoPC 700. It covers the following: Unpacking your PhotoPC 700 Getting to know the camera Installing the batteries Attaching the hand strap Setting the language Setting the date and time... -
Page 14: Getting To Know The Camera
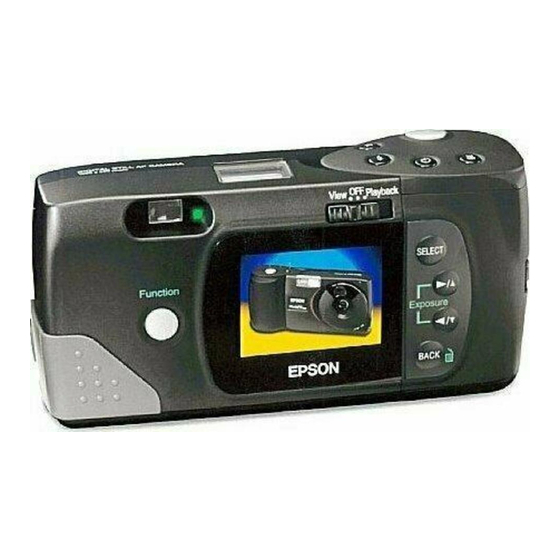
Getting to Know the Camera After you unpack your PhotoPC 700, take a few minutes to learn about its features, as shown below. Front view flash shutter button viewfinder lens lens cover and power switch Getting Started Back view display panel... - Page 15 Bottom view Top view shutter button battery cover lock tripod socket image quality setting display panel memory card eject lever macro mode flash setting setting battery cover self timer setting Getting Started...
-
Page 16: Installing Batteries
Installing Batteries Depending on the country of purchase, your PhotoPC 700 comes with four AA (LR6) alkaline batteries or Ni-MH rechargeable batteries (charge before use). Make sure the camera is off, and follow these steps to insert the batteries. 1. Turn the camera upside down with the lens facing you. -
Page 17: Handling Batteries
Handling batteries When your PhotoPC 700 batteries wear out, you can replace them with any of the following: Single-use AA (LR6) alkaline batteries Single-use AA (FR6) lithium batteries Rechargeable AA Ni-Cd batteries Rechargeable AA Ni-MH batteries Warning: If battery acid gets into your eyes or on your skin, immediately rinse the affected area well with water and seek medical treatment. - Page 18 Do not keep batteries loose in your pockets, to avoid short-circuiting. Getting Started Use a damp cloth for cleaning. If you have EPSON Ni-MH Rechargeable batteries, see the following: Warning: Use only the EPSON Ni-MH Battery Charger, Model EU-23, EU-27, or EU-28 to charge the EPSON Ni-MH Batteries Model EU-24.
-
Page 19: Attaching The Hand Strap
Attaching the Hand Strap To attach the hand strap, loop the strap around the holder on the side of the camera as shown below. Setting the Language For PAL model cameras, you need to set the language for messages displayed on the LCD monitor the first time you use it. -
Page 20: Setting The Date And Time
LCD monitor, and to have the date and time of each picture automatically recorded. Note: If you connect PhotoPC 700 to your computer and access EPSON Photo!2 when the camera’s clock is not set, the camera’s date and time will be set to that of the computer’s automatically. -
Page 21: Using The Camera With Your Computer
See your digital camera software manual for more details, including the following: Installing EPSON Photo!2 and Photo File Uploader Connecting PhotoPC 700 to your computer Transferring pictures to your computer Erasing pictures from the camera... - Page 22 1-10 Getting Started...
-
Page 23: Taking Pictures With Photopc 700
Chapter 2 Taking Pictures with PhotoPC 700 Using PhotoPC 700 to take pictures is similar to using a traditional “point and shoot” camera. This chapter tells you everything you need to know about the following: Turning the camera on and off... -
Page 24: Auto Shut-Off
View mode When the camera is not used for 30 seconds with the LCD monitor in View mode Taking Pictures with PhotoPC 700 When the camera is connected to a computer with the LCD monitor in View mode When the camera is connected to a television... -
Page 25: The Display Panel
Note that several factors can affect battery life, including the surrounding temperature and the type of batteries you use. Low temperatures (especially below 10°C) will drain your batteries more rapidly. See 1-4 for information about changing batteries. macro mode (see page 2-10) Taking Pictures with PhotoPC 700... -
Page 26: Activating The Shutter
Follow the steps below to take photos using the viewfinder or the LCD monitor. You can also take photos from your computer using EPSON Photo!2. To use this feature, see your digital camera software manual. Using the viewfinder 1. Turn the camera on and wait until the status light beside the viewfinder turns green. -
Page 27: Using The Lcd Monitor
Then release the shutter button. When you press the shutter button, the LCD monitor freezes and displays the picture until the camera finishes processing it, then the monitor returns to live preview. Taking Pictures with PhotoPC 700 , the number... -
Page 28: Picture-Taking Range
2.4 m. See page 2-9 for more information on using the built-in flash. Taking Pictures with PhotoPC 700 When you use the flash in macro mode, you may find your pictures come out too light, since the flash is close to the subject. - Page 29 For instructions, see page 3-2. monitor mode switch function button macro Note: Some camera settings return to their default settings when you remove or change the batteries, or when you turn off the camera. navigation LCD monitor Taking Pictures with PhotoPC 700 buttons...
-
Page 30: Image Quality
Image quality The PhotoPC 700 has three color and two monochrome image quality settings. Press the image quality control button to cycle from one setting to another. The settings appear on the display panel as shown below. Fine (default setting) -
Page 31: Flash
The camera’s image capacity will vary accordingly. Flash The PhotoPC 700’s built-in flash is effective within a range of 20 cm to 2.4 m. Press the flash control button to cycle through the three flash settings. -
Page 32: Macro Mode
The camera beeps when the image is captured. The status light on the back of the camera flashes red as the PhotoPC 700 processes the image. When the status light stops flashing and turns green, you can take another picture. You need to press the timer button again each time you want to take a picture using the self timer. -
Page 33: Using The Function Button
To adjust the exposure of your photos manually, follow these steps: 1. Set the exposure adjustment to MANUAL using the View mode. For instructions, see page 3-5. Taking Pictures with PhotoPC 700 2-11... - Page 34 (default setting) adjust +1 adjust +2 2-12 Taking Pictures with PhotoPC 700 Note: If you take your finger off the function button, the information on the display panel changes to show the number of pictures remaining. To see the exposure setting again, simply press the function button again.
-
Page 35: Erasing Your Photos
Checking the Picture Counter The large number in the center of the camera’s display panel shows how many pictures you can take. number of pictures remaining Taking Pictures with PhotoPC 700 select button back button 2-13... -
Page 36: Playing Back Your Photos
LCD screen or on a regular television set. You can also view your photos on the computer using EPSON Photo!2. To use this feature, see your digital camera software manual. Displaying photos on the LCD screen To playback your photos on the LCD screen, follow the steps below. -
Page 37: Displaying Photos On A Television
Displaying photos on a television You can display the pictures in your camera on a regular television just as you can on the LCD screen simply by using the video cable that came with your PhotoPC 700. Note: Color television telecasting specifications are different depending on the country. - Page 38 4. Connect the other end of the video cable to the video input port on the television. 2-16 Taking Pictures with PhotoPC 700 5. Turn on the television and switch it to video mode. 6. Slide the monitor mode switch to Playback.
-
Page 39: Chapter 3 Using The Lcd Monitor Menus
Chapter 3 Using the LCD Monitor Menus When the LCD monitor is in View or Playback modes, you can access the LCD monitor menus, where you can erase selected photos and make a variety of camera and option settings. This chapter explains how, including: Working with LCD monitor menus Setting Panorama or Zoom Setting shooting conditions... - Page 40 Follow these steps to access the LCD monitor menus: 1. Slide the monitor mode switch to View or Playback, then press the SELECT button. Menu icons appear at the top of the LCD screen with the currently selected menu framed in orange. 2.
- Page 41 Following are the eight LCD monitor menus in Playback mode: Settings Information See page 3-7. This menu allows you to This menu allows you to change the following choose whether or not settings: to have photo information displayed clock on the LCD screen. alert beep LCD brightness energy saving...
-
Page 42: Using The Panorama/Zoom Menu
Using the Panorama/Zoom Menu The Panorama/Zoom menu allows you to take pictures in zoom or panorama mode. Access the LCD monitor menus in View mode and select the Panorama/Zoom menu as described on page 3-2, then press the SELECT button to choose from the menu. -
Page 43: Adjusting The White Balance
3. Press the BACK button to save your setting and return to the Conditions menu. You will see CONTINUOUS appears briefly on the screen. 4. To take pictures in continuous shooting mode, keep pressing the shutter button until your camera stops taking pictures. -
Page 44: Adjusting The Sensitivity
1. Access the LCD monitor menus in View mode and select the Conditions menu as described on page 3-2, then press the SELECT button. Icons for each setting appear on the screen, with the uppermost icon highlighted in orange. 2. Press the button to select the exposure icon then press the SELECT button to choose AUTO or MANUAL. -
Page 45: Using The Settings Menu
Using the Settings Menu The Settings menu allows you to change settings for the camera’s internal clock, the alert beep, the LCD brightness level, and the energy saving mode. Follow the instructions below for the changing settings. Setting the clock Follow these steps to adjust the date (year, month, day) and the time (hour and minutes). -
Page 46: Setting Lcd Brightness
Setting LCD brightness To adjust the brightness of the LCD screen, follow these steps: 1. Access the LCD monitor menus in Playback mode and select the Settings menu as described on page 3-2, then press the SELECT button. Icons for each setting appear on the screen, with the uppermost icon highlighted in orange. -
Page 47: Using The Playback Menu
Access the LCD monitor menus in View or Playback mode and select the Information menu as described on page 3-2. The current setting is highlighted. To change the setting, press the SELECT button. Then press the BACK button to save your setting. Using the Playback Menu The Playback menu allows you to switch between Normal and Multi-photo Playback... -
Page 48: Using The Photo Control Menu
Using the Photo Control Menu The Photo Control menu allows you to erase, lock, or unlock images in your camera, and to get information on the camera’s internal and CompactFlash Card’s memory. This menu also allows you to format memory cards and copy images between the camera and the card. -
Page 49: Locking Photos
5. When you have selected all the photos you want to erase, press the BACK button. A message appears asking you to confirm your selections. 6. Press the SELECT button to erase the images and return to the Photo Control menu; press BACK to return to the Photo Control menu without erasing the photos. - Page 50 4. Press the SELECT button. A lock icon bottom of the screen when the photo is locked, and disappears when the photo is unlocked. If you want to lock or unlock other photos at the same time, use button to display them, then press the SELECT button.
-
Page 51: Getting Memory Information
Getting memory information The memory information mode allows you to get information on both your camera’s internal memory and optional CompactFlash memory cards. With the Photo Control menu selected, press the SELECT button. Then press the button until Memory Info is highlighted. -
Page 52: Formatting Memory Cards
Note: EPSON CompactFlash Cards are already formatted when you buy them. You need to format a card only if you want to erase all the data on the card or if a message on the LCD screen instructs you to do so. -
Page 53: Using The Software Menu
Note: You can also upload software programs to your camera from your computer. See your digital camera software manual for instructions. 1. If there are any photos in the camera’s internal memory, transfer the ones you want to your computer or to a CompactFlash Card, then erase all the photos from the camera. -
Page 54: Using The Language Menu
If you selected Delete, a list of the programs installed in your camera appears. Use the choose the program you want to delete, then press the SELECT button. A message appears asking you to confirm you want to delete the program. 5. -
Page 55: Chapter 4 Using The Direct Print Program
Printed image dimensions Features The Direct Print program is software that allows you to print images directly from your PhotoPC 700 with simple procedure. This software includes the following features: Color, monochrome, blue, and sepia printing Full-size, 5 7 size, Card, Album, Sticker, and Index... -
Page 56: Preparing To Use The Direct Print Program
The Direct Print program is already installed in EPSON PhotoPC 700. If you uninstalled the program and want to use it again, you can reinstall the program (the Direct Print kit is packed with your camera). For instructions on installation, see your digital camera software manual. -
Page 57: Available Paper Type
Direct Print program. Photo Quality Ink Jet Paper: Use this paper for standard photo quality printing. EPSON Photo Quality Ink Jet Paper (A4) EPSON Photo Quality Ink Jet Card (A6) EPSON Photo Quality Ink Jet Paper (Letter) -
Page 58: Accessing The Direct Print Program
Photo Quality Glossy Paper: Use this paper for photo quality glossy prints. EPSON Photo Quality Glossy Paper (A4) EPSON Photo Paper (A4) EPSON Photo Quality Glossy Paper (Letter) EPSON Photo Paper (Letter) EPSON Photo Paper (4 6 in.) Photo Quality Glossy Film: Use glossy film to get high gloss photo quality prints. - Page 59 Full Size The Full Size print mode allows you to print a single image full-size onto a sheet of paper. You can print several copies of individual images. Item Choices Photo All or Select Paper Size: A4, Letter, A6, Photo paper Type: Glossy paper, Glossy film, Inkjet paper...
- Page 60 Card The Card print mode allows you to print one image on an A6-sized card. Item Choices Photo All or Select Paper Size: Type: Glossy paper, Glossy film, Inkjet paper Position Top, Center, Bottom, Full size Copies 1 to 99 Time On or Off Color...
- Page 61 Sticker The Sticker print mode allows you to print onto EPSON Photo Stickers. This mode prints 16 small copies of the selected image onto each Photo Sticker sheet. Item Choices Photo All or Select Paper Size: Sticker Type: Glossy film...
- Page 62 To print, access the Direct Print program as described on page 4-4, then follow the instructions below for the print mode you want to use. Full-Size print mode Follow these steps to print using the Full Size print mode: 1. Access the Direct Print program as described on page 4-4.
- Page 63 8. When printing is finished, the LCD screen returns to the Direct Print menu, and the display panel returns to normal. When you finish printing, close the Direct Print program by pressing the BACK button. Then slide the monitor mode switch to OFF and turn off the printer. 7 size print mode Follow these steps to print using the 5 7 size print mode:...
- Page 64 Note: To cancel printing, hold down the camera’s BACK button for about three seconds. A message stating printing is canceled appears on the LCD screen for three seconds, before returning to the Direct Print menu. The printer stops printing and ejects the paper. 8.
- Page 65 7. Press the SELECT button. The camera starts sending the image data to the printer. While the camera is sending data and printing, the LCD screen goes blank and star icons move across the display panel on the top of the camera. Note: To cancel printing, hold down the camera’s BACK button for about three seconds.
- Page 66 4. Press the button to select a setting, then press the SELECT button. 5. Connect the camera to the printer as described on page 4-2, then turn on the printer and load the size and type of paper you selected. When a message telling you how many sheets to load appears at the bottom of the Album print options screen, be sure to load at least that many sheets.
- Page 67 SELECT button. 5. Connect the camera to the printer as described on page 4-2, then turn on the printer and load EPSON Photo Stickers. See the loading instructions that came with the Photo Stickers.
- Page 68 If you want to print an individual image, choose Select. Thumbnail images of the first nine photos in your camera appear with the currently selected image framed in blue. Press the the image you want to print, then press SELECT. You can select several images at the same time.
-
Page 69: Lcd Screen And Display Panel Messages
LCD Screen and Display Panel Messages When printing with the Direct Print program, a variety of status messages may appear on the camera’s LCD screen and display panel. For detailed explanations of these messages, see the following tables. LCD screen messages Message Explanation Check Printer... -
Page 70: Printed Image Dimensions
E56: No paper Load paper into the printer, and then press the printer’s load/eject button (E) to begin printing. (Or press the camera’s BACK button to cancel printing.) Printed Image Dimensions Full-size mode Layout setting Paper Size setting Framed Photo Photo Print Photo Paper Panorama... -
Page 71: Chapter 5 Camera Options
Using the AC adapter Using the Ni-MH Battery Charger Using CompactFlash Memory Cards PhotoPC 700 comes with 4MB of internal memory, which holds up to approximately 6 super fine quality pictures (1280 960 pixels), approximately 12 to 13 fine quality pictures (1280 960 pixels), or approximately 40 to 43 standard quality pictures (640 480 pixels). -
Page 72: Installing A Compactflash Card
If your computer is equipped with a Type II PCMCIA memory card slot, you can access images stored on memory cards directly from your computer by using the optional PCMCIA adapter (B867041). See page 5-3 for more information on this option. Installing a CompactFlash Card Follow these steps to install a memory card in the camera: 1. -
Page 73: Removing A Compactflash Card
Removing a CompactFlash Card Follow these steps to remove a memory card from the camera: 1. Before you open the memory card cover, make sure the camera and the monitor mode switch are turned off. 2. Open the memory card cover, and slide the lever on the bottom of the camera to eject the memory card. -
Page 74: Using The Ac Adapter
Camera Options Note: It is easy to use EPSON Photo!2 to access the photo images in the memory card, since you can see the thumbnail on the screen. To use EPSON Photo!2, see your digital camera software manual. - Page 75 Do not use the AC power cable and the adapter for any purpose other than powering your PhotoPC 700. If the AC plug doesn’t fit your outlet, have a proper outlet installed by a qualified electrician. To avoid radiation danger, do not expose or remove the ferrite core.
-
Page 76: Using The Ni-Mh Battery Charger
Camera Options For the battery charger Beware of shock hazard. Use only with EPSON Ni-MH Rechargeable Batteries, Model EU-24 (1400 mAh). Never attempt to charge other types of batteries in this charger as they may explode, leak, overheat, or cause personal injury. -
Page 77: Operating Instructions
Keep away from heat sources. Do not use the charger outside the temperature range of 0°C to 35°C (2°F to 95°F). Do not insert batteries into the charger backward as they may explode, leak, overheat, or cause personal injury. Do not insert objects through any openings as they may touch dangerous voltage points or short out parts that could result in fire or electric shock. - Page 78 For battery charging 1. If your battery charger has a cover, open the cover. 2. Install the batteries into the compartments, positioning the + and - ends as shown. Warning: Be sure you install four batteries to fill all compartments. Camera Options 3.
- Page 79 4. Extend the retractable plug located on the back of the charger, or connect the battery charger to the power cord as shown below. 5. Plug the charger into an electrical outlet. The light(s) turn red indicating that the charger is working. (If your charger has 2 lights, wait until both SIDE A and SIDE B lights turn red.) When the batteries are fully charged after about two...
- Page 80 5-10 Camera Options...
-
Page 81: Chapter 6 Maintenance And Troubleshooting
Chapter 6 Maintenance and Troubleshooting Your PhotoPC 700 is easy to take care of, and any problems you may have should be easy to solve. See the following section for guidance on cleaning and storing the camera. For solutions to common camera problems, see the section beginning on page 6-2. -
Page 82: Problems And Solutions
The camera may be connected to your computer. When it is connected, you cannot use any of the controls on the camera itself. See your digital camera software manual for instructions on taking pictures from your computer. - Page 83 Taking a picture takes too long. You may be pressing the shutter button all the way down at once. Hold the shutter button halfway down to lock the auto focus, then press the shutter button the rest of the way down to take the photo. For more information, see page 2-4.
-
Page 84: Picture Problems
Picture Problems If you are not satisfied with the pictures you get from PhotoPC 700, you may need to adjust some of the camera settings, or else you may need to brush up on your photography techniques. Read the suggestions listed... - Page 85 Your pictures display poor image quality on the screen or when you print them out. PhotoPC 700 captures images in 24-bit color (16 million colors). Your pictures will not display maximum image quality if your monitor or your computer’s video controller does not support this color depth.
-
Page 86: Camera
See page 3-7 to use the LCD monitor to set the clock. You can also set the clock from your computer. For instructions, see your digital camera software manual. Maintenance and Troubleshooting The color in your picture does not look right. -
Page 87: Physical Dimensions
Appendix A Specifications Camera Physical dimensions Width 144.2 mm Height 69.8 mm Depth 49.3 mm Weight 280 g (without batteries and hand strap) Temperature Operating: 5 to 35 C Non-operating: -20 to 60 C Humidity Operating: 30% to 90% (non-condensing) Non-operating: 10% to 90% Product type Type... -
Page 88: Optical
Image quality modes Super fine image quality (1280 960 pixels, 1280 480 pixels) Fine image quality (1280 960 pixels, 1280 480 pixels) Standard image quality (640 480 pixels) Alternative formats Monochrome, macro, digital 2 zoom, panorama, continuous shooting Optical Lens f = 5.5 mm F2.8 (equivalent to a 36 mm lens on a 35 mm camera) Range... -
Page 89: Interface
Time (seconds) Standard Fine Super fine Interface Serial interface 8-pin mini-DIN, RS-232C-compatible special interface for PC, Macintosh, and EPSON printers Communication speed: 19.2 Kbps or higher (max 230.4 Kbps) Video out NTSC (NTSC model) PAL (PAL model) Power Sources 4 AA batteries (single-use alkaline... -
Page 90: Optional Compactflash Card
Optional CompactFlash Card 4MB CompactFlash Card (B808311) Storage capacity Physical Dimensions: Width 42.8 mm Height 36.8 mm Depth 3.3 mm 15MB CompactFlash Card (B808301) Storage capacity 15MB Physical Dimensions: Width 42.8 mm Height 36.8 mm Depth 3.3 mm Specifications Optional PCMCIA Adapter Interface PCMCIA PC Card ATA Card slot type... -
Page 91: Optional Battery Charger And Batteries
95 mm Optional Battery Charger and Batteries Battery Charger Model EU-23 Input AC 120V, 60Hz Output DC 1.2V 650mA Compatible EPSON Ni-MH Batteries batteries (model EU-24/1400 mAh) Charging time Approx. 160 minutes Power consumption Approx. 8W Charging temperature 0 to 35°C... - Page 92 Dimensions 76 112 22mm Weight Approx. 110g Model EU-28 Input AC 220/230/240V, 50/60Hz Output DC 1.2V 490mA 4 Compatible EPSON Ni-MH Batteries batteries (model EU-24/1400 mAh) Charging time Approx. 180 minutes Power consumption Approx. 8W Charging temperature 0 to 35°C Dimensions 76 115 28.5mm (without AC inlet)
-
Page 93: Appendix B Contacting Customer Support
For United Kingdom and the Republic of Ireland Users If you purchased your printer in the UK or the Republic of Ireland, EPSON (UK) LTD provides a range of customer services and technical support: World Wide Web Faxon EPSON Faxback... -
Page 94: Faxon Epson
To use Faxon EPSON, call 01442 227332 in the UK or 0044 1442 227332 from the Republic of Ireland using a touch-tone phone. You will be asked to follow a simple routine to register your document request. -
Page 95: For Australian Users
Where to purchase genuine EPSON consumables, accessories, and options For Australian Users EPSON Australia wishes to provide you with a high level of Customer Service. As well as this User’s Guide, we provide the following sources for obtaining information: EPSON FAXBACK EPSON FAXBACK will fax you the latest specifications and pricing for most EPSON products offered in Australia. -
Page 96: For Singapore Users
The more information you prepare, the faster we can help solve the problem. This information includes the User’s Guide for your EPSON product, type of computer, operating system, application programs, and any other information you feel is required. -
Page 97: Glossary
Glossary application A software program that helps you carry out a particular task, such as word processing, image editing, or financial planning. Short for binary digit. The smallest unit of data in computer processing. A bit can represent two values: on and off, or 1 and 0. bps (bits per second) A measure of data transmission speed. - Page 98 pixel Short for picture element. Each image is composed of a number of pixels. Pixels are also counted in units of dots. port An interface channel through which data is transmitted between devices. resolution Indication of how finely an image is resolved into pixels. thumbnails Small representations of images.
-
Page 99: Index
Index 5 7 size print mode, 4-5, 4-9–10, 4-16 AC adapter, 2, 5-4–6 specifications, A-4–5 Activating the shutter, 2-4–6 Adjusting camera settings flash, 1-3, 2-9 image quality, 1-3, 2-8–9 macro, 1-3, 2-10 self timer, 1-3, 2-9–10 Album print mode, 4-6, 4-11–12, 4-16 Alert beep, 3-7 Attaching the hand strap, 1-7 Auto shut-off, 2-2... - Page 100 CompactFlash Cards, 2 formatting, 3-14 installing and removing, 5-2–3 installing programs from, 3-15–16 specifications, A-4 storage capacity, 5-1 Computer, using the camera with, 1-9 Conditions menu, 3-2, 3-4–6 Continuous shooting mode, 3-4–5 Copying photos, 3-13 Customer support, Appendix B Date and time, setting, 1-8 Direct Print, available paper type, 4-3–4 connecting the camera to the printer, 4-2–3...
- Page 101 LCD screen and display panel messages, 4-15–16 Lights status, 1-2, 2-4–5 timer, 1-2, 2-9–10 Locking photos, 3-11–12 Macro mode setting, 2-10 Magnification menu, 3-3, 3-9 Maintenance, 6-1–2 Memory information, 3-13 Menus, LCD monitor, 3-2–3 Monitor mode switch, 1-2 Monochrome image quality settings, 2-8 Multi-photo Playback mode, 3-9 Navigation buttons, 1-2 Opticals, A-2...
- Page 102 Rechargeable batteries, 2, 5-6–9 specifications, A-6 Removing, CompactFlash Cards, 5-3 Safety instructions, 3–4 battery charger, 5-6–7 SELECT button, 1-2 Self timer, 2-9–10 Sensitivity, 3-6 Setting, date and time, 1-8 language, 1-7, 3-16 Settings, adjusting, 2-6–10 menu, 3-3, 3-7–8 Shutter, clicking on the camera, 2-4–6 Slide Show menu, 3-3, 3-14 Software menu, 3-3, 3-15–16 Specifications,...