Table of Contents
Advertisement
Operator's Manual
P R
0
F E S S
I
0
N A L _
Fixed Base/Plunge Base
Router Kit
Model No.
130.26620
CAUTION: Read, understand and follow
all Safety Rules and Operating Instructions
in this manual before using this product.
• SAFETY
• OPERATION
• MAINTENANCE
• ESPAI_IOL
Sears, Roebuck and Co., Hoffman Estates, IL 60179 U.S.A.
Advertisement
Table of Contents

Related Manuals for Craftsman 130.26620


Summary of Contents for Craftsman 130.26620
- Page 1 Operator's Manual F E S S N A L _ Fixed Base/Plunge Base Router Kit Model No. 130.26620 • SAFETY • OPERATION CAUTION: Read, understand and follow • MAINTENANCE all Safety Rules and Operating Instructions • ESPAI_IOL in this manual before using this product. Sears, Roebuck and Co., Hoffman Estates, IL 60179 U.S.A.
- Page 2 Repair Parts...._ ............ii,. i .... Pages 21 - 23 Service Numbers..............ii _.-f /.... Back Cover ONE FULLYEAR WARRANTY ON C If this Craftsman Toolfails tO Dyear from the date of ; & REPAIR purchase, RETURN IT TO THE CENTER IN THE UNITED STATES, and Sears will repair it;...
- Page 3 _Read and understand all instructions. Failure to follow all instructions listed below, may result in electric shock, fire and/or serious personal injury. SAVE THESE INSTRUCTIONS Work Area reduce the risk of electric shock. Refer to Keep your work area clean and well lit. "Recommended sizes of Extension Cords"...
- Page 4 that are sold at Sears Disconnect the plug/tom the power source for your that may be before making any adjustments, changing suitable may become hazardous accessories, or storing the tool. Such when used on ; preventive safety measures reduce the Hsk of starting the tool accidentally.
- Page 5 8ome dust created by power Never use dull or damaged bits. Sharp bits sanding, sawing, grinding, must be handled with care. Damaged bits can drilling, and other construction activities snap during use. Dull bits require more force to contains chemicals known to cause cancer, push the tool, possibly causing the bit to break.
- Page 6 IMPORTANT: Some of the following symbols may be used on _=T tool. Please study them and earn the r mean ng. Prober Interpretat on of these symbolmll_l!i alow you to operate the tool betterand safer. Name Symbol Volts Amperes Hertz Watt Kilograms Minutes...
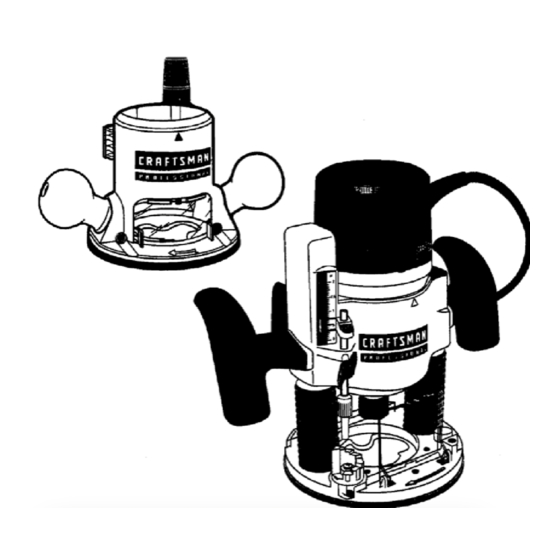
- Page 7 Disconnect the plug from the power source before making any assembly, adjustments or changing accessories. Such preventive safety measures reduce the risk of starting the tool accidentally, Fixed Base with Motor Housing MOTOR HOUSING ROCKER ON'OFF SWITCH - R AUGNMENTARROW B_EC_MPL_ER ROUND HANDLE...
- Page 8 Discon_ the plug from the power souroe _ making any membly, adjustments or ehanglng acoassodes. Such _ safety measures reduce the risk of starting the tool aooldentally. Plunge Base with Motor Ho_lng AIRVENTS SPEED CONTROL D IAL ROCKER ARROW DEPTH ROD FINE RODKNOB - DEPTH ROD BITROTATI_ _ROW...
- Page 9 A wide assortment of muter bits with different ll[tlB_ profiles is available separately. Use 1/2" shank whenever possible, and only use good quality hits. To prevent personal injury, always remove plug from power source before removing installing bits or accessories. INSTALLING A ROUTER BIT COLLET WRENCH...
- Page 10 REMOVING MOTOR FROM BASE Toremove motor from fixed base: (Fig, 5) 1.Hold r outer inhorizontal peslUon, open base clamp lever, depress coarse adjustment LEVER lever, and pull motor upwards until it stops. 2. Turn motor counter-clockwise, and gently pull it free of base. To remove motor from plunge base: (Fig.
- Page 11 l,'E_m INSTALLING MOTOR IN BASES cont. To install motor in plunge base: 1. Release the base clamp lever+ 2. Une up the arrow on the base with arrow on the motor+ (Fig. 8) • To position switch on the right side of the base, line up the base's arrow with arrow on the motor housing that is below the ALIGNMENT...
- Page 12 CAST INDICATOR M MKI E rGL,_P LEVER COARSE LEVER Fixed Base with Motor Hou_ This router is designed for speed, accuracy 8. COAIP_E ADJ_ rMENT: To make a larg_ jpth adjustment, depress and convenience in performing cabinet work, coarse adjustma 'elease lever and raise or routing, fluting, beading, cove-cutting, dove lower to desired i...
- Page 13 TO CLAMP MOTOR When final coarse and fine adjustments have been made, fasten the base clamp lever to secure adjustments. (if additional clamping force is desired: using a 10 mm wrench, rotate clamp nut clockwise SLIGHTLY (1/8 turn or lees), then test clamp. Do not over-tighten.) DEPTH ADJUSTMENT WITH PLUNGE BASE PLUNGING ACTION plunge...
- Page 14 _l[flll[q DEPTH INDICATOR KNOB DEPTH RODFINE ADJUSMENT K NOB TURRET FINE ADJUSTMENT 2. To mlcro-red_ the plunge depth, lower the fine adj_ stop by turning it The plunge base is equipped with a fine clockwise by the daslred amount. adjustment system that allows you to micro adjust the plunge depth of the router bit for Notes: supedor routing accuracy.
- Page 15 ELECTRONIC VARIABLE SPEED CONTROL ROCKER uON/OFF" SWITCH The electronic speed control feature allows Your tool can be turned "ON" or "OFF" by the rocker switch located on the motor housing. motor speed to be matched to cutter size and One side of the switch is marked "1" for "ON", material hardness for improved finish, extended and the other side of switch is marked "O"...
- Page 16 FEEDING THE ROUTER I_m ilm! AS seen from thetopoftherooter, thebit turns c lockwise and the cutting edges face accordingly.Therefore,the most efficientcut is made by feeding the routerso that the bit turns into the work, not away. Figure 14 showsproperfeed for variouscuts. How fast you feed depends on the hardness of the material and the size of the cut.
- Page 17 TEMPLATE GUIDE BUSHINGS Your router's sub-bases are ready to accept made of plywood, hardboard, metal or even the Craftsman Router Template Guide Bushing plastic, and the design can be cut with e router, Set (9-25082), sold separately. jigsaw, or other suitable cutting tool.
- Page 18 TO A'n'ACH TEMPLATE GUIDE WARNING; _LWAYS WEAR SAFETY BUSHINGS TO ROUTER GLASSE_ _i EYE SHIELDS WHEN OPERATIN_ YOUR POWER TOOL. 1. DISCONNECT ROUTER FROM POWER O_ERATION SUPPLY WHILE ASSEMBLING PARTS 1. Place your router, with guide bushing 2. Attach the guide bushing directly to the attached, a_!_St template.
- Page 19 USE IN ROUTER TABLE Your router can also be used in a router table. The fixed base is dasigned to allow easy depth adjustment in a table. The plunge base is not recommended for use in a router table because it may cause damage to the plunge router base.
- Page 20 CARBON BRUSHES p_l'_ GMteln cleaning agents and Thebrushesend commutator inyour CRAFTSMAN Professional Routerhave beanenglnserod to s'='m_mii=_m l_llVsets cause damage to the providemany hoursof dependableservice, plastic parts. _ Includegasoline, c arbon...
- Page 21 ROUTER KIT- MODEL NUMBER 130.26620 The Model Number will be found on the PARTS UST Nameplate. Motor Pos. Part Number Description Always mention the Model Number in all 2610922584 Motor Housing correspondence regarding your tool. 3604220569 Field 3604011620 Armature SEE BACK PAGE FOR PARTS ORDERING 2610913918 Switch INSTRUCTIONS.
- Page 22 ROUTER KIT - MODEL NUMBER 130.26620 The Model Number will be found on the PARTS LIST Fixed Base Nameplate. Pos. Part Number Description 2610919706 Handle Always mention the Model Number In all 2610922557 Base correspondence regarding your tool. 1613300006 _ 2610915060 Clamp Lever Assembly SEE BACK PAGE FOR PARTS ORDERING...
- Page 23 Replacement Parts ROUTER KIT - MODEL NUMBER 130.26620 The ModeJ Number will be found on the Pos. Part Number Description Nameplate. 2610922561 Sub Base 2916650003 Retaining Ring Always mention the Model Number in all 1900210111 O-Ring correspondence regarding your tool. 3603450504 Lock Bolt 3604651503...
- Page 24 i i i iii iiii!!i!!ii !ii i iii :ili ¸¸¸¸ ,i ......Your Home For repair in your home of all major brand appliances, lawn and garden equipment, or heating and cooling systems, no matter who made it, no matter who sold it! For the replacement parts, accessories and owner's manuals that you need to do-it-yourself, For Sears professional installation of home appliances...