Table of Contents
Advertisement
OWNER'S
MANUAL
MODEL NO.
315.175010
CAUTION:
Read Rules for
Safe Operation
and All Instruc-
tions Carefully
CRRFTgMRN +
DUSTLESS
PLATE JOINER
DOUBLE
INSULATED
Thank You for Buying
Craftsman Tools
972000-339
Designed exclusively for and sold only by
SEARS, ROEBUCK AND CO., Hoffman Estates, IL 60179
®
Printed in U.S.A.
Advertisement
Table of Contents

Related Manuals for Craftsman 315.175010


Summary of Contents for Craftsman 315.175010
- Page 1 Read Rules for DUSTLESS Safe Operation and All Instruc- PLATE JOINER tions Carefully DOUBLE INSULATED Thank You for Buying ® Craftsman Tools Designed exclusively for and sold only by SEARS, ROEBUCK AND CO., Hoffman Estates, IL 60179 972000-339 Printed in U.S.A.
- Page 2 TYPICAL APPLICATIONS 175010 PLATE JOINER Page 2...
-
Page 3: Table Of Contents
Exploded View and Parts List ............22-23 FULL ONE YEAR WARRANTY ON CRAFTSMAN PLATE JOINER Ifthis C raftsman Plate Joiner fails to perform propedydue to a defect in mate dal or workmanship within oneyear from the date of purchase RETURN IT TO (OR CONTACT) THE NEAREST SEARS SERVICE CENTER I DEPARTMENT IN THE UNITED STATES and Sears will repair it, free of charge. -
Page 4: Rules For Safe Operation
RULES FOR SAFE OPERATION READ ALL INSTRUCTIONS 1, KNOW YOUR POWER TOOL - Read owner's DON'T ABUSE CORD. Never carry tool by cord manualcarefully,Learn its applications and limi- or yank it to disconnect from receptacle. Keep tations as well as the specificpotential hazards cord from heat, oil, and sharp edges. -
Page 5: Rules For Safe Operation
Do not change the plug in Watch what you are doing and use common any way. sense. Do not operate tool when you are tired, Do When servicing use only Identlcst Craftsman not rush, replacement parts. CHECK DAMAGED PARTS. -
Page 6: Features
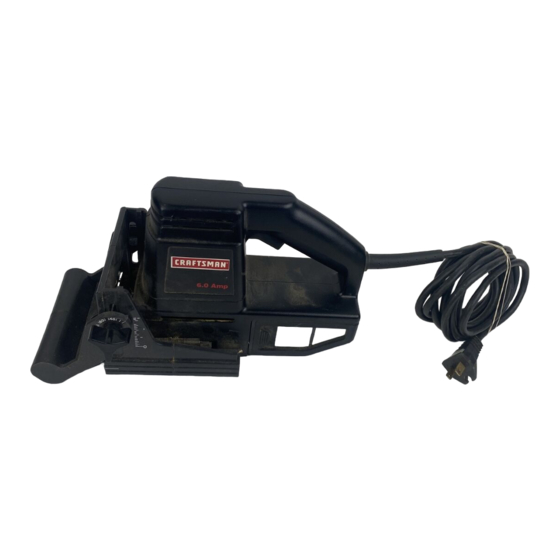
FEATURES Your Plata Joiner has been designed for making fast, accurate, and simple plunge cuts in wood, etc. so that biscuitscan be used to join two or more boards together. When used pmpedy and only for whet it is intended, thisversatge tool will give you yearn of troubta-tree berforrnance, it is professlenally engleeered, but its ease of operaiton allewsthe amateur ta preduce work that is beautiful and precise. -
Page 7: Features
FEATURES KNOW YOUR PLATE JOINER ,_e Fibre 2. Your plate Joinerhas been shipped €ompletely as_mbled end ready for use. Inspect it carefully to make sure no breakage or damage has occurred dudng shipping, ff any parts are damsged or missing, contact your local Seam store or Sears authorized service center to ob(aln replacement parts before attempting to operate your plate J_r_n ThedU6tboxisalsolnstall6dontherearoftooL Its usewillhelpkeeptheworkareaclean. -
Page 8: Adjustments
ADJUSTMENTS DEPTH OF CUT ADJUSTMENTS Your plate joiner can be adjusted to three standard cutting depths to accommodate three standard size biscuits-- #0, #10, and #20. Adjustments are made by engaging slots o_ DEPTH ADJUSTMENT depth adjustment knob with tabs on rear base assembly. For KNOB exsmpta, when using a #0 size biscuit, rotate the depth adjustment knob to the slot marked 0. -
Page 9: Adjustments
ADJUSTMENTS FENCE HEIGHT ADJUSTMENT S_e Figure FRONT HANDLE I _DJUSTABLE FENCE The adjustable fence on your plate joiner can be moved up and down to adjust the position of the blade in relation to the top of the workpiece. A scale on both sides of the fence indicatesthe height of the fence from the center of the blade. -
Page 10: Operation
OPERATION A variety of spllne joints can be made usingyour plate joiner. The number and size biscuitsneeded for each jointdepends on the thickness of the wood and the length of the joint, in general, tbe small #0 b_cuits ehouM be used for mitercuts in 314in. - Page 11 OPERATION BUTT JOINTS See Figure 9. A butt joint is one of the weakest joints in woodworking. This type of joint is mating the end grain of one board with the edge grain of another. The Pendingof glee on thistype of surface Is poor.
- Page 12 OPERATION T-JOINTS l ti/f See Figures 11-15. It I|f! |1/1-. _ MARK(S) A T-jolot is used when the end of a board is joined to the face of another board as shown in figure 11. Attaching shelves to bookcases and inner support braces to frames BISCUITlS) are typical applications, Actual cutting of a T-jofnt is as...
- Page 13 OPERATION T-JOINTS (Continued) ANGLE 15. Once.aU slots have been cut, place a biscuit in each joint ADJUSTMENT and dPJassembts the worlds. Make sum each joint lines up and fits. 16, Rnally, dlaassembfe the workpleces end ptsce a bend of glue In each slot. Also, spread a bead of glue over the entire sudace of the joint.
- Page 14 OPERATION HOW TO MAKE EDGE MITER JOINTS 1. Unplug your plate Joiner. 2. place the pleces of wood to be joined on a level work* l'/_'_'/-'P" e_scurr ///F/ bench as shown in figure 17. -s T 3. Mark centedine of the joint on each board. 4.
- Page 15 OPERATION AUXILIARY FENCE Sse Figures 20.21. When cutting biscuit slots in workptaces lass than 1-1/2 in. wide. it is necessary to make an 8_iliew fenoe end mount it to the bottom of the adjustable fence. Thb fence will pro- vide a positive stop for the height setting of these small workpieces.
-
Page 16: Operation
OPERATION TO INSTALL DUST GROOVES See Figure 23, DOS .°o 1. Unplug your plate joiner. 2. Realigrldust poxwithmarof plate joiner, Groovesladust box align with rails on plate joiner. 3. Slide dust box on plate joiner as shown by the arrow in figure 23, YOUwill feel a soft click as the tabs snap into place, NOTE: As mentioned previously, be careful not to break the tabs that secure dust box to plate joiner,... -
Page 17: Maintenance
MAINTENANCE CLEANING BASE ASSEMBLY I DUST BOX ADJUSTABLE TUNNEL FENCE See Figures 24-26. After extended use, wood particles and resin may build up inside the base assembly of your plate joiner and clog the CREWDRIVER path for wood particles going into dust box. Wood particles packing up in thisarea, not only defeats the dustless feature of your plate joiner, it also makes cutting biscuit slots more difficult. - Page 18 MAINTENANCE BLADE REPLACEMENT ADJUSTABLE See Figures 27-30, After extended use, the blade on your plate joiner may become dull and need replacing. If yOU accidentally hit a nail or other blunt object, it willbreak the carbide tips on the blade. These situations also require replacing the blade. TO REPLACE THE BLADE 1.
-
Page 19: Accessories
MAINTENANCE TO REPLACE THE BLADE (Continued) RIt;OvE T,&O. ooTEo NOTE: Bade teeth point toward the dght of the plate joiner when hem in normal operating position, The direc- tion of €of•don is marked on the blade, An arrow on the bottom of the front base assembly also indicates direc- tion of rotation, See Figure 2Z 16, Tighten blade screw securely. -
Page 20: Troubleshooting
TROUBLESHOOTING PROBLEM SOLUTION Biscuitsdo not fit slots. Biscuits not fittingslots may Biscuit slots are too deep or too shallow. Make fine also cause misalignment of boards being joined. edjustments to depth setting. Bee "TO MAKE FINE ADJUSTMENTS" seoflen on page 8. Biscuitthickness may be out oftolerance. - Page 21 NOTES...
- Page 22 CRAFTSMAN PLATE JOINER - MODEL NO. 315.175010 SEE NOTE "A" NOTE "A" -- The ammmbly shown represents an important pert of the Double Insulated System. To avoid I_e poiIIbillty of a_wi_m or damage to _e syntm_ / sl_mld be parfonned by your nearent Smri Reflalr Cer,ter.
- Page 23 CRAFTSMAN PLATE JOINER - MODEL NO. 315.175010 yourPLATEJOINERorwhenonderi_lrepabparts. Themodel n umber w illbefound ona plateattached tothemotor be,JSl_g, Always mer_ion themodel n umber inJl cofl_spondence regardlng SEE BACK PAGE FOR PARTS ORDERING INSTRUCTIONS PARTS LIST Number Quart. 971484001 Adjusleble Fence I Front Handte ......1...
- Page 24 For repair of major brand appliances In your own home... no matter who made it, no matter who sold it! 1-800-4-MY-HOME sM A.ytime, day ornight (1-1100-469-4663) www,sesrs,com To bringin productssuchas vacuums,lawnequipmentand electronics for repair,call for the locationof your nearest Sears Parts & Repair Center, 1-800-488-1222 An_ime, day or night...