Advertisement
Available languages
Available languages
Quick Links
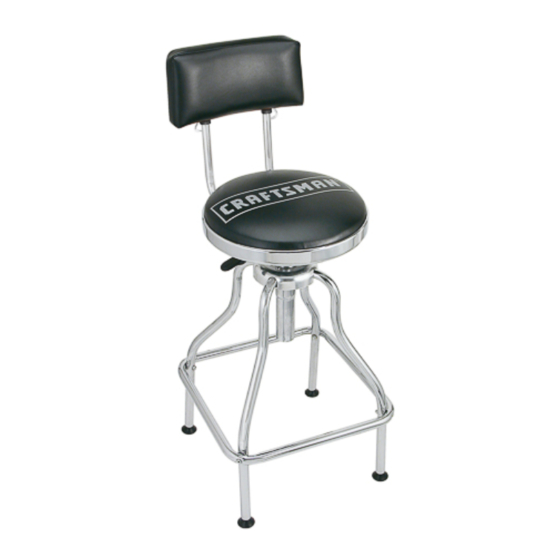
I CRAFTSMAN°I
WORKSHOP
STOOL
WITH ARMS
Model 875.62828
One-Year
Full Warranty
For one year from the date of purchase,
if
this Craftsman
Workshop
Stool fails due to
defect in materials
or workmanship,
return it
to any Sears store or other Craftsman
outlet
in the United States for free repair or re-
placement.
This warranty
gives you specific
legal rights,
and you may also have other rights that vary
from state to state.
Sears, Roebuck
and Co., Dept. 817WA,
Hoffamn
estates,
IL
SAFETY
INSTRUCTIONS:
WEAR SAFETY
GLASSES
when assem-
bling this product.
BE CAREFUL
of possible
sharp edges.
DO NOT stand on this product. You may
fall which may cause personal
injury.
PARTS
See illustration
on back of page.
NOTE: The stool seat and backrest are pre-
assembled
prior to shipment.
ASSEMBLY
and OPERATION
INSTRUCTIONS
For assembly hex key (19) and a mini wrench (20)
are supplied.
1. Remove all parts from shipping carton. Remove all
packaging material from parts. Check parts
against parts list before beginning assembly. If any
parts are missing,
call 1-800-290-9054.
2. Insert upper end of each backrest support bar (2)
into backrest (1) so that one of the two spring
locks snaps into place.
Be sure to snap each support bar into backrest at
same height.
3. Loosen lock knobs (18) on underside of seat (5)
enough so that you can insert the lower end of
each support bar into the seat bracket. Insert
support at least 4 inches to ensure seat stability.
Tighten lock knobs (18) securely.
4. Loosen lock knobs (18) on underside of seat (5)
enough so that you can insert the lower end of
each arm rest support (4) into the seat bracket on
either side. Insert support at least 1.5 inches to
ensure arm rest stability. Tighten lock knobs (18)
securely.
5. Unscrew nylon lock nuts (10) from hex bolt (7).
Place hex bolts through holes in top of leg fixture
(8). Invert connector and lay it on floor. Position
each leg (11) into connector so that hex bolt goes
through leg hole. Place strength plate (9) over legs
so that hex bolt goes through holes in strength
plate. Finger-tighten lock nuts, nylon ring up, onto
ends of hex bolts.
6. Place square foot rest (14) around legs. Remove
lock nuts from leg screws (13). Insert a leg screw
into each corner of square and through hole in
related leg. Finger-tighten lock nut. When all leg
screws and lock nuts are in place, securely tighten
them. Then securely tighten the lock nuts on the
strength plate (9).
7. Stand leg assembly upright. Insert air cylinder (6),
white button up, through hole in top of leg connec-
tor until cylinder comes to rest in the leg fixture (8).
8. Place seat on top of cylinder. Apply weight to seat
to lock it to the cylinder. CAUTION: To avoid injury,
be sure that seat is securely locked to cylinder
before sitting on stool.
9. Raise or lower seat by lifting up on the seat
adjustment lever beneath seat. Lower the lever to
lock seat at desired height.
10.If necessary, you may adjust the leg feet (15)
slightly so that the stool rests perfectly flat on the
floor. Do not unscrew the leg foot so far as to
make the connection between foot and leg un-
stable.
Sears, Roebuck and Co., Hoffman Estates, IL 60179 USA
www.sears.com
Advertisement

Related Manuals for Craftsman 875.62828


Summary of Contents for Craftsman 875.62828
- Page 1 3. Loosen lock knobs (18) on underside of seat (5) to any Sears store or other Craftsman outlet enough so that you can insert the lower end of in the United States for free repair or re- each support bar into the seat bracket.
- Page 2 WORKSHOP STOOL WITH ARMS Model 875.62828 Ref # Part # Description 9000-01A Backrest 9000-03A Support for backrest 9000-17 Arm -rest 9000-18 Arm-rest support 9000-02 Seat 9000-04 Air cylinder 9000-05 Hex bolt M6x40 9000-06 Fixture 9000-07A Strength plate 9000-08 lynoc nut M6 9000-09 Legs 9000-08...
- Page 3 (3) en el respaldar (1), de forma que uno de los dos Garantia completa por un a#o cierres de resorte encaje en su posici6n. Si esta Banqueta de Taller Craftsman falla AsegOrese de encajar cada barra de apoyo en el respaldar a lamisma altura.
- Page 4 BANQUETA DE TALLER COM ARMAMENTOS Modelo 875.62828 Nro. Ref. Pieza # Descripcion 9000-01A Respaldar 9000-03A Barra de apoyo de respaldar 9000-17 Apoyabrazos 9000-18 Apoyo de apoyabrazos 9000-02 Asiento y soporte de asiento 9000-04 Cilindro de aire 9000-05 Tornillo de capucha de cabezal hueco 9000-06 Conector de pata...
- Page 5 Your Home For repair - in your home - of all major brand appliances, lawn and garden equipment, or heating and cooling systems, no matter who made it, no matter who sold it! For the replacement parts, accessories owner's manuals that you need to do-it-yourself. For Sears professional installation of home appliances...