Electrolux EHD60100P User Manual
Hide thumbs
Also See for EHD60100P:
- Specification (18 pages) ,
- User manual (12 pages) ,
- User manual (40 pages)
Table of Contents
Advertisement
Advertisement
Table of Contents

Related Manuals for Electrolux EHD60100P


Summary of Contents for Electrolux EHD60100P
- Page 1 user manual Induction hob EHD60100P...
- Page 2 We were thinking of you when we made this product...
- Page 3 Thank you for choosing a first class product from Electrolux, which hopefully will provide you with lots of pleasure in the future. The Electrolux ambition is to offer a wide variety of quality products that make your life more comfortable.
-
Page 4: Table Of Contents
4 electrolux contents Contents Safety instructions Description of the Appliance Operating the appliance Tips on Cooking and Frying Cleaning and Care What to do if … Disposal Installation Instructions Assembly Guarantee/Customer Service Service The following symbols are used in this user manual: Important information concerning your personal safety and information on how to avoid damaging the appliance. -
Page 5: Safety Instructions
5 Children’s safety • The cooking zones will become hot when you cook. Therefore, always keep small children away from the appliance. Safety instructions For Australia: • The appliance is not intended for use Please comply with these instructions. If... - Page 6 6 electrolux safety instructions Safety during use How to avoid damage to the appli- ance • Remove stickers and film from the glass ceramic. • The glass ceramic can be damaged by objects falling onto it. • There is the risk of burns from the appliance if used carelessly.
-
Page 7: Description Of The Appliance
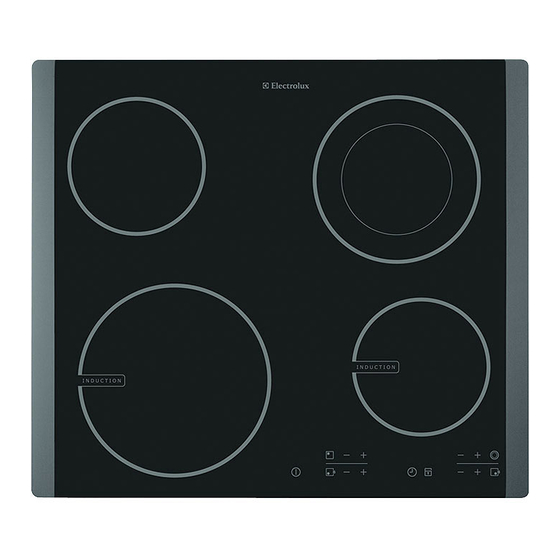
7 Description of the Appliance Cooking surface layout Single cooking zone 1200 W Double ring cooking zone 700/1700 W Control panel Induction cooking zone 2300 W Induction cooking zone 1400 W with power function 3700 W... - Page 8 8 electrolux description of the appliance Touch Control sensor fields The appliance is operated using Touch Control sensor fields. Functions are controlled by touching sensor fields and confirmed by displays and acoustic sig- nals. Touch the sensor fields from above, without covering other sensor fields.
- Page 9 9 Displays Display Description Cooking zone is switched off Keep warm setting Keep warm setting is set Heat settings Heat setting is set Automatic warm up function Automatic warm-up function is activated Fault Malfunction has occurred...
- Page 10 10 electrolux description of the appliance Residual heat indicator Warning! Risk of burns from residu- al heat. After being switched off, the cooking zones need some time to cool down. Look at the residual heat indicator Residual heat can be used for melt- ing and keeping food warm.
-
Page 11: Operating The Appliance
11 Operating the appliance Use the induction cooking zones with suitable cookware. Switching the appliance on and off Control panel Display Pilot light Switch on Touch for 2 seconds lights up Switch off Touch for 1 second... - Page 12 12 electrolux operating the appliance Switching the double ring cook- ing zone on and off With the double ring cooking zone the heating surface can be matched to the size of the cookware. Control panel Pilot light Switch on Touch...
-
Page 13: Using The Automatic Warm-Up Function
13 Using the automatic warm-up function All cooking zones are equipped with an automatic warm-up function. The auto- matic warm-up function sets the cook- ing zone to the highest setting for a certain period of time and then automat- ically switches back to the cooking set- ting that was originally set. -
Page 14: Locking/Unlocking The Control Panel
14 electrolux operating the appliance Locking/unlocking the control panel The control panel, with the exception of the “On/Off” sensor field, can be locked at any time in order to prevent the set- tings being changed e.g. by wiping over the panel with a cloth. -
Page 15: Using The Child Safety Device
15 Using the child safety device The child safety device prevents unin- tentional use of the appliance. Setting the child safety device Step Control panel Display/Signal Switch on the appliance (Do not set a heat setting) -
Page 16: Switching The Power Function On And Off
16 electrolux operating the appliance Switching the power function on and off The power function makes more power available to the induction cooking zones, e.g. to bring a large quantity of water to the boil quickly. The power function is activated for 10 minutes. - Page 17 17 Power Management The cooking zones of the cooking sur- face have a maximum power available to them. Two cooking zones make up a pair (see figure). So that the Power function can always be carried out, Power Management may...
-
Page 18: Using The Timer
18 electrolux operating the appliance Using the timer All cooking zones can use each use one of the two timer functions at the same time. Function Condition Outcome after the time has elapsed Automatic cut-out a heat setting is set... - Page 19 19 Selecting a cooking zone Step Control panel Display Touch once Pilot light of the first cooking zone flashes Touch once Pilot light of the second cook- ing zone flashes Touch once Pilot light of the third cooking...
- Page 20 20 electrolux operating the appliance Setting the time Step Control panel field Display Select cooking zone Pilot light of the cooking zone selected flashes Touch for the 00 to 99 minutes cooking zone selected After a few seconds the pilot light flashes more slowly.
- Page 21 21 Displaying the time remaining for a cooking zone Step Control panel field Display Select cooking zone Pilot light of the cooking zone selected flashes faster The time remaining is displayed After a few seconds the pilot light flashes more slowly.
- Page 22 22 electrolux operating the appliance Safety cut-out Induction cooking zones • In the event of overheating (e.g. Cooking surface when a pan boils dry) the cooking • If after switching on the cooking sur- zone automatically switches itself off. face, a heat setting is not set for a is displayed.
-
Page 23: Tips On Cooking And Frying
23 Tips on Cooking and Frying Information on acrylamides According to the latest scientific knowledge, intensive browning of food, especially in products con- taining starch, can constitute a health risk due to acrylamides. Therefore we recommend cooking at the lowest possible temperatures and not browning foods too much. -
Page 24: Cookware For Induction Cooking Zones
24 electrolux tips on cooking and frying Cookware for induction cooking zones Cookware material Cookware material Suitable Steel, enamelled steel Cast iron Stainless steel if appropriately labelled by the manufacturer Aluminium, copper, brass Glass, ceramic, porcelain Cookware for induction cooking zones is labelled as suitable by the manufacturer. - Page 25 25 Pan size Induction cooking zones adapt auto- matically to the size of the bottom of the cookware up to a certain limit. However the magnetic part of the bottom of the cookware must have a minimum diame- ter depending upon the size of the cooking zone.
-
Page 26: Tips On Energy Saving
26 electrolux tips on cooking and frying Tips on energy saving Place cookware on the cooking zone before it is switched on. If possible, always place a lid on the cookware. -
Page 27: Examples Of Cooking Applications
27 Examples of cooking applications The information given in the following table is for guidance only. Heat Cooking- Cooking set- suitable for Tips/Hints process time ting Off position Keeping food Keeping cooked foods warm... -
Page 28: Cleaning And Care
28 electrolux cleaning and care Cleaning and Care Take care! Risk of burns from resid- ual heat. Warning! Sharp objects and abra- sive cleaning materials will damage the appliance. Clean with water and washing up liquid. Warning! Residues from cleaning agents will damage the appliance. - Page 29 29 Removing deposits 1. Place a scraper on the glass ceramic surface at an angle. 2. Remove residues by sliding the blade over the surface. 3. Wipe the appliance with a damp cloth and a little washing up liquid.
-
Page 30: What To Do If
30 electrolux what to do if … What to do if … Problem Possible cause Remedy The appliance cannot be More than 10 seconds have Switch the appliance on again. switched on or is not operating passed since the appliance... - Page 31 … electrolux 31 Problem Possible cause Remedy flashes Unsuitable cookware Use suitable cookware No cookware on the cooking Place cookware on the cook- zone ing zone The diameter of the bottom of Move onto a smaller cooking...
-
Page 32: Disposal
32 electrolux disposal Disposal Packaging material The packaging materials are envi- ronmentally friendly and can be re- cycled. The plastic components are identified by markings, e.g. >PE<, >PS<, etc. Please dispose of the packaging materials in the appro- priate container at the community waste disposal facilities. -
Page 33: Installation Instructions
33 Installation Instructions Safety instructions WARNING! The laws, ordinances, directives and Risk of injury from electrical cur- standards in force in the country of use rent. are to be followed (safety regulations, • The electrical mains terminal is live. -
Page 34: Electrical Connection
34 electrolux installation instructions Electrical Connection Before connecting, check that the nom- inal voltage of the appliance, that is the Once connected to the mains sup- voltage stated on the rating plate, corre- ply check that all cooking zones are sponds to the available supply voltage. -
Page 35: Assembly
35 Assembly... - Page 36 36 electrolux assembly...
- Page 37 37...
- Page 38 38 electrolux assembly...
-
Page 39: Rating Plate
39 Rating Plate EHD60100P 949 592 659 55GAD83AG 230 V 50 Hz Induction 3,7 kW 6,6 kW ELECTROLUX... -
Page 40: Guarantee/Customer Service
Appliances or parts become the contained in this document; property of Electrolux. This warranty does not (b) Electrolux shall not be liable for any loss or apply to light globes, batteries, filters or similar damage whether direct or indirect or consequen- perishable parts. - Page 41 New Zealand, loss or damage whether direct or Electrolux (if any) arising out of or in relation to indirect or consequential that is reasonably forsee- the Appliance or any services supplied by able.
-
Page 42: Service
42 electrolux service Service In the event of technical faults, please first check whether you can remedy the problem yourself with the help of the op- erating instructions (section “What to do if…”). If you were not able to remedy the prob-... - Page 44 822 930 666-B-250407-02...