
Related Manuals for Philips Screeneo HDP1550


Summary of Contents for Philips Screeneo HDP1550
- Page 1 Screeneo Register your product and get support at www.philips.com/welcome HDP1550 HDP1550TV HDP1590 HDP1590TV User Manual...
-
Page 2: Table Of Contents
Wizard ................. 19 Wifi Hotspot ..............19 Digital Living Network Alliance (DLNA) ....20 7 Bluetooth ..........21 Activating the Bluetooth connection ......21 Setting up Bluetooth parameters ......... 21 Bluetooth speaker ............21 Philips · HDP15x0 & HDP15x0TV... -
Page 3: Overview
CH + the WiFi (Miracast, DLNA,..) and Bluetooth functions. PQRS WXYZ SUBTITLE TEXT Only the models HDP1550TV and HDP1590TV have PHILIPS the DVB-T function. Symbols Used Notice Product Highlights Troubleshooting This symbol designates tips that will help you Connecting to devices with HDMI output to use your device more effectively and easily. -
Page 4: General Safety Information
2 Wait one to two hours before you take the device out of the plastic bag. The device should not be used in a very dusty environ- ment. Dust particles and other foreign objects may damage the unit. Philips · HDP15x0 & HDP15x0TV... -
Page 5: Power Supply
Power Supply • how to make a proper and regular cleaning and disinfection in the case of any particular eventu- alities-ocular infections, infestations of the head, Before turning on your device, check that the outlet mixed use, etc. .. where disinfection of the that you are going to plug it into conforms to the indi- glasses is not possible as it may damage the func- cations shown on the information plate (voltage, cur-... -
Page 6: Overview
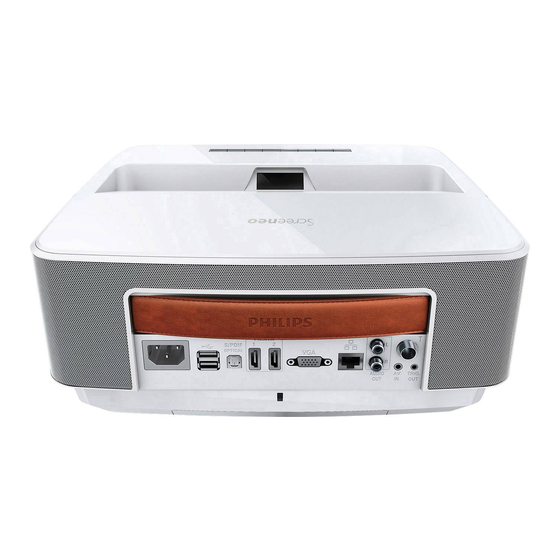
ANTENNA – Aerial socket for TV connection 4 SD – Memory card slot – Lens 5 ý – USB port for a USB storage medium or to con- nect accessories (mouse or keyboard). 6 Focus wheel for image sharpness Philips · HDP15x0 & HDP15x0TV... -
Page 7: Remote Control
SUB/SHIFT TTX/ RECALL – To recall the last function or the last channel viewed in DVB-T mode. PHILIPS OPTIONS – To call the option menu. INFO – To display program information on current program in DVB-T mode. MENU – To display the settings menu in DVB-T 1 Long press: Power off the projector . -
Page 8: Browsing The User Interface
2 The software keyboard appears. 3 Enter the text on the software keyboard. 1.Depending on the device model, TV can be replaced by BT speaker. Philips · HDP15x0 & HDP15x0TV... -
Page 9: Symbols In The Statusbar
Symbols in the Statusbar 1 – Time 2 – Date 3 – LAN status display 4 – Bluetooth status display 5 – WiFi status display Overview... -
Page 10: Initial Operation
Make sure the polarities(+ and -) are aligned cor- rectly. The power cord is used as a power unit cut off. As a precaution, the outlet shall be located close to the device and be of easy access in case of danger. Philips · HDP15x0 & HDP15x0TV... -
Page 11: Using The Remote Control
3 Push the battery compartment back into the remote control until the locking mechanism engages. Notice Normally the batteries will last for around one year. If the remote control stops working, please replace the batteries. If the device is not used for a long time, take out the batter- ies. -
Page 12: Initial Installation
Press OK to continue. Turning off the projector Press the B button on the panel control of the device or on the remote control more than 5 seconds. Philips · HDP15x0 & HDP15x0TV... -
Page 13: Connect To The Playback Device
4 Connect to the Playback Device Supplied cables Connecting to a Computer HDMI cable (VGA) Connecting to Devices with Notice HDMI Output Many laptops do not activate the external video output automatically when you connect Use the HDMI cable to connect the projector to a com- a second display such as a projector. -
Page 14: Connecting Using An Audio/Video (Cvbs) Adapter Cable
Hi-Fi system (cable not tion. provided). Notice Switching to the Multimedia Device Sig- nal Output See the multimedia device instruction manual to find out how to switch the signal output to this jack. Philips · HDP15x0 & HDP15x0TV... -
Page 15: Connecting The Headphones
Connecting the headphones 7 Connect the external device (smartphone or tablet) to the same WiFi network that the projector. 1 Before connecting the headphones, turn down the 8 Select on the WifiDisplay application of the external volume on the device. device the name of the projector connection (in the example Screeneo_5f31). -
Page 16: Memory
Switch the device off in order to make sure ory card. that the device does not access the mem- ory card. 3 Press lightly on the memory card to remove it. 4 The memory card is ejected. Philips · HDP15x0 & HDP15x0TV... -
Page 17: Network
6 Network 8 Confirm with OK. The projector can be connected to the network by a network hard-wired cable or through a wireless (Wi-Fi) 9 Using ¡/¢ select On. connection. 10 Confirm with OK. Use the procedure below appropriate to the type of 11 Using ¡/¢... -
Page 18: Wireless Network (Wlan)
You can activate the login with a pin code or using Push Button Configura- tion (PBC), if your access point (Access Point, Router) supports this method. Philips · HDP15x0 & HDP15x0TV... -
Page 19: Setting Up A Wireless Network (Wlan) Using
Wifi Hotspot Using WPS with Push Button Configuration (PBC) Notice 1 Switch the device on using the on/off key. Important! 2 After the initial screen the main menu appears. The projector can work as an access point, if only a wired lan network is installed in the location of use. -
Page 20: Digital Living Network Alliance (Dlna)
• WPA2 PSK Select the field and press OK. Password With the keyboard, enter the new password. Show password Check the box to display the password. 12 Using ¡/¢ select Save. 13 Confirm with OK. Philips · HDP15x0 & HDP15x0TV... -
Page 21: Bluetooth
7 Bluetooth 8 Confirm with OK. Activating the Bluetooth 9 Using ¡/¢ select the desired setting. connection 10 Confirm with OK. 11 Modify the desired settings. 1 Switch the device on using the on/off key. 2 After the initial screen, the main menu appears. Menu Description Select device... - Page 22 3 Depending on model, use the navigation keys to select BT Speaker or APPs>BT Speaker. 4 Press the Yellow key to rename the connection. 5 Use the keyboard to enter the new name. 6 Press OK to confirm. Philips · HDP15x0 & HDP15x0TV...
-
Page 23: Media Playback
8 Media Playback Notice Keys Action Navigation Keys Green key of the Allows to set the slide show All the keys shown are buttons on the remote remote control parameters for picture files. control. Allows to set the shuffle Notice mode for music files: Best Settings for Optimal Use •... -
Page 24: Video Playback
7 Use ¡/¢ to select the video file that you wish to The explorer searches for servers and shows them play. in a list. Select the desired DLNA server. 4 Confirm with OK. The content of selected media is displayed. Philips · HDP15x0 & HDP15x0TV... - Page 25 5 To only display the picture content, select Picture Slide Show with Background using the keys ¡/¢on the left of the screen and Sound confirm with OK. 1 During the slide show, press OK to display the menu Notice bar on the bottom of the screen. The use of color keys 2 Using À/Á...
-
Page 26: Music Playback
DLNA repeatedly to shut off the volume completely. The explorer searches for servers and shows them in a list. Select the desired DLNA server. 4 Confirm with OK. The content of selected media is displayed. Philips · HDP15x0 & HDP15x0TV... -
Page 27: Managing Files
Managing Files Delete Files You can delete files from the internal memory, the con- nected USB storage medium or the memory card. 1 Switch the device on using the on/off key. 2 The main menu appears. 3 Use the navigation keys to select the desired media (USB, Memory or DLNA). -
Page 28: Digital Tv Playback (Depending On Model)
8 At the end of the search, press OK. Your TV is now set. You can start watching and enjoy- ing all your channels. Television Notice Navigation Keys All the keys shown are buttons on the remote control. Philips · HDP15x0 & HDP15x0TV... -
Page 29: Modifying The Dvb-T Settings
1 Switch the device on using the on/off key. 2 The main menu appears. 3 Use the navigation keys to select TV. 4 Confirm with OK. 5 The last viewed channel is played. Change the chan- nel using keys CH+/CH-, ¡/¢ or enter directly the number with the keypad. -
Page 30: Android
Memory Card, page 16). 3 Switch the device on using the on/off key. 4 After the initial screen the main menu appears. 5 Use the navigation keys to select APPs 6 Confirm with OK. Philips · HDP15x0 & HDP15x0TV... -
Page 31: Settings
11 Settings 1 Switch the device on using the on/off key. Rear – rear projection; the device is located behind the projection surface; the image is reflected hori- 2 After the initial screen the main menu appears. zontally. Front Ceiling – the device is hanging from the ceiling in an upside-down position;... - Page 32 Information – Display free space in the internal mem- ory and information on the device (Capacity: / Free space: / Firmware version: / Device name: / Model:) Demo mode – switching demo mode on and off. Philips · HDP15x0 & HDP15x0TV...
-
Page 33: Service
12 Service Cleaning 12 The device turns off and on again. After around 5 minutes the Language Selection screen appears. The firmware update is now completed. DANGER! DANGER! Instructions for Cleaning! Inserting a Memory Card! Use a soft, lint-free cloth. Never use liquid or easily flammable cleansers (sprays, abrasives, Never pull out the memory card while the polishes, alcohol, etc.). -
Page 34: Troubleshooting
Only the initial screen appears and not the image from • Please check that the VGA-output of the computer the connected computer is switched on. • Check if the resolution of the computer is set to 1280*800(for VGA connection) or 1080P(for HDMI connection). Philips · HDP15x0 & HDP15x0TV... - Page 35 Problems Solutions The device turns itself off • When the device is running for a long period of time, the surface becomes hot and a warning symbol appears on the projection (see Symbols in the Status- bar, page 9). The device automatically turns off when it gets too hot.
-
Page 36: Appendix
Projected image size (inch) ......50 up to 100 Screen distance (mm)........108 up to 441 Display refresh rate ......60Hz/50Hz/120Hz Power supply Input ........100V-240V, 4.0 A, 50/60HZ Power consumption............150W Off mode power consumption ......<0,5W Manufacturer ........JQH Group Co., Ltd. Philips · HDP15x0 & HDP15x0TV... - Page 37 Sagemcom Documents SAS / has decided to integrate environmental performances in PHILIPS products or Sagemcom Documents SAS / the life cycle of this products, from manufacturing to PHILIPS approved products.
- Page 38 PHILIPS and the PHILIPS’ Shield Emblem are registered trademarks of Koninklijke Philips N.V. and are used by Sagemcom Documents SAS under license from Koninklijke Philips N.V. È 2013 Sagemcom Documents SAS All rights reserved Sagemcom Documents SAS Documents Business Unit Headquarters : 250, route de l’Empereur...